With the help of SonicWall firewalls, you can see and manage every program on your network. This extra control improves compliance and data leakage prevention by recognizing apps based on their distinctive signatures rather than ports or protocols.
Setting Up Security Through A Firewall On A SonicWALL Device
Small and medium-sized organizations utilize SonicWALL firewalls. All network communications are protected by SonicWALL devices, from small nonprofit organizations to medium-sized and enterprise-class businesses.
The company's exclusive SonicOS operating system powers the firewall devices made by SonicWALL. Almost all SonicWALL devices currently run the SonicOS Enhanced operating system. The system's firmware can offer ISP failover services, zone administration, and WAN load balancing thanks to the enhanced operating system version.
Sonicwall Firewall Configuration - Table Of Content
The Installer's Guide
There are several wizards included with SonicWALL firewall devices. Model-specific menus are available (for example, the WEP/WAP Encryption settings menu is only accessible on models with wireless capability).
A cheap utility that facilitates the deployment of a new router is the Setup Wizard. When a network is reconfigured, a SonicWALL device can also be reset to factory defaults and then deployed using the Setup Wizard.
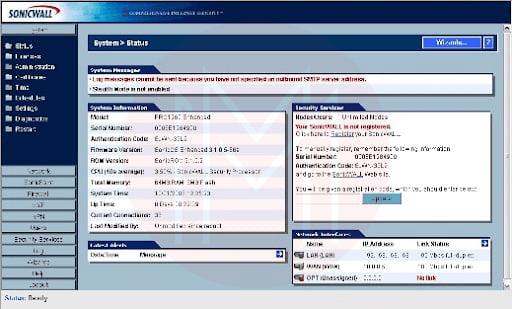
To use the Setup Wizard, log in to a SonicWALL firewall and select the Wizards button. The Wizards button (Figure 1) can be found on the primary System | Status page.
A SonicWALL PRO 1260 is used to demonstrate the procedure. The SonicWALL Configuration Wizard displays four options after you select the Wizards button (Figure 2)
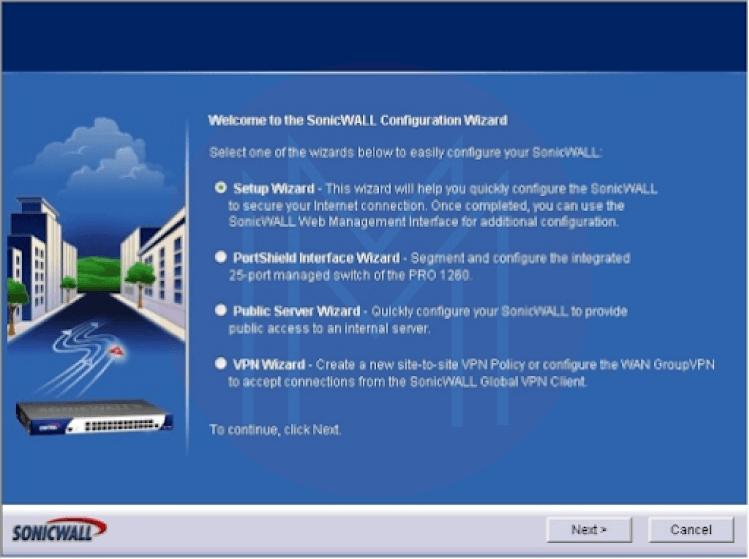
The Setup Wizard, PortShield Interface Wizard, Public Server Wizard, and VPN Wizard are your options. In this case, we'll choose Setup Wizard and move on to the following action. On the screen appears the Setup Wizard.
- The Password Change screen will appear. Enter the default or old password first, then type the new one and confirm your entry. When finished, select Next.
- The Time Zone Change menu will then show up. Click Next after choosing the proper time zone and checking the option to enable automatic DST adaptation of the firewall.
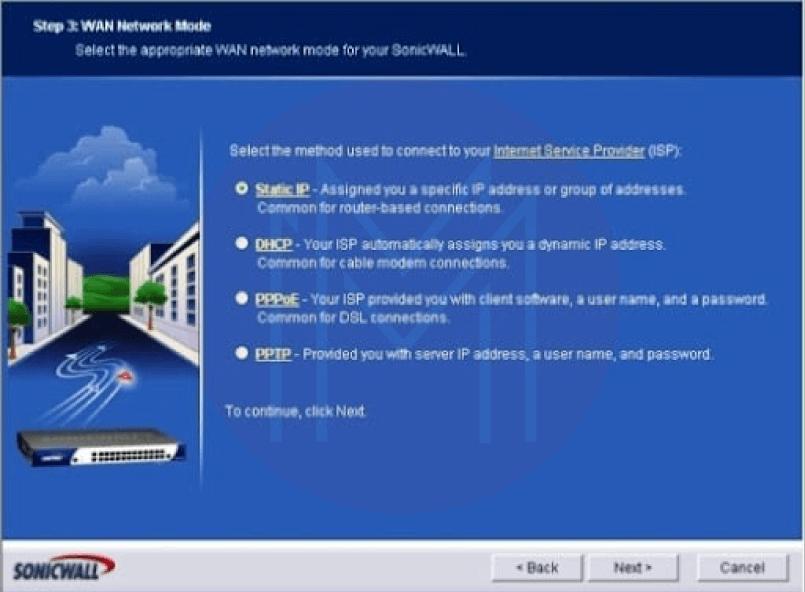
- The WAN Network Mode screen appears. The radio button you select will depend on your connection to your ISP (Static IP, DHCP, PPTP, or PPPoE). Next, click the Next button. In this case, Static IP will be used. Refer to Figure 3.
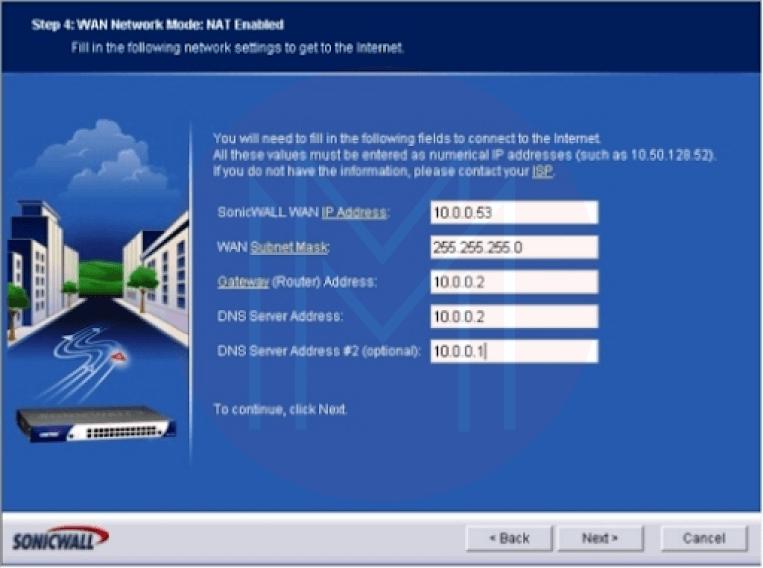
- Step 4: Display the options WAN Network Mode: NAT Enabled. (View Figure 4.) after inputting the DNS server address, secondary DNS address, gateway (router) address, WAN subnet mask, and SonicWALL WAN IP address, click Next.
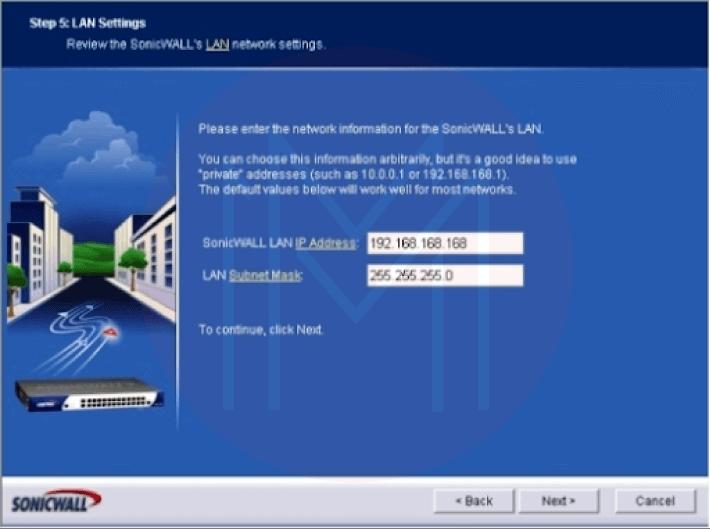
- The LAN Settings option will open in Step 5. Give the LAN of the SonicWALL an IP address. After entering a subnet mask, click Next. (View Figure 5.)
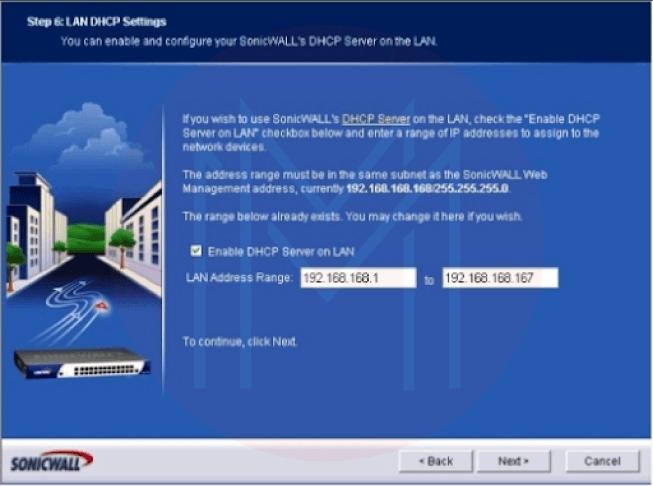
- Step 6: The LAN DHCP Settings screen displays. Check the Enable DHCP Server On LAN box to enable DHCP services from the SonicWALL device. This requires a valid LAN address range. Click Next. Figure 6 is shown.
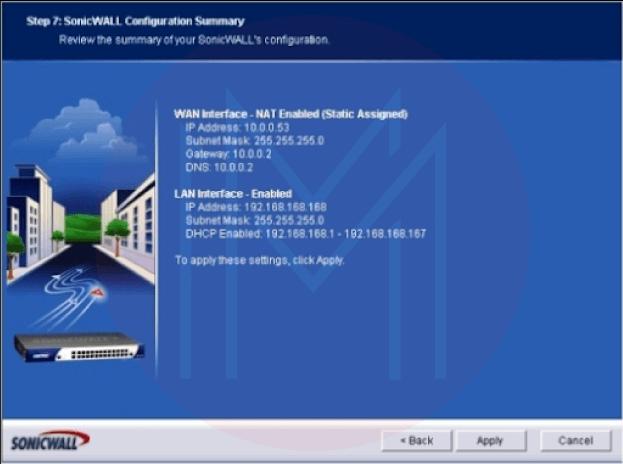
- Step 7: SonicWALL configuration summary (Figure 7). When you are sure that all the settings are correct, go over the data the wizard has supplied and click Apply. If the configuration has to be changed, click the Back button.
- A prompt will warn you to wait while the SonicWALL settings are stored. You'll receive a message thanking you for your changes and the successful completion of the Setup Wizard after the configuration is complete.
| If you would like to Enrich your career with a SonicWall certified professional, then visit Mindmajix - A Global online training platform: “SonicWall Training” Course. This course will help you to achieve excellence in this domain. |
Login to SonicWALL
Once the Setup Wizard is finished, log in to the firewall using the IP address you supplied to the SonicWALL device in Step 5. (on the LAN Settings menu). A standard dialogue box will appear and ask you for your name and password. After entering the username and password you created for the firewall, click the Login button.
The SonicWALL device, by default, displays the System | Status menu. On the left side of the SonicWALL interface screen, select Firewall from the menu.
The menu Firewall | Access Rules | All will now show up. Essential details on how the firewall is configured are provided on this page of the SonicWALL program. In addition to zone and priority information, the Access Rules menu also displays source and destination data, service type, action status, and user information (Figure 8)
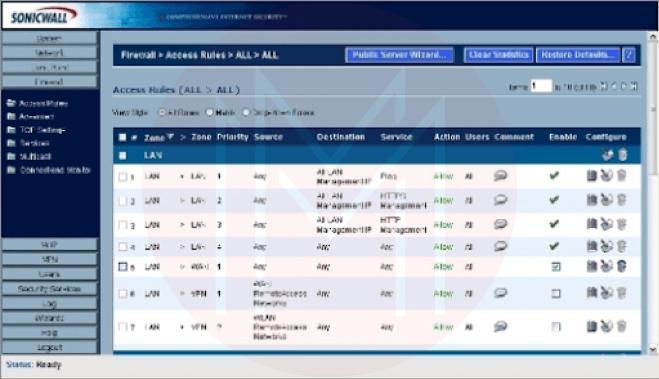
To view traffic statistics for an access rule, simply place your cursor on the graph icon toward the end of each line of access rules. While the trash can icon can remove an access rule, the pencil and paper icon can modify access rule configurations.
Creating Rules For Access
To create access rules:
- Sign in to access the SonicWALL firewall.
- Select "Firewall" from the menu.
- You should select the Matrix or Drop-down Boxes View Style radio choice in Figure 9.
- Click the applicable From and To Zones (like WAN to LAN).
- Click the Add button located at the bottom of the menu.
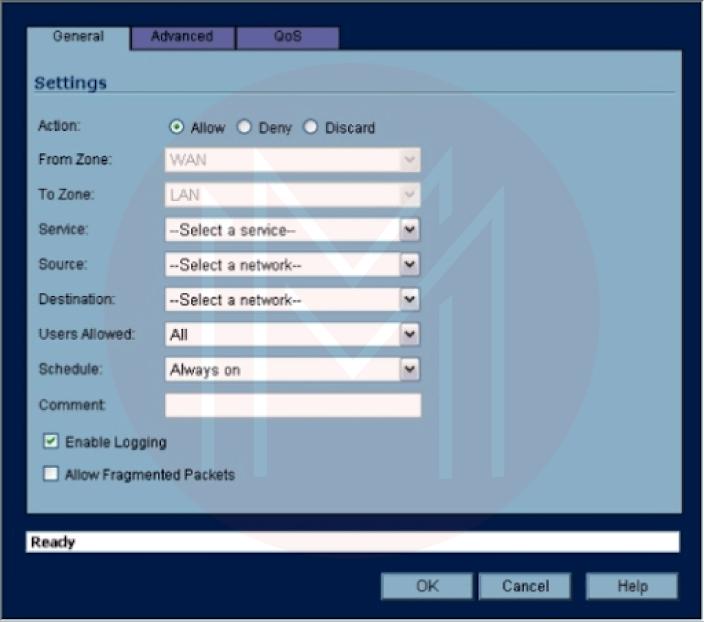
- Using the General tab, choose one of the three possible traffic outcomes that meet the access rule's settings: Allow, Deny, or Discard.
- Choose the proper service from the Service drop-down box. The drop-down boxes for Source, Destination, Users Allowed, and Schedule should be used similarly.
- Type a note outlining the access rule or its objective.
- Uncheck the Enable Logging item if you do not want events related to the new access rule to be logged.
- You can set any advanced options using the Advanced tab (such as a timeout for inactive TCP connections or the maximum number of connections allowed).
Press OK.

Editing Rules for Access
- Log on to the SonicWALL firewall.
- Select "Firewall" from the menu. Editing an access rule involves:
- Choosing Access Rules
- Select the access rule you want to update, then select the pencil and paper icon.
- Using the available drop-down choices, modify the access rule as necessary (Figure 10). Alternatively, you can remove an access rule by selecting the trash can icon next to it.
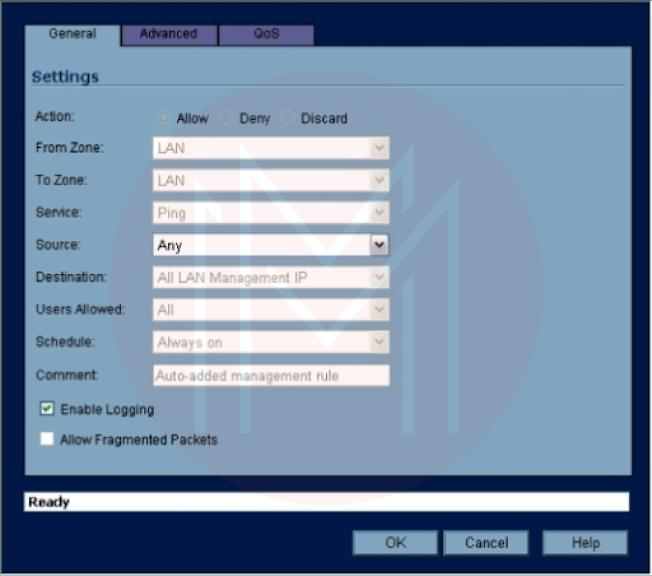
Click OK to put the changes into effect (When you confirm deleting an access rule, the rule is deleted). The SonicWALL firmware will be modified to update the firewall's configuration.
Groups of Editing Services
To simplify firewall administration, service objects, and groups are included by default on SonicWALL devices. By leveraging service groups and entities, SonicWALL firewalls enable standard programs and services (including PC Anywhere, ShoreTel, VNC, and Yahoo Messenger) for network users.
- Log on to the SonicWALL firewall.
- Select "Firewall" from the menu.
- Choose Services. Visit the following to check a firewall's services settings.
There are numerous service groups by default (Figure 11). Apply the following steps to add additional groups or objects:
- Log on first before you can access the SonicWALL firewall.
- Select "Firewall" from the menu.
- Choose Services.
- The Custom Services radio button should be selected.
- Click Add Group to create a new Service Group or Add to create a new Service (Figure 12).
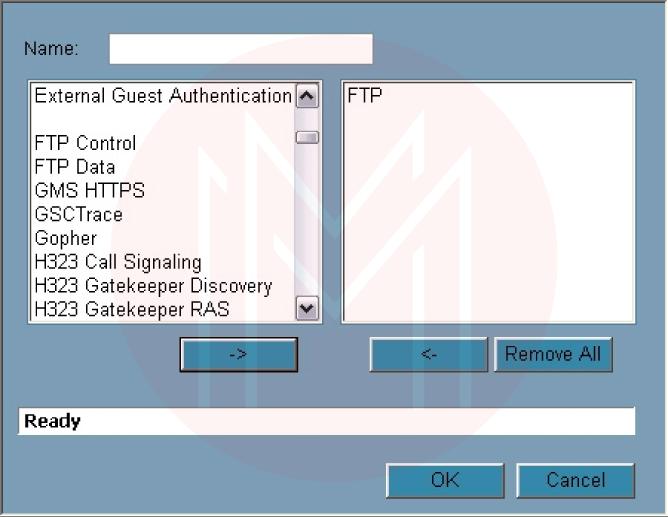
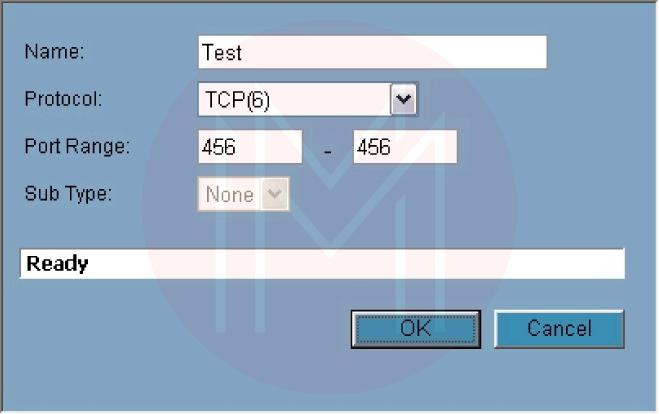
The left pane is pre-populated with several options when you click Add Group. To change its settings, click the pencil and paper icon next to it after selecting one of those options, or type your name and click OK. Click the Add button, give the service a name, select a protocol, if necessary, choose a port range or subtype, and then click OK to create a new service.
| Preparing for SonicWall Interview? Here are Top SonicWall Interview Questions |
Using 3CX to configure a SonicWALL Firewall
This post describes the configuration of Dell Sonicwall devices for use with the 3CX Phone System based on TZ100, TZ100W, TZ105, TZ105W, TZ200, TZ200W, TZ205, TZ205W, TZ210, TZ210W, TZ215, TZ215W, NSA 220, NSA 220W, NSA 240, NSA 2400, NSA 3500, NSA 4500, NSA 5000 For Sonicwalls with a Many-to-One NAT configuration, go to this handbook.
Requirements
HotFix firmware SonicOS 5.8.1.15o HotFix 152075 or later is needed for DELL Sonicwall firewalls
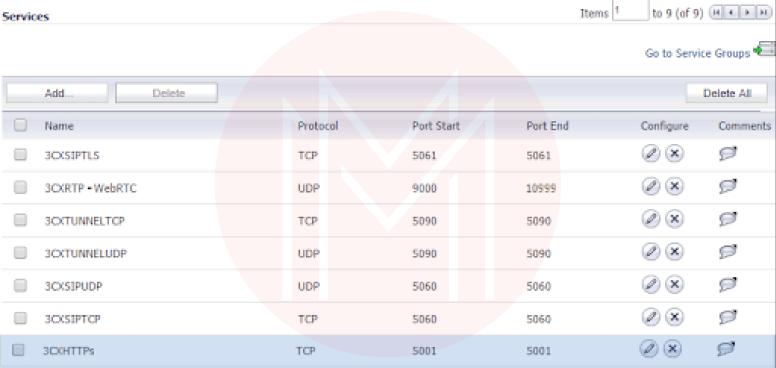
Step 1: Creation of Service Objects
To correctly configure the SonicWall, you must create service objects for each port or port range that needs to be forwarded. The next step is to add these service objects to a service group so that the policies can be applied to them.
-
Open the Web Management Console for the DELL SonicWall Firewall Gateway and select Network Services.
-
For each port that 3CX needs to be forwarded, add a service object to the "Services" section.
-
Include all of the Services mentioned above Objects as members of a new service group you've created called "3CX Services" in the section "Service Groups."
-
Under Network Address Object, find the subsection "Address Objects."
-
Add a new Address Object here and set:
ThreeCX PBX
Assignment of Zone: LAN
Kind: Host
IP Address: The LAN IP address of your 3CX Server
Step 2: Establishing NAT Policies
- Press "Add" under "Network NAT Policies."
- Fill in the following fields to create your Inbound NAT policy:
The “General” tab
Original Source: Any
Translated Source: Original
Original Destination: WAN Interface IP
Translated Destination: 3CX PBX (This is the Address Object that was created in the first step)
Original Service: 3CX Services (This is the Service Group that was created in the first step)
Translated Service: Original
Inbound Interface: Choose the WAN interface that your 3CX will use.
Outbound Interface: Any
Comment: 3CX Inbound Connections
Enable NAT Policy: Checked/Enabled
3. Fill in the following fields after pressing "Add" to build your Outbound NAT policy:
“General” tab:
Original Source: 3CX PBX (This is the Address Object created in the first step.)
Translated Source: WAN Interface IP
Original Destination: Any
Translated Destination: Original
Original Service: Any
Translated Service: Original
Inbound Interface: Any
Outbound Interface: Choose the WAN interface that your 3CX will use.
Comment: 3CX Outbound Connections
Enable NAT Policy: Checked/Enabled
“Advanced” tab:
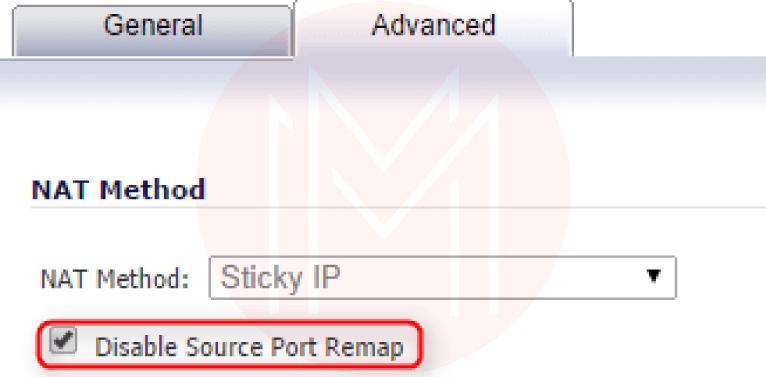
Disable Source Port Remap: Checked/Enabled
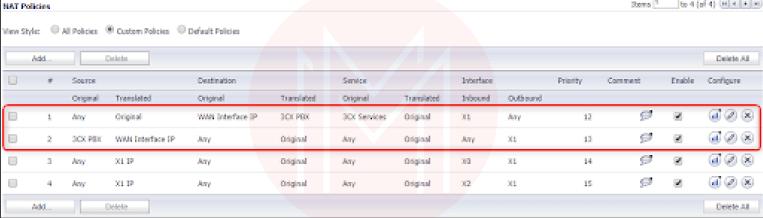
When you've finished creating the two necessary NAT Policies, they should look like this.
Step 3: Creating Access Rules for the Firewall
Select "WAN to LAN" from the "Firewall → Access Rules" menu and press "Add."
Create a new Access Rule with the fields below:
“General” tab:
Action: Allow
From Zone: WAN
To Zone: LAN
Service: 3CX Services (This is the Service Group that was created in the first step.)
Source: Any
Destination: Choose the Address Object for the "WAN/Public IP" you've set up in 3CX.
Users Allowed: All
Schedule: Always on
Comment: 3CX Inbound Access
Allow Fragmented Packets: Checked/Enabled
Step 4: Disabling SIP Transformations
1. Navigate to ”VoIP → Settings.”
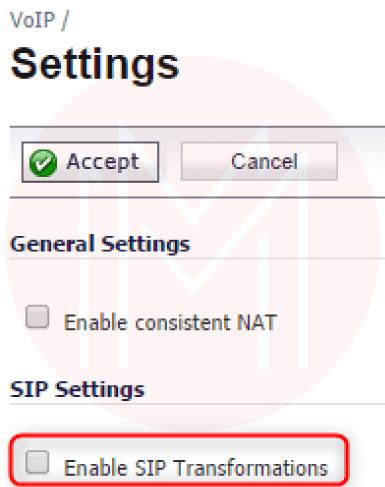
2. Disable option: Enable SIP Transformations in the “SIP Settings” section.
Step 5: Validating Your Configuration
Log into your 3CX Management Console → Dashboard → Firewall and run the 3CX Firewall Checker. This will check to see if your firewall is set up correctly for 3CX.
FAQs
1. How do I configure my firewall step by step?
Step 1: Secure your firewall as a first step.
Step 2: Create your firewall zones and IP addresses.
Step 3 Configure access control lists.
Step 4: Set up the logging and additional firewall services.
Step 5: Verify your firewall settings.
2. How to configure SonicWall firewall TZ300?
TZ300 SonicWall installation comprises the following steps:
- View the contents of the package.
- Turn the appliance on.
- Affix the interfaces.
- Run the installation wizard.
- Register the product
- Get the most recent firmware.
3. Is a SonicWall a router or firewall?
A firewall having routing capabilities is called SonicWall (hereafter referred to as the firewall). A router with some firewall functionality is an ISP modem. An ISP modem can be configured in "Bridged Mode" or as a "Router."
4. What is the use of the SonicWall firewall?
With the help of SonicWall firewalls, you can see and manage every program on your network. This extra control improves compliance and data leakage prevention by recognizing apps based on their distinctive signatures rather than ports or protocols.
5. Is SonicWall a VPN?
You can give Windows and Linux users simple, secure access using SonicWall's SSL VPN NetExtender. Remote users can securely connect to and utilize any application on the business network thanks to this transparent software.
6. What kind of firewall is SonicWall?
NEXT-GENERATION FIREWALL (NGFW) Use an intuitive, comprehensive security solution tailored to your requirements to guard your small business or branch location against intrusion, malware, and ransomware. SonicWall TZ firewalls provide enterprise-grade security without the expense or complexity.
7. What is DMZ in SonicWall?
A machine or a collection of computers not covered by a network firewall is defined as DMZs in computer networking. Firewalls like SonicWall can defend your network against security risks, but occasionally these programs provide an excessive level of security, preventing legal apps from connecting to the Internet.
8. Is SonicWall a Layer 7 firewall?
The latest SonicWall firewall firmware, SonicOSX 7.0, enables fine-grained management and enforcement of dynamic Layer 7 apps within the security policy. Layer 3 to Layer seven regulations are combined by SonicOSX into a single rule called Security Policy.
9. Is SonicWall hardware or software?
The corporation introduced a security solution in the late 1990s that was initially marketed as Interpol and then renamed SonicWALL. It was a specialized hardware appliance with firewall and VPN software aimed at the small-enterprise market.
10. How do I find my SonicWall IP address?
Login to the SonicWall Management Interface. (If you are configuring the SonicWall for the first time, the default Lan IP is http://192.168.168.168). Once you are logged into SonicWall, please click the Network option on the top bar and navigate to System.
11. Do I need a Sonic firewall?
Regardless of the size of your company, it is a must. It doesn't matter if you select SonicWall or one of its rivals; what matters is that it performs well.
Imagine that you don't and are looking for a dedicated firewall with all the capabilities you require to safeguard your small to medium-sized organization. In that situation, Sonicwall is what ITS suggests.
In addition to being one of the largest cybersecurity firms in the world, SonicWall has established a reputation for being a creative business. To make networks even safer, they are constantly looking for innovative methods to improve and modernize their products.
12. What are the three types of firewalls?
Depending on how you implement the hardware, software, and cloud-based firewalls are the three types available.
Conclusion:
In this post, we have learned and understood the steps that should be applied to configure SonicWall Firewall on devices successfully.
 On-Job Support Service
Online Work Support for your on-job roles.

Our work-support plans provide precise options as per your project tasks. Whether you are a newbie or an experienced professional seeking assistance in completing project tasks, we are here with the following plans to meet your custom needs:
- Pay Per Hour
- Pay Per Week
- Monthly
| Name | Dates | |
|---|---|---|
| SonicWall Training | Jul 18 to Aug 02 | View Details |
| SonicWall Training | Jul 21 to Aug 05 | View Details |
| SonicWall Training | Jul 25 to Aug 09 | View Details |
| SonicWall Training | Jul 28 to Aug 12 | View Details |

Keerthi Sai is a Senior Writer at Mindmajix with tons of content creation experience in the areas of cloud computing, BI, Perl Scripting. She also creates content on Salesforce, Microstrategy, and Cobit.