- Home
- Blog
- ServiceNow
- ServiceNow Tutorial

- ServiceNow Interview Questions and Answers
- What is ServiceNow Ticketing Tool
- Top 10 IT Management Tools
- What is Servicenow Workflow
- ServiceNow Admin Interview Questions and Answers
- What is ServiceNow - A Complete Guide for Beginners
- What is ServiceNow GRC
- ServiceNow Reporting
- ServiceNow Data Model
- What is ServiceNow Orchestration
- What is ServiceNow ITIL - A Complete Overview
- ServiceNow vs Jira Service Management
- ServiceNow Architecture
- SLA ServiceNow
- ServiceNow Webassessor
- ServiceNow Integration With Jira
- ServiceNow Scripting Interview Questions
ServiceNow Modules and Applications
https://cdn.mindmajix.com/blog/images/salesforce1-310521.png https://cdn.mindmajix.com/blog/images/salesforce-types-of-cloud-computing-310521.png https://cdn.mindmajix.com/blog/images/salesforce-310521.png
ServiceNow is a cloud solution enterprise which we use for IT service management, process automation, IT operation management, and IT business management. ServiceNow provides various ready-made workflows, products, and solutions for an enterprise. ServiceNow is one of the leading players in the Cloud ITSM market. By 2025, the global Cloud ITSM market is expected to reach $12.2 billion.
The highlight of ServiceNow is its extensively managed workflow that offers support and allows the enterprise service domain to define services, deliver services, assure service availability, customer interaction, and resource sharing. Organizations from various areas are implementing ServiceNow.
Through ServiceNow, IT companies can work with all the departments on a platform to save both money and time. This makes the future with ServiceNow a safe profile for new job aspirants. So, individuals who want to build a career on the ServiceNow Platform can enroll in our ServiceNow Online Training. As per Indeed.com, the average salary for ServiceNow jobs in the US is around $105K per annum. In this ServiceNow tutorial, you will learn everything you require to get started with the ServiceNow platform. Before we start, let us have a look at what we will be discussing in this article:
Best ServiceNow Tutorial - A Definitive Guide
What is ServiceNow?
ServiceNow is a cloud-based platform that provides IT service management and automates general business processes. It includes various adaptive features that can differ by user and instance. It was established in 2004 by Fred Luddy, the former CTO of software companies like Remedy Corporation and Peregrine Systems. It is an incorporated cloud solution that integrates the services in a single system of the record.
Why do we need ServiceNow?
ServiceNow is a robust tool that allows organizations to develop future-based patterns for eliminating out-of-date ones. ServiceNow establishes a place where each machine, customer, and employee that is associated with a company can request through the single cloud platform. Several departments working on these requests can prioritize, collaborate, and assign for identifying the issues and gaining the knowledge for identifying the problems creatively. It produces enhancements in the employee service, and our service levels will increase. ServiceNow drives our work quicker and best than ever before.
ServiceNow History
- In 2006, it was termed ServiceNow.
- In 2007, ServiceNow opened the silicon valley office.
- In 2011, ServiceNow created an association with Accenture.
- In 2012, ServiceNow it has become a traded company with a market capitalization of the US $210 million IPO.
- In 2017, it bought telepath, a UI company.
- In 2018, ServiceNow bought FriendlyData, an NLP company.
- In 2019, ServiceNow bought Appsee.
- In 2020, ServiceNow acquired Passage AI and Loom Systems.
ServiceNow Features
- ServiceNow hosts better for your customers with fewer preservation costs.
- It is easy to customize.
- It offers live reporting and monitoring.
- It associates with the honesty and privacy of the data.
- It allows enhanced internal monitoring.
ServiceNow Terminology
#Lists
Lists display the records set from the data table.
#Forms
It displays one record from the data table, uses it for entering or updating a record in the data table.
#Users
They are the individuals who use ServiceNow in an enterprise. The system administrator can create a new user, navigate the existing users’ list, replicate and delete a user.
#Roles
Roles are related to the tasks that a user carries out in an organization. According to the work profile, we assign a role.
#Groups
Groups are the set of users, which carry out the same task. We can access a group through “System security/Users and groups/Groups.

ServiceNow Architecture
Today almost all cloud contributions deploy on old-time multi-tenant architecture like Azure, AWS, Oracle, Salesforce, etc. Multi-tenant architecture generates a single instance that supports multiple customers. Generally, it deals with the databases that demand regular maintenance, that provides resources access to the customers. For this reason, ServiceNow has chosen Multi-instance architecture.
Multi-instance is a unique instance we create for every employee who holds an individual resource stack. Multi-instance provides us with the liberty to deal with every user’s fundamental requirements, allowing us to deal with a customer-customer base.
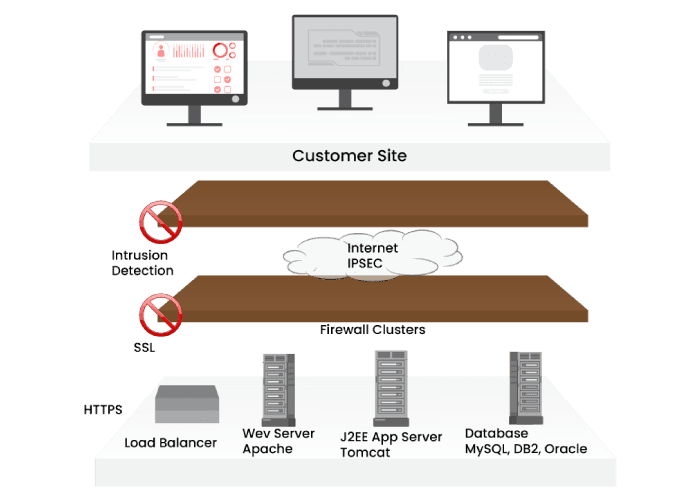
Following are the elements of the ServiceNow Architecture:
- Apache Webserver
- Load balancer
- J2EE app server
- Database: Mysql, Oracle
- Internet IPSEC
- Firewall clusters
- Client site
- ServiceNow Capabilities
#Orchestration
Through ServiceNow, we can orchestrate or automate easy or complex tasks on remote servers. When we implement orchestration in the company, the complete work needs less labor and skill. It automates systems such as Microsoft Exchange mail servers, VMware, etc.
#LDAP
Companies use active directories for various purposes. We can use it to provide access to the applications or maintain an outlook distribution list. LDAP integration is the cakewalk for ServiceNow, and the highlight is we do not need to code anything. Through simple configuration, we can do integration.
#Web Services
ServiceNow platforms offer the capability of using or publishing the API simultaneously. ServiceNow supports WSDL, SOAP, REST API protocols. We can either create a Scripted API or Codeless API.
#Mobile Ready
Today everyone wants an enterprise service/application/solution to be mobile-ready. They must make the changes on the way. The forms and applications of ServiceNow are mobile-friendly, and we can publish them on mobile without particular development for mobile. ServiceNow offers a web-based application for a mobile app for Android and iOS.
Leave an Inquiry to learn ServiceNow Online Training in Bangalore
#Enterprise Portal
The most essential requirement for any enterprise is to have a web portal where we can seek service, access, and report. ServicePortal provides wings to various organizations. Today organizations are building separate ServicePortal to display their ServiceNow capabilities.
ServiceNow Products
Following are the services provided by ServiceNow:
#1 HR Management
We can use ServiceNow for all the HR delivery services like timesheet management, performance management, employee document management, and leave management.
#2 IT Service Management
We can use ServiceNow as a ticketing tool for managing problems, changes, and incidents. It contains various advanced analytics, insights, and features that affect the delivery of IT.
#3 Finance Management
ServiceNow handles all the activities associated with finance and automates financial activities. Besides contributions referred above, ServiceNow provides services for IT security operations, virtual chatbots, and business management.
#4 ServiceNow Instance
ServiceNow instance is a group of databases, virtual machines, applications assembled jointly to give the services to a customer. We develop the ServiceNow customer instance on the multi-instance architecture. The crucial point is every customer has customized applications and separate databases running on the shared hardware resources.
ServiceNow User Interface(UI)
The user interface of ServiceNow has default elements. The user interface is highly compliant, and we can customize it according to the business requirements.

Following are the components of the user interface:
#Application Navigator
Application Navigator enables us to browse all the modules and applications beneath the applications. We give the module’s name or application in the navigation filter, and ServiceNow automatically displays all matching modules and applications.
#Banner Frame
The banner frame contains setting options, logo, user profile, option, and global search bar to switch between help and conversation in the right sidebar.
| Related Article: ServiceNow Interview Questions for Freshers |
#Sidebar
By default, a sidebar does not exist. The user has to trigger it from the banner frame. The sidebar either displays the help or conversation options. Through the conversation feature, we chat with our associates and browse by using chat history. The help option enables us to refer to the articles that administrators add.
#Content frame
The content frame is the primary part of the ServiceNow portal that records the complete content of the modules and applications. This frame also contains the main menu of the applications, which are essential from the administration perspective.
ServiceNow Administration handles sidebar automapping routine administration, maintenance, and support of the ServiceNow Platform for enterprises. It also contains user interface customization, updating versions, applications, and modules configuration, handling user access, monitoring system performance, UI policies, etc.
ServiceNow administrators are responsible for setting up ServiceNow, loading initial data into ServiceNow, establishing roles, groups, and users.
| If you want to enrich your career and become a professional in Servicenow Administration, then enroll in "Servicenow Admin Training" - This course will help you to achieve excellence in this domain. |
ServiceNow Configuration
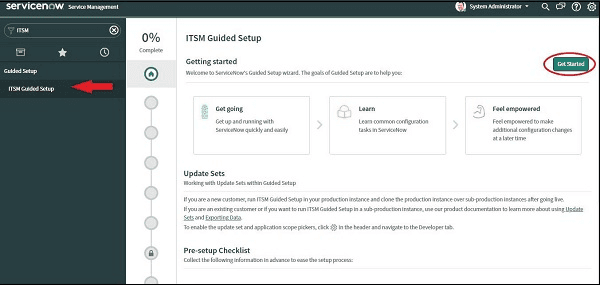
The best method for the initial configuration of ServiceNow is through the “ITSM guided setup” application. Usually, the System administrator has access to the ITSM guided setup application.
ITSM guided setup gives a series of tasks that allow us to configure IT service management applications on our ServiceNow Instance from the beginning comprising a logo, company name, banner, fields to be displayed in lists, forms, etc.
Furthermore, the ITSM guided setup also helps in configuring the main applications like Change, Incident, etc. For opening the ITSM guided setup, browse ITSM in the navigation bar and open “ITSM guided setup,” and press the Get started button.
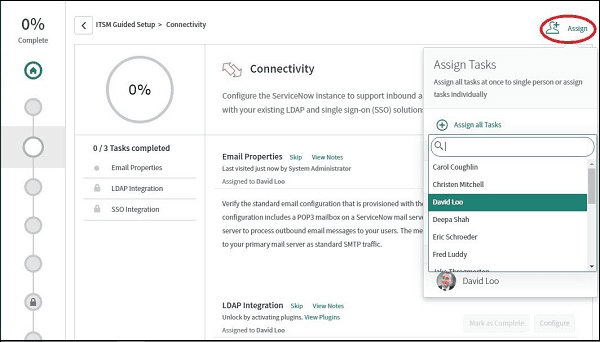
We categorize the complete setup into different categories like connectivity, company, data, etc. We must configure every category through the guided menu. The total advancement for every category we display, and the content frame, displays the whole completion status at the content frame top.
We can set up the order category, and we can jump the configuration of any particular category. The configuration task of the ServiceNow from the beginning is enormous, and thus, we can allocate the job to the configuration of every category to an individual admin user.
Guided setup steps are self-explanatory and very detailed. We can fool around with the directed setup and try to set up different categories.
Import sets
We use Import sets for importing the data in the ServiceNow from external sources like JDBC, excel, etc. We import the data into ServiceNow, and after that, we map the data in the appropriate ServiceNow tables. We can import the data manually one time, or we plan regular import to take place automatically.
Manual Import
We can import the data manually through the “Load data” module of the “System import set” application. For example, we have to import five groups of ServiceNow. The table that stores the group is “sys_user_group. We have to enter “sys_user_group.list” in the navigation bar for browsing the data in that table.
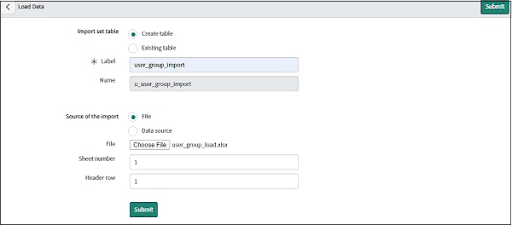
Open the “Load data” module for the “System import set” application. In the import set table, press the “create table” because we do not have any current import table to import user groups. Generally, import tables are staging tables or intermediate tables.
Since we import the file, we first load the data in this table, and after that, we load the table from this import table to the actual intent table in ServiceNow.
After that, we give a new table name in the label field, and the Important point is that all the tables that the user create have the prefix of the “u_” in the system table and the name table of the ServiceNow that have the prefix “sys_” in the name. We have to choose the file from the explorer.
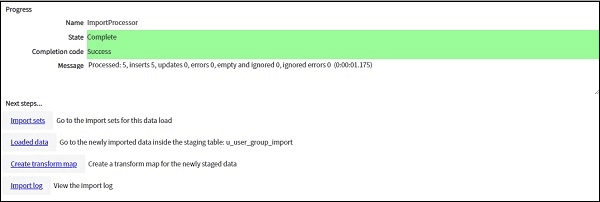
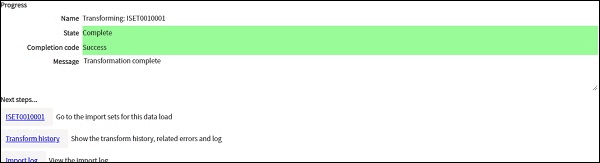
After completing the process, we can see the above screen with the state as complete and the next steps that we have to follow. First, we will import the sets in the Next steps.
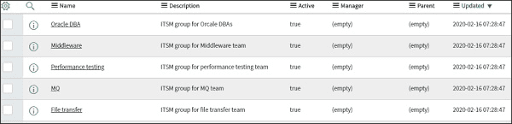
We can see that the import set we create with the state as Loaded, which indicates that data of the excel file has been loaded in the mid-table; Important named “u_user_group_import”. We can check the data in the mid-table by entering the “u_user_group_import.list” in the navigation bar.
After that, we will move forward and generate the transform map for the imported data. Generally, in the transform map, we generate the map between the target table and mid-table, indicating which column of the central table matches which column of the target table. We can consequently load the data in the target table.
Open the “Create transform map” module, and type any name for the transformation map. Choose the source table, which is “u_user_group_import” in our target table and case that is sys_user_group. We have to maintain this transform map, active, verify active box and “Run business rule”. Business rules are a group of rules that runs when we insert or update anything in the table.
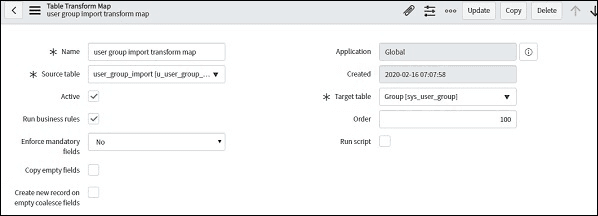
For instance, if the user does not type the data in the field, the default values are established automatically. We can provide our mid script if we wish to process data before inserting it into the target table. To give our script, we have to verify the Run script box.
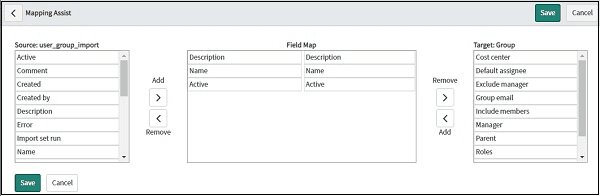
After creating the transform map, either we map the source table column to the target table or enable ServiceNow to do the automapping. Open the “Transform Maps” module in the “import sets/Administrations/Transform Maps”.
Choose the transform map and go to the “Related Links” section. In the related links section, we have two options. Mapping assist and auto mapping. Press the Automap matching fields, and you will detect all the mapping of the Field map tab.
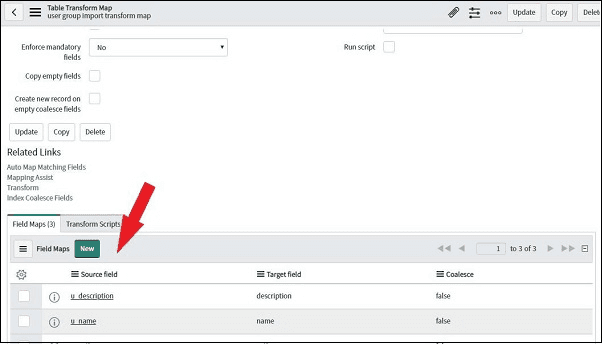
By clicking Mapping Assist, we can do mapping manually.
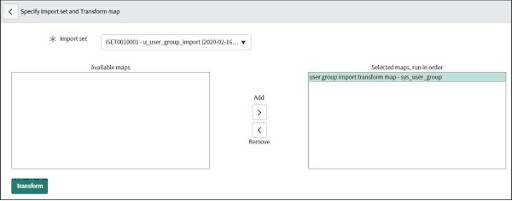
After that, we run a transform map for loading the data in our intent table. This is our last step. Open the “Run Transform” module in the “System import set”. Choose the transform map and press Transform.
As we are importing user groups for the first time, we have to create a transform map, import table, etc. We have to reduce all these efforts in the following imports of user groups because we already have a transform map and an import table.
ServiceNow Installation
Step1: Use the following URL for downloading the setup
“https://developer.servicenow.com/”
Step 2: Give the registration details, and press submit.
--
Step 3: Check the inbox. We will get the mail for activating our account.
--
Step 4: When your account is active, log in through our credentials.
--
Step 5: Accept service agreement.
--
Step 6: Accept the developer agreement.
Step 7: After completing the survey and press the submit button.
--
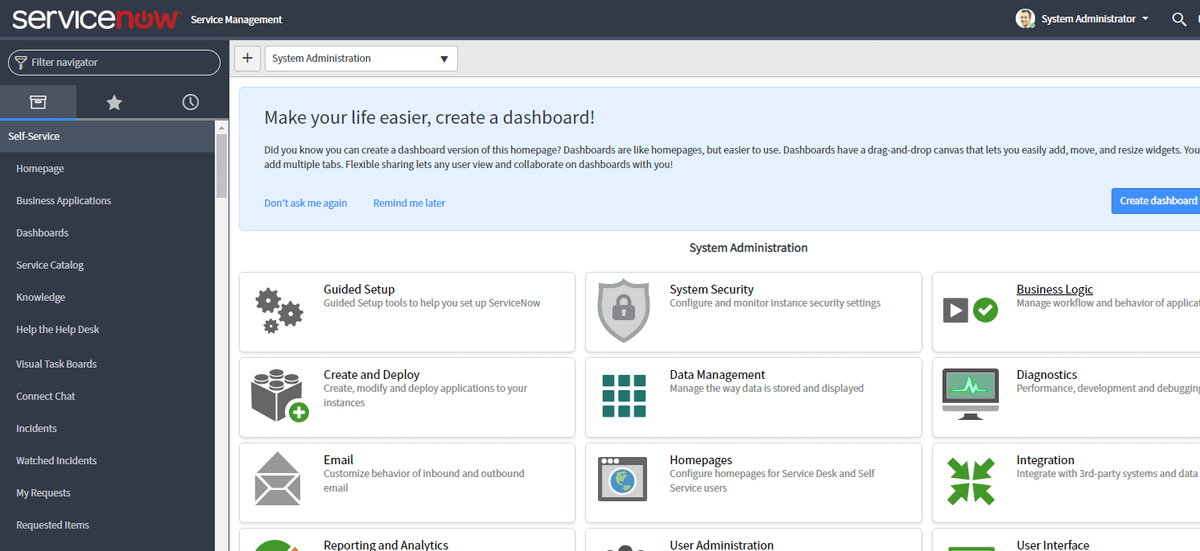
Step 8: After form submission, ServiceNow dashboard emerges, press “Request Instance”.
--
Step 9: Type the reason for using the instance.
--
Step 10: Now select the London release.
Step 11: It can take processing the instances. After completing the process, we will discover the login credentials and login to the dashboard as displayed below:
Step 12: press the login link for changing the password.
--
Step 13: Lastly, we display the dashboard.--
ServiceNow workflow
Servicenow Workflow - You can use a drag-and-drop interface to make the multi-step processes automatic within a platform. Within every workflow, there are a number of activities. Moreover, to ease the understanding of workflow, there is also a graphical Workflow editor present which provides visual aids in the form of a flowchart.
From this workflow chart, the understanding of various transitions from one activity to another becomes clear as crystal, through the lines connecting boxes.
As discussed, it provides very efficient support to the customers, and therefore, nurtures them. A study claims that satisfactory, the probability for a company to sell a new product to a satisfied customer is 60-70%, whereas, the probability lies near 20% for selling the same product to a new client or customer.
Therefore, the service of ServiceNow indirectly helps in increasing the revenue generation of the company.
Another feature of ServiceNow is its low price which charges for its maintenance. Most businesses are attracted to this cloud-based software due to the very same reason. This feature can help businesses in their cost-cutting. There is another feature of ServiceNow.
It secures the confidentiality of data without sacrificing the integrity of the workspace, and vice versa.
ITIL Stages
Following are the five stages of ITIL:
Service Strategy
Service Strategy is the first stage of the ITIL that sets out the plan of the new service. In this stage, we prepare the correct blueprint and work plan of the service. In this phase, we discuss the services like resources, value creation, capabilities, portfolio, investment, etc.
Service Design
Service Design is the second stage of ITIL. Whereby the architecture of the latest or modified service occurs, according to the service strategy. It also establishes the policies, solutions, and processes according to the business needs.
Service Transition
Service Transition is the third stage of ITIL, and the primary aim of this stage is planning, managing, building, and deploying the latest or modified IT service in real-time. This phase outlines the backout and risks management plans.
Service Operation
The service operation stage emphasizes the regular IT services, which we deliver to the customers. It assures us that we provide every IT service efficiently without any interruption. This stage initiates several processes, which we have to perform in service interruption.
Continual Service Improvement
This stage stresses the steps that are useful for increasing the complete performance and efficiency of the services. CSI works with all stages and recognizes the opportunities with the metrics-based approach.
ServiceNow Development
ServiceNow offers various built-in applications and features that we can use to deploy ITSM in any enterprise. Concurrently, we have various business needs to establish different elements and processes. ServiceNow is customer-oriented, and developers can create modules and applications according to the customer’s needs through Javascript principles.
[Also, read ServiceNow Developer Instance]
Application Creation
ServiceNow offers an application known as “Studio”, where we can create our latest applications, provide the source codes, generate new tables for our applications, etc. The studio offers a guided and user-friendly interface to create new applications.
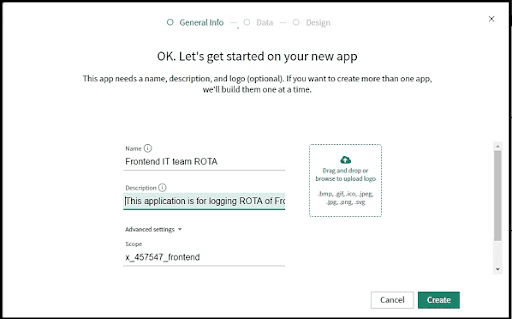
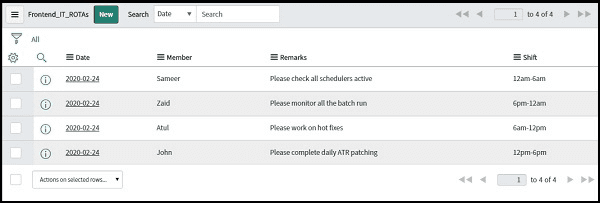
The Front-end IT team requires the application in the ServiceNow whereby the manager publishes shift rotation(shift ROTA). For every employee, there would be 6hrs shift, and they have to support 24*7
From the navigator of the goto studio, we will open a new window. After that, press the “create an application” option. We will provide the application description and name. Lastly, press “Create”.
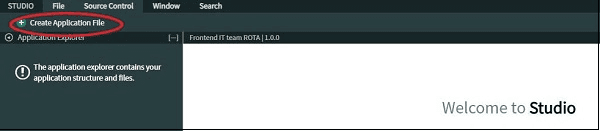
After that, we will create a table for our application by using “Create application file”.
Press the table option that exists in the Data Model and click “Create”. After that, we will enter the new table details. We will give the table name, and other details are default.
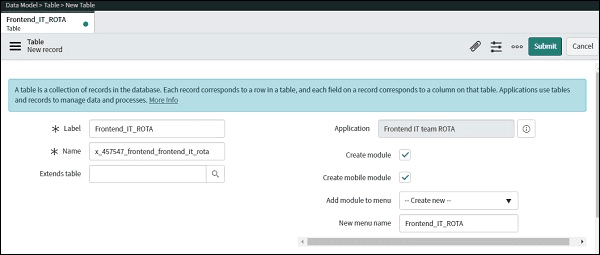
Scroll to the bottom and define the columns for these tables. We have the following column definition and chosen reference of the “sys_user” in the member column.
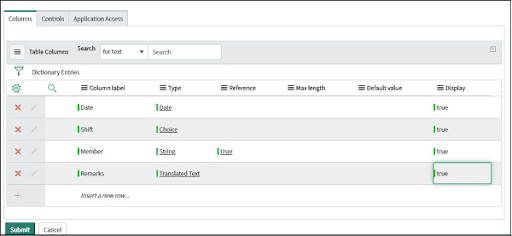
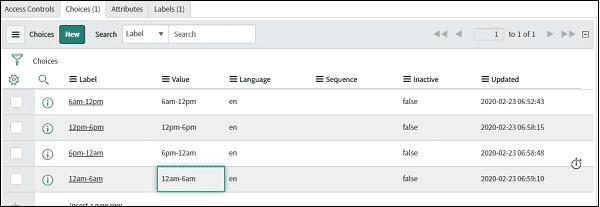
Press the Shift column and choose “Create a Choice list”, we will create shift choices like 12 pm-6 pm, 12 am-6 am
Studio automatically creates the list, module, application, and module menu for us. We create the extra tables, UI, modules, etc., information from the “create application file” option like we did to create the “ROTA” table.
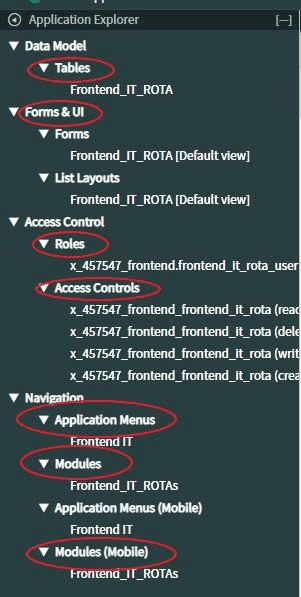
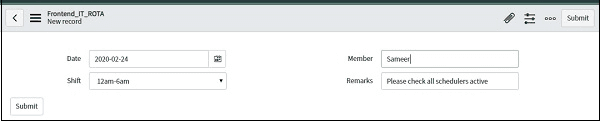
Let us see how our application appears in ServiceNow. Type “Frontend_IT_ROTA” in the navigation bar, open a new module. After that, we insert the latest ROTA records in our application. Press the New Button.

ServiceNow Scripting
In ServiceNow, we have two types of Scripting:
- Server Side
- Client-Side
Server-side scripting indicates information processing happens at the webserver, whereas client-side scripting suggests processing happens at the user’s system. We have particular tasks that we can perform by using any kind of script.
| If you want to enrich your career and become a professional in Linux, then enroll in "ServiceNow Scripting Training" - This course will help you to achieve excellence in this domain. |
Client-side Scripting
We can do client-side scripting in different scenarios like displaying alert messages, populating default values in the form field, Configuring values in one field according to the user response in another form field, etc. Following are the types of client scripts:
Onload()- When we load the form, we execute this script.

Onchange()- When we change a particular field in the form, we execute this script.

Onsubmit()- When we submit a form, we execute this script.
To load our new application, we execute the following script:--
When we use “onChange” in the next application, we will pass it with the following arguments:
Control: For this field, we will configure the client script.
OldValue: OldValue is the field value when we load the form.
newValue: newValue is the field value after changing it.
isLoading: It is the boolean value denoting whether the change is happening within the form load. The boolean value is true when the change is because of a form load. When the form loads, every field value on the form changes.
template: It is a boolean value denoting whether the change has happened because of the field population through a template. The boolean is true when the difference is because of the people by using a template.
Server Side Scripting
We execute Server-side scripts on the ServiceNow server or database. Following are the two categories of Server-side scripting:
- Business rules
- Script includes
Business rules
We can find the business rules module in the system definition application. For creating a business rule, press ”new”. We make a simple business rule through business rule actions that contain a dropdown interface.
We can use business rule action for setting the field values or adding the message in the form. We can select when to execute the business rule as follows:
Before: Logic exists in this business rule implemented before database operation.
After: The logic exists in this business rule implemented after the database operation.
Asynch: Asynch business rules implement their logic but the scheduler queues the work to be executed immediately but not certainly immediately after the database operation.
Display: Display business rules implement their logic when the form loads and we load a record from the database.
We can select the database operation at which we must execute the business rule.
Script Include
By using Script include, we can develop custom functions and classes, and after that, we use them in the scripts as frequently as we require. We can use the script included in other server-side and client-side scripts. But, we will execute them only when invoked by other scripts externally.
For creating a new script include, we will use the “Script include” module in the “System definition”. In the “Script include” module, we will press the “new” option for creating a new script include.
In the script include form, we provide script include name. The API name field is the internal script, including name, and we use it when we invoke the script include from other applications. Verify the client callable checkbox when we have to use the script included in the client-side scripts.
In the application, we will provide the application name for which we use this script. In the “accessible form” field, we will give the application scope. When we have to write a script for an application, we first write a script include, which will verify the invalid character in all the fields. According to the string characters, we will define the function, which takes the argument in the form of a string and returns false or true.
We will use the function in the business rule scripting for validating when the value provided in the member field does not include an invalid character when submitting the form.
Go to the open script module, and we will use the following script:
<code>
After that, we will write the business rule script for validating the member field. Go to the business rule module and generate a new business rule for our application. Go to the business rule module and generate a business rule for the application.
ServiceNow Modules and Applications
Applications monitor almost all platform functionality, and we can navigate through the application navigator at the screen left side. An administrator can customize the navigator for providing various modules to different users, and users can use perspectives, filters, collapse, and expand control for altering the modules that are visible at any moment.
Following are the applications of the ITIL service desk:
Incident
The main objective of the Incident is to restore the general service operation as soon as possible and reduce the contrary effect on the business operations. This assures that we maintain the best levels of service quality and availability.
Problem
This application analyses the fundamental cause of the incidents detected by the service desk. It organizes error correction in the IT infrastructure and carries out dynamic problem prevention.
Visit here to learn ServiceNow Training in Hyderabad
Change
This process assures that we use standard procedures and methods for effective and rapid managing of all the modifications for reducing the effect of the changes linked incidents on the service quality.
Service Catalog
It is an application method for the customers for ordering pre-defined, packaged services and goods from our IT enterprise or other departments. It provides a continuous and inherent online ordering expertise with the comfortability they require.
Configuring Users and Groups
ITIL-supported applications are developed on a single platform and contain business rules, workflow, reporting, notifications facilities. Service-now.com works continuously throughout all the roles and applications. We can deploy the Service-now system in a modular style. This enables us to execute the applications that resolve our instant business requirements and also provides us with the expertise to stimulate the extensions and applications as our organization’s
needs grow and advance:
- How to create a user account and user group
- How to use user groups
- Roles when we would associate a group or user to a role
Users
Service-now administrators add users to their service-now instance. A recently added user must be related to a group. The administrator will select the mandatory fields. Administrators will use a distinct user ID while creating the latest item or updating the existing items. When Admin updates all the logs, it will be hard to trace what was configured and by whom.
Groups
A group comprises users who have a general-purpose, providing an easy method for referring to those users jointly. Groups can approve change requests, receive e-mail notifications, etc. Any assignment rules, business rules, and attributes that refer to the group will mechanically apply to all the group users.
Roles
A user will have bounded access to data in the Service-now.com set. Users can get system roles that enable full access as their position needs. Admin user has all the roles.
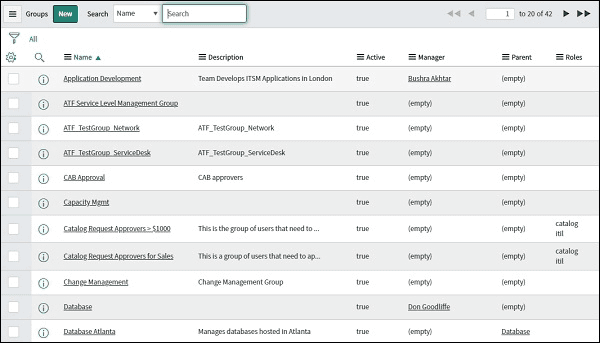
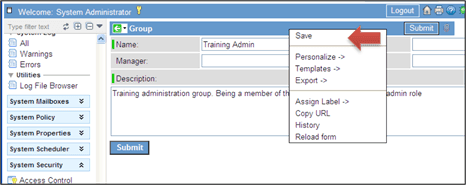
Create a group
We create a group that is useful for the administrators. This group will provide the admin role to all the group members. This enables us to provide users with a role.
Step1: Go to “User Administration/Groups”.
Step2: Press “New” for creating the group with the below attributes:
Name
Description
Step3: After creating the group, press the “save” button.
Source: https://servicenow-support.org/pdf/service-now-training-manual.pdf
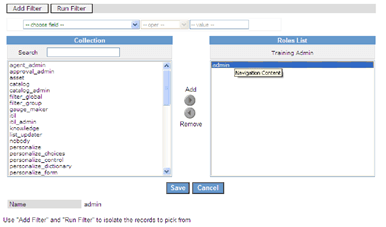
Step4: Provide admin role to the new group
Within the group record, scroll down through the related list “Roles” and Press “EDIT”.
Include the admin role and “save”.
This will revert you to the organized group form and verify that the admin role is initiated to “Inherits=true”.
Source: https://servicenow-support.org/pdf/service-now-training-manual.pdf
We can administer the admins by inserting members into the group. Compared to individual users, we can administer groups easily.
By clicking the “Edit” button, we can add the available users.
Create a User
In many cases, we will import the users through LDAP integration. Out of box users are ITIL, Admin, and Employee.
Step1: Go to “User Administration/Users” and click “new”.
Step2: Fill in the following fields in the user form:
User ID
First Name
Last Name
Password
Step3: We have to add the users to our groups.
Go to left navigation and click “Groups”(User Administration/Groups)
Click the “Training Admin” group.
Scroll down to the users and press the “EDIT” button.
In the search bar, type the user name and save.
Step4: When our user exists in the group and must have the admin role.
Go to “System Security/Role Allocation” and click the “this report” button.
We see the report of all the users, and after that, we click “plus next” to admin and verify whether our user is there.
Conclusion
In this ServiceNow tutorial, you will learn different aspects like what is ServiceNow, ServiceNow installation, ServiceNow development, ServiceNow configuration, ServiceNow administration. It goes into the details of ITIL, Configuring users and groups, ServiceNow scripting, and creating applications. So, through this ServiceNow tutorial, you will get an in-depth understanding of ServiceNow concepts.
If you have any queries, let us know by commenting in the below section.
Related Article:
 On-Job Support Service
Online Work Support for your on-job roles.

Our work-support plans provide precise options as per your project tasks. Whether you are a newbie or an experienced professional seeking assistance in completing project tasks, we are here with the following plans to meet your custom needs:
- Pay Per Hour
- Pay Per Week
- Monthly

Ravindra Savaram is a Technical Lead at Mindmajix.com. His passion lies in writing articles on the most popular IT platforms including Machine learning, DevOps, Data Science, Artificial Intelligence, RPA, Deep Learning, and so on. You can stay up to date on all these technologies by following him on LinkedIn and Twitter.