In the recent era, the Puppet configuration management tool is becoming more popular in the midst of organizations. Generally, the system administrators tend to do repetitive tasks which will be more difficult and trickier depending on the infrastructure of the company.
Making use of the centralized tool that can help the users to build an infrastructure with ease is the only solution to reduce the risks faced by the system administrators. Due to the positive impacts of Puppet configuration management tools, they are widely used to deploy, configure, manage, and maintain the systems.
This Puppet tutorial has been prepared with the intention of providing a specific level of understanding of the Puppet tool and its importance in today’s World. The objective of this tutorial is that one would gain a decent knowledge of Puppet in the automation of infrastructure.
Basic Concepts of Puppet Tutorial
What is Puppet?
Puppet is one of the open-source software configuration management technologies which has its own declarative language to define the system configuration. This configuration management tool is mainly used to automate the delivery and management of hybrid infrastructure.
Puppet technology is developed in the Puppet lab which is written in Ruby DSL (Domain Specific Language). This configuration management tool mainly runs on Linux and Windows systems to manage the configuration of these systems.
| If you would like to Enrich your career with a Puppet certified professional, visit our “Puppet Online Training” This course will help you to achieve excellence in this domain. |
Key Metrics of Puppet
Huge Installation Base
Puppet is the most famous configuration management tool that is widely used in more than 36,000 organizations including Google, Red Hat, Siemens, and much more across the World. Especially the usage of Puppet is found in 75% of Fortune 100 companies.
Great Developer Base
In fact, Puppet technology is most-welcomed by the developers to develop it. It has a number of contributors to create its source code.
Good Commercial Track Record
Since the establishment of Puppet, it has been continuously keeping good commercial records. The performance results of the Puppet in major projects led to greater development.
Best Documentation
The best thing about Puppet is that it has a well-developed wiki with detailed documentation and enhanced references for both the language and its resources.
Obviously, this information proves that Puppet has a great demand among various ranges of organizations.
Configuration Management
In general terms, configuration management comprises a set of rules and methodologies to keep track of the design, performances, functions, and operational information of the system. The major elements of configuration management are:
- Identification of Configuration: Configuration identification is the process of labeling software and hardware configuration, grouping related configuration items, and labeling revisions to those configured items.
- Change Management: Change Management is a standardized approach developed to deal with the changes that arise from both the organization and the individual.
- Configuration Status Accounting: The method of recording and reporting configuration items such as hardware, software, etc. from the baseline during design or production.
- Configuration Status Accounting: The method of recording and reporting configuration items such as hardware, software, etc. from the baseline during design or production.
| Related Article: Advanced Puppet Interview Questions |
Why do we use Puppet?
There are a plethora of reasons to use Puppet as the best configuration management tool than others.
The major reason for using the Puppet configuration management tool is that helps the users to define Infrastructure As Code (IAC) with fewer codes of Puppet scripts. IAC plays a vital role in DevOps practices like version control, automated testing and development, and continuous delivery.

Puppet has the ability to provide more platform support to users of:
- Microsoft Windows
- Debian/Ubuntu
- Redhat, Centos, Fedora
- MAC OS X Server
The puppet tool gives hands to reduce the chance of downtime that may occur due to configuration issues by avoiding it and improves the speed of recovery.
The Puppet enables the users to configure any systems at regular intervals which can also be modified as per the need.
The Puppet eases the process of sharing, testing, and imposing the changes of the cloud platforms and data centers.
The system administrators and DevOps professionals make use of the Puppet as it makes them work smarter in less time.

Special Features of Puppet
Idempotency
The idempotency feature of the Puppet makes it stand away from other configuration management tools. This makes the user execute the same set of configurations multiple times on the same machine.
Also, it helps in maintaining the lifecycle of a machine even from its development; change in configuration, and up to the end of its life. Hence, you can update the machine for a long time without rebuilding the same machine several times.
Cross-Platform
With the support of the Resource Abstraction Layer (RAL) in Puppet, an individual can target certain configuration systems nevertheless of the implementation details, the working process of the configuration command that takes place in the file.
Applications of Puppet
Regardless of the type and size of the organization Puppet is widely used in different applications due to its major features like
- Portable infrastructure: With Puppet, organizations can use consistent configuration management techniques in their public clouds and data centers.
- Flexibility: Puppet provides sufficient flexibility to match the ideal configuration with the right machine.
- Scalability: Puppet is more helpful for the organizations to drive the growth of the organization and meet the infrastructural needs. Hence it is considered as the better choice than the manual approaches and scripting solution.
- The perspective of Infrastructure: Puppet provides access for an organization to visualize all machines and infrastructure to maintain the servers.
Comprehension of Puppet Architecture and its components
The Puppet technology adopts the Master-Slave Architecture (Client-Server Architecture) in which the client is referred to as a Puppet agent or slave and the server is known as the Puppet master.

The components of Puppet architecture can be defined as follows,
Puppet Master
Puppet Master plays a paramount role in handling the configuration-related process and it employs the configuration to nodes with the help of Puppet agent. It runs on designated servers and controls the deployment, configuration, etc.
Puppet Slave or Agent
Puppet agents run on the client machine which is maintained and managed by the Puppetmaster. And so, it is considered as the actual working machines.
Configuring Repository
Config repository is the storage area where the entire server-related configuration and nodes are stored to retrieve them at any time.
Facts
Facts are the global variables that contain the details of the machine including the operating system and network interfaces. They are mainly used to determine the current status of any node.
Catalog
The process of converting the configurations that are written in Puppet to a compiled format is known as catalogs which are then applied to the target machines.
Manifests
Manifests are nothing but the files where all the resources such as services and packages that are to be verified and changed are declared. The manifests contain the Puppet code and it uses the .pp extension.
Module
A module is the collection of manifests and data which are organized in such a way to facilitate the sharing of the files.
Class
Classes in Puppet are similar to other programming languages that have classes to arrange the codes with the intention of making it easier to read and understand it. it also helps the users to reuse certain parts of the code.
Resources
Resources are termed as the fundamental unit for system configurations and it denotes the files, packages, users and so on.
Nodes
The nodes are the place where the Puppet agents are installed to manage all the servers or clients.
These are the major components of the Puppet architecture which can be set up by installing Puppet on both the client and server machines.
Puppet Master and Slave Communication
The Puppet Master and Slave communication takes place through a secure encrypted channel with the help of SSL (Secure Socket Layer).
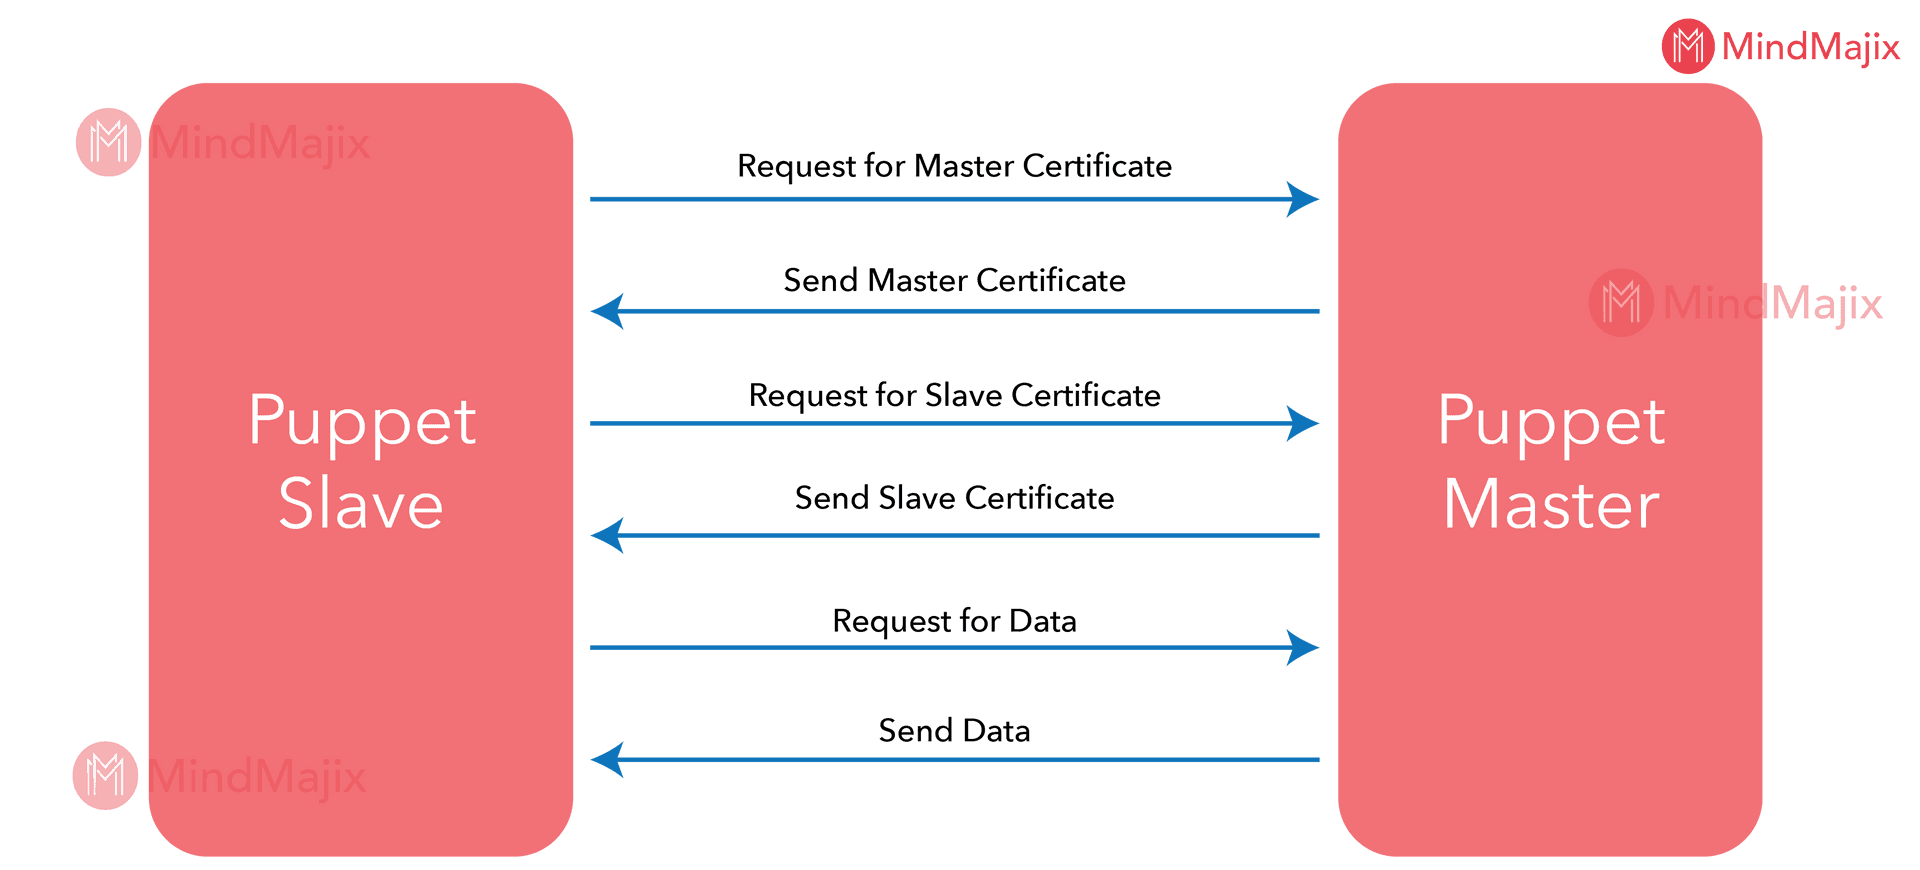
The Puppet Master and Slave communication occur as shown in the image.
- Initially, the Puppet Slave requests for Puppet Master Certificate
- Puppet Master sends the requested Master Certificate
- Puppet Master asks for Slave Certificate and Slave sends the Puppet Slave Certification
- Puppet Master receives the signed Slave Certificate
- Puppet Slave requests for the configuration/data
- Finally, the Puppet Master sends the configuration/date to Slave
Understand the Working of Puppet
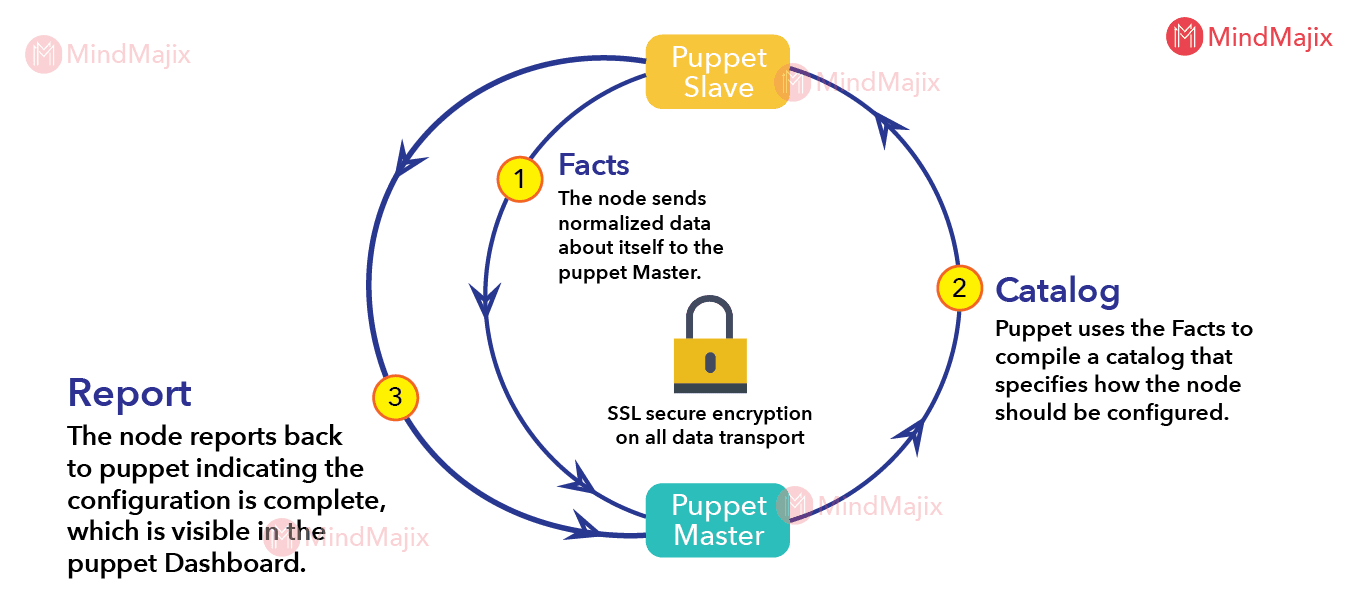
The Puppet has a simple and efficient workflow method to carry out the process in it. As said above Puppet master possess all the configuration information for each node which is controlled by a Puppet master with the help of manifests. The workflow process can be defined as follows,
- The nodes of the Puppet master have the installed Puppet slave on them. At first, the Puppet agent gathers all the configuration information of the nodes that use facts.
- The Puppet agents send the Facts as key/value data pair representing the factors of slave state like IP address, operating system, etc.
- After receiving the information, the Puppet master makes use of these facts to compile the catalog to define the method for a slave configuration.
- Puppetmaster sends back the catalog to the agents. The Puppet agents utilize those catalogs and the information to make the necessary changes or updates on nodes.
- The Puppet slave reports back to the master by informing that configuration is complete and it is visible in the dashboard of the Puppet.
- The Puppetmaster can share the final configuration reports with the third-party tool based on the requirements.
How to install and configure Puppet in Linux?

Pre-Installation
If you are decided to install Puppet you have to do certain pre-installation tasks as follows:
Choose the Deployment Type
There are two types of deployment from which you can select the right one that you want.
Master/ Agent Puppet
Master/Agent Puppet is one of the commonly used deployments as they provide more convenience while updating the configurations. In order to set up this deployment, you need a central server to run the central Puppet master.
The Puppet agent service should be run on other nodes. The Puppet agent receives the configuration from the master and they are independent of one another. When you choose the Master/Agent deployment type you should have the server on the Puppet master.
The Puppetmaster is decided first as you can start the installation of the Puppet on the agent nodes. Keep in mind that the Puppet master is not supported in Windows. Make sure that you are satisfying the following requirements
- Fast Processor
- High RAM
- Fast Disk
- Reliable Hostname
- Standalone Puppet
In the Standalone Puppet, all the nodes take the Puppet modules and manifest to have the same files for Puppet Master and Agent. This means that there is no Puppet master or slave in this type of deployment.
This is more beneficial for the Puppet master as it reduces the process of compilation. Every node of the standalone Puppet is aware of the configuration of other nodes.
Check the system requirements
The Puppetmaster should possess the ability to handle all the agents that they are ready to serve. Your system should have an OS version with official packages to make the installation process easier. Otherwise, the Puppet will run until it gets the supported Ruby version causing a complex installation path.
Verify the Network Configurations
In the Master-Slave deployment, you should give more focus to the networking configurations to tackle the Puppet’s traffic.
- Firewall: Check whether the Puppet master server permits the incoming connections on port 8140. Also, the agent node should be able to connect with the master on the same port.
- Hostname: Ensure that every node having a unique hostname
- DNS Configuration: Both the forward and reverse DNS must be configured in the right manner.
- Keep up the time: You should verify that the Puppet master server has an accurate time as it decides the certificate authority. The improper time setting may lead to the issue of expired or future agent certificates.
These are the pre-installation process that you should do while planning for the Puppet installation. Now, get into the installation of Puppet in your system.
Installation of Puppet
Go through the following steps to install the Puppet on Linux (Red Hat Enterprise Linux):
Step 1: Enable the Puppet Package Repository
Run the below-given command to enable the Puppet package repository
Step 2: If you wish you can enable the prereleases
Execute the below command to enable the prereleases
[Puppetlabs-devel]name=Puppet Labs Devel <%= @dist.capitalize -%><%= @version -%> – $basearch

baseurl=https://yum.Puppetlabs.com/<%= @dist.downcase -%>/<%= @codename -%>/devel/$basearch

gpgkey=file:///etc/pki/rpm-gpg/RPM-GPG-KEY-Puppetlabs

enabled=1

gpgcheck=1
Otherwise, you can disable the prerelease by setting the value 0
Step 3: Update the Puppet master to the latest version by executing the given command
sudo Puppet resource package Puppet-server ensure=latest
You have to restart the Puppet master server after upgrading it.
Step 4: Install the agent nodes on the server
Should run the following command in all the agent nodes of Puppet
sudo yum install Puppet
Step 5: Upgrade with the Puppet agent with the given command
Sudo Puppet resource package Puppet ensure=latest
When you complete these processes in a perfect way, Puppet will get installed successfully. The next process is to configure the Puppet based on the following steps.
Configuration of Puppet
Step 1: Create the Puppet Master’s Certificate
Make sure that you have given the main name for Puppet service in your site as the DNS resolves it to the Puppet master. Navigate to the ‘main’ section of the Puppet. conf file of master and create the list of comma-separated hostname and set the value of DNS names.
dns-alt-names =Puppet,Puppet.example.com,Puppetmaster,Puppetmaster.example.com
Run the following command to generate the Puppet certificate
sudo Puppet master –verbose –no-daemonize
When it displays the Puppet master version press ctrl+C
Step 2: Starting the Puppet master service
Run the below-mentioned command to start and enable the service
systemctl start Puppetmastersystemctl enable Puppetmaster
Step 3: Configuring the Puppet’s agent node
Add the Puppet.conf file of the agent node in the agent section
server= Puppet.example.com
Step 4: Start the Puppet agent service with the help of the following command
sudo Puppet resource service <NAME> ensure=running enable=true
Step 5: Generating a certificate request for the Puppet agent node
During the first attempt of the agent nodes, they will ask for the request certificates which must be approved by the admin
First of all, log into the Puppet Master and execute the command as shown below
sudo puppet cert list
Run the below-given command to sign all requests
sudo Puppet cert sign –all
Step 6: Enter the following command to start and enable the Puppet agent
systemctl start Puppetsystemctl enable Puppet
Step 7: Use the following command to verify the correctness of the sign in the certificates
Puppet agent –fingerprint
With the execution of the last command, your Puppet is installed and configured successfully in your system.
Puppet Manifest
In order to handle the process of Puppet configuration management, you have to write a set of scripts or Puppet codes for configuring the systems. Take a look at detailed information about the Puppet manifest.
What is Puppet Manifest?
In general, Puppet programs are written in Ruby which is termed as manifests. The manifests are mainly composed of Puppet code and their filenames with .pp extension. In other words, manifests can be defined as the Puppet programs that are built to create or manage any target host machine. Manifest enables the users to have a collection of various resources which are grouped together by making use of class and definition. The components of the Puppet manifests are
- Files: Plain files that are to be imported to place them in the destined location
- Resources: Represents the element that should you need to evaluate or change and it may be files, packages, etc.
- Templates: They are used to create configuration files on nodes to reuse later
- Nodes: It defines all the information and definition of the client node within the block of code.
- Classes: Classes are used to combine different types of resources together.
Why do we need Puppet manifest?
Developing the manifest files is similar to Puppet programming. The main objective of the manifest files is to define the configuration of the resources. You have to declare the resources and basic components for Puppet codes in the manifest files. Since manifests are the building block of large Puppet modules such as facts, files, and templates they are more essential in Puppet. These modules enable the users to split the Puppet code into multiple manifests.
The syntax of Puppet manifest
Here is the syntax for writing the basic Puppet manifest file:
The resources of the same type should not have the same title but you can use the same title for different types of resources.
resourcetype { ‘title’:argument or attribute1  => value,

argument or attribute2 => value, }
Syntax with example
In the below code block, two types of resources are defined; the first one represents the package, and the second denotes the exec package. The package resource must be installed before using it in the code. The keyword ‘before’ helps you to show that the package resource is executed before the command.
package { ‘curl’:ensure => ‘installed’

before => Exec[‘install script’]

}

exec { ‘install script’:

command => ‘/usr/bin/curl’

}
Hands-On example for the basic Puppet manifest file
The real-time example for the basic Puppet manifest file is
Modifying the etc/motd file in the entire infrastructure server and employing the Puppet automation to add the desired content in the file. The file name etc/motd is nothing but a kind of file that is available in UNIX-like systems. This file contains the message as ‘message of the day
- Check whether the file is present at the location
- Make the required changes in the file if it is there
- Change the file permission when you need it
file {‘/etc/motd’:name    => ‘/etc/motd’

ensure=> present,

owner   => ‘root’,

group   => ‘root’,

content => ‘The Testing content’, }

}
This is one of the best examples for Puppet manifests in which the resource type is a file and the title is etc/motd. The text that is added to the file is ‘The Testing Content’.
What are the Puppet Modules?
Puppet modules are a collection of manifests, files, templates, classes, and so on. The modules are also referred to as the portable manifest as it contains all the components of the Puppet. The modules should be written in an understandable form to the readers.
Each module has its own tasks like installing and configuring a part of the software. The name of the modules must contain only lowercase letters. The benefit of the Puppet module is that it allows for code sharing. A module can be created with the help of basic programming knowledge. Otherwise, you can get the support of pre-existing Puppet modules.
Pre-existing Puppet modules
The pre-existing Puppet modules are more helpful for users who want to create modules with less programming knowledge. These pre-existing modules were written and developed by huge communities of the IT software automation.
Since pre-existing modules are public anyone can download, install and use them in their applications. Still, now there is about 5000+ pre-existing module available for all.
Installation of Puppet modules online and offline
The Puppet modules can be downloaded both offline and online. Go through the following steps to download the modules.
In order to download the Puppet modules, you need to install and configure the vim package. Vim module is one of the popular text editors that allow you to install and configure the vim package in different platforms.
Downloading the Puppet modules manually
Step 1: Visit the official page of the Puppet forge or click here https://forge.Puppet.com/saz/vim. You will be navigated to the web page that looks like the given below image.
Step 2: In the search bar under ‘what do you want to automate’ type the name of the module that you want to download. As you are looking for the Vim module you need to type the name as given in the following image.
Step 3: When you do the above step it will provide multiple results from which you have to choose the required one. Click on the individual module to get into the basic introduction ofthe respective module.
For example, the dhoppe vim module is chosen for downloading the Puppet module manually. Go through the below image to understand this process.
Step 4: Download the vim module just by clicking on download latest.tar.gz and get the module in the tarball. View the following image to locate the link,
Installing the Puppet Module
- After the completion of the download process, you have to get ready for installing it in your system.
- Run the following command in the master server to install the module from the tarball.
- Puppet module install /path/dhoppe-vim-1.4.1.tar.gz
- The ‘path’ in the code block denotes the path to the directory where you have saved the tarball.
Installation of Puppet module online
- The users who are all looking for the installation of Puppet online can make use of the Puppet module tool by executing the following command.
- Puppet module install dhoppe-vim –version 1.4.1
- Make sure that you are using the latest version of the module before executing the command.
Conclusion:
Thus, this is the essential information that you need to know about Puppet technology. The Puppet is being used as the best configuration management tool to manage the servers.
The Master-Slave architecture of the Puppet makes it more beneficial for organizations. The tedious tasks such as testing, operating, and maintaining the changes in software are now automated by the DevOps tool called Puppet.
The risks faced by the system administrators are reduced to a great level with the support of the Puppet tool. In fact, Puppet is found to be the most used configuration management tool among organizations. Make use of this Puppet tutorial and reap its complete benefits in your organization.
 On-Job Support Service
Online Work Support for your on-job roles.

Our work-support plans provide precise options as per your project tasks. Whether you are a newbie or an experienced professional seeking assistance in completing project tasks, we are here with the following plans to meet your custom needs:
- Pay Per Hour
- Pay Per Week
- Monthly
| Name | Dates | |
|---|---|---|
| Puppet Training | Jul 28 to Aug 12 | View Details |
| Puppet Training | Aug 01 to Aug 16 | View Details |
| Puppet Training | Aug 04 to Aug 19 | View Details |
| Puppet Training | Aug 08 to Aug 23 | View Details |

Ravindra Savaram is a Technical Lead at Mindmajix.com. His passion lies in writing articles on the most popular IT platforms including Machine learning, DevOps, Data Science, Artificial Intelligence, RPA, Deep Learning, and so on. You can stay up to date on all these technologies by following him on LinkedIn and Twitter.