- Home
- Blog
- Apache Nifi
- Apache NiFi Tutorial

Apache NiFi is a data flow system based on the concepts of Flow-based programming. It is developed by the National Security Agency (NSA), and then in 2015, it became an official part of the Apache Project Suite.
Every 6-8 weeks, Apache NiFi releases a new update to meet the requirements of the users.
This Apache NiFi tutorial is designed for beginners and professionals who are willing to learn the basics of Apache NiFi. It includes several sections that provide core knowledge of how to work with NiFi.
Apache NiFi Tutorial for Beginners
So if you’re looking to improve your knowledge of Apache NiFi, you’ll like this tutorial.
Let’s get started!
What is Apache NiFi?
Apache NiFi is a robust, scalable, and reliable system that is used to process and distribute data. It is built to automate the transfer of data between systems.
- NiFi offers a web-based User Interface for creating, monitoring, and controlling data flows. NiFi stands for Niagara Files which was developed by National Security Agency (NSA) but now it is maintained by the Apache foundation.
- Apache NiFi is a web-based UI platform where we need to define the source, destination, and processor for data collection, data storage, and data transmission, respectively.
- Each processor in the NiFi has relations that are used while connecting one processor to another.
| If you want to enrich your career and become a professional in Apache NiFi, then visit Mindmajix - a global online training platform: "Apache NiFi Training" This course will help you to achieve excellence in this domain. |
Why do we use Apache NiFi?
Apache NiFi is open-source; therefore, it is freely available in the market. It supports several data formats, such as social feeds, geographical locations, logs, etc.
Apache NiFi supports a wide variety of protocols such as SFTP, KAFKA, HDFS, etc. which makes this platform more popular in the IT industry. There are so many reasons to choose Apache NiFi. They are as follows.
-
Apache NiFi helps organizations to integrate NiFi with their existing infrastructure.
-
It allows users to make use of Java ecosystem functions and existing libraries.
-
It provides real-time control that enables the user to manage the flow of data between any source, processor, and destination.
-
It helps to visualize DataFlow at the enterprise level.
-
It helps to aggregate, transform, route, fetch, listen, split, and drag-and-drop the data flow.
-
It allows users to start and stop components at individual and group levels.
-
NiFi enables users to pull the data from various sources to NiFi and allows them to create flow files.
-
It is designed to scale out in clusters that provide guaranteed delivery of data.
-
Visualize and monitor performance, and behavior in the flow bulletin that offers inline and insight documentation.
Features of Apache NiFi
The features of Apache NiFi are as follows:
-
Apache NiFi is a web-based User Interface that offers a seamless experience of design, monitoring, control, and feedback.
-
It even provides a data provenance module that helps to track and monitor data from the source to the destination of the data flow.
-
Developers can create their customized processors and reporting tasks as per the requirements.
-
It supports troubleshooting and flow optimization.
-
It enables rapid development and testing effectively.
-
It provides content encryption and communication over a secure protocol.
-
It supports buffering of all queued data and provides an ability of backpressure as the queues can reach specified limits.
-
Apache NiFi delivers a system to the user, the user to the system, and multi-tenant authentication security features.
Apache NiFi Architecture
Apache NiFi Architecture includes a web server, flow controller, and processor that runs on a Java Virtual Machine (JVM).
It has three repositories such as FlowFile Repository, Content Repository, and Provenance Repository.
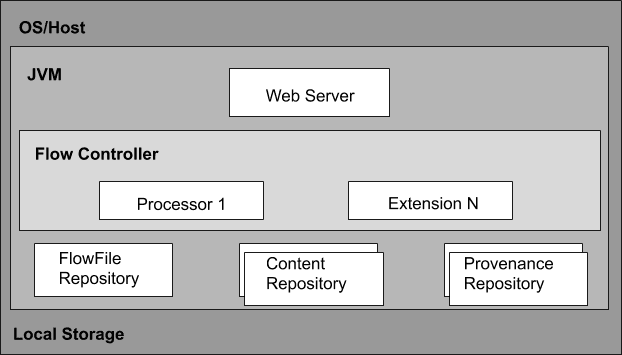
- Web Server
Web Server is used to host the HTTP-based command and control API.
- Flow Controller
The flow controller is the brain of the operation. It offers threads for extensions to run and manage the schedule of when the extensions receive resources to run.
- Extensions
Several types of NiFi extensions are defined in other documents. Extensions are used to operate and execute within the JVM.
- FlowFile Repository
The FlowFile Repository includes the current state and attribute of each FlowFile that passes through the data flow of NiFi.
It keeps track of the state that is active in the flow currently. The standard approach is the continuous Write-Ahead Log which is located in a described disk partition.
- Content Repository
The Content Repository is used to store all the data present in the flow files. The default approach is a fairly simple mechanism that stores blocks of data in the file system.
To reduce the contention on any single volume, specify more than one file system storage location to get different partitions.
- Provenance Repository
The Provenance Repository is where all the provenance event data is stored. The repository construct is pluggable to the default implementation that makes use of one or more physical disk volumes.
Event data is indexed and searchable in each location.
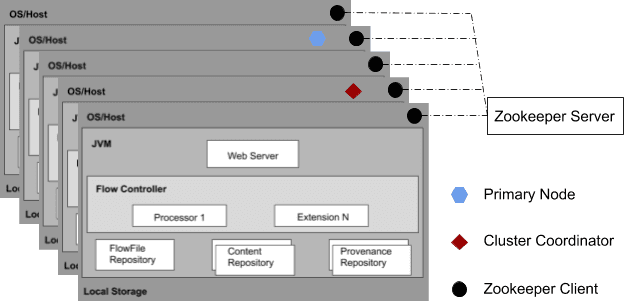
From the NiFi 1.0 version, a Zero-Leader Clustering pattern is incorporated. Every node in the cluster executes similar tasks on the data but operates on a different set of data.
Apache Zookeeper picks a single node as a Cluster Coordinator. The Cluster Coordinator is used for connecting and disconnecting nodes. Also, every cluster has one Primary Node.
Key concepts of Apache NiFi
The key concepts of Apache NiFi are as follows:
-
Flow: Flow is created to connect different processors to share and modify data that is required from one data source to another destination.
-
Connection: Connection is used to connect the processors that act as a queue to hold the data in a queue when required. It is also known as a bounded buffer in Flow-based programming (FBP) terms. It allows several processes to interact at different rates.
-
Processors: The processor is a Java module that is used to either fetch data from the source system or to be stored in the destination system. Several processors can be used to add an attribute or modify the content in the FlowFile. It is responsible for sending, merging, routing, transforming, processing, creating, splitting, and receiving flow files.
-
FlowFile: FlowFile is the basic concept of NiFi that represents a single object of the data selected from the source system in NiFi. It allows users to make changes to Flowfile when it moves from the source processor to the destination. Various events such as Create, Receive, Clone, etc. that are performed on Flowfile using different processors in a flow.
-
Event: An event represents the modification in Flowfile when traversing by the NiFi Flow. Such events are monitored in the data provenance.
-
Data provenance: Data provenance is a repository that allows users to verify the data regarding the Flowfile and helps in troubleshooting if any issues arise while processing the Flow file.
-
Process group: The process group is a set of processes and their respective connections that can receive data from the input port and send it through output ports.
| Related Article - Apache NiFi Interview Questions |
Apache NiFi User Interface
Apache NiFi is a web-based platform that can be accessed by the user using web UI. The NiFi User Interface allows mechanisms for creating, visualizing, monitoring, and editing automated data flows.
The UI is divided into several segments, and each segment is responsible for different functions of the application. These segments include various types of commands that are discussed as follows:
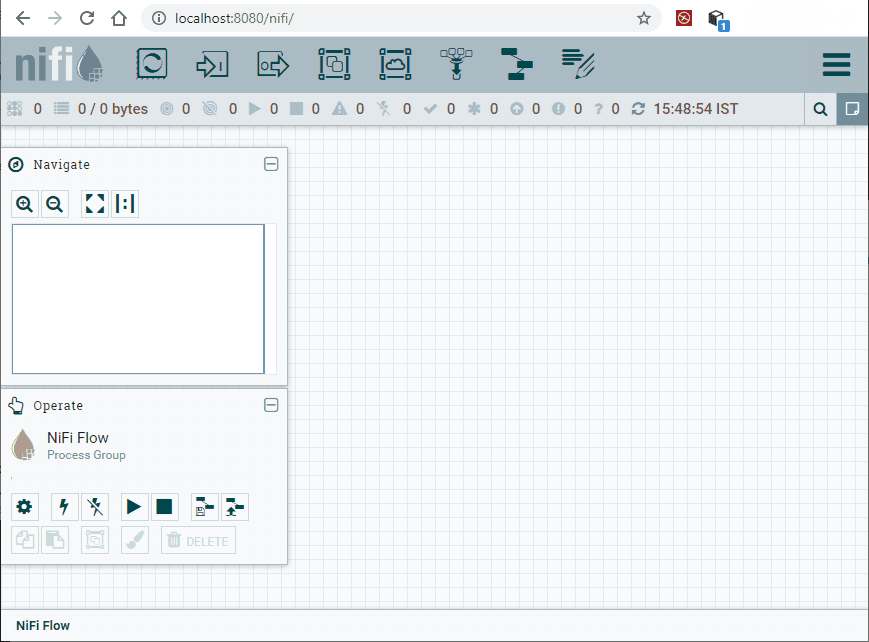
When a Data Flow Manager (DFM) navigates to the User Interface (UI), a blank canvas appears on the screen, where it allows to build a data flow.
In the figure, the Components Toolbar runs over the top left side of the screen. It includes the components that can allow drag-and-drop into the canvas to build a data flow.
The Status Bar provides information regarding the number of Active threads, amount of existing data, number of existing Remote Process Groups, number of existing processors, number of existing Versioned Process Groups, and timestamp at which all information was refreshed lastly.
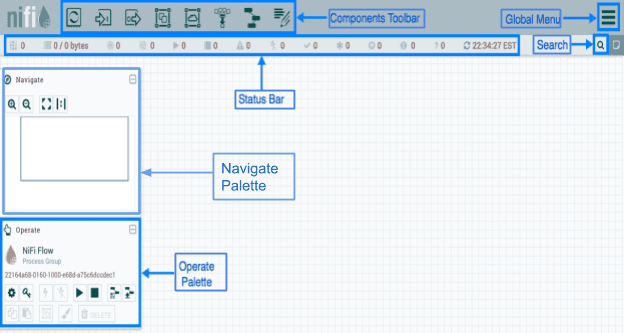
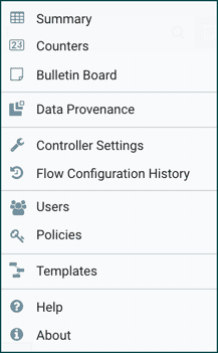
The Global Menu is on the right side of the UI that includes options used to manipulate the existing components on the canvas.
The search bar is used to refer to the information about the components in DataFlow. The Navigate Palette is used to pan over the canvas and to zoom in and out.
The Birds Eye View in the Navigate palette offers a high-level view of the data flow and allows it to span over large portions of data flow.
The Operate palette on the left-hand side of the screen includes various buttons that are used by DFMs to manage the flow and to access and configure system properties.
Components of Apache NiFi
The following are the components of Apache NiFi:
Processor
![]()
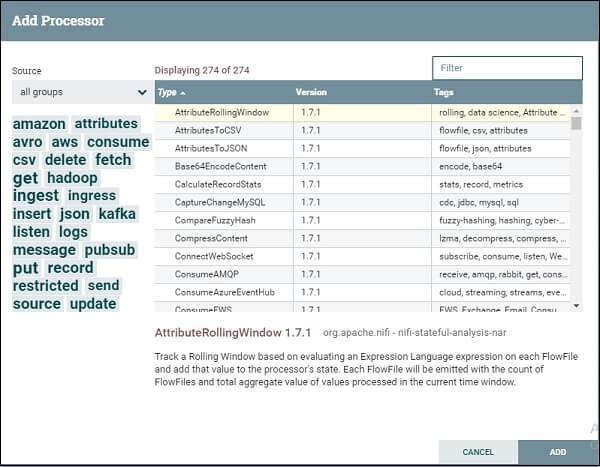
Users can drag the processor icon into the canvas and can add the required processor for the data flow in NiFi.
Input port
![]()
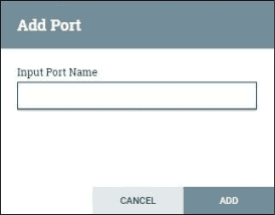
The input port is used to get data from the processor, which is not available in the process group. When the Input icon is dragged to the canvas, then it allows adding an Input port to the dataflow.
Output port
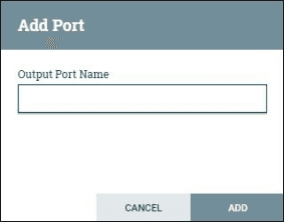
The output port is used to transfer data to the processor, which is not available in the process group. When the output port icon is dragged into the canvas, then it allows adding an output port.
Process Group
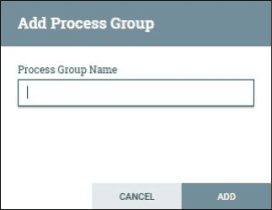
Process group helps to add process groups in NiFi canvas. When the Process Group icon is dragged into the canvas, it enables to enter the Process Group name, and then it is added to the canvas.
Remote Process Group
![]()
Funnel
![]()
The Funnel is used to send the output of the processor to various processors. Users can drag the Funnel icon into the canvas to add Funnel to the dataflow.
It allows adding a Remote Process Group in the NiFi canvas.
Template
![]()
The template icon is used to add the dataflow template to the NiFi canvas. It helps to reuse the data flow in the same or different instances.
After dragging, it allows users to select the existing template for the data flow.
Label
![]()
These are used to add text on NiFi canvas regarding any component available in the NiFi. It provides colors used by the user to add an aesthetic sense.
Processors Categorization in Apache NiFi
The following are the process categorization of Apache NiFi.
- AWS Processors
AWS processors are responsible for communicating with the Amazon web services system. Such category processors are PutSNS, FetchS3Object, GetSQS,PutS3Object, etc.
- Attribute Extraction Processors
Attribute Extraction processors are responsible for extracting, changing, and analyzing FlowFile attributes processing in the NiFi data flow.
Examples are ExtractText, EvaluateJSONPath, AttributeToJSON, UpdateAttribute, etc.
- Database Access Processors
The Database Access processors are used to select or insert data or execute and prepare other SQL statements from the database.
Such processors use the data connection controller settings of Apache NiFi. Examples are PutSQL, ListDatabaseTables, ExecuteSQL, PutDatabaseRecord, etc.
- Data Ingestion Processors
The Data Ingestion processors are used to ingest data into the data flow, such as a starting point of any data flow in Apache NiFi. Examples are GetFile, GetFTP, GetKAFKA,GetHTTP, etc.
- Data Transformation Processors
Data Transformation processors are used for altering the content of the FlowFiles.
These can be used to replace the data of the FlowFile when the user has to send FlowFile as an HTTP format to invoke an HTTP processor. Examples are JoltTransformJSON ReplaceText, etc.
- HTTP Processors
The HTTP processors work with the HTTP and HTTPS calls. Examples are InvokeHTTP, ListenHTTP, PostHTTP, etc.
- Routing and Mediation Processors
Routing and Mediation processors are used to route the FlowFiles to different processors depending on the information in attributes of the FlowFiles.
It is responsible for controlling the NiFi data flows. Examples are RouteOnContent, RouteText, RouteOnAttribute, etc.
- Sending Data Processors
Sending Data Processors are the end processors in the Data flow. It is responsible for storing or sending data to the destination.
After sending the data, the processor DROP the FlowFile with a successful relationship. Examples are PutKAFKA, PutFTP, PutSFTP, PutEmail, etc.
- Splitting and Aggregation Processors
The Splitting and Aggregation processors are used to split and merge the content available in the Dataflow. Examples are SplitXML, SplitJSON, SplitContent, MergeContent, etc.
- System Interaction Processors
The system interaction processors are used to run the process in any operating system. It also runs scripts in various languages with different systems.
Examples are ExecuteScript, ExecuteStreamCommand, ExecuteGroovyScript, ExecuteProcess, etc.
How to install Apache NiFi?
To install Apache NiFi, do the following steps.
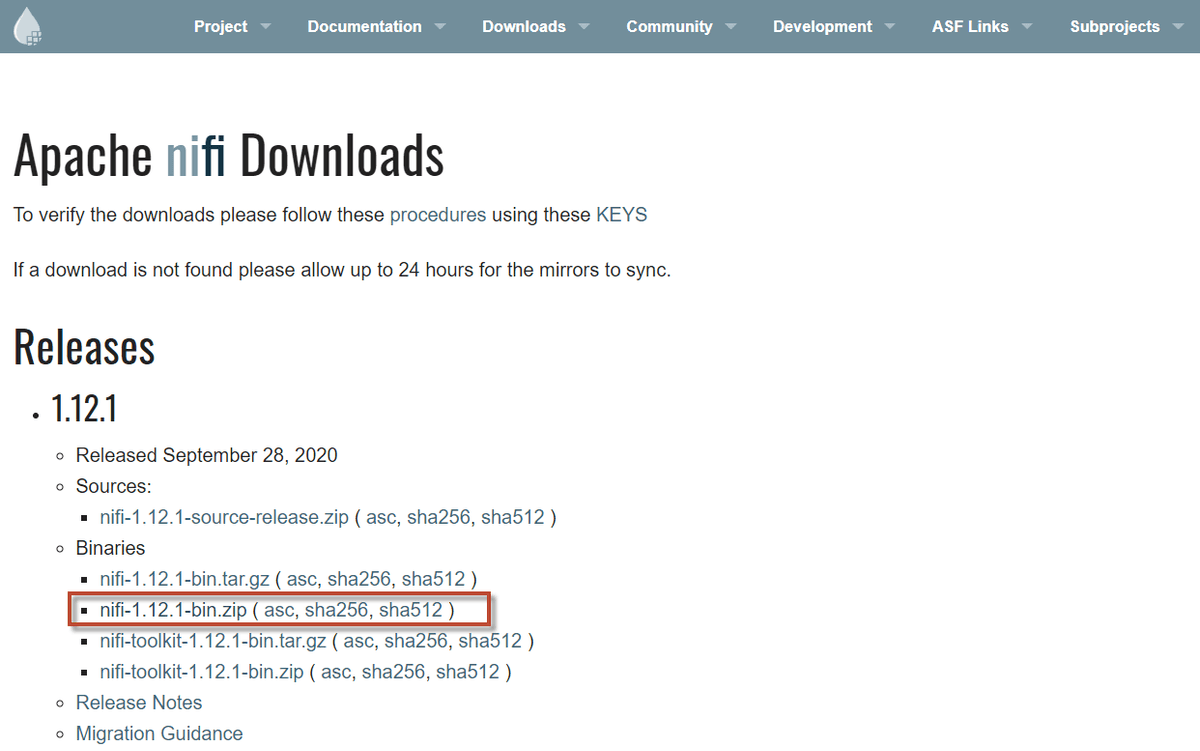
1. Click on the link and download the latest version of Apache NiFi.
2. Under the Binaries section, click on the zip file of the NiFi application setup for Windows OS.
 3. The above link redirects you to a new page. Here, you will get a link to download Apache NiFi.
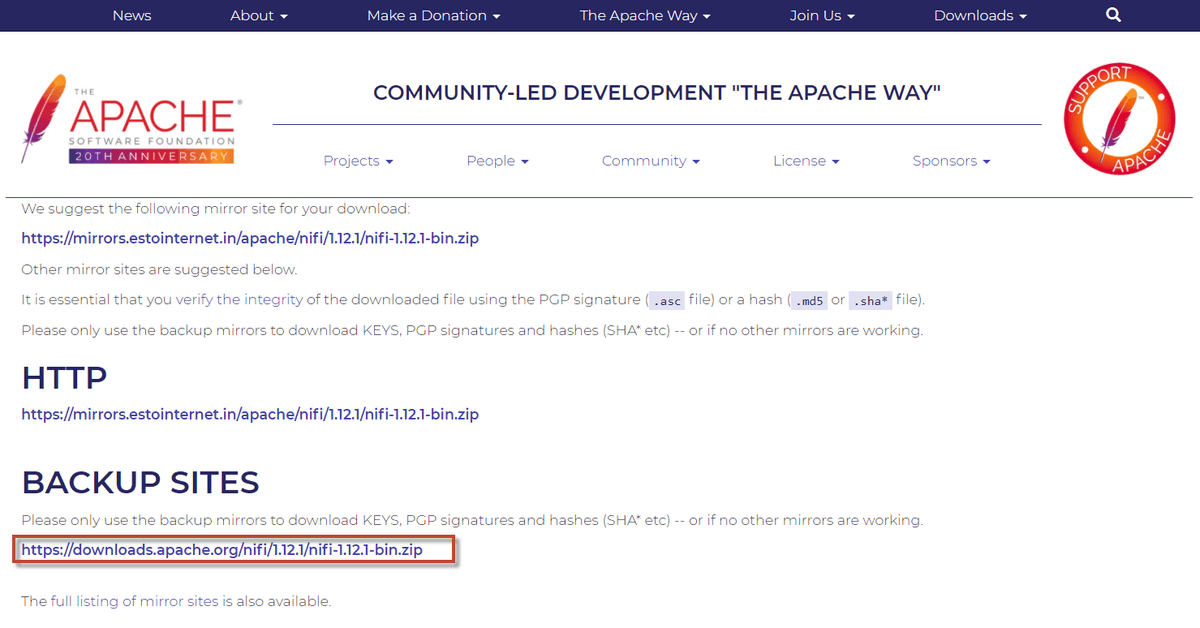
4. After downloading the file, extract the file.
5. Open the bin folder (i.e., nifi-1.12.1 > bin) and click run-nifi and run to start.
6. The dashboard of NiFi will launch on the browser on successful installation. The dashboard of Apache is known as canvas, where we create the dataflows.
How to build a flow?
To build a flow, we need to add two processors on canvas and configure them. Let’s see how to add and configure the processors.
Add and configure processors
To add and configure processors, do the following steps.
-
Go to the component section in the toolbar and drag a processor. An Add Processor window opens, where it includes a list of processors.
-
Find the required processor or reduce the list of processors based on category and functionality.
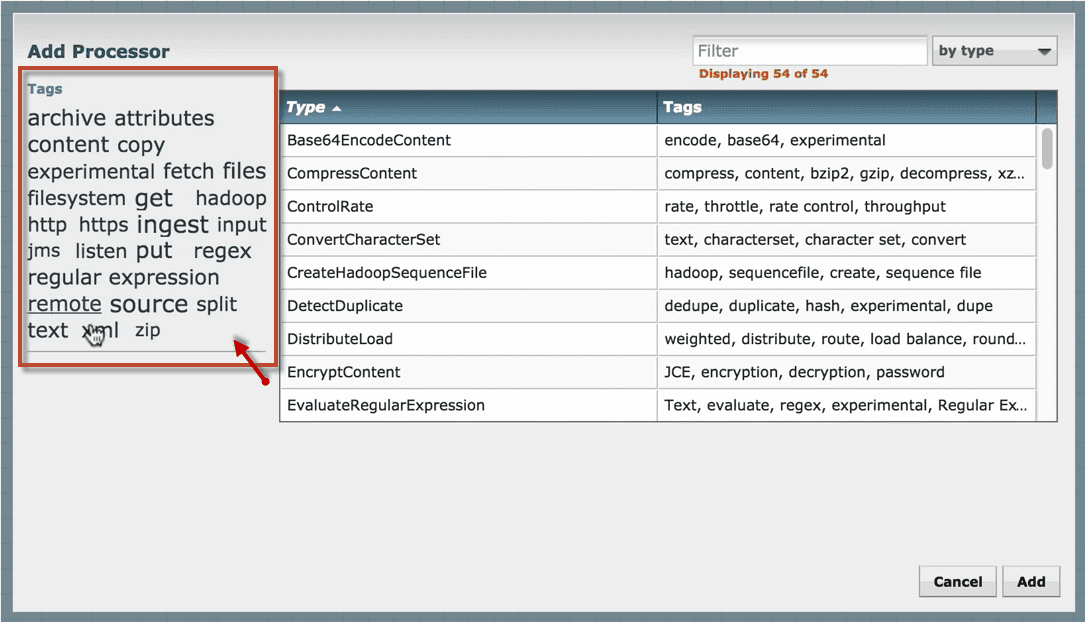
3. Click on the processor that you want to select and add it to the canvas by double-clicking the processor or click ‘Add’.
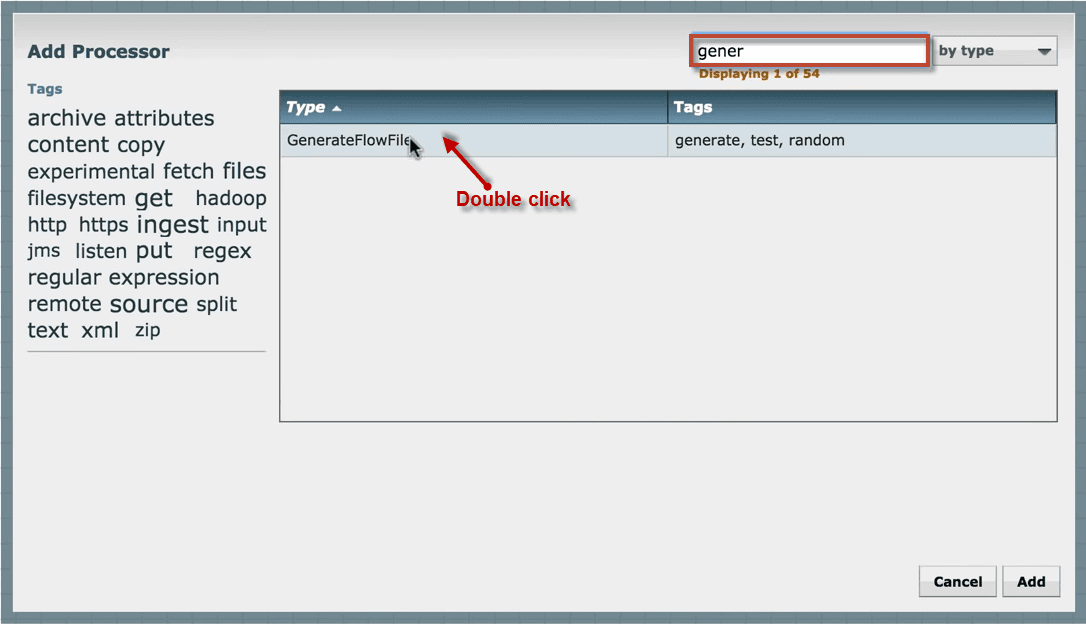
4. If you know the name of the processor, you can type the name in the filter bar. Add another processor to the canvas.
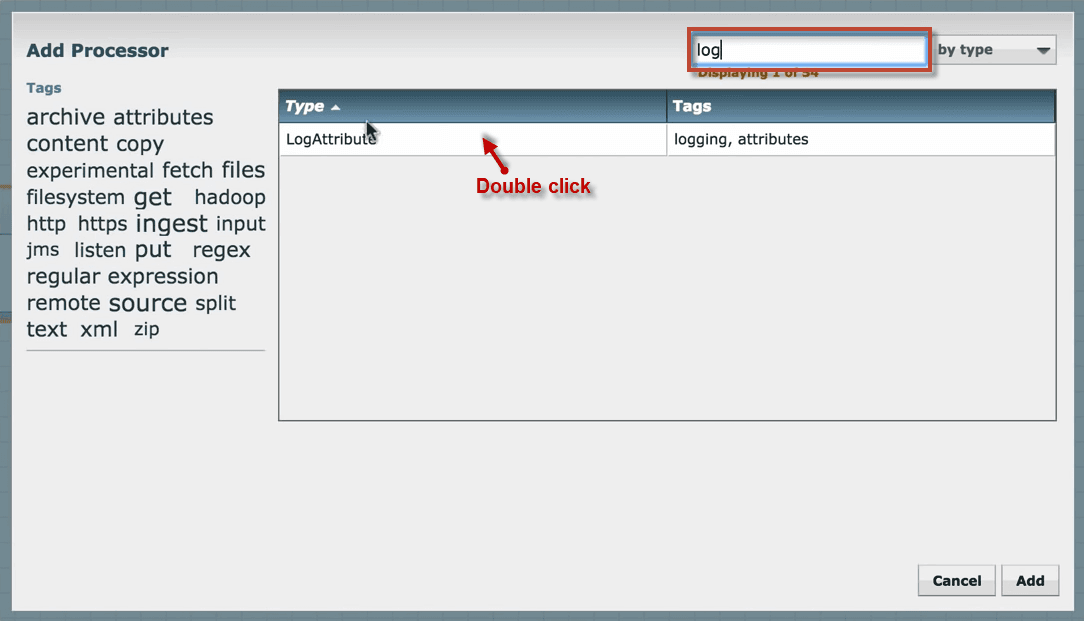
5. You will see that both the processors are invalid because they have a warning message indicating the requirements need to be configured to make processors valid and to execute.

6.To satisfy the warning requirements, we need to configure and run the processors.
Configure Generate Flow File Processor
To configure the Generate FlowFile Processor, do the following steps.
-
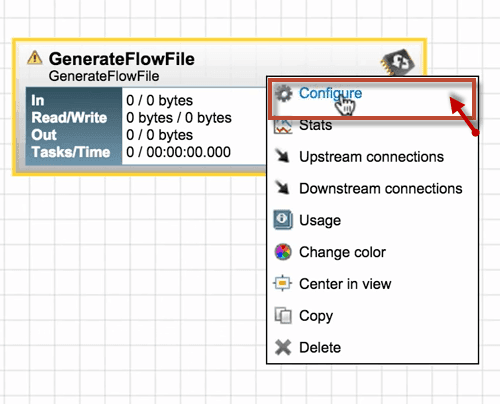
Right-click on the Generate FlowFile Processor and click Configure.
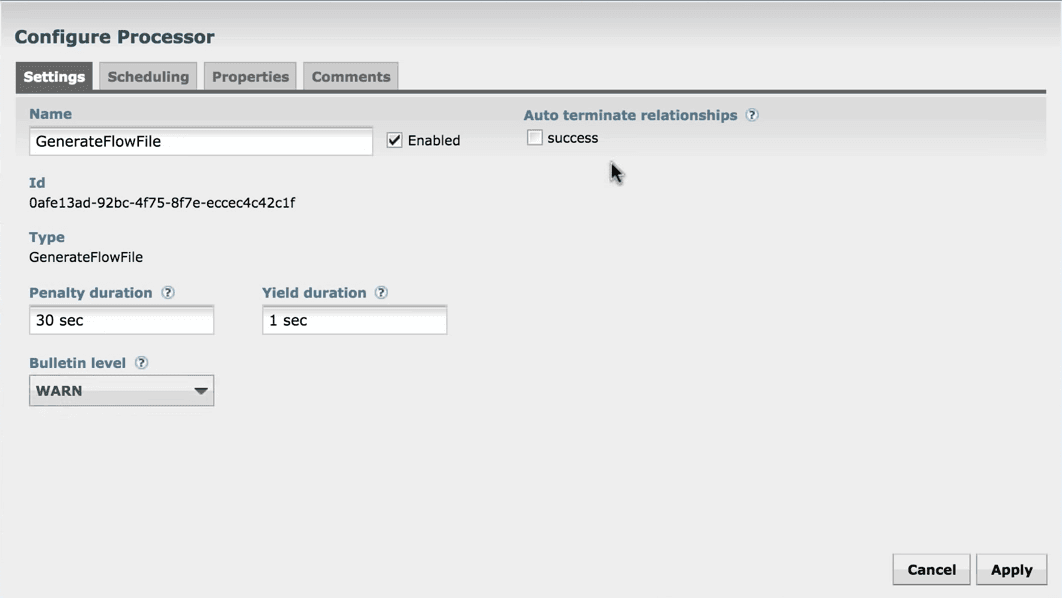
2. A configure processor window opens that includes four tabs (i.e., Settings, Scheduling, Properties, and Comments).
3. In the Settings tab, we can change the Processor name, but by default, it shows the Processor name.
Each processor has a unique ID number, that is not configurable.
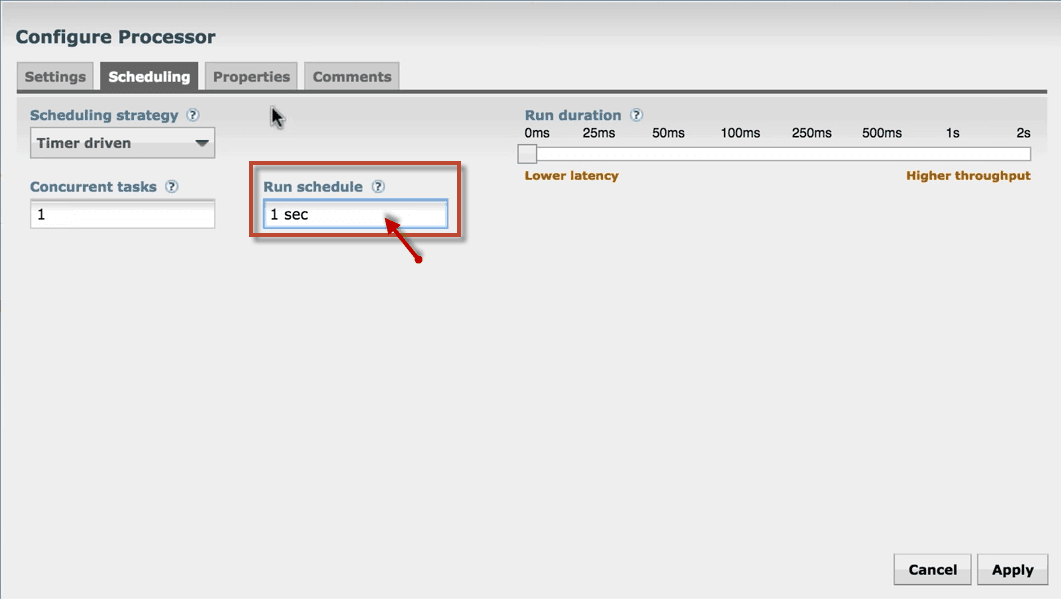
4. Next tab is Scheduling that defines how to run, how long to run, and how often to run the schedule.
Set Run schedule as 1sec because this processor produces the test files quickly.
5. Next tab is Properties which is the main tab where we can configure the information that the processor needs to run.
Double-click on File size to change the size of the file and click Apply.
6. The last tab is Comment, type any comment such as why you configured the processor that helps your team to understand easily.
Click Apply to save the changes made and complete the configuration of Generate FlowFile processor.
Configure Log Attribute Processor
To configure the LogAttribute Processor, do the following steps.
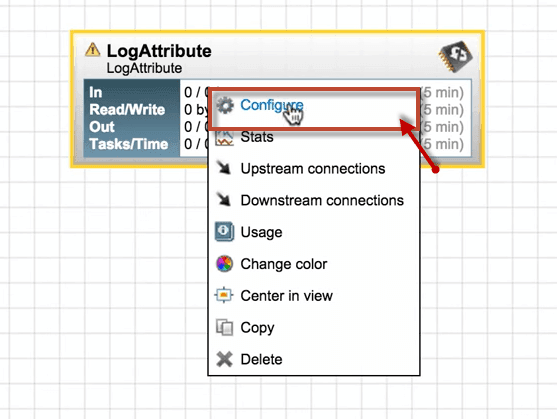
1. Right-click on LogAttribute Processor and click Configure from the list.
2. A configure processor window opens as same as Generate FlowFile Processor.
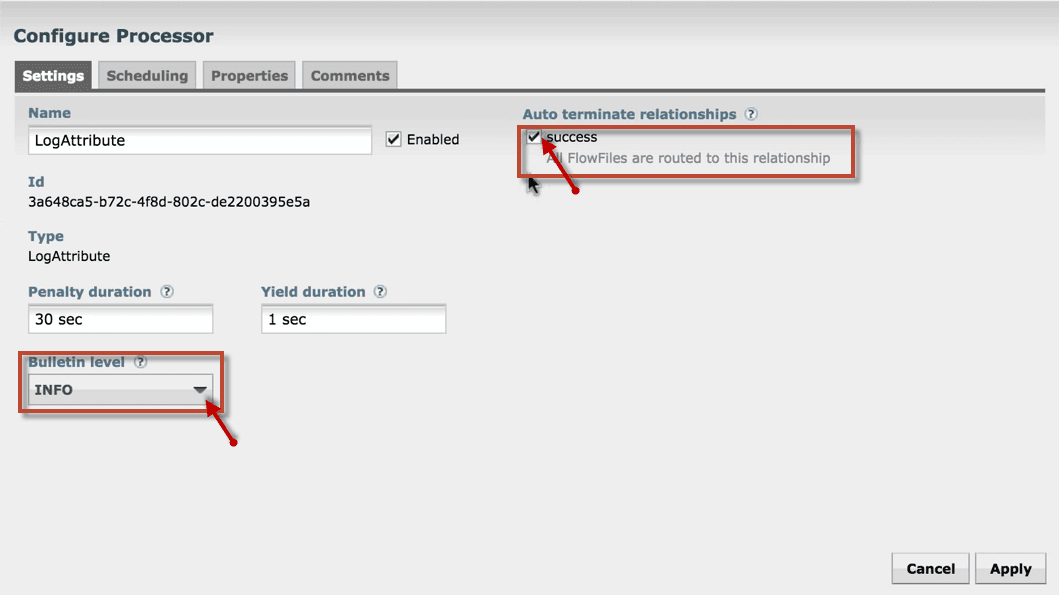
3. In the Settings tab, set the bulletin level as INFO from WARN. And enable the success check box, so that all FlowFiles are routed to this relationship.
4. Leave all other tabs as a default and click Apply to complete the configuration of the LogAttribute Processor.
After completing the above steps, we can see the processors are still invalid. It is because we have not connected them.
Connect and Run Processors
To Connect and Run the processors, do the following steps.
- To connect the processors, hover the mouse to the center of the processor, an arrow in the circle will appear. Drag the mouse from that circle to another processor until it highlights in green color.

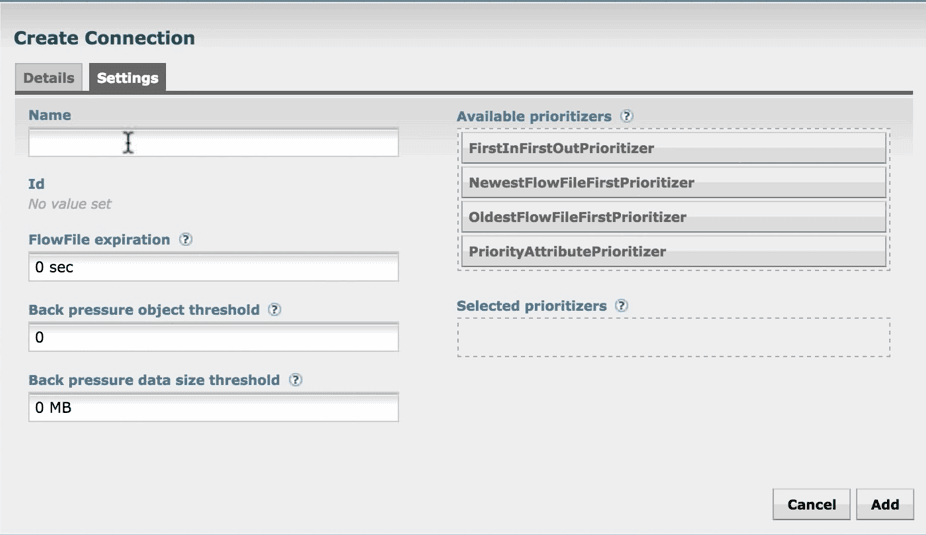
2. A create connection window opens that includes the Details and Settings tab. The Details tab shows the connection is connecting from which processor to which processor.
It also shows the list of relationships that are included in the connection.
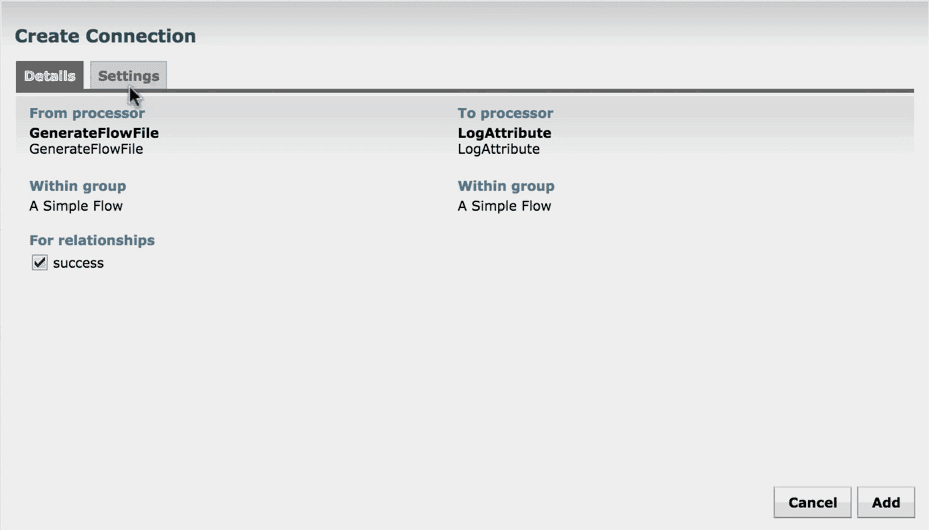
3. The Settings tab provides the required settings for the connection. Set as default connections and click ADD.
4. You can see the processors are now valid and there is a stop symbol instead of a warning symbol.

5. Select the processors by pressing the Shift key and click Start to run the processors.
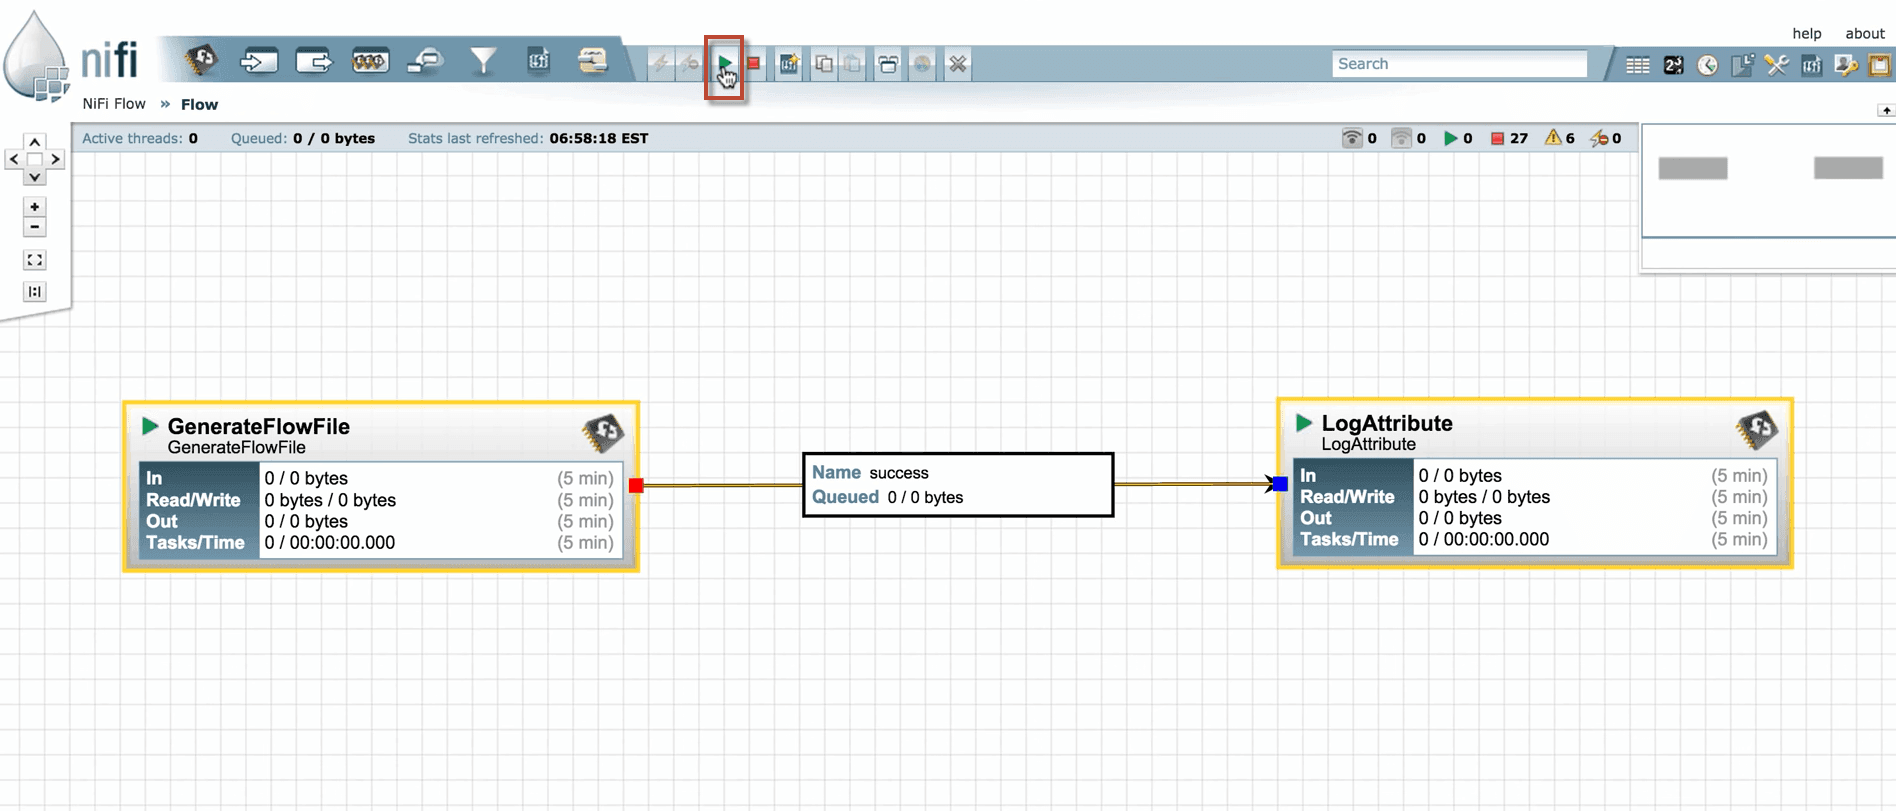
6. Right-click anywhere in the canvas and select Refresh to check what the processors are performing with the information.

7. Now you can see that the Log Attribute processor is producing bulletins as we configured to produce bulletins at INFO level.
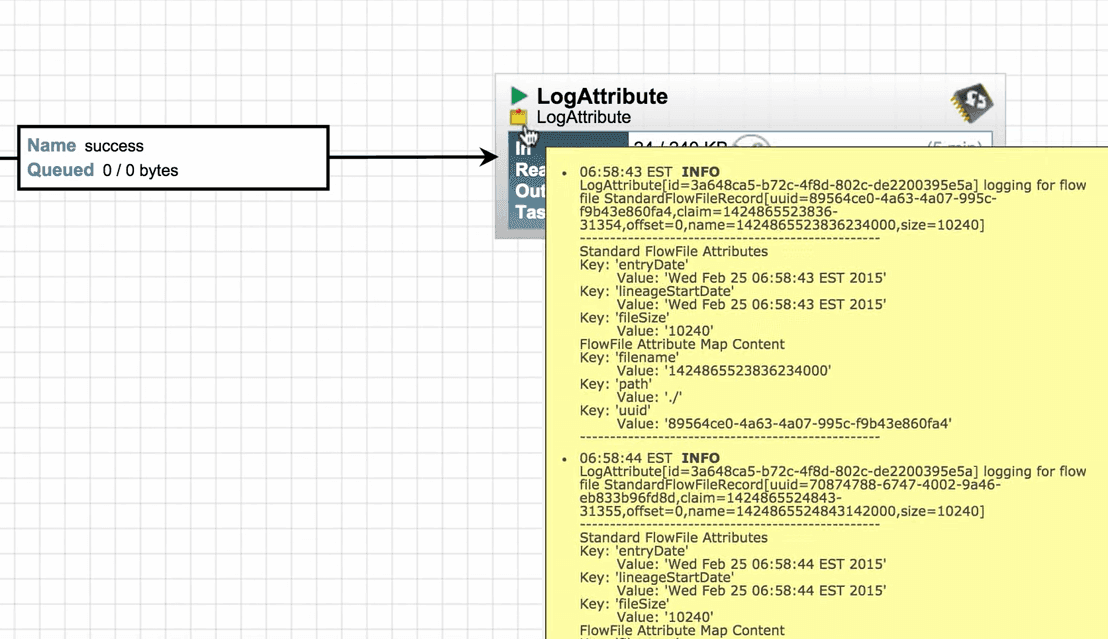
8. We can see that data is out from Generate FlowFile processor and is received by the LogAttribute processor.

Notice that no data is coming into the Generate FlowFile processor as it does not have any incoming connection.
9. Now, stop the LogAttribute processor by selecting the processor and click Stop. Refresh the canvas to see that the data has been queued up in the connection.


10. Right-click on the LogAttribute processor and click Start to restart the processor so that the queued data will clear out.
It runs accurately. This is how we create a simple Data flow in Apache NiFi.
Advantages of Apache NiFi
The Advantages of Apache NiFi are as follows:
- Apache NiFi offers a web-based User Interface (UI). So that it can run on a web browser using port and localhost.
- On a web browser, Apache NiFi uses the HTTPS protocol to ensure secure user interaction.
- It supports the SFTP protocol that enables data fetching from remote machines.
- It also provides security policies at the process group level, user level, and other modules.
- NiFi supports all the devices that run Java.
- It provides real-time control that eases the movement of data between source and destination.
- Apache NiFi supports clustering so that it can work on multiple nodes with the same flow processing different data, which increases the performance of data processing.
- NiFi supports over 188 processors, and a user can create custom plugins to support various types of data systems.
Disadvantages of Apache NiFi
The following are the disadvantages of Apache NiFi.
- Apache NiFi has a state persistence issue in the case of a primary node switch that makes processors unable to fetch data from source systems.
- While making any change by the user, the node gets disconnected from the cluster, and then flow.xml gets invalid. The node cannot connect to the cluster till the admin copies the .xml file manually from the node.
- To work with Apache NiFi, you must have good underlying system knowledge.
- It offers a topic level, and SSL authorization might not be sufficient.
- It is required to maintain a chain of custody for data.
Conclusion
On a final note, Apache NiFi is used for automating and managing the data flows between the systems. Once the data is fetched from the external source, it is represented as a FlowFile within the architecture of Apache NiFi.
I hope this tutorial helps you to lead the way to design and configure your data flows in Apache NiFi. Now, it’s your turn to explore the NiFi. If any queries are triggered, feel free to drop your query in the comment session.
 On-Job Support Service
Online Work Support for your on-job roles.

Our work-support plans provide precise options as per your project tasks. Whether you are a newbie or an experienced professional seeking assistance in completing project tasks, we are here with the following plans to meet your custom needs:
- Pay Per Hour
- Pay Per Week
- Monthly
| Name | Dates | |
|---|---|---|
| Apache Nifi Training | Feb 14 to Mar 01 | View Details |
| Apache Nifi Training | Feb 17 to Mar 04 | View Details |
| Apache Nifi Training | Feb 21 to Mar 08 | View Details |
| Apache Nifi Training | Feb 24 to Mar 11 | View Details |

Keerthana Jonnalagadda working as a Content Writer at Mindmajix Technologies Inc. She writes on emerging IT technology-related topics and likes to share good quality content through her writings. You can reach her through LinkedIn.


