SpecFlow Tutorial - What is Behavior Driven Development
The entire cycle of software design, development, and testing are pretty complicated. Each team works towards a common goal. BDD plays an instrumental role as it minimizes the communication gap between the key stakeholders of any software project. This SpecFlow tutorial will help you understand how BDD can be utilized.
- 6 Hot And In-Demand Tech Areas In 2024
- How To Forward Your Career With Cloud Skills?
- Top 7 On-Demand IT Certifications
- Most In-demand Technologies To Upskill Your Career
- Top 10 Hottest Tech Skills to Master in 2024
- Top Skills You Need to Become a Data Scientist
- Groovy Interview Questions
- Facets Interview Questions
- Crystal Reports Tutorial
- VAPT Interview Questions
- Flutter Tutorial
- Saviynt VS Sailpoint
- Flutter vs Xamarin
- PingFederate Interview Questions and Answers
- Dart vs Javascript : What's the Difference?
- Terraform Private Registry
- Cylance Interview Questions and Answers
- Sophos Interview Questions and Answers
- Top Camunda Interview Questions
- NUnit Interview Questions and Answers
- Impala Interview Questions and Answers
- ETL Tutorial
- Ionic Interview Questions
- Grafana Tutorial
- What is VAPT? - A Complete Beginners Tutorial
- SnapLogic Interview Questions
- Saviynt Interview Questions
- What is PingFederate? - A Complete Beginners Tutorial
- SnapLogic Tutorial
- Grafana Interview Questions
- RHCE Interview Questions and Answers
- Web Services Interview Questions
- Domo Interview Questions and Answers
- Terraform Interview Questions
- What is Sophos? | Sophos Turorial for Beginners
- Top Servlet Interview Question And Answers
- NLP Interview Questions and Answers
- Microsoft Intune Interview Questions
- Top XML Interview Questions And Answers
- Tosca Commander
- Katalon vs Cypress
- SQLite Tutorial
- Tosca Tutorial - A Complete Guide for Beginners
- Xamarin Interview Questions and Answers
- UiPath vs Automation Anywhere - The Key Differences
- OpenShift Interview Questions
- What is Katalon Studio - Complete Tutorial Guide
- Kronos Interview Questions
- Tosca Framework
- Burp Suite Tutorial
- Mendix Interview Questions
- Power Platform Interview Questions
- Burp Suite Interview Questions
- What is Mendix
- What is Terraform ?
- Burp Suite Alternatives
- Dart vs Kotlin
- What is Kronos?
- ES6 Interview Questions
- Entity Framework Interview Questions
- COBOL Interview Questions
- Express JS Interview Questions
- OSPF Interview Questions
- LINQ Tutorial
- CSS3 Interview Questions and Answers
- Auth0 Tutorial
- MS Access Interview Questions
- What is SPARQL - A Complete Tutorial Guide
- ExpressJS Tutorial
- UML Tutorial
- HTML vs XML
- Cypress vs Jest
- Impacts of Social Media
- Top 10 Highest Paying Jobs in India 2024
- OWASP Interview Questions
- Security Testing Interview Questions
- OpenShift vs Docker
- ES6 Tutorial
- Spark SQL Interview Questions
- Spark SQL Tutorial
- What is OWASP?
- AppDynamics Interview Questions
- Dynatrace Interview Questions
- Rest Assured Tutorial
- New Relic Interview Questions
- REST API Tutorial
- Datadog Interview Questions
- Rest API Interview Questions
- Rest Assured Interview Questions
- PTC Windchill Interview Questions
- Easiest Tech Skills To Learn
- Python SQLite Tutorial - How to Install SQLite
- Datadog Tutorial - Datadog Incident Management
- What is AppDynamics - AppDynamics Architecture
- RabbitMQ Interview Questions And Answers
- What is Dynatrace
- Datadog Vs Splunk
- Web Developer Job Description
- JP Morgan Interview Questions
- Types of Corporate Training
- Benefits of Corporate Training
- What is Corporate Restructuring?
- Blended Learning in Corporate Training
- What is Corporate Level Strategy?
- Flutter Projects and Use Cases
- How to become a Web Developer
- How To Install Keras?
- How to Install Flutter on Windows?
- How to Install Cypress on Windows?
- How to Become a Computer Scientist?
- How to Install Katalon Studio in Windows
- How to Become a Programmer
- OWASP Projects and Use Cases
- How to Install Sophos?
In the.NET framework, Specflow is a testing framework that supports BDD (Behavior-Driven Development) approaches. It's a GitHub-hosted open-source framework. It facilitates the creation of acceptance test drivers for .NET applications utilizing ATDD (Acceptance test driver development). This allows us to create scenarios in plain English using the Gherkin language, which is easily understood by everyone.
BDD concepts are supported by Spec Flow. It makes writing acceptance test drivers for .NET applications that use ATDD (Acceptance test driver development). Using the Gherkin language, we can build situations in simple English that anybody can understand. This introductory SpecFlow tutorial will cover everything you need to know about.
Basics of SpecFlow
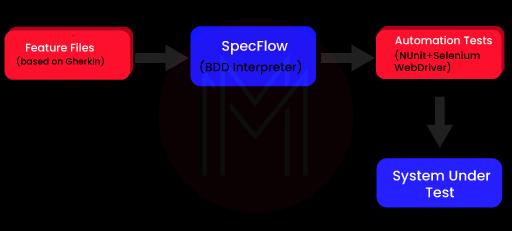
We will use SpecFlow as the BDD interpreter in this SpecFlow tutorial for utilizing SpecFlow Selenium C#. Following the parsing of the feature film, the automation code for that Scenario is invoked.
Automation Tests include NUnit framework + Selenium WebDriver
This section provides the test code for each Scenario. In the file where the automation tests are implemented, each scenario step will have a matching Step definition. Each Step definition, in turn, will have a method/code implementation to which it will be tied. Because there is a connection between the Scenario Steps -> Step Definition -> Methods, it is also known as Code Binding.
We'll utilize the NUnit test framework with the Selenium test suite for this SpecFlow lesson, which employs the Selenium WebDriver to interact with the underlying parts of a web page.
| If you want to enrich your career and become a professional in SpecFlow, then enroll in "SpecFlow Training". This course will help you to achieve excellence in this domain. |
Installation Instructions for Specflow
In this SpecFlow tutorial, we utilize Visual Studio 2019 as the IDE to demonstrate SpecFlow Selenium C# and the NUnit framework. For conducting operations on the respective web components presented on the web page, Selenium leverages the Selenium WebDriver. You should have the Selenium WebDriver installed on your workstation for local Selenium testing.
The installation of Specflow is a two-step procedure.
1) Using the Visual Studio IDE to install the essential plugins.
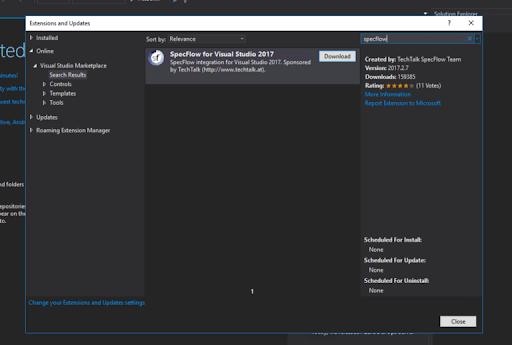
- Navigate to Tools -> Extensions & Updates to install the spec flow plugin.
- On the left side, select "Online."
- In the right panel, look for spec flow.
- Select "Specflow for Visual Studio 2017" from the search results.

2) Creating feature files and step definitions for the project.
- In Visual Studio, create a basic new project. We may make any type of project, such as a Class Library, a Console Application, or a Unit Test Project, for example. We're going to do a Class Library project for the sake of simplicity. "SpecflowBasic" is the name of the project.
- A test runner is required to run the Specflow scenarios that we will be creating. Specflow comes with a built-in runner named Specflow + Runner
- Click on Tools -> NuGet Package Manager -> Package Manager Console for installing Specflow + Runner.
- Run the command after the Package Manager Console has opened.

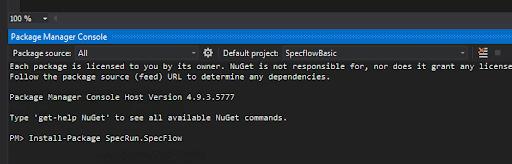
- Install-Package SpecRun.SpecFlow
- We will also require the assistance of a test framework to Assert the values. NUnit is one of the alternatives, along with MsTest and others.
- Type the command by opening Package Manager Console to install the NUnit framework to the application.
- Install-Package NUnit.
3) Make a new class called "CalculatorApplication" that will serve as our test application. This is a basic class including functions for doing addition, multiplication, division, square root, and other operations on the provided input. The CalculatorApplication class looks like this.
4) After installing the package, create two folders in the project and call them Features and Step Definitions, respectively, to store the feature files and step bindings. The reason for this folder arrangement for Feature & Step definitions will be discussed in depth.
5) Create a new Feature file in the features folder and call it CalculatorFeature.


You would see that by default, the feature file has some description in Feature and Scenario.
You would see that by default, the feature file has some description in Feature and Scenario.
Replace that with what we are going to test.
Feature: CalculatorFeatureIn order to test my applicationAs a developerI want to validate different operations of the application Scenario: Add two numbersGiven I have provided 50 and 20 as the inputsWhen I press addThen the result should be 70 Scenario: Subtract two numbersGiven I have provided 50 and 20 as the inputsWhen I press subtractThen the result should be 30 Scenario: Multiply two numbersGiven I have provided 50 and 20 as the inputsWhen I press multiplyThen the result should be 1000 Scenario: Divide two numbersGiven I have provided 50 and 20 as the inputsWhen I press divideThen the result should be 2.5 Scenario: SquareRoot of numberGiven I have provided 50 as inputWhen I press square rootThen the result should be 3.87
6) Creating Step Definitions: Specflow allows you to construct bindings/implementation for the various stages in feature file scenarios in an automated manner. By right-clicking on the feature file and selecting "Generate Step Definitions," you may accomplish this.


This phase does not ensure that all of the steps will be implemented, but it does its best to combine common steps into scenarios and reuse as many bindings as possible. However, when a scenario step needs to be created, it makes the work of avoiding boilerplate code easier.
After selecting "Generate Step Definitions," a window will appear with a list of the processor's discovered step implementations. As needed, one can pick or de-select the options.

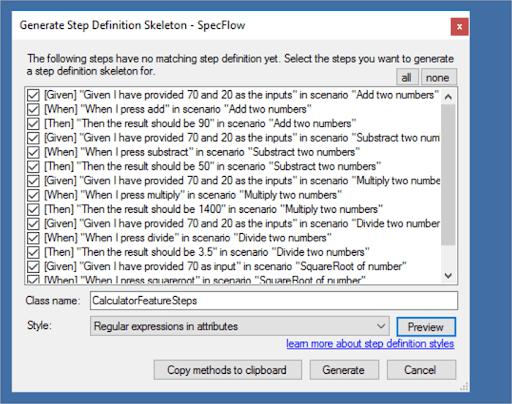
In the following sections, we'll go deeper into the Style option seen in the picture above.
Let's keep all of them chosen with default settings for the time being. When you click on the Preview button, you'll see a preview of how the implementation will appear.


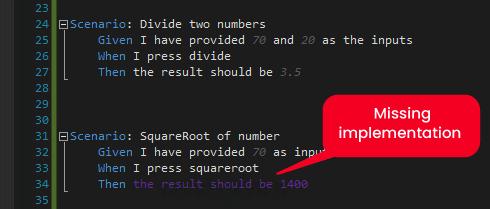
If there are still any unimplemented steps after developing Step definitions, the Feature files give a visual manner of identifying the unimplemented applications. It highlights such actions in a distinct color, making it very clear that there are specific steps that have yet to be implemented.

Note: Step definitions can also be produced manually — any .cs file with the [Binding] Attribute is a Step implementation class. The Gherkin syntax will check for a match for the specified scenario step implementation.
How to set up Specflow with Selenium in Visual Studio?
It is used with the Visual Studio IDE or via the command prompt. The most current version of SpecFlow used to create this SpecFlow instructional was 3.0.225. SpecFlow also supports MSTest v2, xUnit 2, and other essential test frameworks in addition to NUnit. We recommend reading the NUnit test automation guide for more details on the framework.
Selenium is a free (open-source) automation framework for web applications that work with many browsers and operating systems; further information is available here. It's typically used in conjunction with SpecFlow to assess the user interface of your web project.

In Visual Studio, set up SpecFlow using Selenium.
In this SpecFlow tutorial, we utilize Visual Studio 2019 as the IDE to demonstrate SpecFlow Selenium C# and the NUnit framework.
For conducting operations on the respective web components presented on the web page, Selenium leverages the Selenium WebDriver. You should have the Selenium WebDriver installed on your workstation for local Selenium testing. For common browsers such as Opera, Firefox, Chrome, Internet Explorer, Microsoft Edge, and others, Selenium WebDriver is available.
Note: If you're still using previous versions of Visual Studio, such as Visual Studio 2015/Visual Studio 2017, the installation process for SpecFlow Selenium C# may differ somewhat.
1. In Visual Studio, install the required plugins.
You must first install SpecFlow integration for Visual Studio 2019 before beginning the SpecFlow lesson.
You have two options for installing this plugin:
- The SpecFlow integration for VS 2019 is available for download through the Visual Studio Marketplace.
- You may install it by double-clicking on the downloaded.
- vsix file once it has been downloaded.
- You must quit the Visual Studio IDE before proceeding with the installation.
Manage Extensions — The Manage Extensions option in the IDE is the second way to add SpecFlow integration for Visual Studio 2019.
Plugin Installation instructions
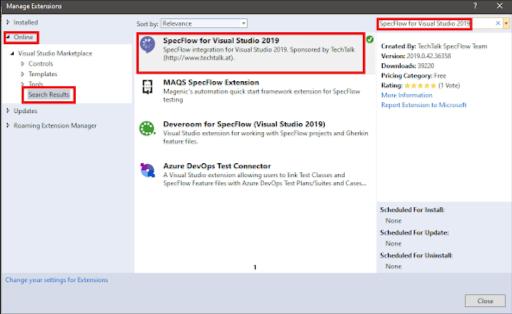
- To manage extensions, go to Extensions -> Manage Extensions.
- On the left side, select "Online."
- In the Online Extensions, look for "SpecFlow for Visual Studio 2019" and install it.

2. SpecFlow and Other Required Packages Installation
We'll develop a "Class Library" project to demonstrate how to use SpecFlow with the NUnit framework.
4.5.2 of the Net Framework.


We install SpecFlow, SpecFlow.NUnit, and SpecFlow.Tools after the project are set up. MsBuild.Generation is a collection of MSBuild. Generation packages. We need to install the SpecFlow.NUnit package since we're utilizing the NUnit test framework with SpecFlow Selenium C#. SpecFlow.Tools. In SpecFlow 3, the MsBuild.A generation package is required to build code-behind-the-files.


These packages can be downloaded using two methods
- The 'Package Manager Console - PM Commands' contains PM (Package Manager) commands.
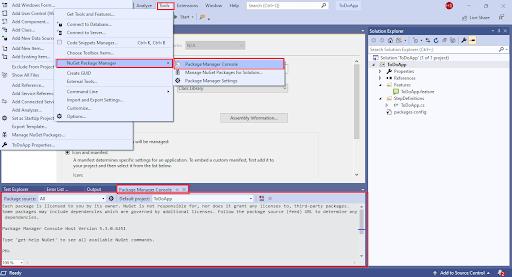
- Click on 'Tools' -> 'NuGet Package Manager' -> 'Package Manager Console' for running the commands from the PM console.

Execution of the commands on the Package Manager (PM) Console could be
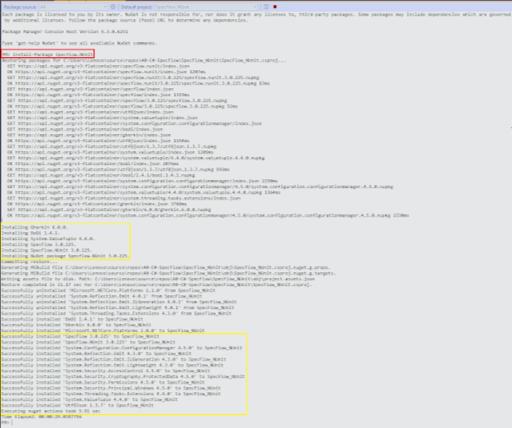
- Install-Package Specflow
- Install-Package Specflow.NUnit
- Install-Package SpecFlow.Tools.MsBuild.Generation
- Install-Package NUnit3TestAdapter
The installation screenshots are shown below:

By executing the command Get-package on the Packet Manager Console, one can check whether the packages are installed or not. Shown below is the command execution output:
| PM> Get-Package ID | Versions |
| SpecFlow | {3.0.225} |
| SpecFlow.NUnit | {3.0.225} |
| SpecFlow.Tools.MsBuild.Generation | {3.0.225} |
| Install-Package NUnit3TestAdapter | {3.15.1} |
NuGet Package Manager – for opening the NuGet Package Manager, go to ‘Tools’ -> ‘NuGet Package Manager’ -> ‘Manage NuGet Packages for Solution


Search for the SpecFlow package in the Browse area and install it. Next, look for SpecFlow.NUnit package and install it. The current stable version of the SpecFlow, SpecFlow.NUnit, and SpecFlow.Tools.MsBuild.Generation packages were 3.0.225 at the time of creating this SpecFlow lesson.
NUnit3TestAdapter was version 3.15.1 at the time.

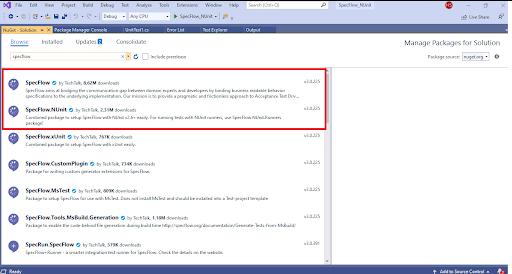
SpecFlow and SpecFlow.NUnit is the base package required for any type of C# project on SpecFlow and NUnit test framework.
Data-Driven Testing
Data-Driven Testing is a software testing method in which test data is stored in a table or spreadsheet format. Data-driven Testing allows testers to write a single test script that runs tests for all test data from a database and expects the test results to be provided in the same table. It's also referred to as Table-Driven Testing or parameterized testing.
What Are the Benefits of Data-Driven Testing?
- Data-Driven Testing is essential since testers typically have many data sets for a single test.
- It might take a long time to create various tests for each data collection.
- Data-driven testing allows for the separation of data from test scripts, and the use of the same test scripts for numerous permutations of input test data, resulting in more efficient test results.
The Table in SpecFlow
Tables in Specflow are quite useful and may be utilized in various ways. Tables may also be used to manage enormous amounts of information. They're strong but not intuitive because you have to deal with dictionary objects, simple class objects, and collections.
Tables are part of the SpecFlow Assist Helpers package. We'll need to add TechTalk.SpecFlow.Assist the namespace at the top of your code to utilize these aids.
Tricks and Tips
The [Binding] characteristic is the essential component.
The [Binding] attribute is adequate to guarantee the runner finds our CommonStepDefinitions class when it initializes, so we don't need to give it a specific name.
- We may set up the ScenarioContext in the function Object() { [native code] }, just like any other class. For example, we can use SpecFlow Dependency Injection to get an instance of the scenario context.
- This method will run before every scenario in the project, as indicated by the [BeforeScenario] property.
- This method will be called after each scenario in the project, as indicated by the [AfterScenario] property.
- An example of a [Given] characteristic may be applied to any project situation. ** \s* It's possible that this is what you're looking for, but it's also possible that it isn't. Limiting the scope using [Scope] properties is possible; however, utilizing them in the CommonStepDefinitions class would be counter-intuitive. Reverting to [Scope] is also considered an anti-pattern;
This may be what you're looking for, but it's also possible that it isn't. Limiting the scope using [Scope] properties is possible; however, utilizing them in the CommonStepDefinitions class would be counter-intuitive. Reverting to [Scope] is also considered an anti-pattern;
Any step definition — Given, When, Then — may be added to the CommonStepDefinitions class; for example, the example above contains a common step that I've included in almost every SpecFlow project.
The usage of attributes like [BeforeScenario] in the CommonStepDefinitions class should be carefully considered before implementation (and much more so if the [BeforeFeature] / [BeforeTestRun] details are used), but they may be pretty beneficial.
Multiple Characteristics: Another option to share steps is to add multiple bindings to the function you wish to share, either within the CommonStepDefinitions class (or any specialized feature file for that matter):
| Related Article: SpecFlow Interview Questions |
What is Behavior-Driven Development (BDD)
TDD's cousin, Behavior Driven Development (BDD), is a kind of extension of TDD (Test Driven Development).TDD is a programming technique in which programmers only write code after the automated tests have failed. BDD is all about having talks and discussions across the project's many teams so that everyone understands the feature needs. Once development begins, they can collaborate toward a unified objective of identifying user stories.
The heart and soul of the BDD method is 'conversation,' and anything beyond that is optional. The main distinction between BDD and ATDD (Acceptance Test Driven Development) is that the focus is now on "behavior" rather than "test." In this SpecFlow lesson, we'll try to comprehend it better. Development from the Outside-In,
The acceptance tests in BDD, are created from the outside, focusing on business behavior rather than technical implementation. The benefit of this kind of development is that the language employed is common in nature and can be easily comprehended by both technical and non-technical persons. The outside-in product integrates the best of both worlds, TDD and ATDD, into a single methodology.
The 'User Stories' are at the heart of the BDD process, and developers must first compose them. These user stories document the functionality, trigger acceptance tests, and automate them. As a result, BDD is ideal for Acceptance Tests.
Scenarios are the word used in BDD to describe examples. A scenario describes how a feature should operate when various types/values of input parameters are used. Scenarios are written in the Gherkin format. Gherkin is a domain-specific language that allows you to create scenarios that explain business behavior without worrying about technical details.
Benefits of BDD
Because BDD is a crucial component of this SpecFlow lesson; one should know its benefits. The following are the benefits of utilizing BDD:
- BDD is a communication and cooperation tool since it connects critical stakeholders, such as product owners, developers, and testers. This guarantees that they are all on the same page regarding the project's requirements and expectations.
- Tests are created in a simple English-like manner that does not necessitate any programming or coding knowledge. This allows members of various teams, such as business analysts, developers, and product managers, to actively engage in the test generation and update process.
- Compared to TDD tests, BDD tests have a longer shelf life in most cases since the main focus is on business behavior rather than test implementation. In such cases, the Outside-In method is quite helpful.
- BDD may generate reusable, modular, and maintainable automated tests. This is because features and scenarios are simple to comprehend, and anybody, such as an analyst, technical manager, developer, or tester, may change the flow sequence or expand the BDD test.
BDD Characteristics
The following are significant characteristics of BDD:
It uses an example or Scenario to characterize the system or feature being created. For example, if you're making a basic Calculator App, the many behaviors include addition, multiplication, division, and so on.
As a result of BDD, all stakeholders will first gather to decide on the application's behavior. Such as Addition, and will have situations similar to those described below.
I'm given two numbers to work with: 30 and 50. When I add these two integers together, I get
Then I should get an output of 80.
If you look at the illustration above, it's a scenario written in plain English that everyone can understand and clarifies the needs for a product (as per the acceptance criteria). As a result, the first step is to identify these needs.
- Now that the QA has a collection of these situations, they create tests against them, which will fail because the feature has not yet been implemented.
- The developer now develops feature code and runs these tests once more.
- The testing may be successful or unsuccessful. If they don't work, refactor the code and try again.
- After the code is reworking, all scenarios and tests should pass.
As a result, BDD takes the TDD technique to the next level by incorporating standard, readily understood specifications in scenarios. They are also the feature documentation in and of themselves.
Cucumber/JBehave for Java, Lettuce for Python, Jasmine for Javascript, and Specflow for .NET are tools for developing tests in the BDD methodology.

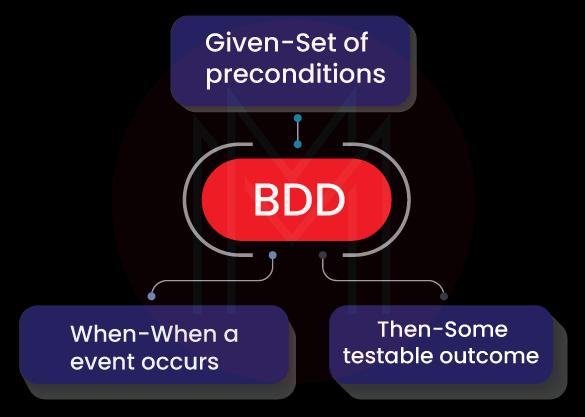
Most of us know the 3 A's, which stand for Arrange, Act, and Assert in unit testing. In the BDD universe, they are replaced by Now, Given, When, and Then.
Assume you're creating a scenario for validating a product added to an e-commerce application's shopping cart that requires you to be logged in as a prerequisite.
The following is an example of a specification:
- Scenario: Products are added to a logged-in customer's basket.
- Given On my application, I have a logged-in customer.
- When I add two of a product's amount to my shopping cart
- The shopping cart should then be updated to include the correct product and quantity.
The Keywords Given, When, & Then
- Given: This describes a collection of prerequisites for the situation under consideration. A logged-in client, for example, is a prerequisite for the case in the model. In a unit test, the step implementation will need to check a logged-in customer, similar to the Arrange example.
- When: This is used to describe an action or a phase in the execution of an activity. The consumer in this example is attempting to add a product to his shopping basket. As a result, the simulation code to add a product to the cart will be handled by implementing this step. This is analogous to the Act step in Unit tests.
- Then: This is used to define the Scenario's outcome and, more importantly, where the validations should be placed. In the area of unit testing, it's comparable to the Assert phase. In this case, the step implementation will verify that the product was added and the amount is the same as the buyer specified.
The Feature File
The feature file is simply a collection of different situations for the program being developed or tested. It may also be regarded as multiple application modules that can be logically isolated from one another.
What's the difference between SpecFlow and Cucumber?
Cucumber is a program that reads plain text Gherkin syntax specification files and executes those specs using ruby files. Specflow is a cucumber. Net 'port' that uses Gherkin syntax files but connects them to. Net code.
| Related Article: SpecFlow vs Cucumber |
Code Files
The code files used in the application are shown below:
CalculatorFeatureSteps.cs
using System;
using TechTalk.SpecFlow;
using NUnit;
using NUnit.Framework;
 namespace SpecflowBasic.StepDefinitions
{
[Binding]
public class CalculatorFeatureSteps
{
// instantiating application instance
CalculatorApplication app = new CalculatorApplication();
 // variables to hold input values and the intermediate result
int input1, input2;
double output;
 [Given(@"I have provided (.*) and (.*) as the inputs")]
public void GivenIHaveProvidedAndAsTheInputs(int p0, int p1)
{
input1 = p0;
input2 = p1;
}
 [Given(@"I have provided (.*) as input")]
public void GivenIHaveProvidedAsInput(int p0)
{
input1 = p0;
}
 [When(@"I press add")]
public void WhenIPressAdd()
{
output = app.add(input1, input2);
}
 [When(@"I press substract")]
public void WhenIPressSubstract()
{
output = app.subsctract(input1, input2);
}
 [When(@"I press multiply")]
public void WhenIPressMultiply()
{
output = app.multiply(input1, input2);
}
 [When(@"I press divide")]
public void WhenIPressDivide()
{
output = app.divide(input1, input2);
}
 [When(@"I press squareroot")]
public void WhenIPressSquareroot()
{
output = app.squareRoot(input1);
}
 [Then(@"the result should be (.*)")]
public void ThenTheResultShouldBe(double p0)
{
Assert.AreEqual(p0, output);
}
 }
}
CalculatorApplication.cs
using System;
using System.Collections.Generic;
using System.Linq;
using System.Text;
using System.Threading.Tasks;
 namespace SpecflowBasic
{
class CalculatorApplication
{
public int add(int input1, int input2)
{
return input1 + input2;
}
 public int subsctract(int input1, int input2)
{
return input1 - input2;
}
 public int multiply(int input1, int input2)
{
return input1 * input2;
}
 public double divide(double input1, double input2)
{
return input2 != 0 ? Math.Round(input1 / input2, 2) : 0;
}
 public double squareRoot(int input1)
{
return input1 != 0 ? Math.Round(Math.Sqrt(input1), 2) : 0;
}
 }
}
packages.config
<?xml version="1.0" encoding="utf-8"?>
<packages>
<package id="Newtonsoft.Json" version="10.0.3" targetFramework="net461" />
<package id="NUnit" version="3.11.0" targetFramework="net461" />
<package id="SpecFlow" version="2.4.0" targetFramework="net461" />
<package id="SpecRun.Runner" version="1.8.5" targetFramework="net461" />
<package id="SpecRun.SpecFlow" version="1.8.5" targetFramework="net461" />
<package id="SpecRun.SpecFlow.2-4-0" version="1.8.5" targetFramework="net461" />
<package id="System.ValueTuple" version="4.3.0" targetFramework="net461" />
</packages>
Conclusion
For the.Net framework, SpecFlow is an open-source version of Cucumber. BDD tests may be produced using the Gherkin language and performed using the NUnit test framework utilizing SpecFlow with Selenium C#. It's also compatible with MSTest, xUnit, and other test frameworks. Features and Scenarios are stored in feature files, which are essential text files. Feature files do not require any technical knowledge because Gherkin is utilized in this SpecFlow course.
Automation testing using Selenium Grid has scalability concerns; hence remote Selenium Grid is advised for better test coverage. Existing tests may be converted to a more scalable Remote Selenium Grid by making minor modifications to the existing local Selenium WebDriver implementation. I hope this SpecFlow lesson helped you understand how to use SpecFlow with Selenium and C#.

.svg&w=750&q=75)
Stay updated with our newsletter, packed with Tutorials, Interview Questions, How-to's, Tips & Tricks, Latest Trends & Updates, and more ➤ Straight to your inbox!
| Name | Dates | |
|---|---|---|
| SpecFlow Training | May 04 to May 19 | View Details |
| SpecFlow Training | May 07 to May 22 | View Details |
| SpecFlow Training | May 11 to May 26 | View Details |
| SpecFlow Training | May 14 to May 29 | View Details |


Usha Sri Mendi is a Senior Content writer with more than three years of experience in writing for Mindmajix on various IT platforms such as Tableau, Linux, and Cloud Computing. She spends her precious time on researching various technologies, and startups. Reach out to her via LinkedIn and Twitter.


Copyright © 2013 - 2024 MindMajix Technologies