- Blue Prism vs Selenium
- Career Scope in Selenium-The Future of Testing
- Essene of Getting Certified in Selenium
- Getting Started With Selenium
- Top 10 Reasons Why You Should Learn Selenium
- Selenium Interview Questions
- Selenium Release History Infographics
- Tosca vs Selenium
- Automation Selenium RC using TestNG - Selenium
- Commands in Context Menu - Selenium
- Debugging - SELENIUM
- Different Flavours of Selenium
- Finding Elements by XPATH and Using CSS - SELENIUM
- How to Create test suites in Selenium
- How to Setup and Configure Selenium Webdriver with Eclipse
- How to use WebDriver Backed Selenium
- How to work on pages with AJAX in selenium?
- How to Install Debugbar Tool - SELENIUM
- How to Install IE Developer Tool - SELENIUM
- Installation of Selenium IDE
- Introduction to Selenium
- Introduction to Selenium 2.0 Webdriver-SELENIUM
- Java Tutorial for Selenium WebDriver
- How to Locate & Find Elements - SELENIUM
- Locators & How to Install Firebug - SELENIUM
- Running Test Cases - SELENIUM
- Sample Programs in Remote Control for Selenium
- Selenium Commands – “Selenese”
- Selenium Commands with Examples - SELENIUM
- Selenium WebDriver Commands List
- Synchronisation commands - SELENIUM
- What Is Selenium RC : A Step-by-Step Guide for 2024
- XPATH Usage in Selenium
- Skills That Will Make You a Champ Software Tester with Latest Trends
- Tricentis Tosca Automation Tool (2025)
- Tosca Interview Questions for 2025
- Using Selenium to Interact With Elements on a Web Page
- What is Selenium? - Selenium Automation Testing Introduction
- What is selenium IDE
- Xpath Interview Questions
- Selenium WebDriver Interview Questions
- Selenium With Python Interview Questions
- Selenium Projects and Use Cases
- How to Install and Configure Selenium WebDriver?
Selenium is the primary thing that strikes to mind when we plan to automate web application testing. Here, in this Selenium tutorial blog, we’ll cover all Selenium concepts from basic to advanced in detail with an easy-to-understand approach. This tutorial is specifically designed for beginners with little or no prior knowledge of Selenium.
Before getting started, let’s see the list of topics covered in this blog, to get started with Selenium.
Selenium Tutorial - Table of Contents
In this Selenium tutorial, we will start from the basics of Selenium and learn all the major Selenium concepts that a Selenium professional must be aware of. Now, let’s have a look at the components of this tutorial.
- What is Selenium?
- Benefits
- Installation
- Components
- Architecture
- Locators
- What is TestNG?
- Selenium in the Market
- Limitations
- How to run a Selenium Test Script?
What is Selenium?
Selenium is one of the most popular Open Source Web UI (User Interface) automation testing suites, developed by Jason Huggins in 2004 as an internal tool at Thought Works. This automated testing framework validates web applications across multiple browsers and platforms. Various programming languages like Java, Python, PHP, Ruby, C#, etc., are used for creating Selenium Test Scripts and deployed on platforms like Windows, Linux, or Mac.
Selenium only tests web applications; we can neither test any mobile application or desktop application using Selenium. Also, note that Mozilla Firefox is Selenium WebDriver’s default browser. This automation testing framework integrates with other automation test tools such as Jenkins, Docker, Maven, etc., for achieving continuous testing. Also, it integrates with JUnit and TestNG to manage test cases and generate reports.
| If you want to enrich your career and become a professional in Selenium, then enroll in "Selenium Training" - This course will help you to achieve excellence in this domain. |
Benefits of Selenium WebDriver
Following are the reasons that made Selenium such a widely adopted tool:
- Cross-browser compatibility - Supports a wide range of browsers like Chrome, Safari, Internet Explorer, Opera, and so on.
- Reduces test execution time - Since Selenium supports parallel test execution, dramatically reduces the time and improves the efficiency of tests.
- Few resources needed - Compared to other test automation tools like UFT, RFT, etc., Selenium needs fewer resources.
- Employs a rich language for tests - Selenium supports DSL, which includes over 200 commands that are easy to learn and test the web applications.
- Flexible language - Can be integrated with frameworks like Maven and Ant for source code compilation.
- Multiple OS support - Supports execution of various types of tests through various browsers like Safari, Chrome, Firefox, etc.
- Visibility in End-to-End Testing: Selenium offers excellent visibility for end-to-end application testing.

Selenium Installation
Selenium installation is a 3 step process.
-
Install Java 8 or higher version
-
Install Eclipse IDE
-
Install and Configure Selenium WebDriver.
1. Install Java: Follow the below steps to complete Java installation.
- Step 1: Download and install the Java Software Development Kit (JDK).
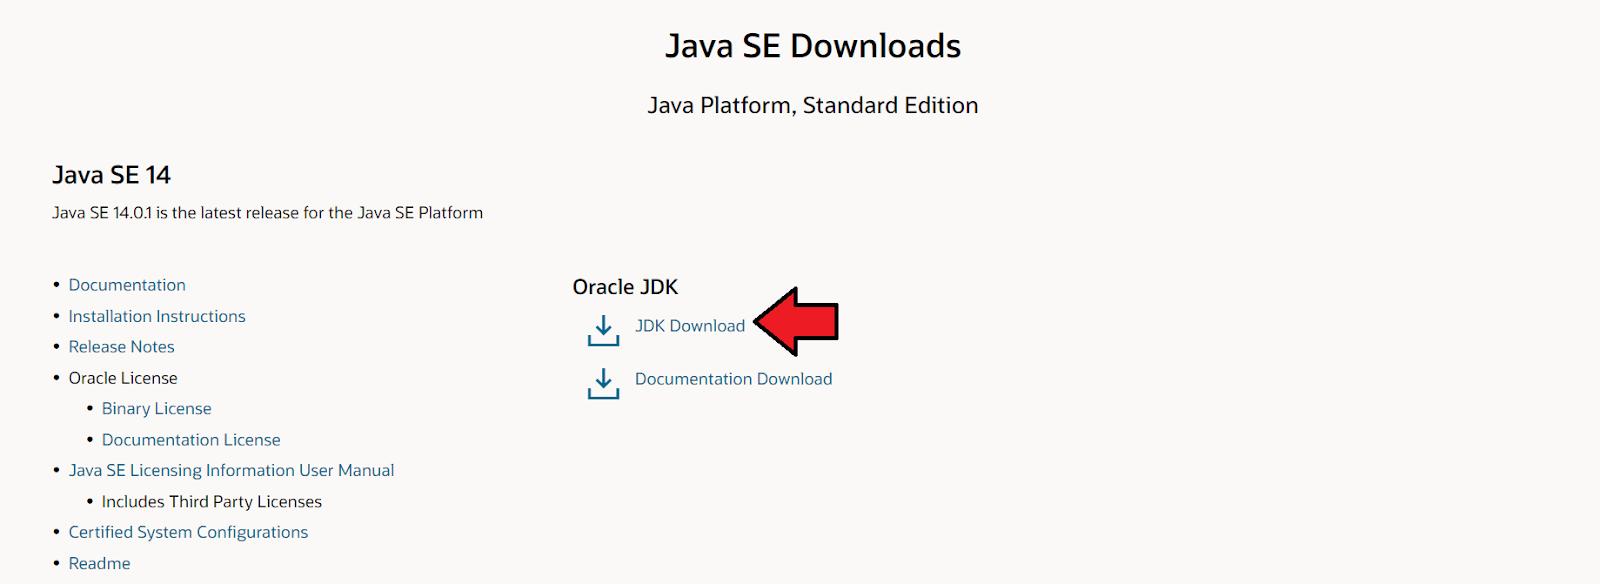
- Step 2: On the next page, click the download link against your matching system configuration and accept the license agreement.
- Step 3: Once the download is finished, follow the instructions provided by the installation wizard. To set the PATH variable on Microsoft Windows:
-
- Select Control Panel and then System.
- Click Advanced and then Environment Variables.
- Add the location of the bin folder of the JDK installation to the PATH variable in System Variables.
- Step 4: To cross-check the installation, run the run following command in cmd – java -version. It'll display the installed version of Java in your System.
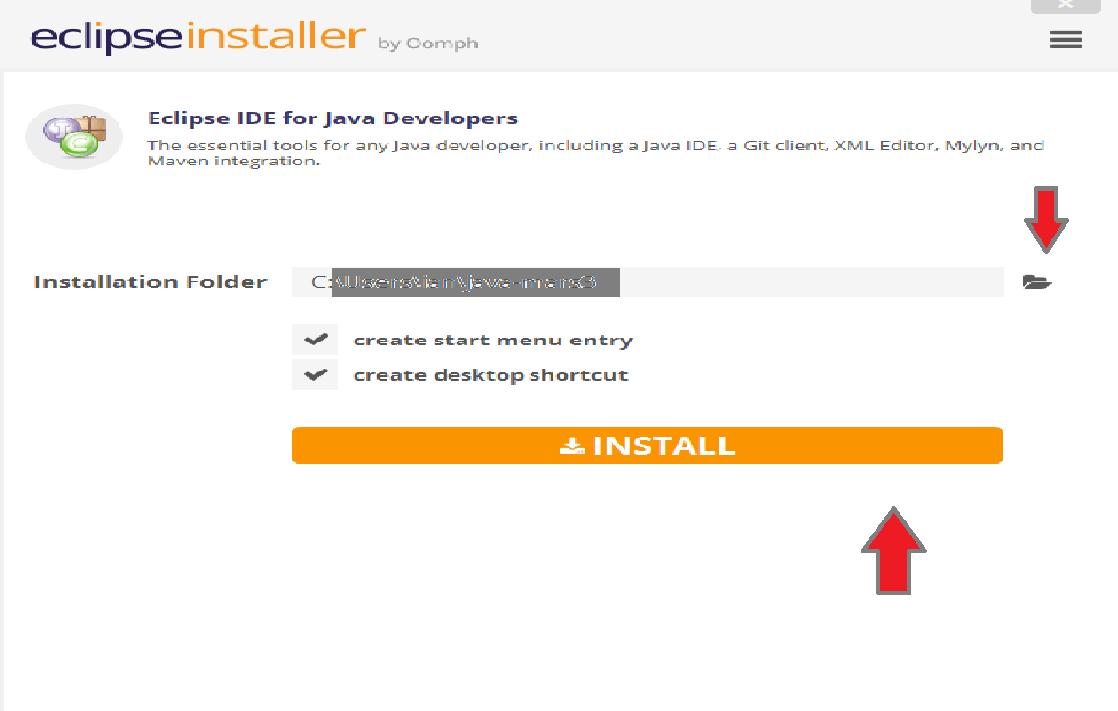
2. Install Eclipse: Follow the below steps to install and configure Eclipse.
- Step 1: Download the Eclipse Installer
Download Eclipse Installer from http://www.eclipse.org/downloads
- Step 2: It will redirect you to the "Download Packages" section. Scroll down through the webpage and click on "Eclipse IDE for Java Developers". Select the download link depending on your system.
- Step 3: Select your installation folder
Specify the folder where you want Eclipse to get installed. The default folder will be in your User directory. Select the 'Install' button to begin the installation.
-
Step 4: After installation, click on launch.
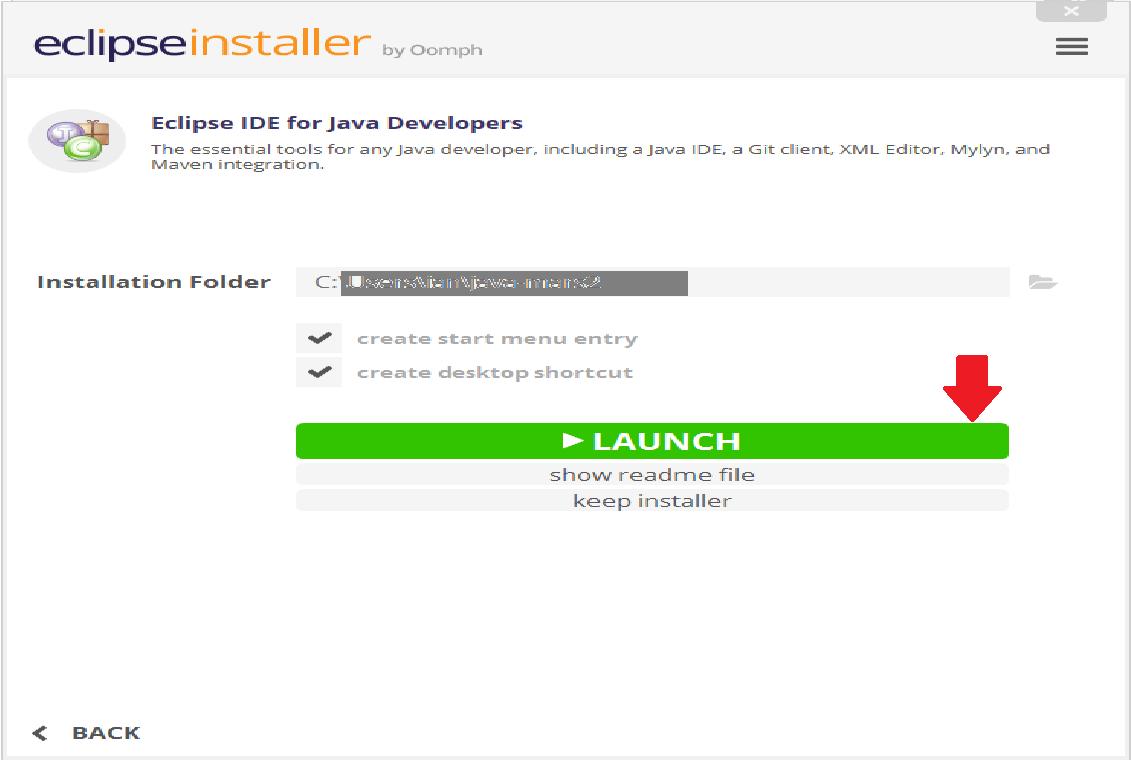
Now, this will start eclipse IDE for you.
3) Install and configure Selenium WebDriver
- Step 1: Navigate to https://www.selenium.dev/downloads/ and download the Selenium Java Client Driver.
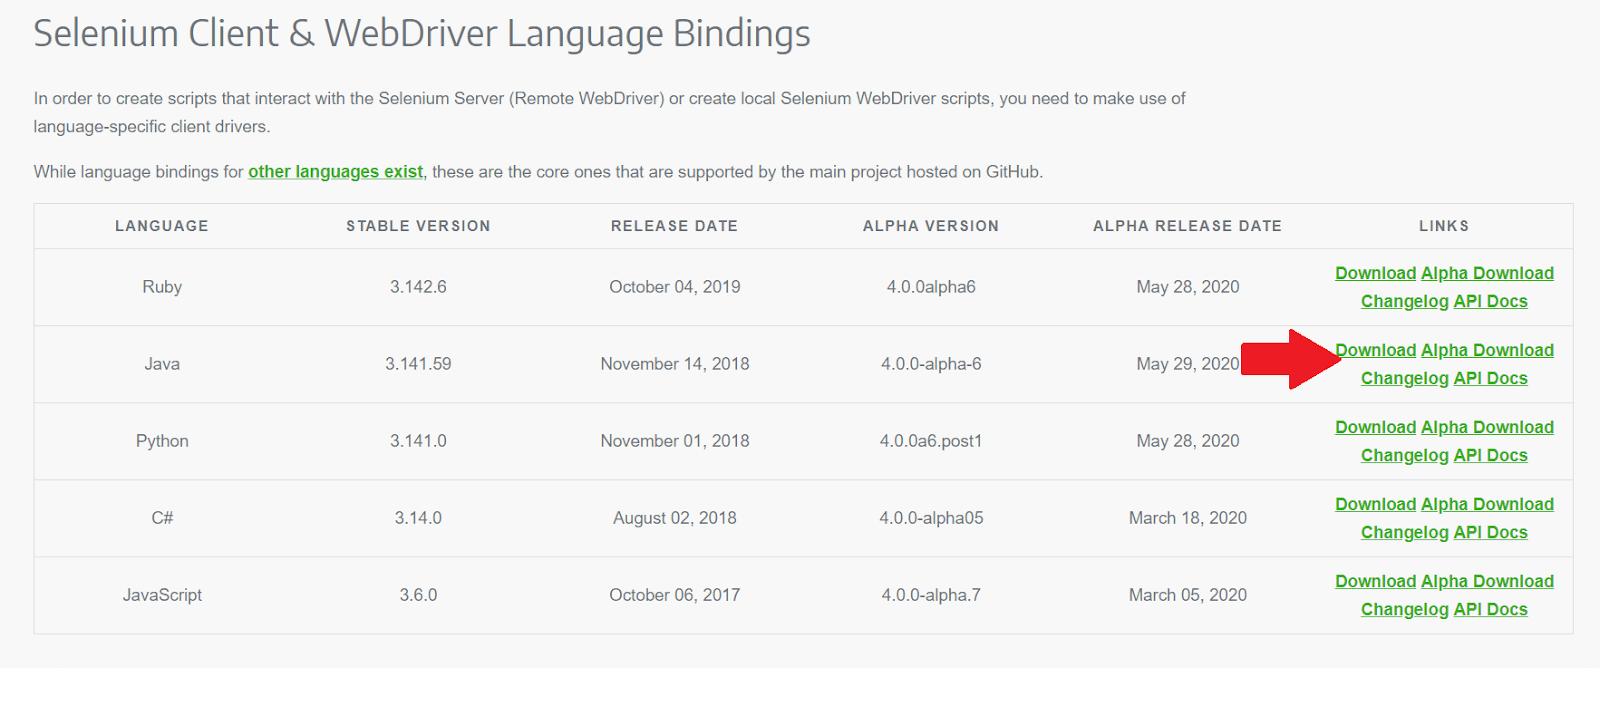
- Step 2: The download will be in zipped format, namely "selenium-3.14.0.zip". Extract the contents to C drive as "C:selenium-3.14.0".
- Step 3: Configure Eclipse IDE with WebDriver.
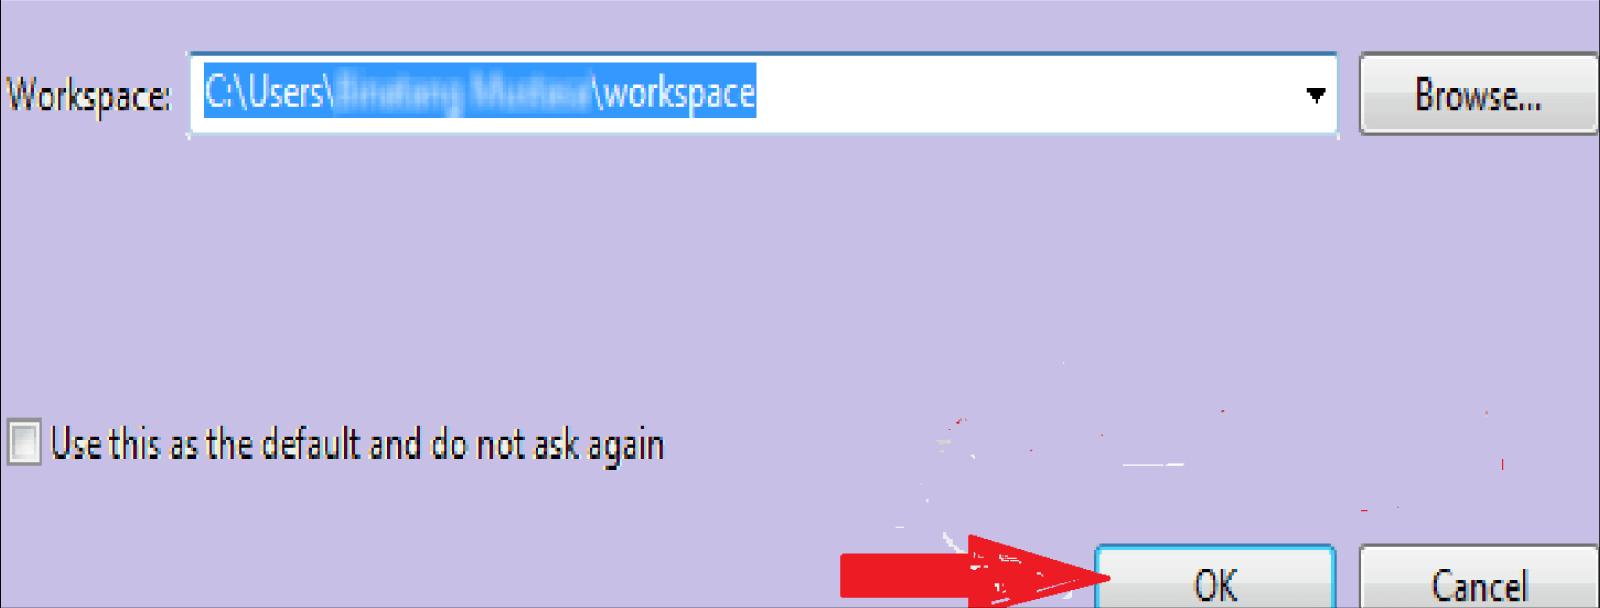
Launch the "eclipse.exe" file inside the "eclipse" folder that we extracted while installing Eclipse. If you installed Eclipse correctly, the executable should locate on C:eclipseeclipse.exe. Eclipse stores your projects in a folder called a workspace.
Just accept the default location when asked to select a workspace.
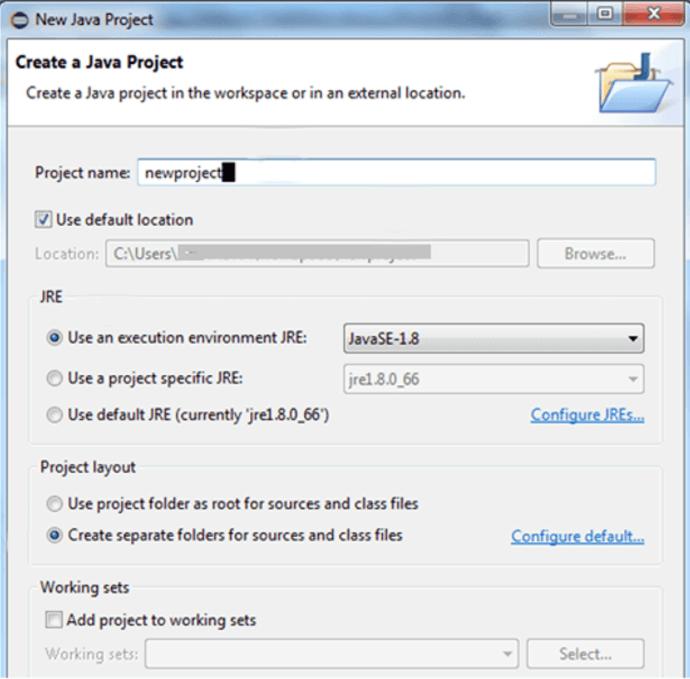
- Step 4: Create a new project, as shown below:
- Step 5: Next, a pop window will open, enter the details of Project Name, Location to save the project, Select an execution JRE, Select layout project option, and click on the Finish button.
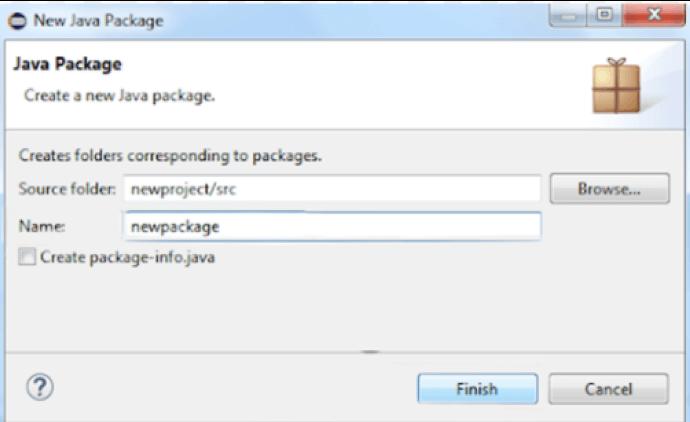
- Step 6: Next, Right-click on the newly created project and choose New > Package, and name that package as "new package". Finally, click on the finish but
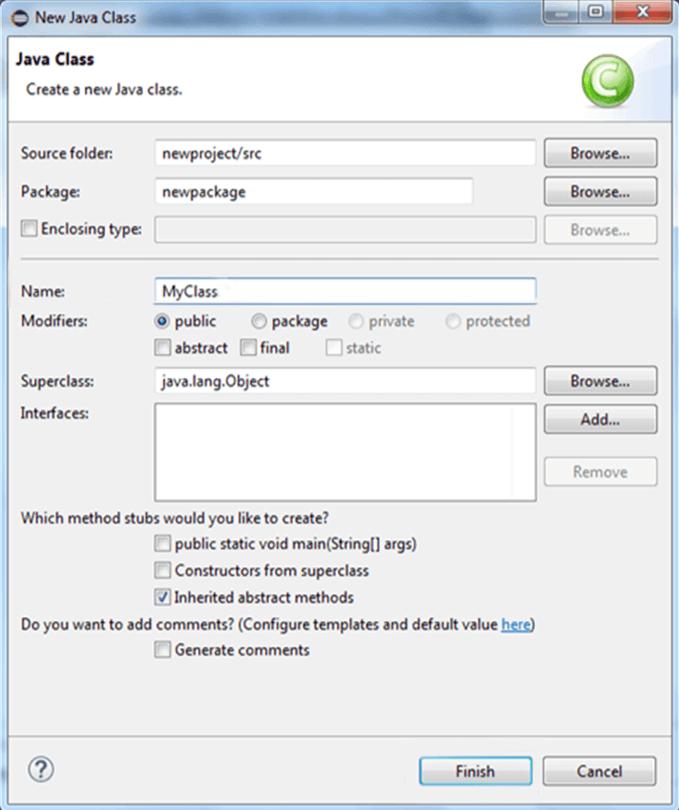
- Step 7: Create a class file and give a public access modifier, by creating a new Java class under the new package by just right-clicking on it and then selecting- New > Class, and then name it as "MyClass".
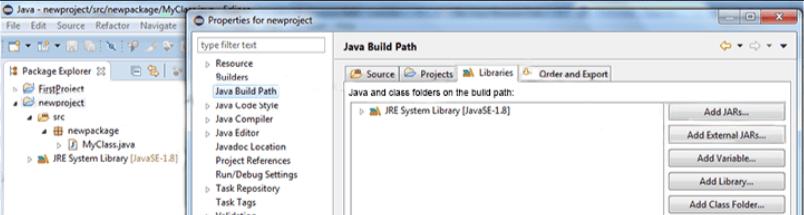
- Step 8: Next, click on your project -> Build Path -> Configure Build Path and add external JARs as shown in the figure.
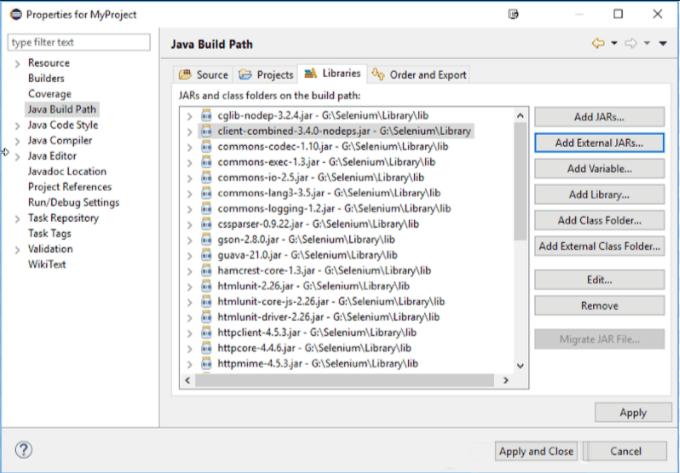
- Step 9: After selecting jar files, click on the OK button. Select all files inside and outside the lib folder. Once done, click the "Apply and Close" button.
- Step 10: Finally, click OK and import Selenium libraries into our project.
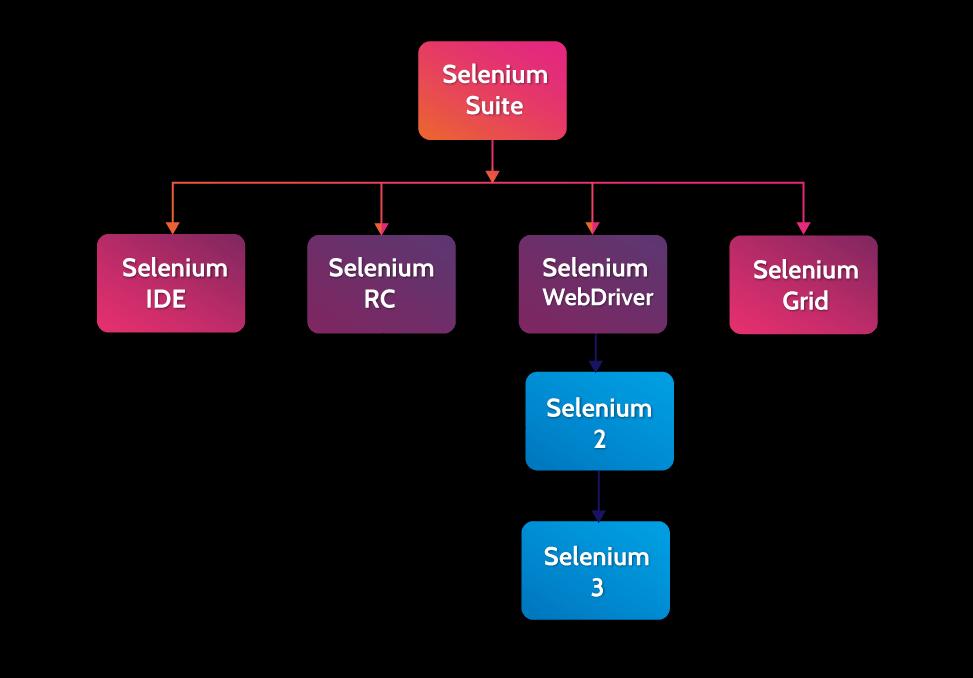
Selenium Components
Selenium is not just a single tool but a suite of software, each caters to a specific role in aiding the development of web application test automation. Selenium is composed of various components like:
- Selenium IDE
- Selenium client API
- Selenium WebDriver
- Selenium Remote Control
- Selenium Grid.
The below-mentioned diagram gives you a fair understanding of selenium components and test automation tools.
[ Check out Selenium Commands with Examples ]
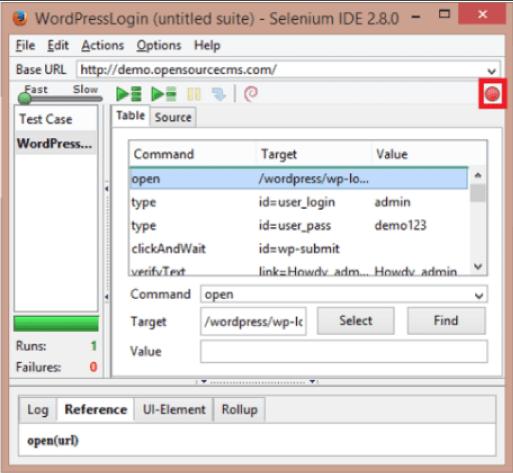
1. Selenium IDE (Integrated Development Environment)
Selenium IDE is a tool that provides a complete integrated development environment for selenium tests. Shinya Kastani from Japan created it in 2006 and donated it to Apache's Selenium project. It's easy to use Firefox Add-On and Chrome Extension for faster execution of test cases and also allows you to record, edit, and debug functional tests.
Using the record-and-play feature automates the browser by giving auto-completion support and moving commands faster around. A particular test scripting language called Selenese records the scripts in Selenium. It comes up with commands to carry out actions in a web browser and restore data from the resulting pages. The benefit of using Selenium IDE is that tests recorded within the plugin can be used in programming languages like Python, Ruby, Java, etc. through export options.
To create test scripts using Selenium IDE, we need to use Selenium WebDriver or the Selenium RC.
Check out the below-mentioned image for Firefox's IDE plugin.
[ Related Article: Installation of Selenium IDE ]
2. Selenium client API
Other than Selenese, Tests in Selenium supports various programming languages and communicates with Selenium through calling methods in the Selenium Client API. Presently, Selenium supports client APIs for C#, Java, Ruby, Python, R, and JavaScript.
3. Selenium Remote Control (RC)
Selenium Remote Control (RC) is also referred to as Selenium Core for a long time before WebDriver merge brought up Selenium 2. To overcome the same-origin policy created by Selenium core, Paul Hammant, a ThoughtWorks engineer introduced Selenium RC.
Selenium Remote Control involves an HTTP proxy server that "tricks" the browser into believing that both the web application and selenium core tested from the same domain. Therefore, making it has a two-component tool.
- Selenium RC Server
- Selenium RC Client – Library containing your programming language code.
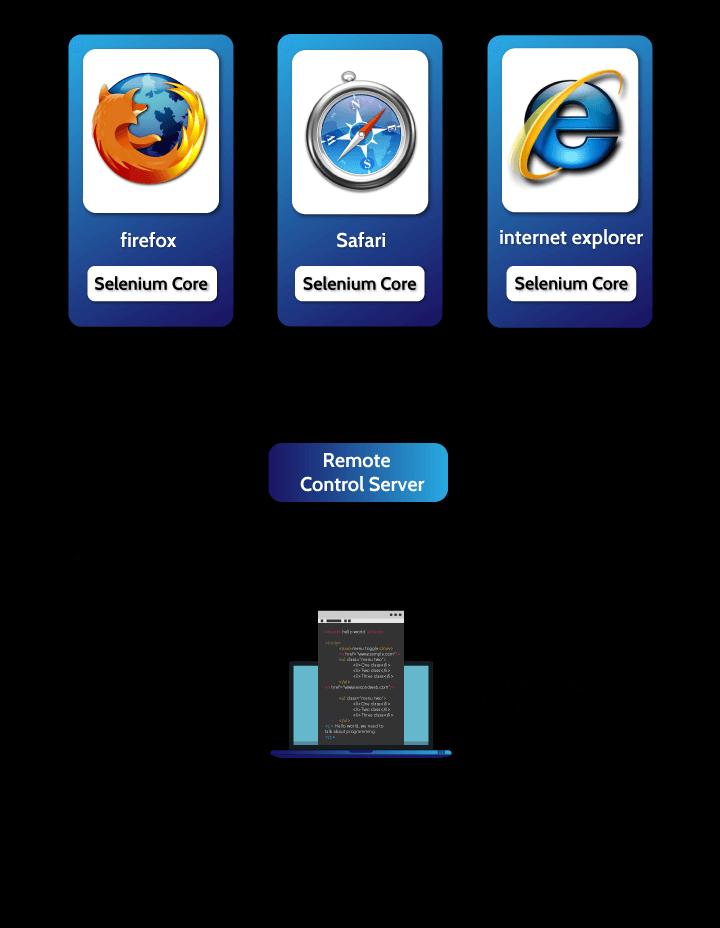
The above diagram depicts the brief architecture of Selenium RC.
Selenium RC manages various programming languages like PHP, Java, C#, Perl, Ruby, Python, etc. It was depreciated and moved to the legacy package from Selenium v3 onwards.
The drawback with Selenium RC is that when we try to execute test cases, we need to start the Selenium Standalone server manually and Selenium WebDriver overcomes the problem.
4. Selenium WebDriver
A browser automation framework that accepts commands and sends them to a browser is called a Selenium WebDriver. It communicates and controls the browser directly and executes through a browser-specific driver. WebDriver is an upgrade to RC as it runs much faster and makes direct calls to the Browser. The below diagram depicts how the selenium web driver works.
Selenium WebDriver supports the following:
- Operating System – Mac OS, Windows, Solaris, Linux.
- Browsers – Mozilla Firefox, Internet Explorer, Google Chrome 12.0.712.0 and above, Opera 11.5 and above, Safari, Android, HtmlUnit 2.9, and iOS.
- Programming languages - Java, C#, PHP, Python, Perl, Ruby, and Javascript.
Simon Stewart founded selenium WebDriver in 2006. It’s the first cross-platform that controls the Browser from the OS level. In contrast to Selenium IDE, WebDriver allows programming interfaces for creating and executing test cases. The web elements written under the test cases will enable you to identify the web elements on the web pages and perform actions on those elements.
[Related Article: RPA vs Selenium]
Selenium WebDriver Architecture
Selenium WebDriver API provides communication between both browsers and programming languages. The below image represents the architectural representation of Selenium Webdriver.
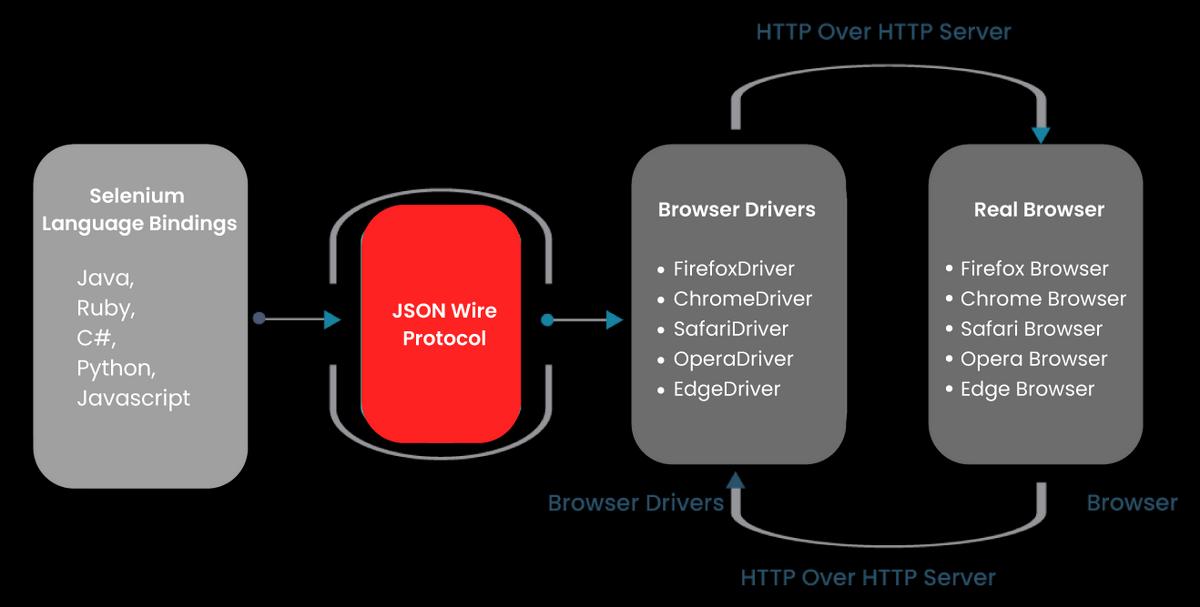
- Selenium Language Bindings
- JSON Wire Protocol
- Browser Drivers
- Real Browsers.
Let's understand each of them in detail:
- Selenium Client Libraries/Language Bindings: Multiple libraries like Java, Python, Ruby, etc., are supported by Selenium. The client libraries/language bindings are built to support various languages. If you want to gain more knowledge about libraries, refer to the official site of SeleniumSelenium.
- JSON Wire Protocol: JavaScript Object Notation (JSON) transfers data between a server and a client on the web. JSON supports data structures like array and object. For REST web services, JSON is an industry-standard for transferring information between HTTP servers.
- Browser Drivers: Selenium uses browsers to build a secure relationship without exhibiting the internal logic of the Browser's functionality. If the web driver receives any command, it gets executed on the particular browser and the response will return in an HTTP response.
- Browsers: Selenium supports various browsers like Internet Explorer, Mozilla Firefox, Google Chrome, Safari, and more.
Selenium Locators
Locating elements in selenium WebDriver is done through Selenium Locators by findElement() and findElements() methods.
- findElement() - This returns a WebElement object based on a defined search criteria
- findElements() - This returns a list of WebElements matching the search criteria. Returns an empty list, if no elements found.
Elements on a web page can have various attributes, and most of them will be notable for different elements.
The following are the eight attributes that we use to locate elements on a webpage:
| Method | Syntax |
| By ID | driver.findElement(By.id (<element ID>)) |
| By name | driver.findElement(By.name (<element name>)) |
| By class name | driver.findElement(By.className (<element class>)) |
| By tag name | driver.findElement(By.tagName (<html tagname>)) |
|
By link text | driver.findElement(By.linkText (<linktext>)) |
| By partial link text | driver.findElement(By.partialLinkText (<linktext>)) |
| By CSS | driver.findElement(By.cssSelector (<css selector>)) |
| By XPath | driver.findElement(By.xpath (<xpath>)) |
What are Browser Elements
Selenium WebDriver is one of the most widely used tools among all the set of tools available. It's essential to understand how to use Selenium for interacting with web apps. In this section, we'll learn how to communicate with GUI objects using Selenium Webdriver.
It performs application interaction using elements to develop user-defined functions. Browser elements are different components present on web pages. The most common elements we notice are:
- Text boxes
- CTA Buttons
- Images
- Hyperlinks
- Radio buttons/ Checkboxes
- Text area/ Error messages
- Drop down box/ List box/ Combo box
- Web Table/ HTML Table
- Frame.
Testing these actions essentially means checking whether they respond the way we want and working fine. For example, if you wish to test text boxes, what would you test it for?
- Whether we can send text or numbers to the text box
- Can we retrieve text that passed to the text box, etc
If you are testing an image, you will download and upload the image, click on the image link, retrieve the image title, etc.
Similarly, operations are executed on each of the elements mentioned earlier.
5. Selenium Grid
Selenium Grid was initially called HostedQA and developed by Patrick Lightbody. With a combination of RC (remote control), it runs tests on the remote machines. By using Grid, multiple test scripts will operate on various devices at the same time.
It supports parallel execution using Hub-Node architecture. We can connect to the selenium RC by just stating the browser version and operating system details. Through remote control capabilities, we can specify these values. One server makes a move as a hub in Selenium WebDriver and tests communicate to the hub to access browser instances. The hub contains a list of servers that gives access to the browser instances (WebDriver nodes) and allows tests to use these instances. Test scripts executed on various nodes can be written in multiple programming languages.
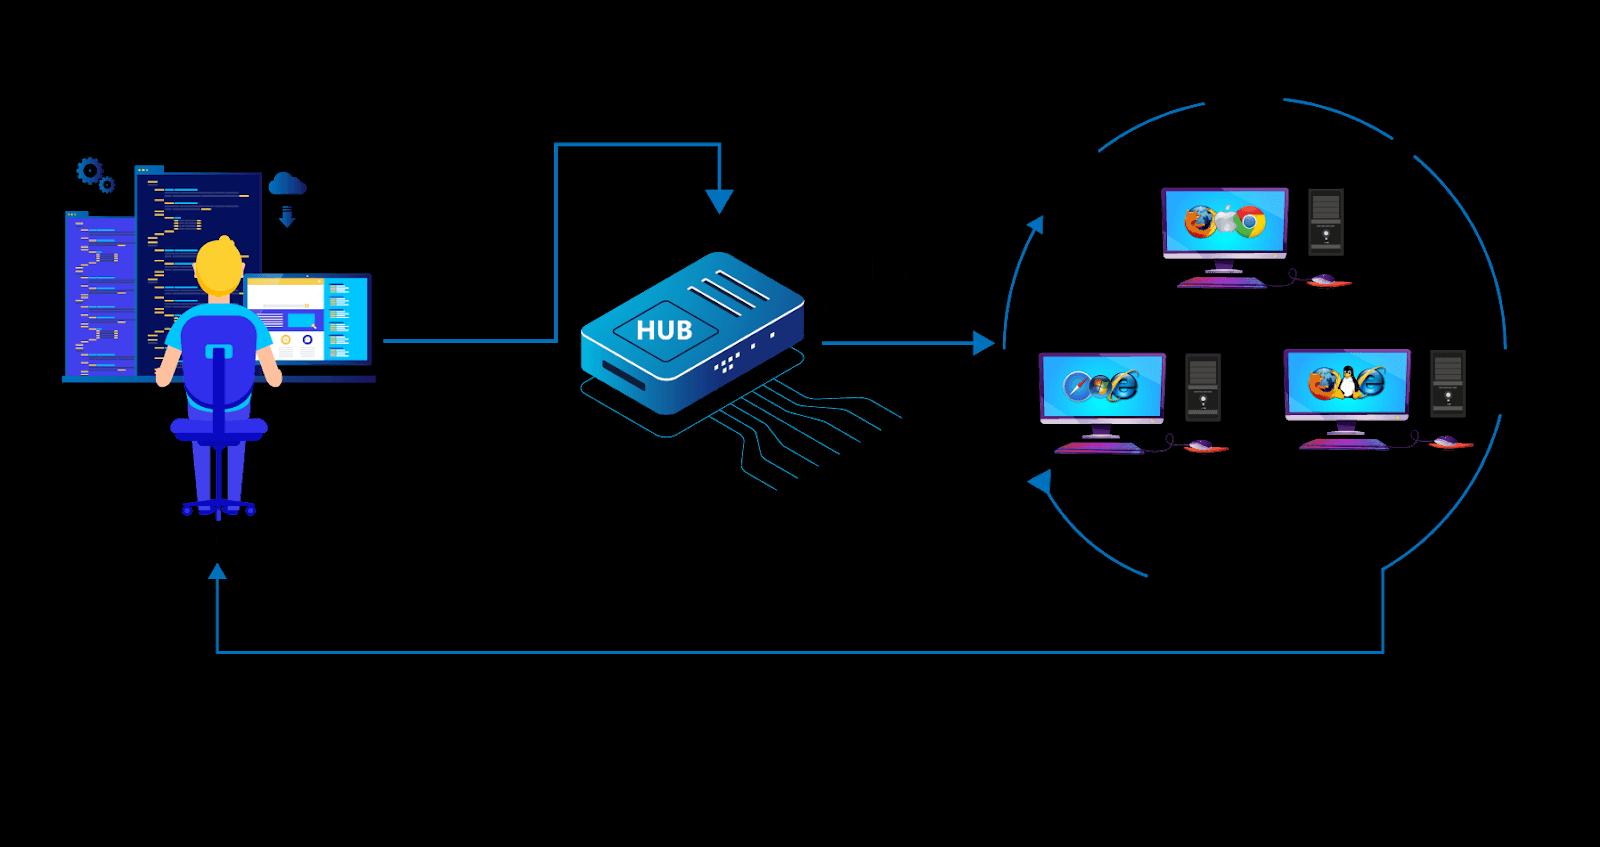
Selenium Grid has more than 2000 browser environments that enable you to run tests and automate cross-browser testing.
What is TestNG?
TestNG stands for Test Next Generation, and it’s an open-source framework inspired by JUnit, which uses annotations. It supports grouping, parameterization, parallelization, sequencing techniques in the code, etc., which was not possible earlier.
Besides managing test cases, TestNG even maintains detailed reports of tests.
Since selenium does not support code execution in test cases, we can use TestNG for the same purpose.
TestNG framework provides the following features −
- Generates reports in a proper format
- Multiple test case grouping
- Supports cross-browser testing
- Integrates with Jenkins and Maven.
Annotations in TestNG
Annotation defines a piece of code that controls the flow of methods. Annotations play a significant role in the TestNG framework.
Some of them are listed below:
| Annotated method | Use |
| @BeforeSuite | This annotation will run only once before all tests in the suite have run. |
| @BeforeTest | This annotation executes before the first @Test annotated method. |
| @BeforeClass | This annotation executes before the first @Test method execution. |
| @BeforeMethod | This annotation executes before every @Test annotated method |
| @Test | Executed the methods under the test |
| @AfterMethod | This annotation executes after every @Test annotated method. |
| @AfterClass | This annotation executes after all the test methods in the current run. |
| @AfterTest | This annotation executes when annotated methods complete the execution |
| @AfterSuite | This annotation will run once after the execution of all tests in the suite has run. |
Selenium in the Market
Software testing is one of the mainstreams in the recent past. Testing all the processes of the software against odds improves the performance of the system. Powerful tools like selenium, QTP, Cucumber, etc. dominate the software testing market. And, Selenium stands top on the list because of its features and functionalities.
As many companies have started using web applications, the need for Selenium is shooting up. The below listed are the few roles you can consider to work as Selenium WebDriver Professional:
- Automation Test Lead
- Quality Engineer
- Senior Test Engineer
- QA Engineer
- Selenium Automation Analyst
Selenium Limitations
Following are the limitations of Selenium:
- Requires a high skill set – However, Selenium supports various programming languages; still, it requires a high-level proficiency to automate tests effectively.
- Incomplete solution – Since it's open-source, it requires third-party frameworks to resolve technical issues.
- Hard to modify codes – Scripts written within Selenium are hard to modify.
- Difficult to support other browsers – Faces difficulty when implemented in other browsers other than Firefox.
- Should be familiar with any programming language - To create test scripts in a web driver should be familiar with any of the supported programming languages.
- Doesn't support inbuilt reporting capability - Should rely on plugins like JUnit and TestNG for test reports.
How to run a Selenium Test Script?
There are seven essential elements of a Selenium test script, which apply to any test case and any application under test (AUT):
- Create a Selenium WebDriver instance.
- Navigate to a Web page (required URL).
- Locate an HTML element.
- Perform an action on an HTML element.
- Anticipate the browser response to the action.
- Run tests and record test results using a test framework.
- Conclude the test.
Import Packages/Statements:
The import statements imports built-in and user-defined packages into the Java source file.
- org.openqa.selenium.WebDriver - It's a library package that references the WebDriver interface to instantiate the new web browser.
- org.openqa.selenium.chrome.ChromeDriver - It's a library package that references the ChromeDriver class required to start Chrome-specific drivers onto the Browser instantiated by the WebDriver class.
Let's Automate Selenium Login:
1. Create a Selenium WebDriver Instance
Webdriver driver=new ChromeDriver();To launch a website on the desired Browser, set up system properties to the Browser driver’s path.
System.setProperty(wedriver.chrome.driver","File path for the Exe");
2. Configure the Browser if needed
If you want to maximize the Browser, then you can do that by the code below.
driver.manage().window().maximize();3. Navigate To The Required URL
Open a browser with the desired URL and write the below syntax.
driver.get("https://www.linkedin.com/login");
4. Locate The HTML Element
Try to locate the email and password field of the login area of Linkedin. Below is the DOM structure for the email input box:
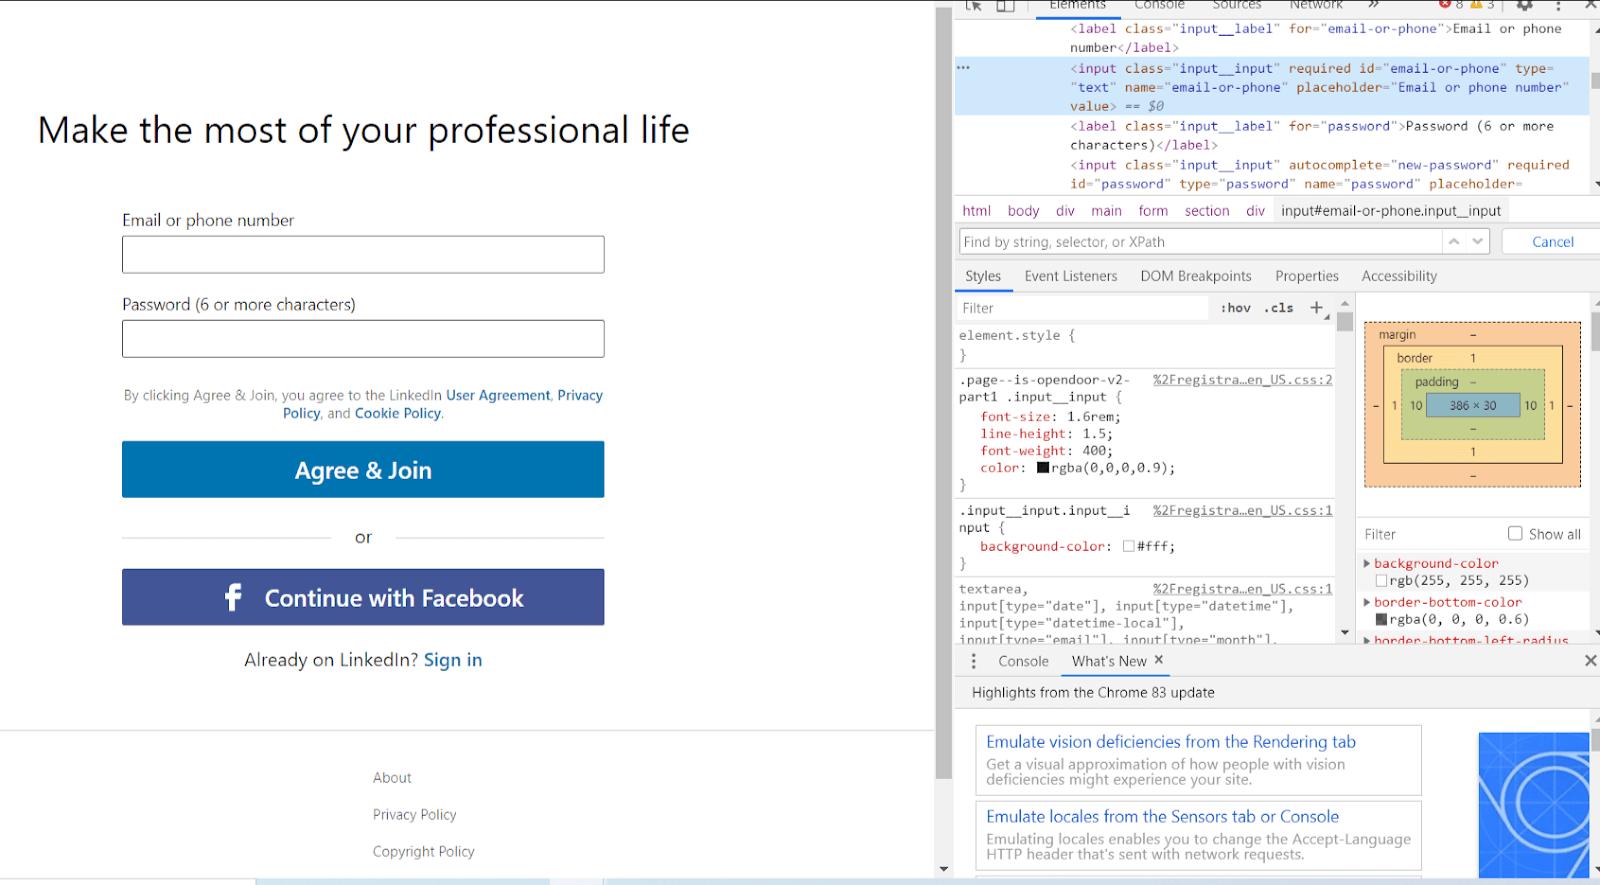
Format:
driver.findElement(By.id("password")); WebElement
password=driver.findElement(By.id("password"));
driver.findElement(By.xpath("//button[text()='Sign in ']")); WebElement login=driver.findEllement(By.xpath('//button[text()='Sign in']"));
5. Perform an action on an HTML element
To execute actions, we need to make use of methods "sendKeys" and "click".
username.sendKeys("xyz@gmail.com");
password.sendKeys("exampleAboutSelenium123"); login.click();
| Learn Selenium Interview Questions and Answers that help you grab high-paying jobs |
6. Verify & Validate The Action
To verify and validate the results, we need assertions. They play a vital role in comparing both the actual and expected results. The assertion class is presented by both the TestNG and JUnit framework, and we can choose either.
The below syntax will help you to assert the outcome from actions:
Assert.assertEquals(String actual, String expected);
So, in this case, we will save our actual URL post-login into a string value which is:
String actualUrl="https://www.linkedin.com/feed/";
And expected URL can be found from the below method:
String expectedUrl=driver.getCurrentUrl();
So your final assertion would become as:
Assert.assertEquals(actualUrl, expectedUrl);
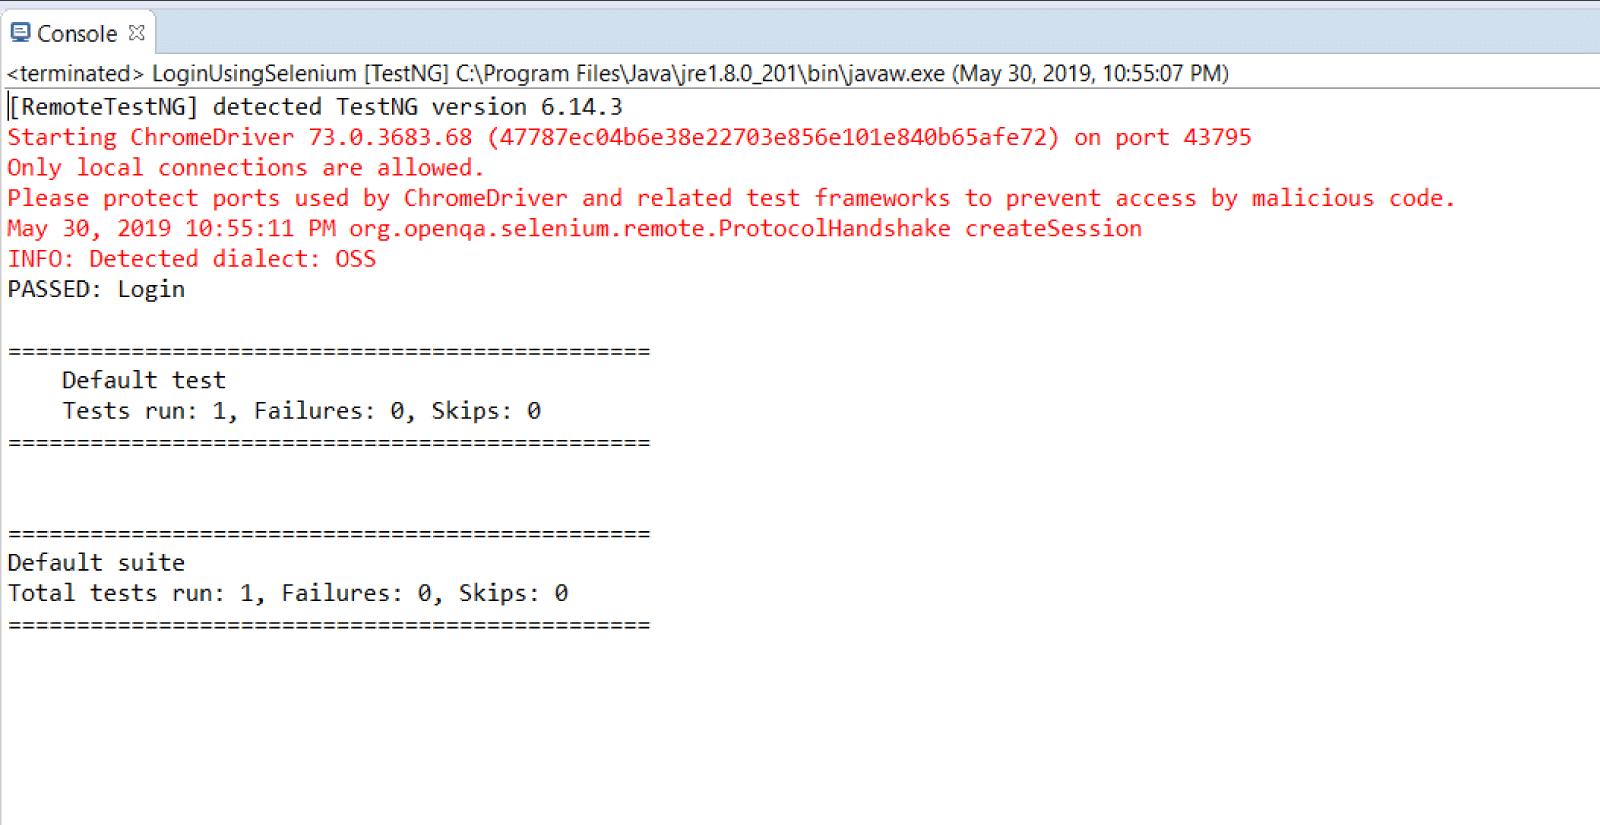
The entire code we explained here is present in the below code snippet.
import java.utl.concurrent.TimeUnit;
import org.openqa.selenium.By;
import org.openqa.selenium.WebDriver;
import org.openqa.selenium.WebElement;
import org.openqa.selenium.chrome.Driver;
import org.testng.Assert;
import org.testng.annotations.Test;
public class LoginUsingSelenium{
@Test public void login(){//TODO Auto-generated method stub
System.setProperty("webdriver.chrome.driver","path of driver");
WebDriver driver=new ChromeDriver(); driver.manage().window().maximize();
driver.get("http://www.linkedin.com/login");
WebElement username=driver.findElement(By.id("username"));
WebElement password=driver.findElement(By.id("password"));
WebElement login=driver.findElemet(By.xpath("//button[text()='Sign in']"));
username.sendKeys("example@gmail.com");password.sendKeys("password");
login.click(); String actualUrl="https://www.linkedin.com/feed/";
String expectedUrl=driver.getCurrentUrl();
Assert.assertEquals(expectedUrl,actualUrl);}}
Conclusion
With this, we have come to the end of this Selenium tutorial. We hope you understood the concepts and added some value to your knowledge. If you wish to gain more insights into Selenium, then check out our Selenium Training Online.
If you have any questions on Selenium or want any topic to learn from us, please comment below and try our best to help.
 On-Job Support Service
Online Work Support for your on-job roles.

Our work-support plans provide precise options as per your project tasks. Whether you are a newbie or an experienced professional seeking assistance in completing project tasks, we are here with the following plans to meet your custom needs:
- Pay Per Hour
- Pay Per Week
- Monthly
| Name | Dates | |
|---|---|---|
| Selenium Training | Aug 01 to Aug 16 | View Details |
| Selenium Training | Aug 04 to Aug 19 | View Details |
| Selenium Training | Aug 08 to Aug 23 | View Details |
| Selenium Training | Aug 11 to Aug 26 | View Details |

Madhuri is a Senior Content Creator at MindMajix. She has written about a range of different topics on various technologies, which include, Splunk, Tensorflow, Selenium, and CEH. She spends most of her time researching on technology, and startups. Connect with her via LinkedIn and Twitter .