- Blue Prism vs Selenium
- Career Scope in Selenium-The Future of Testing
- Essene of Getting Certified in Selenium
- Getting Started With Selenium
- Top 10 Reasons Why You Should Learn Selenium
- Selenium Interview Questions
- Selenium Release History Infographics
- Selenium Tutorial
- Tosca vs Selenium
- Automation Selenium RC using TestNG - Selenium
- Commands in Context Menu - Selenium
- Debugging - SELENIUM
- Different Flavours of Selenium
- Finding Elements by XPATH and Using CSS - SELENIUM
- How to Create test suites in Selenium
- How to Setup and Configure Selenium Webdriver with Eclipse
- How to use WebDriver Backed Selenium
- How to work on pages with AJAX in selenium?
- How to Install Debugbar Tool - SELENIUM
- How to Install IE Developer Tool - SELENIUM
- Installation of Selenium IDE
- Introduction to Selenium
- Introduction to Selenium 2.0 Webdriver-SELENIUM
- Java Tutorial for Selenium WebDriver
- How to Locate & Find Elements - SELENIUM
- Locators & How to Install Firebug - SELENIUM
- Running Test Cases - SELENIUM
- Sample Programs in Remote Control for Selenium
- Selenium Commands – “Selenese”
- Selenium Commands with Examples - SELENIUM
- Selenium WebDriver Commands List
- Synchronisation commands - SELENIUM
- What Is Selenium RC : A Step-by-Step Guide for 2024
- XPATH Usage in Selenium
- Skills That Will Make You a Champ Software Tester with Latest Trends
- Tricentis Tosca Automation Tool (2025)
- Tosca Interview Questions for 2025
- Using Selenium to Interact With Elements on a Web Page
- What is Selenium? - Selenium Automation Testing Introduction
- What is selenium IDE
- Xpath Interview Questions
- Selenium WebDriver Interview Questions
- Selenium With Python Interview Questions
- Selenium Projects and Use Cases
While developing the Applications for browsers, it becomes important to test and validate the user interactions with the services that any application provides. However, it becomes overhead to test such a large number of test cases manually. That is where Selenium comes into the picture to help us automate the web browsers for testing purposes.
As an open-source framework, it enables users to automate the browsers for testing the web elements of any application. In this article, we will delve deep into Selenium, its features, and its installation on Windows.
Table of Contents
- Overview of Selenium
- Features
- Prerequisites For Selenium Installation
- Installing JDK For Selenium
- Installing Eclipse IDE For Selenium
- Steps to Install and Configure Selenium WebDriver
- FAQs
Overview of Selenium
Selenium is an automation tool for web browsers that is capable of defining the scripts for action and interaction with the web components. It supports multiple browsers so that we can validate our application against a wide range of test scenarios in the browser. It supports distributed browser allocation for scalability and multiple browsers for flexibility.
Being an open-source tool and having a large community base, it is one of the most efficient automation tools for web browsers. Thus, it becomes important to know the features of Selenium before we install it on our Windows Platform.
| If you would like to enrich your career in Selenium, then enroll in our "Selenium Certification Training". This course will help you to achieve excellence in this domain. |
Features of Selenium
- It Can Accommodate Parallel Tests: Selenium provides Selenium Grid tools so that we can run parallel tests across the machines. This makes it a scalable automation tool.
- It Supports Multiple Browsers: We can use Selenium for testing our application against multiple browsers such as Chrome, Safari, Edge, Firefox, and Internet Explorer. We can also run tests on multiple versions of the browser. Hence, it provides a flexible approach.
- We Can Record and Playback User Interactions: Selenium provides the IDE tool that enables us to record the user’s actions and interaction log and playback it for more detailed analysis. Thus, all user interaction is taken into consideration.
- It Provides a Single Standard API For Testing: We can use Selenium as a single standard API for writing the test scripts for multiple browsers. Thus, you do not need to write multiple scripts for different browsers.
- It has API Support For Complete Control: Selenium has an Action API (low-level interface) which helps us to take complete control over the test cases for any application. We can construct the virtualized input and chain them and call the service to execute them all at one go.
Prerequisites For Selenium Installation
Since Selenium uses scripts for automating the testing of mobile applications, we have to configure a client environment so that we can write test user interaction with web components. These scripts are language-specific and need to be installed and configured on your machine.
In this article, we are using Java and Eclipse IDE as the client to write the test scripts. Therefore, you have to install the Java and Eclipse IDE on your Windows Platform before installing the Selenium WebDriver.
Selenium Environment Setup:
First, let us learn to install Java on our Windows System.
1. Installing Java Software Development Kit (JDK)
Step 1: Go to https://www.oracle.com/java/technologies/javase/jdk17-archive-downloads.html scroll down the JDK 17 archives and click on the link to install the installer file for JDK 17 as shown below:
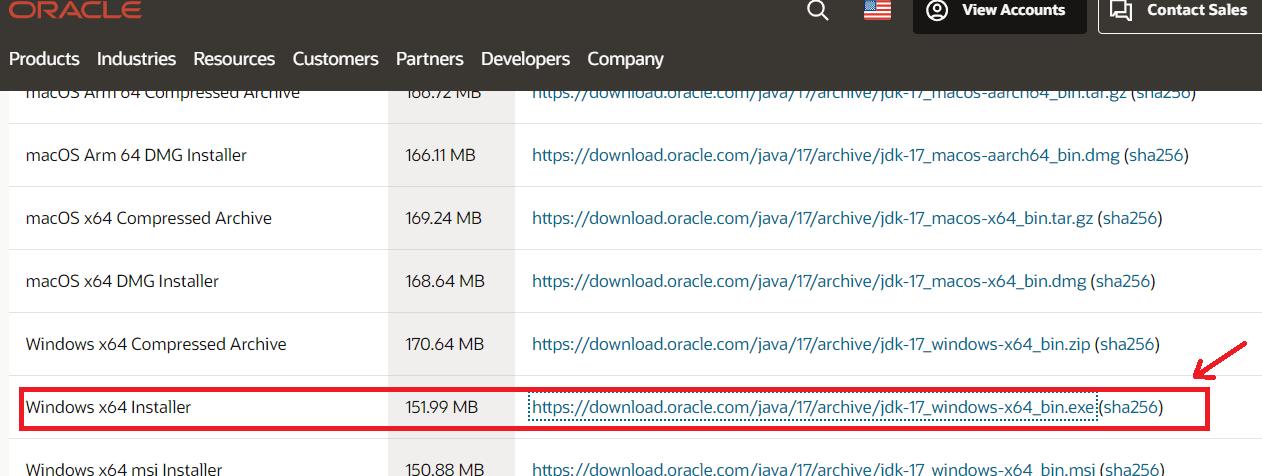
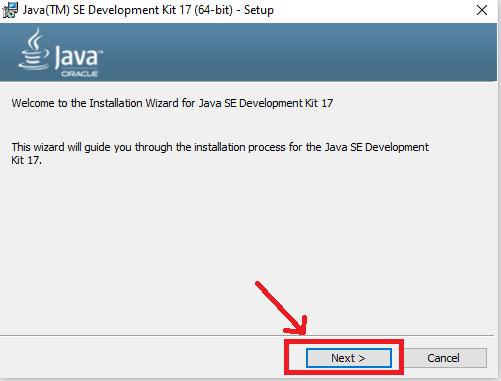
Step 2: Navigate to the folder where the file is downloaded. Double-click on the executable installer file to start the installation. Then, click on ‘Next.’
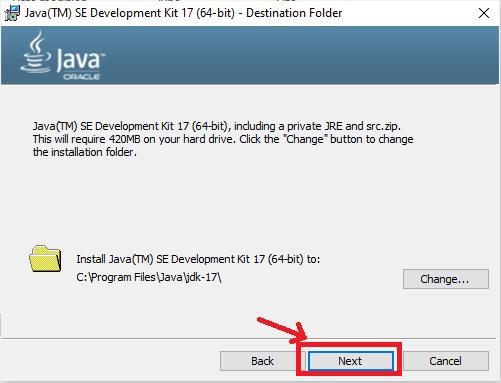
Step 3: If you wish, you can modify the destination path where the JDK will be installed. Then, Click on the Next Button.
Step 4: The installation process starts as shown below:
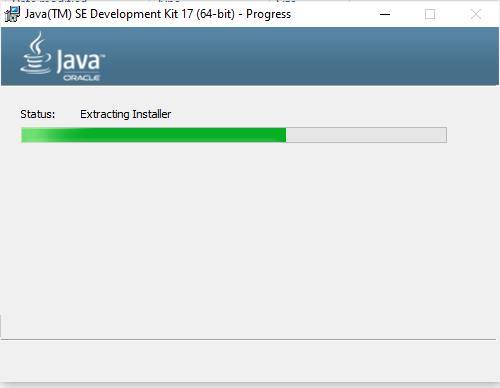
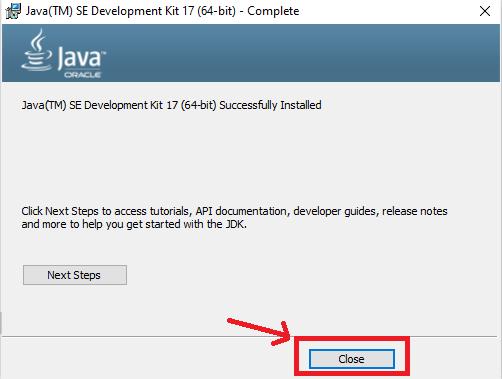
Step 5: Once the installation is finished, close the wizard.
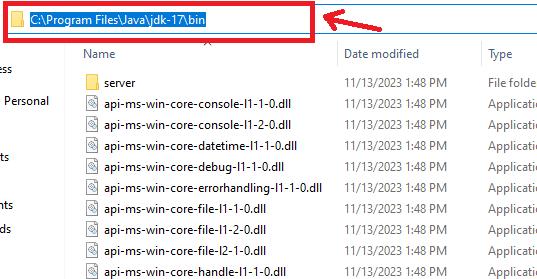
Step 6: Go to the bin folder for your JDK 17 directory on your system and copy its path as shown below:
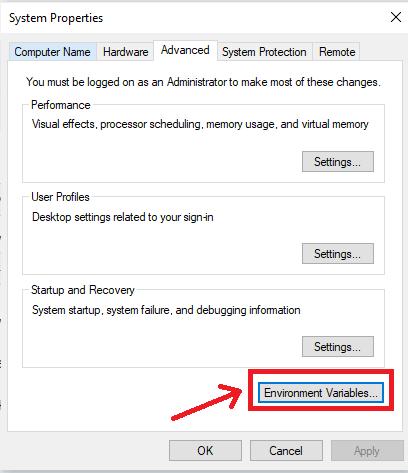
Step 7: Now, you have to set the PATH Variable in your system environment. Open the control panel then, go to the advanced system settings, and click on the ‘Environment Variables’ as outlined below:
Step 8: Under the system variables, select the ‘Path’ variable and click on the ‘Edit’ button.
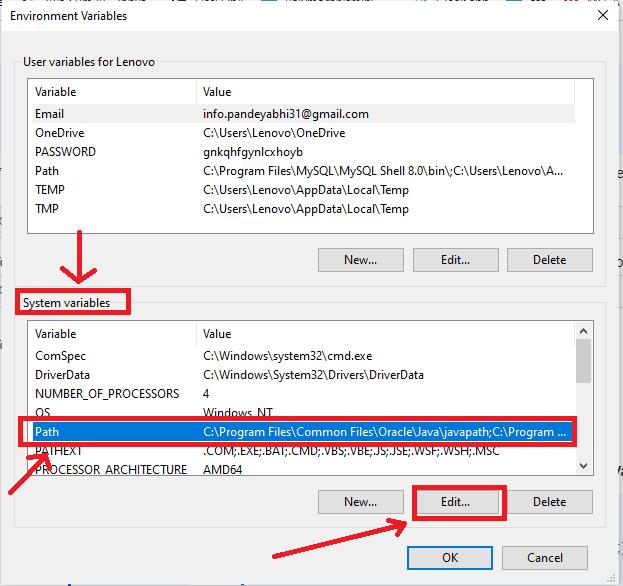
Step 9: To set the PATH variable on the system, click on the ‘New’ option and add the location of the bin folder of the JDK installation to the PATH variable in System Variables as demonstrated below:
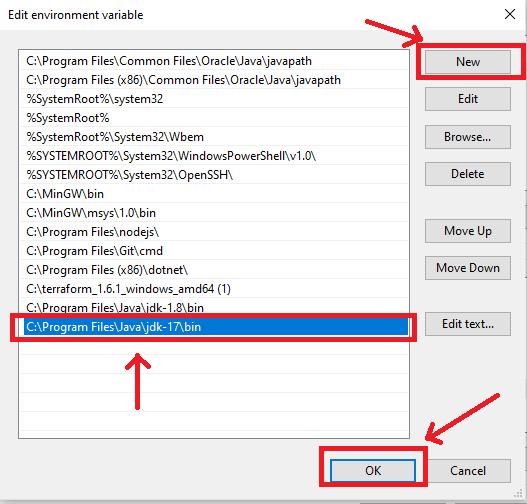
Now, close all Advanced System Settings wizard.
Step 10: Now, open the command prompt and run the command ‘java -version’ to verify the installation of JDK on your Windows as outlined below.
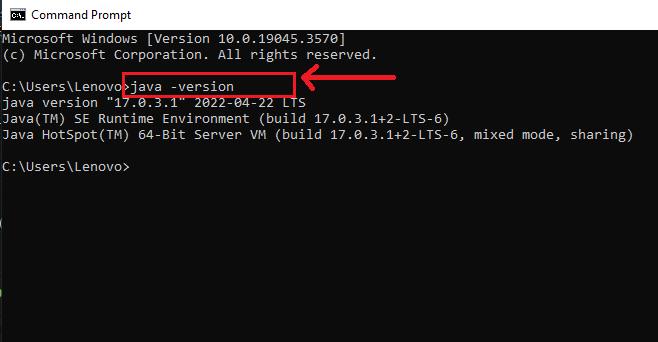
After we have verified the Java installation, let us install Eclipse on our Windows System.
[ Check out Selenium Interview Questions and Answers ]
2. Install Eclipse IDE For Selenium
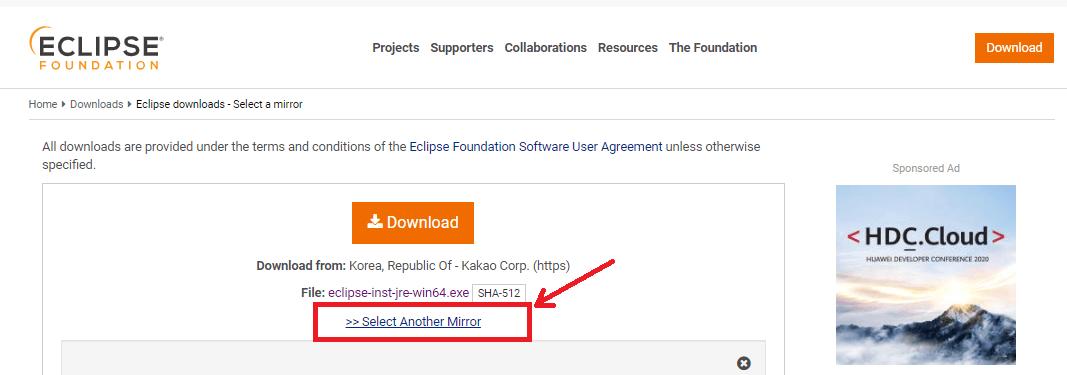
Step 1: First, you have to eclipse IDE. Go to the official website https://www.eclipse.org/downloads/ and click on the ‘Download’ button as depicted below.
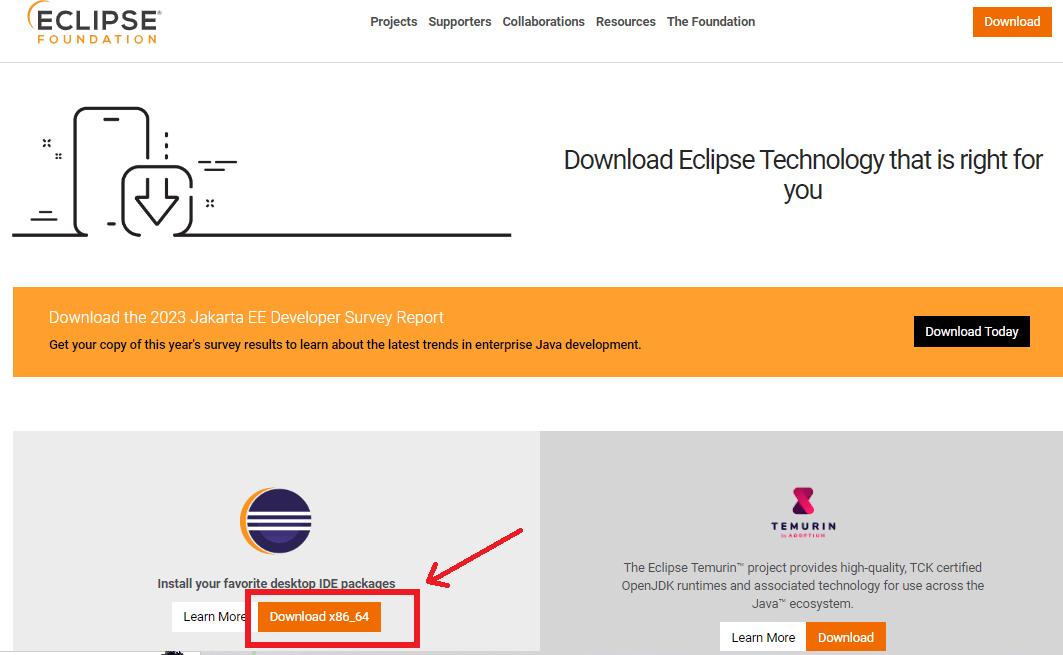
Step 2: Choose the ‘Select Another Mirror’ option as shown below.
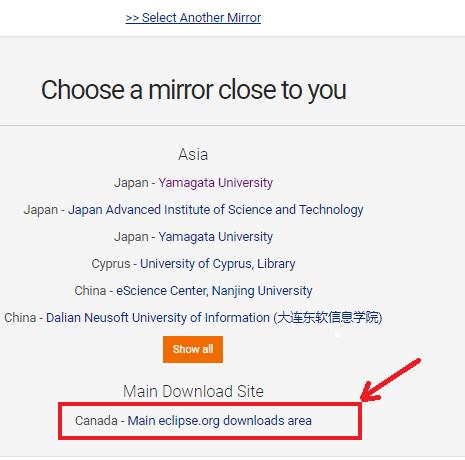
Step 3: Now, select the ‘Main eclipse.org download area’ option. After this, the setup file will be downloaded on your system.
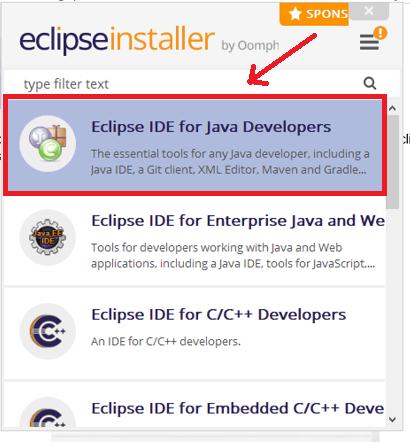
Step 4: Navigate to the folder where the setup file is downloaded and double-click on the file. The pop-up for installation wizard appears as shown below:

Step 5: Choose the ‘Eclipse IDE for Java Developers’ as depicted below:
Step 6: Choose the folder location where you want to install the Eclipse IDE as shown below:
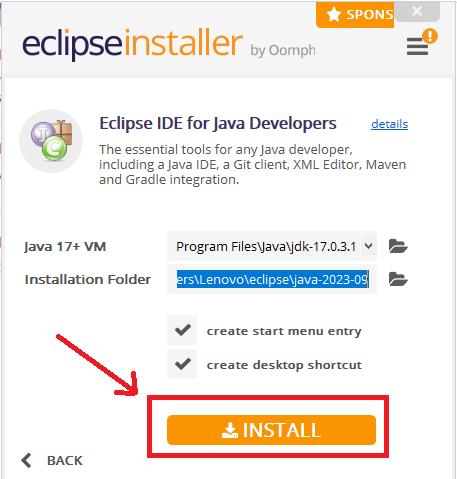
Step 7: After this, click on the Install button. After the installation is complete, you will get the option to launch the Eclipse IDE on your screen as shown below.
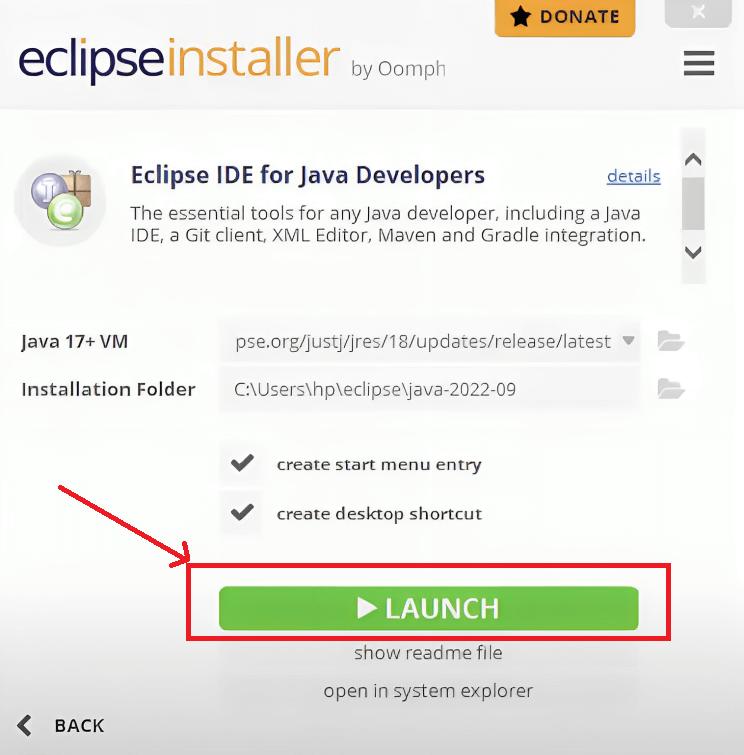
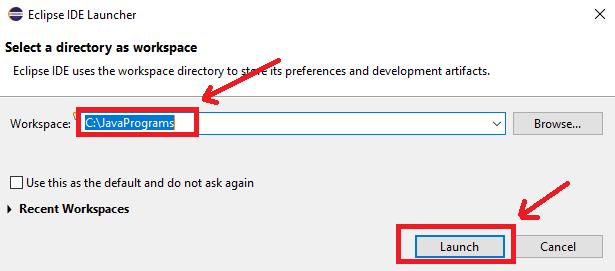
Step 8: Once you launch the Eclipse IDE, a pop-up asks you to specify the destination folder in which you want to launch your Eclipse Environment.
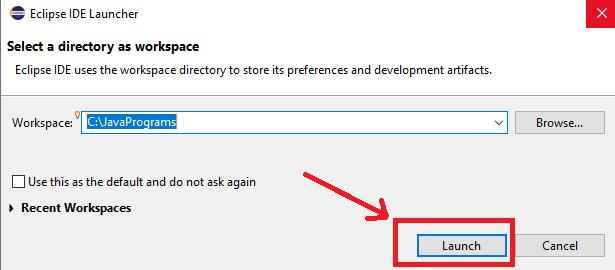
Step 9: Click on the ‘Launch’ option. The Eclipse IDE screen appears as demonstrated below.
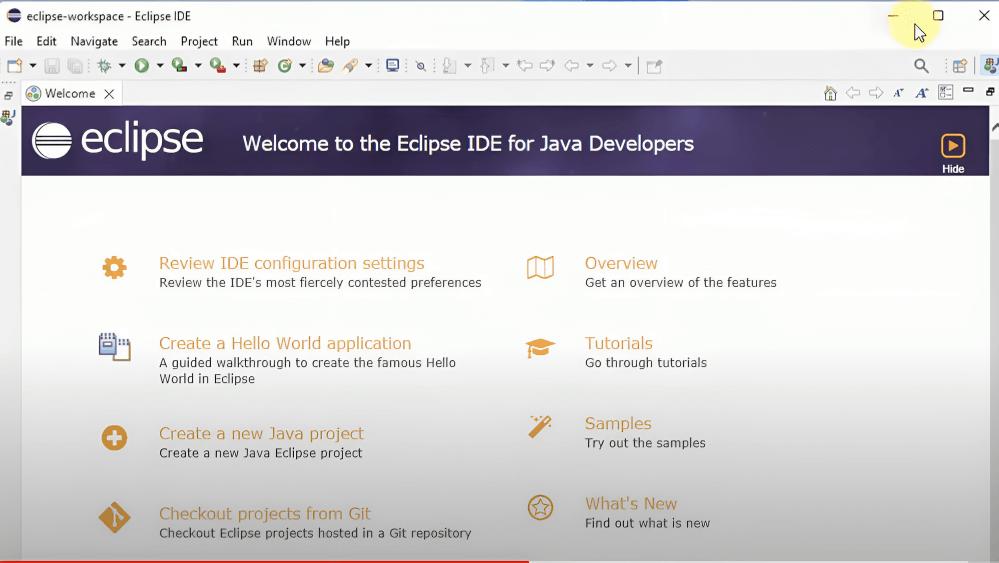
After we have installed Eclipse in our system, let us install Selenium WebDriver on our Windows System.
[ Check out Selenium Project Ideas For Beginners ]
How to Download and Install Selenium WebDriver on Windows?
Step 1: Go to the official website https://www.selenium.dev/downloads/ and choose Selenium for Java Language as outlined below.
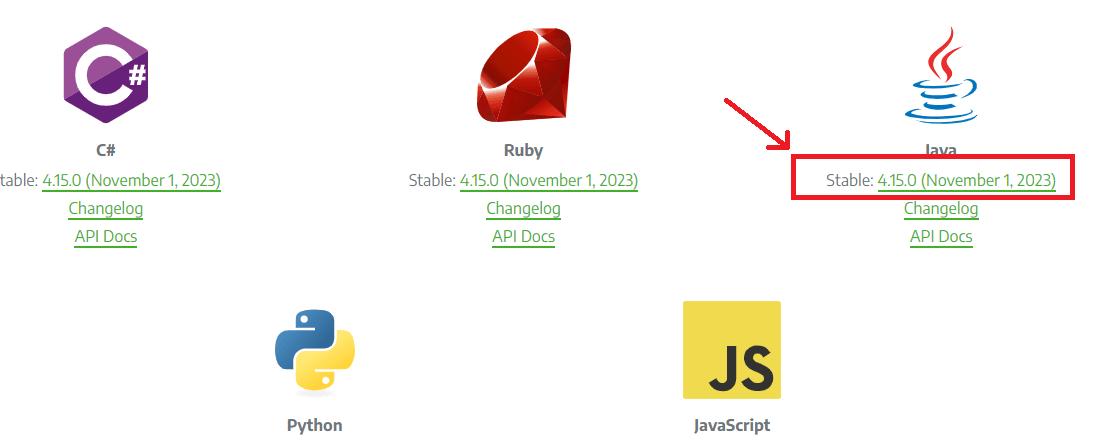
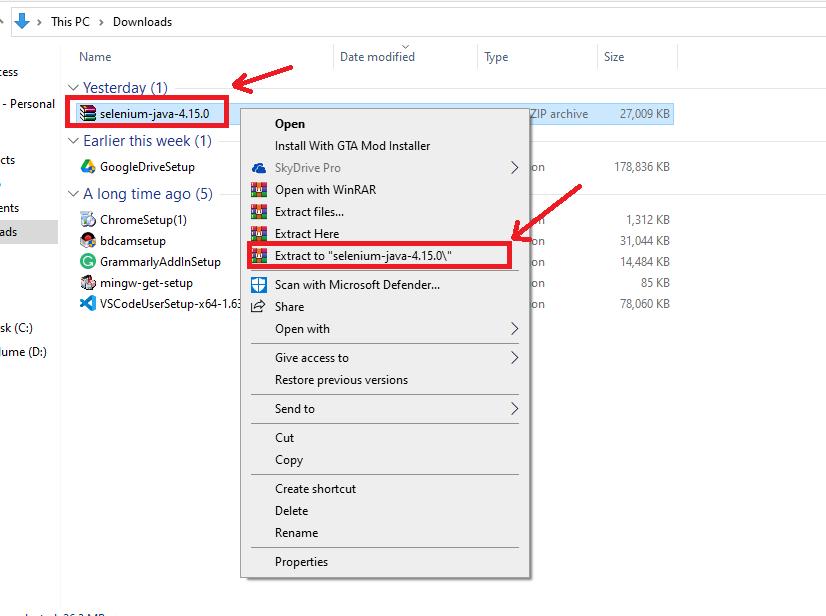
Step 2: Navigate to the folder where the zip file has been downloaded. Right-click on it and click on ‘extract to selenium-java-4.15.0.’
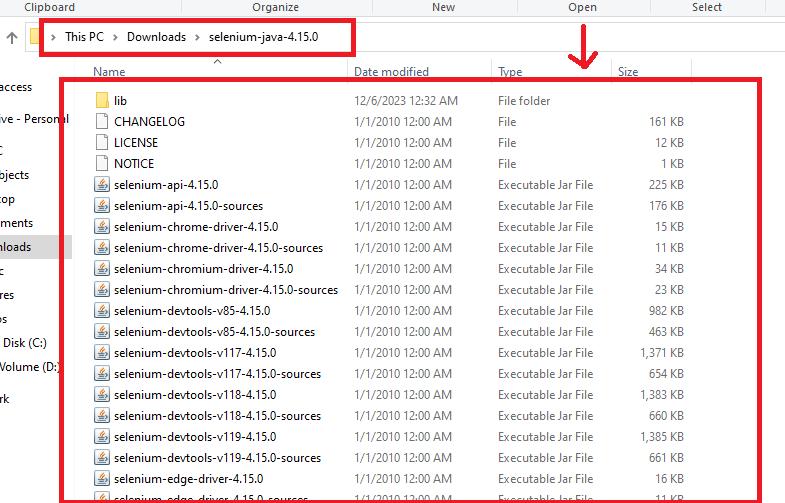
Step 3: The extracted files appear as depicted below which contain the essential jar files.
Configure Eclipse IDE with Selenium WebDriver
Step 4: Now, launch the Eclipse workspace on your preferred folder as shown below.
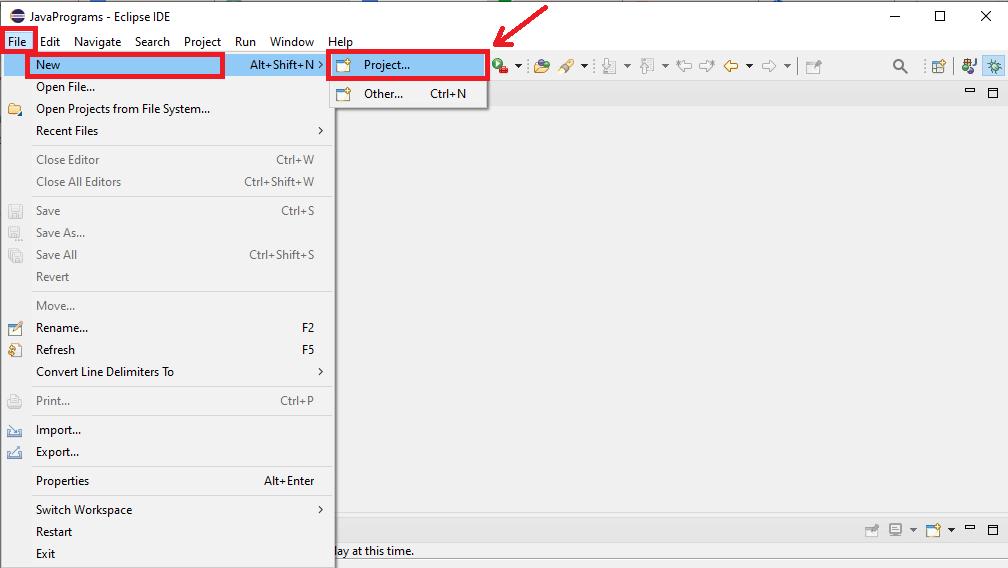
Step 5: Hover on the ‘New’ option under the ‘File’ menu. Then, select ‘Project.’
Step 6: Select the Project type as ‘Java Project’ and click ‘Next.’
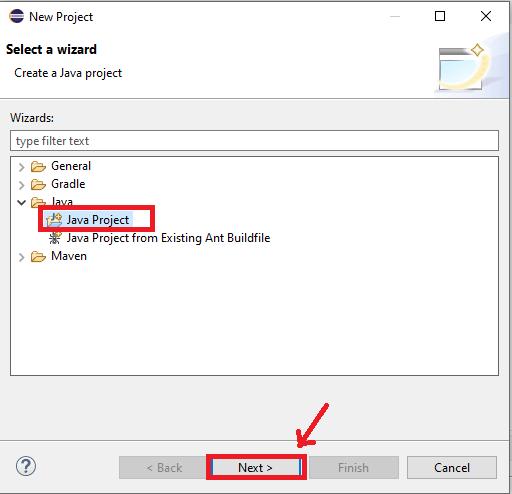
Step 7: Add the desired project name and keep the settings as default. Then, click on the ‘Finish’ button to continue.
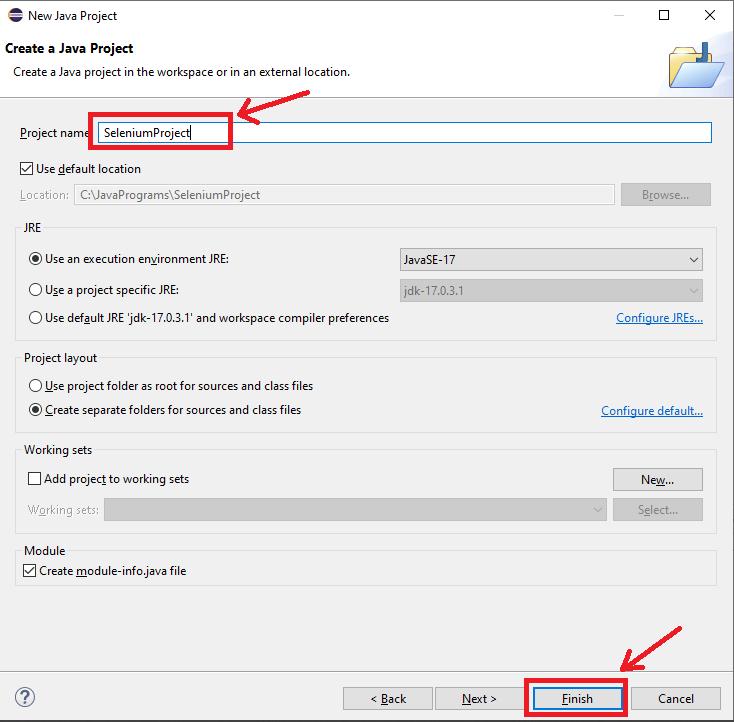
Step 8: Right-click on the newly created project to create a new package as shown below.
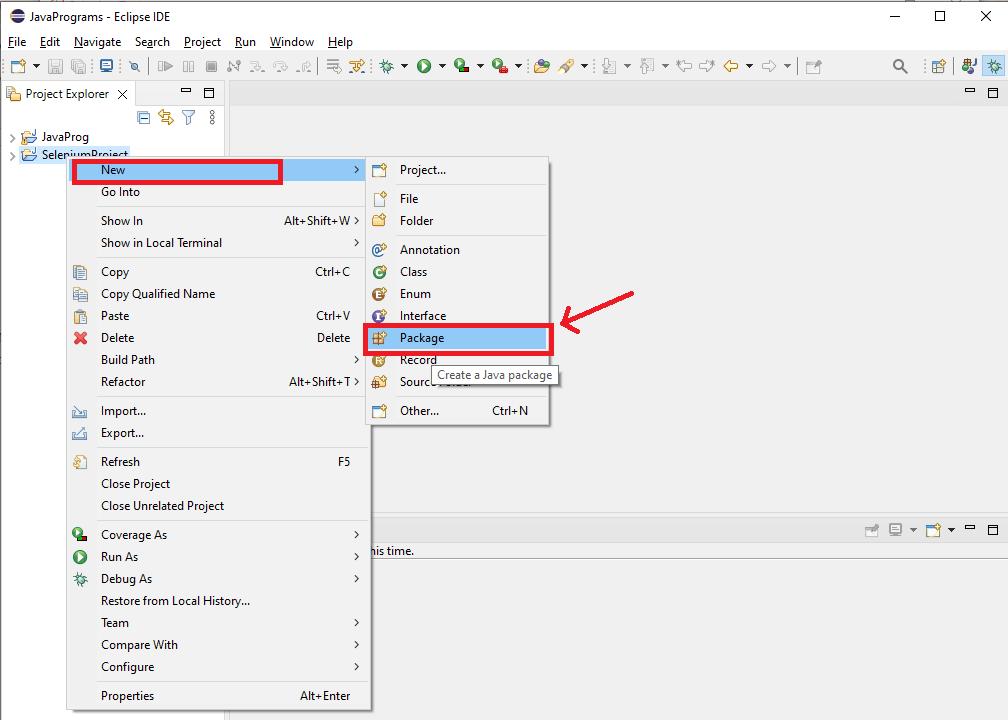
Step 9: Select the package name and continue by clicking on the ‘Finish’ button.
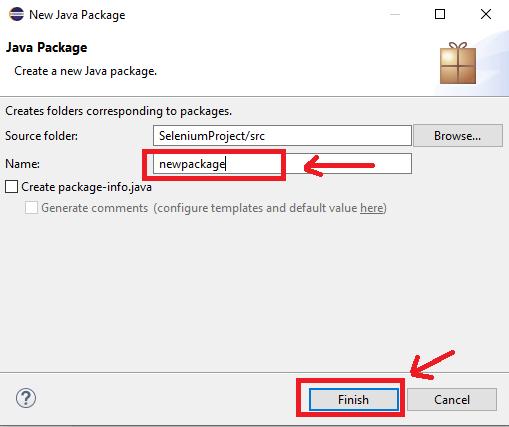
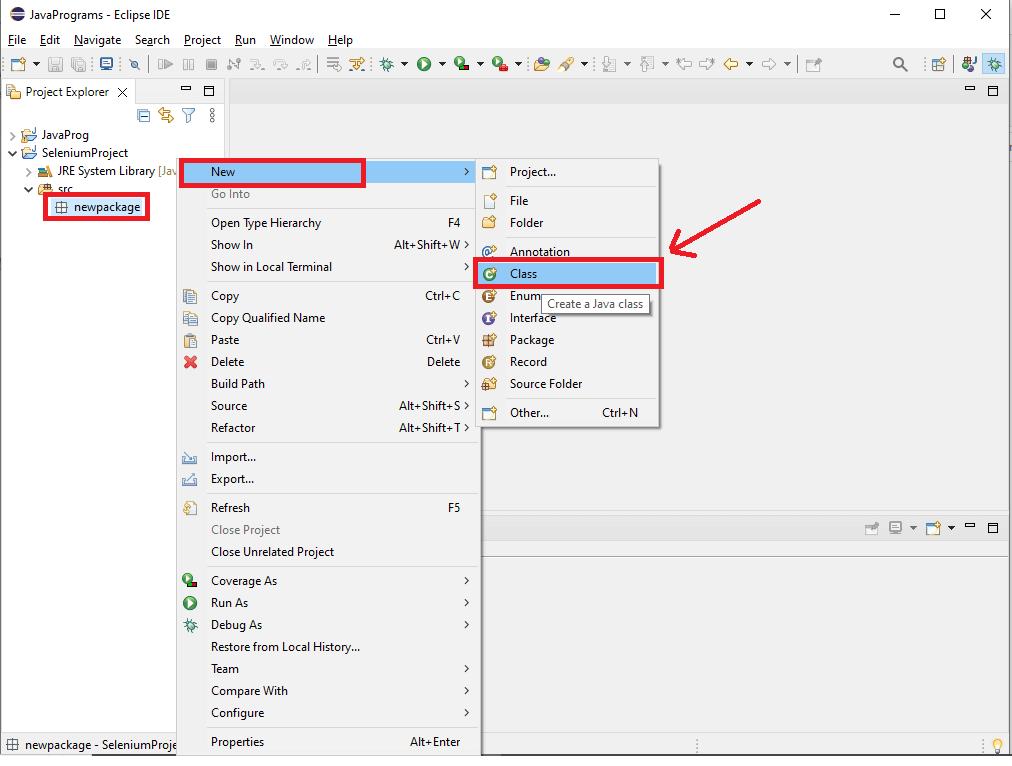
Step 10: Now, right-click on the package that we created in the previous step to create a new class name ‘’ as mentioned below.
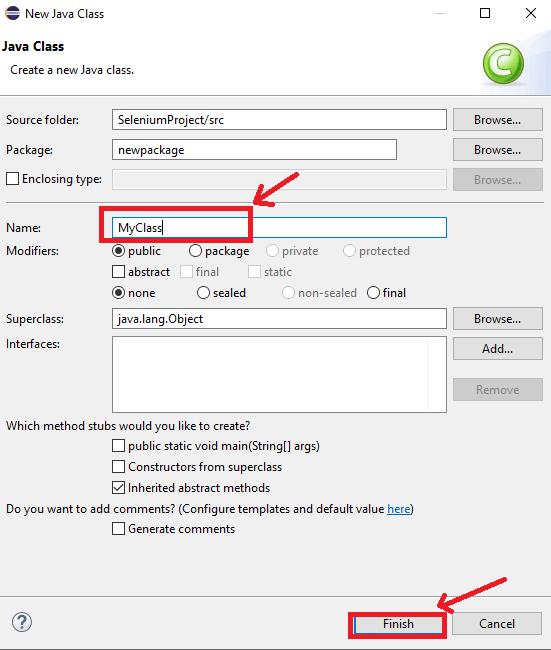
Step 11: In the pop-up that appears as shown below, specify the class name as per your preference. Then, click on the ‘Finish’ button.
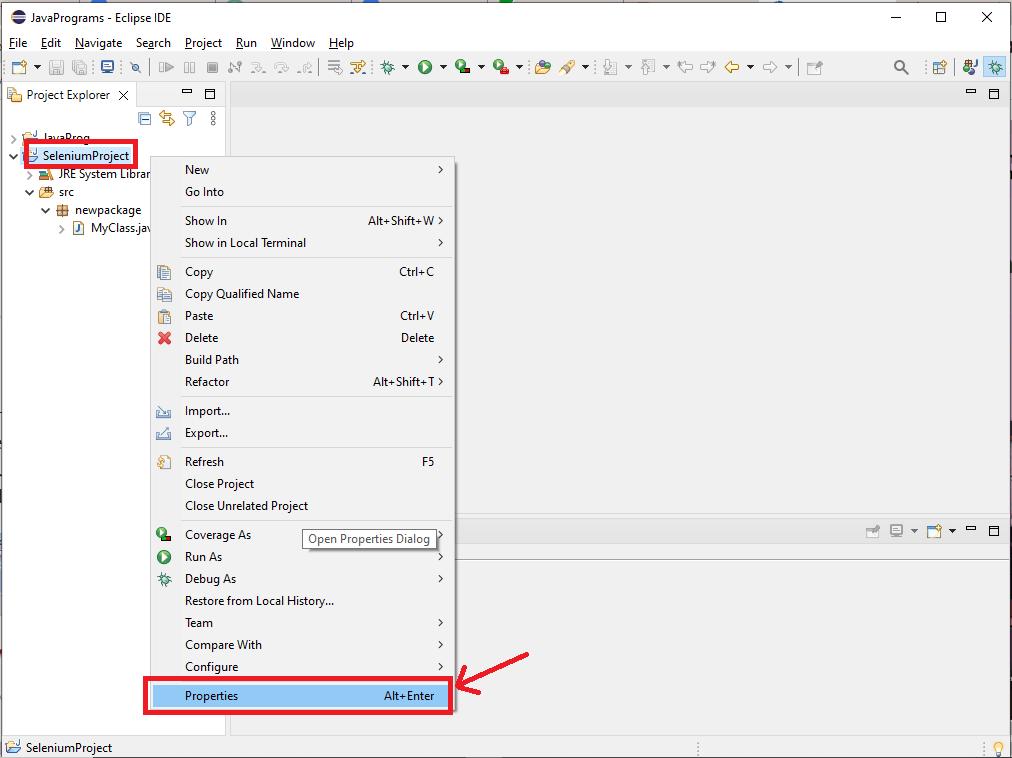
Step 12: Now, right-click on the Project and click on the ‘Properties’ option.
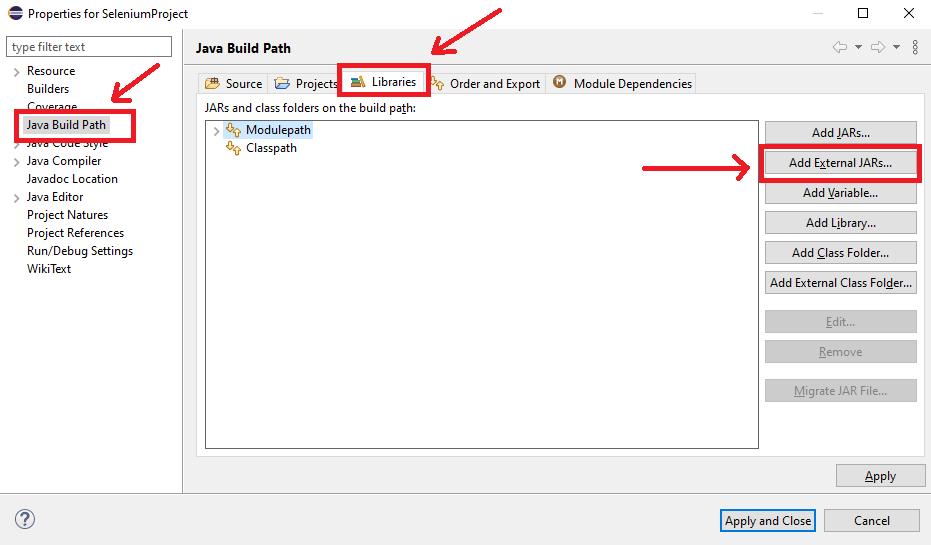
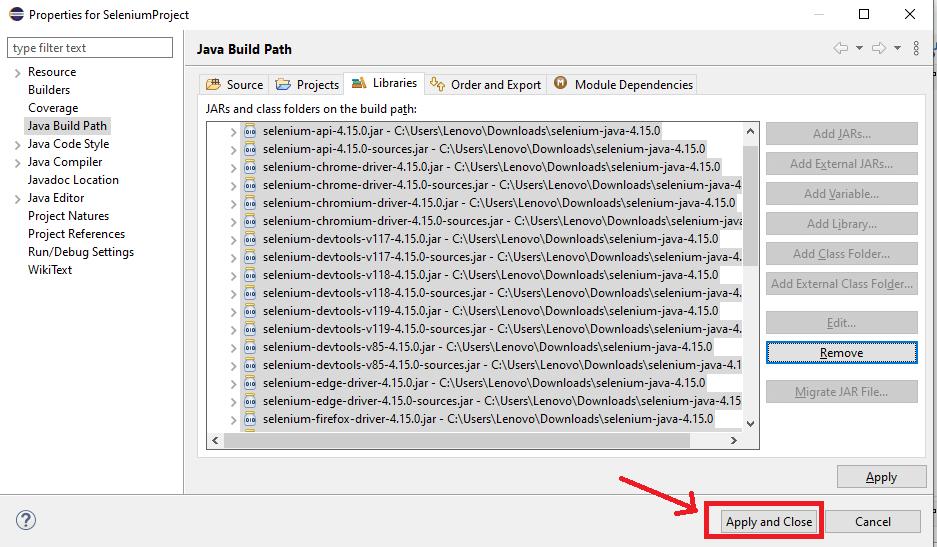
Step 13: The properties dialog box appears as shown below. Select the ‘Java Build Path’ option and then, navigate to the ‘Libraries’ tab. Then, click on the ‘Add External JARSs’ option.
Step 14: In the dialogue box, double-click on the ‘lib’ directory to open it.
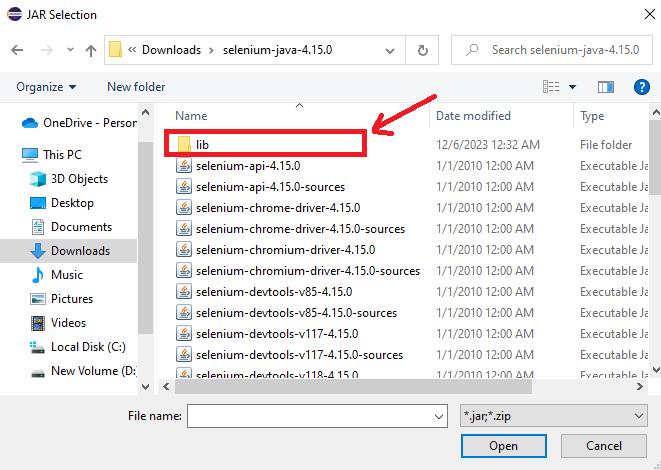
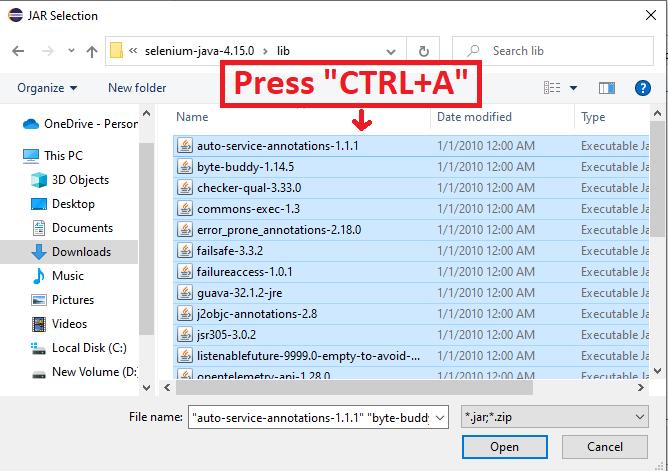
Step 15: Press ‘CTRL+A’ to select all the files inside the lib folder as shown below.
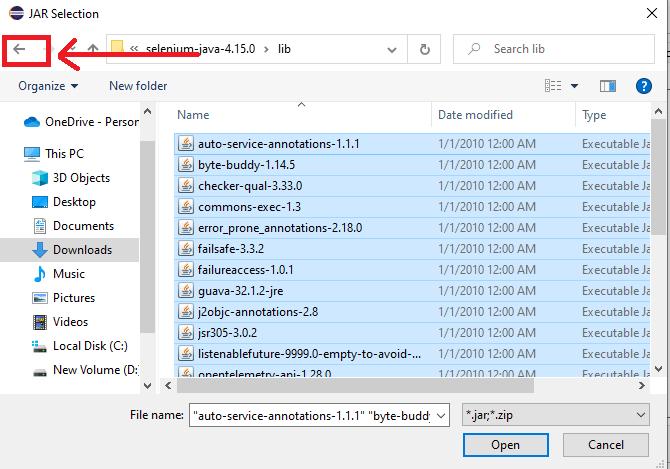
Step 16: Then, navigate back to the root folder.
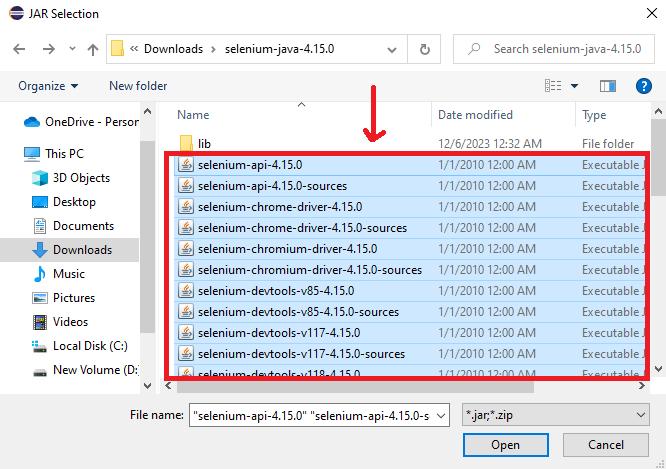
Step 17: Select all the files outside the lib folder and click on the ‘Open’ button.
Step 18: Continue by clicking on the ‘Apply and Close’ button.
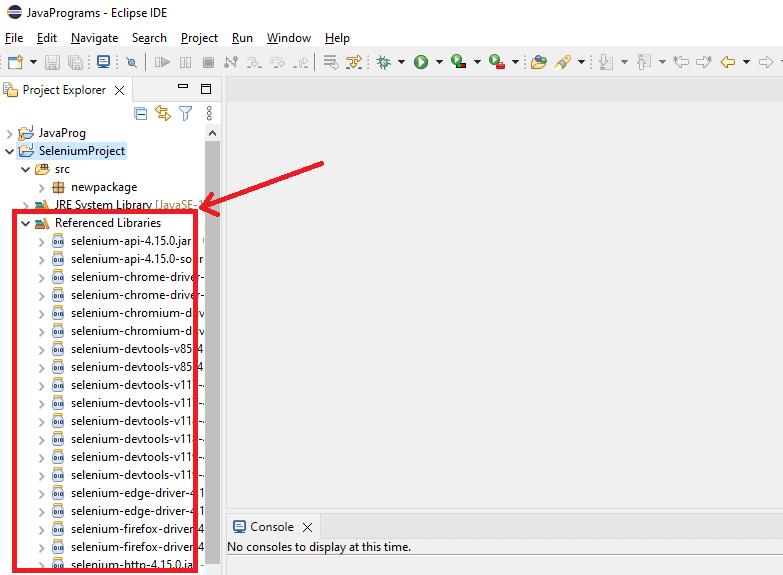
Step 19: The Selenium WebDriver Libraries are visible in the Project as shown below. You can now use them by importing them into the project and writing the text script.
Selenium WebDriver Installation FAQs
1. When should I choose the Selenium Grid for Test Cases?
Selenium Grid is used in cases that deal with concurrent testing of applications. It means that you use it to run parallel tests across multiple machines for multiple browsers. This feature is very useful to save the time consumed in separately testing the application for different browsers.
2. What is a BiDirectional Functionality in Selenium WebDriver?
Selenium BiDirectional Functionality is a new feature of Selenium that allows users to implement advanced actions such as executing JavaScript commands, intercepting network requests, and handling browser events in real-time. It provides a cross-browser API for the web browsers for testing user interaction.
3. What is Selenium IDE?
It is a browser extension that records the user’s actions in the browser under the specified parameters using the existing Selenium commands. It is used for invoking record and playback features in Selenium.
4. How to run Selenium using a command line using Java Client?
You can use the package ‘org.openqa.selenium.cli’ to configure and run the Selenium using the command line interface. It provides various classes and interfaces such as ‘CliCommand,’ ‘CliCommand.Executable,’ and ‘WrappedPrintWriter’ for this purpose.
5. What is a Locator in Selenium WebDriver?
We can use the Locators to identify the elements available in the DOM (Document Object Model) representation. Selenium provides various locators such as ID Locator, Name Locator, Class Name Locator, Tag Name Locator, Link Text Locator, Partial Link Text Locator, XPath Locator, CSS Selector, and XPath with Index Locator to find out the elements in a webpage.
[ Also Learn Selenium WebDriver Interview Questions ]
Conclusion
Selenium has been proven to be a wonderful tool to automate the testing of browser-based applications. It provides a standard API along with the Drivers, Framework, and External Libraries. We can run the specific Drivers for the browsers available in Selenium which runs on the same system to simulate user interactions.
It simplifies browser automation testing so that rapidly changing web-based technologies can be easily adapted for development. After successfully installing Selenium on our system, we can easily write the test scripts for web browsers.
 On-Job Support Service
Online Work Support for your on-job roles.

Our work-support plans provide precise options as per your project tasks. Whether you are a newbie or an experienced professional seeking assistance in completing project tasks, we are here with the following plans to meet your custom needs:
- Pay Per Hour
- Pay Per Week
- Monthly
| Name | Dates | |
|---|---|---|
| Selenium Training | Feb 14 to Mar 01 | View Details |
| Selenium Training | Feb 17 to Mar 04 | View Details |
| Selenium Training | Feb 21 to Mar 08 | View Details |
| Selenium Training | Feb 24 to Mar 11 | View Details |

Viswanath is a passionate content writer of Mindmajix. He has expertise in Trending Domains like Data Science, Artificial Intelligence, Machine Learning, Blockchain, etc. His articles help the learners to get insights about the Domain. You can reach him on Linkedin


