- Home
- Blog
- Oracle Apex
- How to Install Oracle Apex

Developing software and applications is a need for all organizations, but not all can manage the complex coding and development workflows for their changing business requirements. Therefore, they need a tool that can help them to create the application without any programming experience. Oracle APEX helps us to address this issue by providing a low-code environment for creating the software application.
In this comprehensive guide, we will walk you through the complete installation process of Oracle APEX on your Windows system including its overview and features. So, let us start without any delay.
Table of Contents
- Overview of Oracle APEX
- Features of Oracle APEX
- Prerequisites for Installation
- JDK Installation
- Steps to Install Oracle APEX
- Configuring ORDS Server
- Frequently Asked Questions
- Troubleshooting for Oracle APEX Installation
Overview of Oracle APEX
The Oracle APEX is a low-code development tool that enables us to develop and deploy secure enterprise applications. We can create the Enterprise Application with faster speed, without any complex programming workflow. The architecture of APEX contains a web browser, Oracle REST Data Services (the web server), and an Oracle database containing APEX.
Thus, due to the simple architecture, it has extremely low-latency data access. As a result, we can develop data-driven applications with powerful search and retrieval capabilities. Now, let us see some latest features of the Oracle APEX.
Features of Oracle APEX
- It simplifies the debugging tasks:
If the application has some bugs or errors, we can create a working copy of the application and solve the bug or error. After this, we can merge the copy into the main application. This makes debugging tasks simple and easy.
- It supports advanced Components for Application:
APEX provides various advanced functionalities for our applications such as new Combobox, Image Upload, and QR Code Generator items. Thus, we do not need to use third-party API for complex JavaScript code for such features.
- Oracle APEX is portable:
Users can run Oracle APEX on various platforms such as Cloud or On-premises systems. We can run it in any environment according to our requirements.
- It supports Stateless and Serverless configuration:
The APEX Application has a Stateless and Serverless configuration. Additionally, the states of the connections are stored in the tables so that they can be reused again. Therefore, we can develop applications with less number of connections.
- It helps us in SaaS integrations:
We can easily integrate our ERP System with the Oracle APEX platform to simplify the business processes. We can also integrate the REST Web Services and other databases for data access.

With these features, it becomes a useful platform for application development. Now, let us what is required before we move on to APEX installation.
Prerequisites for Installation
- Oracle APEX is supported on a JavaScript-enabled browser. It supports multiple browsers namely Google Chrome, Mozilla Firefox, Apple Safari, and Microsoft Edge.
- To run the Oracle APEX on your Windows System, Oracle Database 19c or later has to be installed and configured.
- ORDS Server configuration requires Java installation. Thus, it is recommended to install the latest version of JDK (Java Development Kit).
- APEX also requires the Oracle REST Data Services (ORDS) version 20.0 or later. It is a Java-based server that will used for Database Actions, Oracle APEX access, and REST APIs for our databases.
Follow the steps mentioned in the subsequent sections to configure the prerequisites and Oracle APEX on your Windows System.
Oracle Database Installation and Configuration
- Step 1: Go to the site https://www.oracle.com/in/database/technologies/oracle19c-windows-downloads.html and click on the link to download the Oracle 19c as shown below:

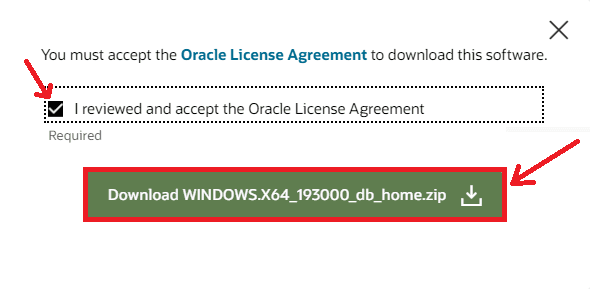
- Step 2: Accept the license and click on the ‘Download’ button.
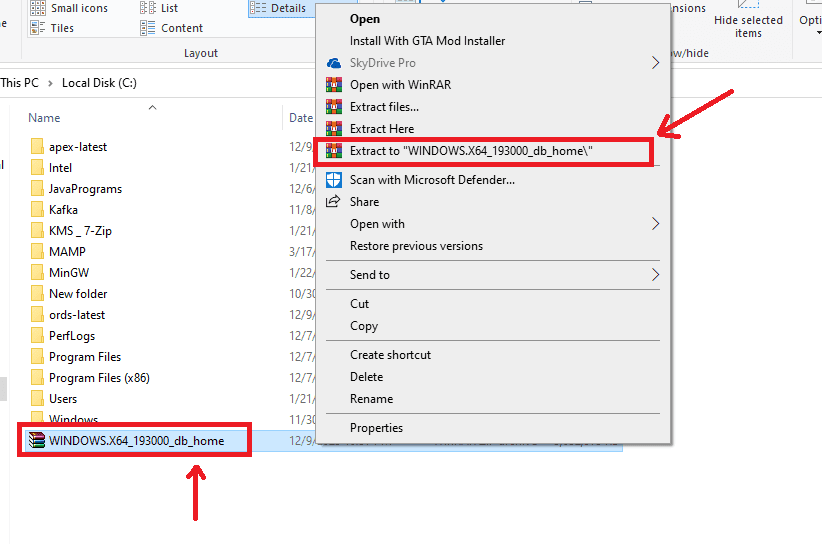
- Step 3: Locate the file and extract its contents as depicted below:
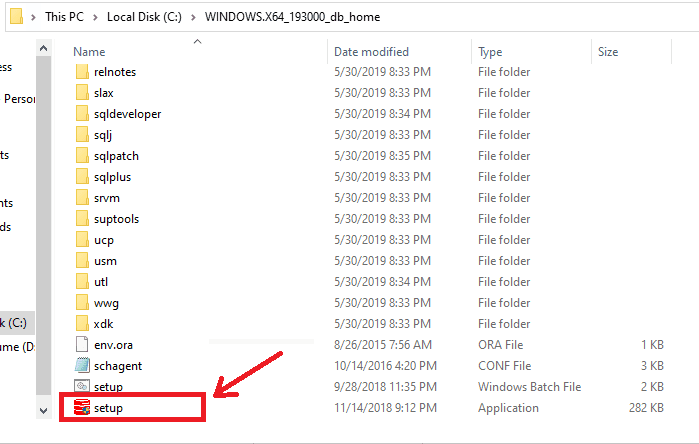
- Step 4: Now, open the extracted folder and scroll down to find the setup file. Double-click on it to start the installation.
- Step 5: The installation wizard appears as shown below. Choose the ‘Set up software’ option and click ‘Next.’

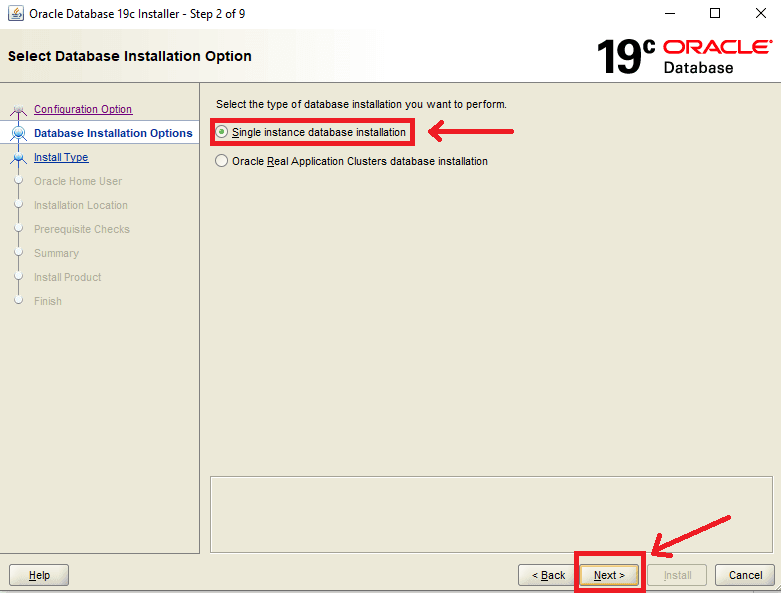
- Step 6: Keep the options of Single database instance selected by default and click ‘Next.’
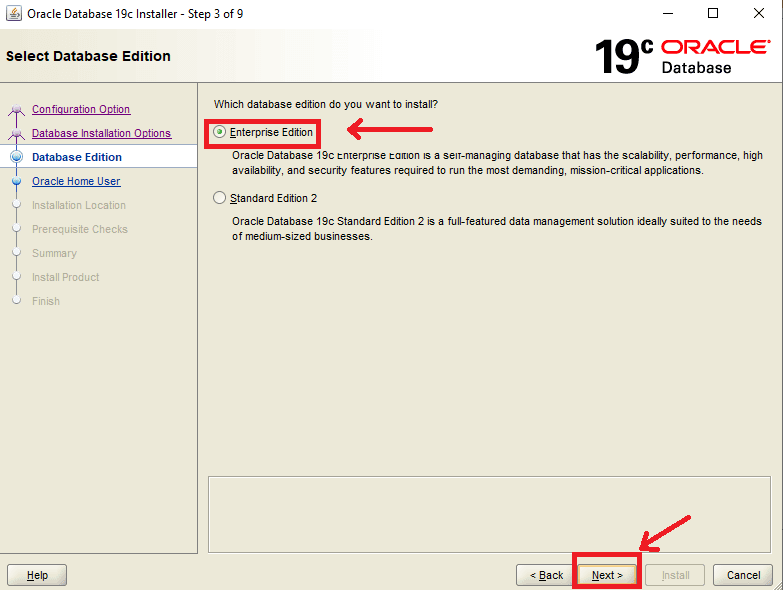
- Step 7: Leave the ‘Enterprise Edition’ option as selected and click on ‘Next.’
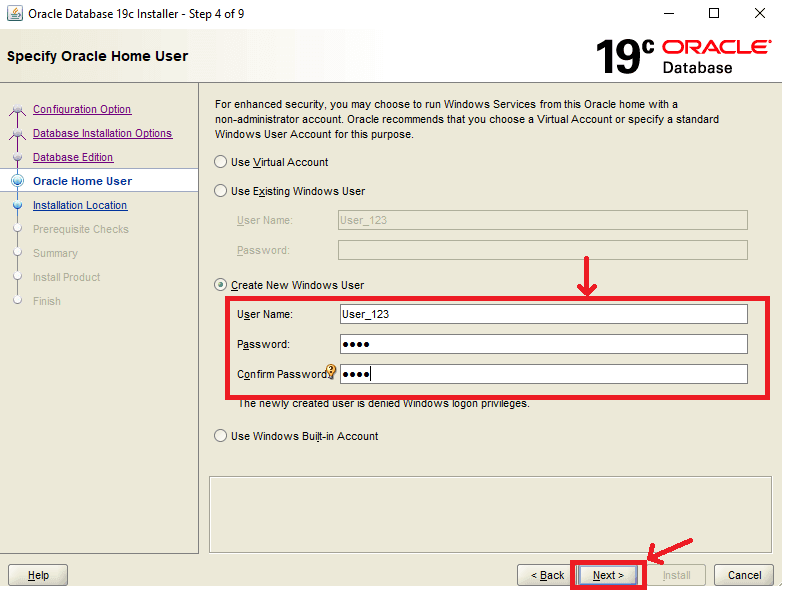
- Step 8: Specify your preferred username and password and continue by clicking on the ‘Next’ button.
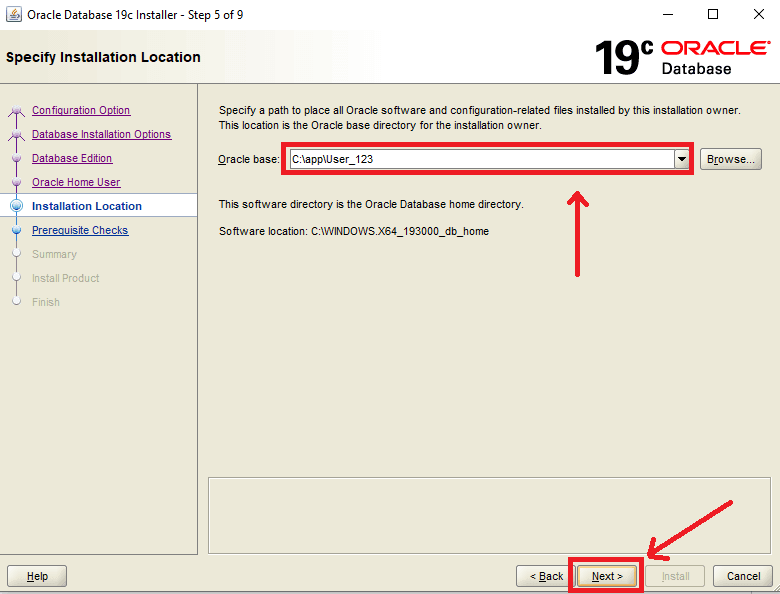
- Step 9: Specify the path to the directory where you want to install the Oracle database.
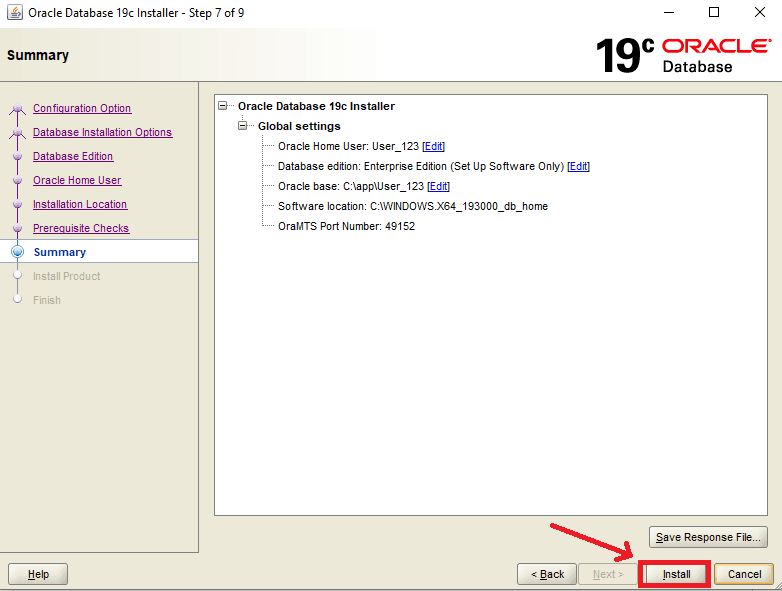
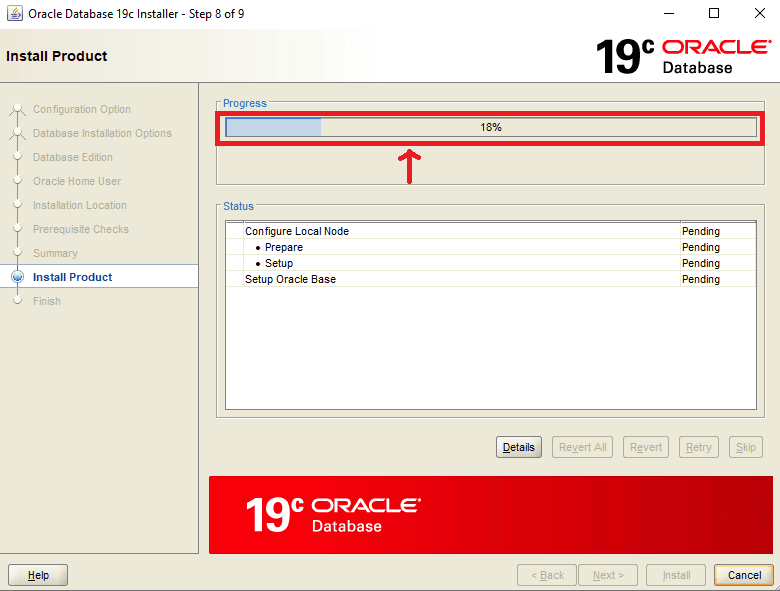
- Step 10: Now, prerequisite checks will be performed as shown below. Click on ‘Install’ to start the installation.
- Step 11: Installation starts as shown below.
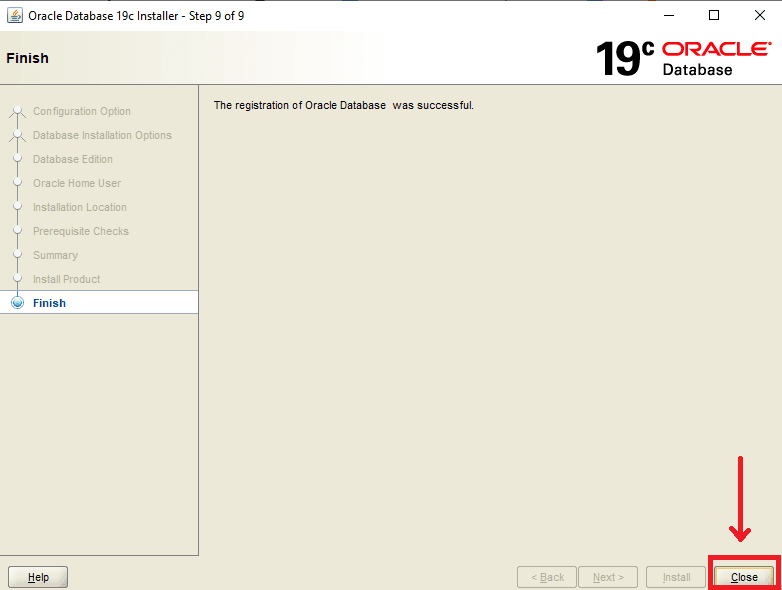
- Step 12: Close the installation wizard after it is completed.
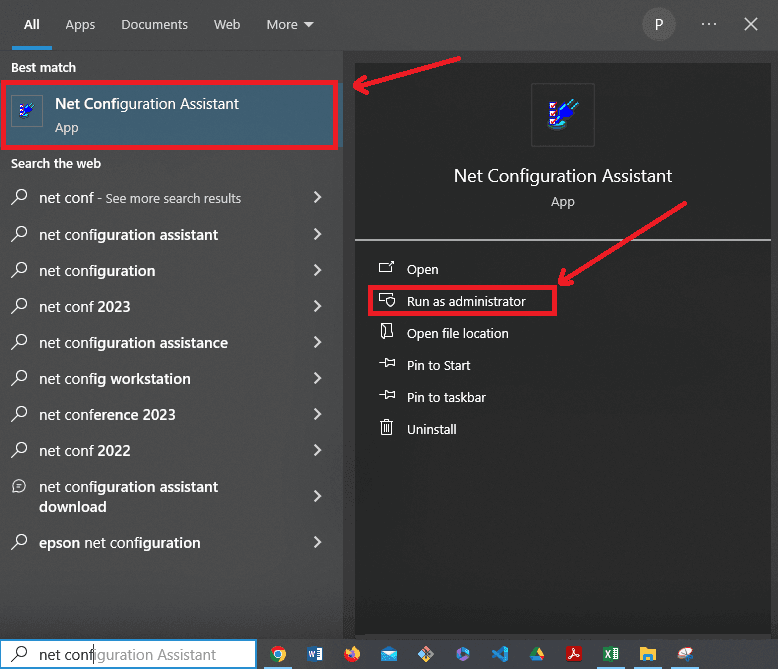
- Step 13: Search for the ‘Net Configuration Assistant’ and select ‘Run as administrator’ as shown below:
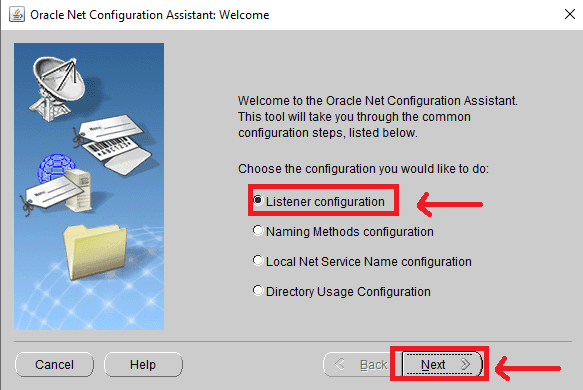
- Step 14: Choose ‘Listener Configuration’ and click ‘Next.’
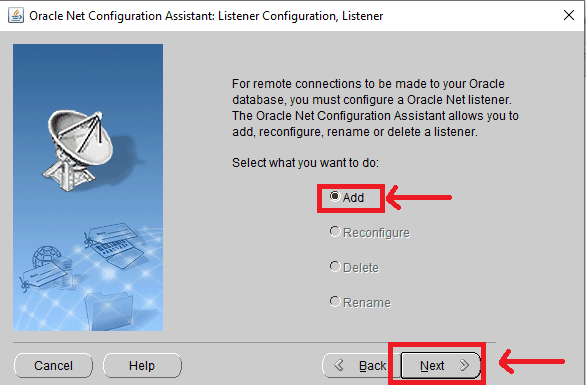
- Step 15: Choose the ‘Add’ option and select ‘Next.’
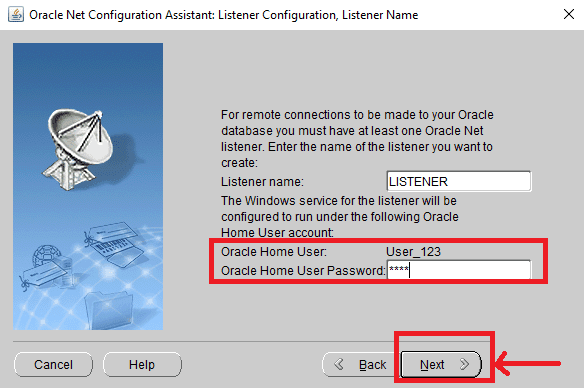
- Step 16: Keep the name ‘LISTENER’ by default and enter your password which we set in step 8. Then, click ‘Next.’
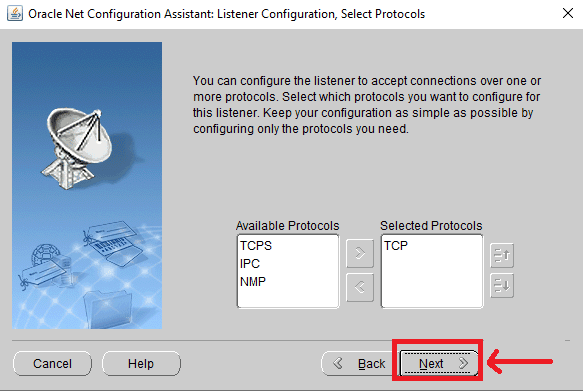
- Step 17: Keep the settings by default and continue to ‘Next.’
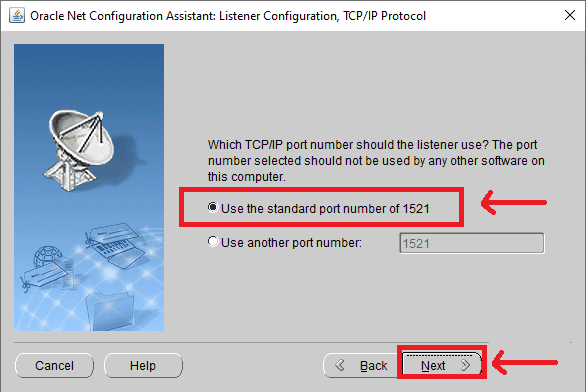
- Step 18: Select to use the standard port and click ‘Next.’
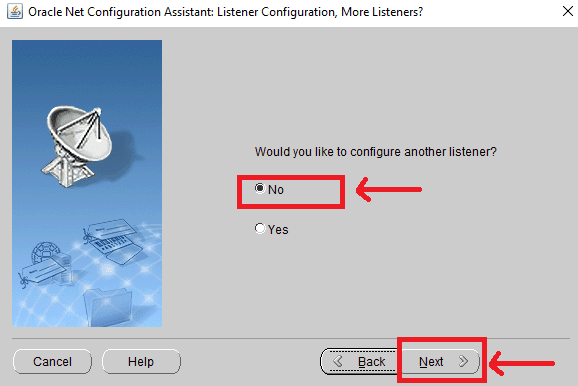
- Step 19: Now, click the ‘No’ option and select the ‘Next’ option.
- Step 20: Again, click on ‘Next.’

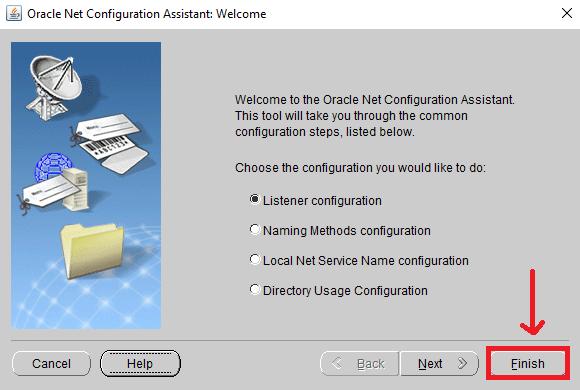
- Step 21: Finally, select ‘Finish’ to exit the configuration wizard.
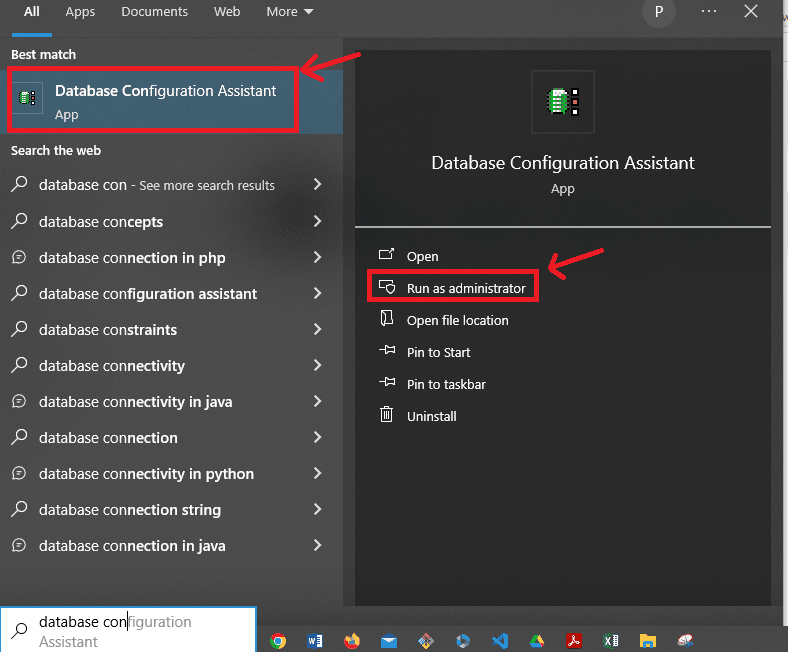
- Step 22: Now, search for ‘Database Configuration Assistant’ and run it as administrator as shown below.
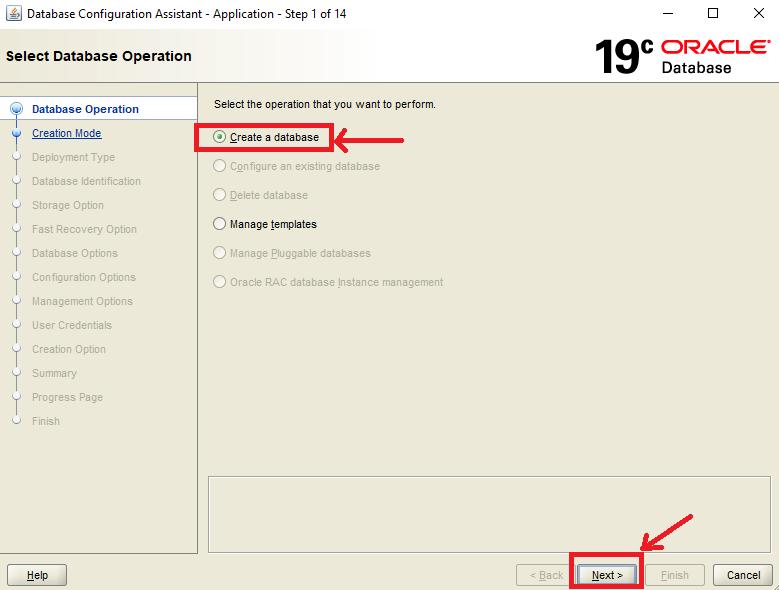
- Step 23: Select the ‘Create Database’ option and click ‘Next.’
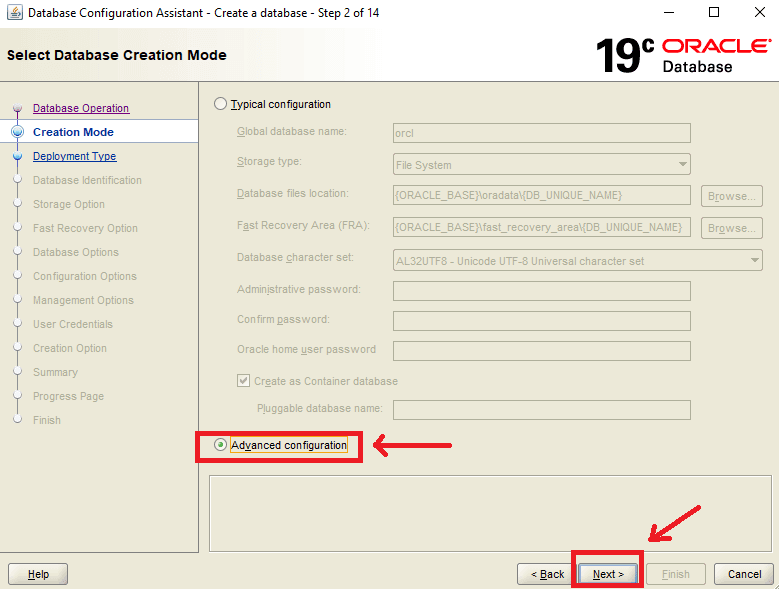
- Step 24: Select the ‘Advanced Configuration’ and continue to ‘Next.’
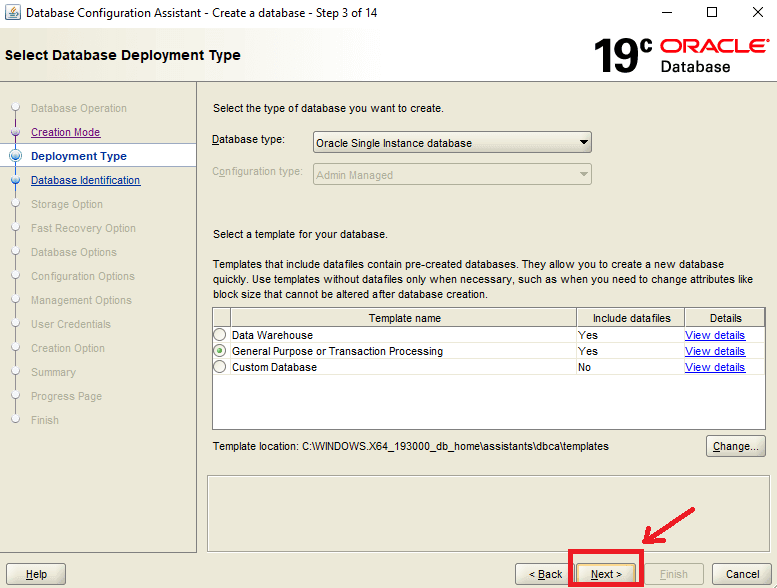
- Step 25: Leave the settings as default and continue to ‘Next.’
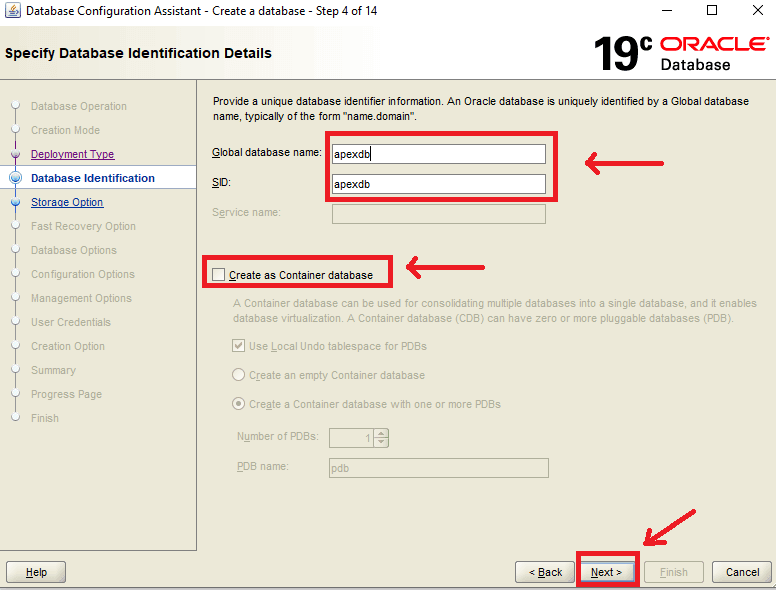
- Step 26: Select a name for your database. Here, we are using the name ’apexdb.’ Uncheck the ‘Create as Container Database’ option and then, click ‘Next.’
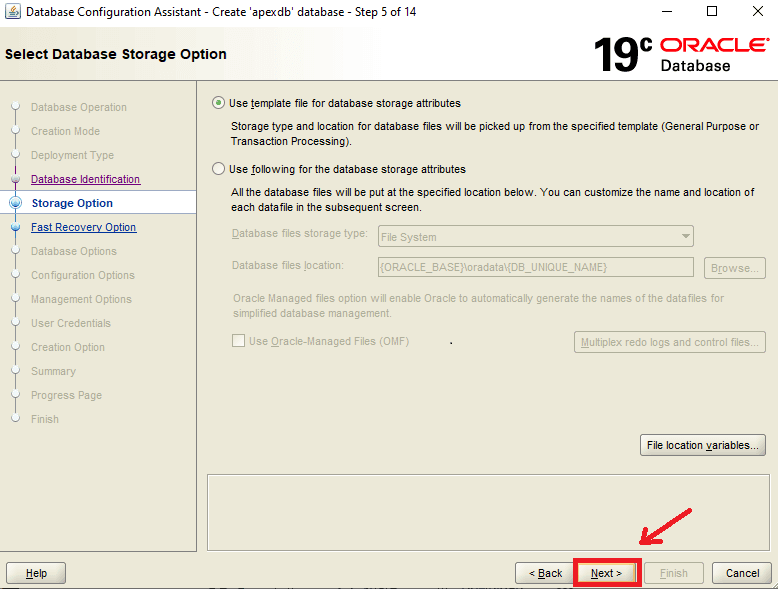
- Step 27: Keep the settings as default and then select the ‘Next’ option to proceed ahead.
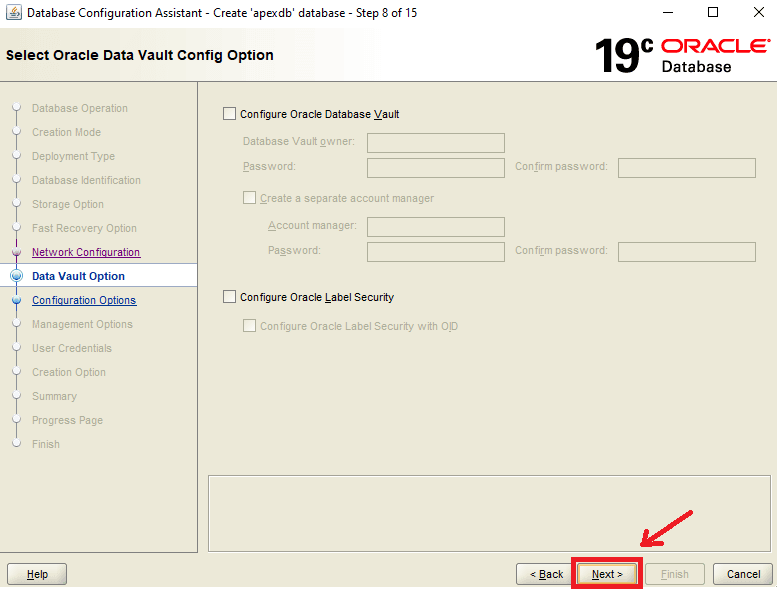
- Step 28: Again, leave the default settings unchanged and continue to ‘Next.’
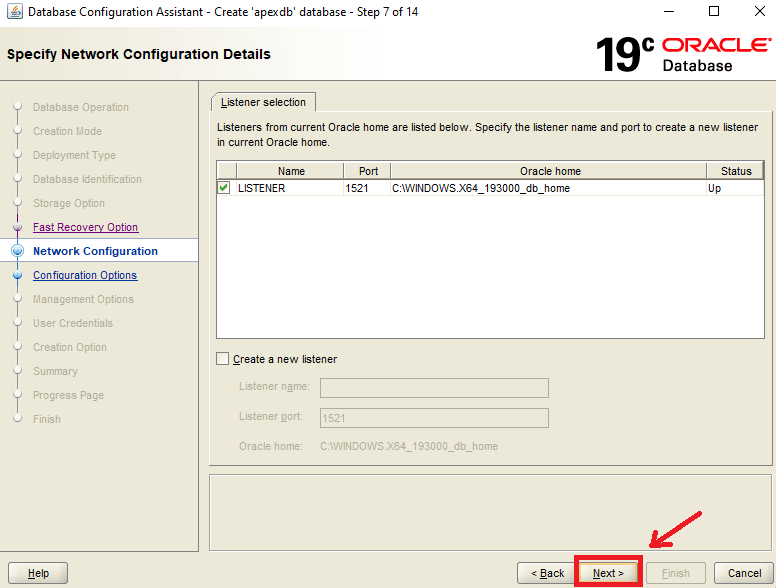
- Step 29: After the Listeners are identified, click on the ‘Next’ button.
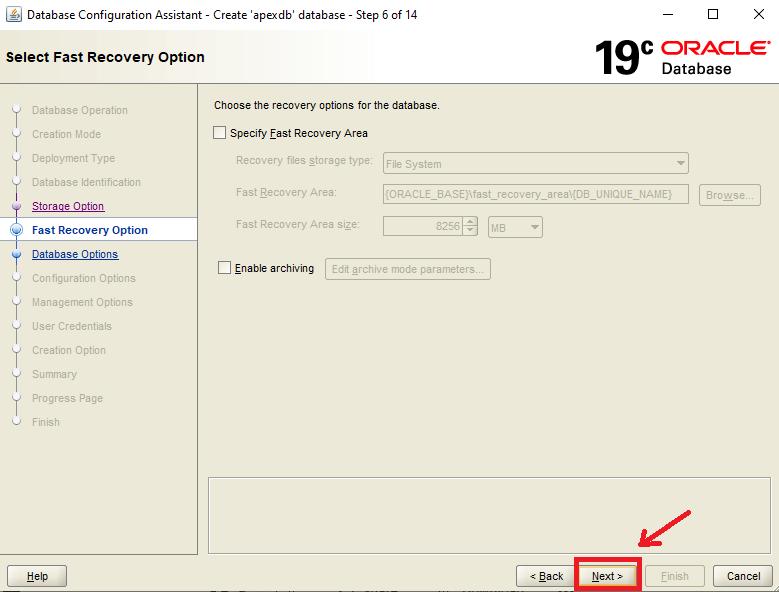
- Step 30: Without changing the default settings, continue to ‘Next.’
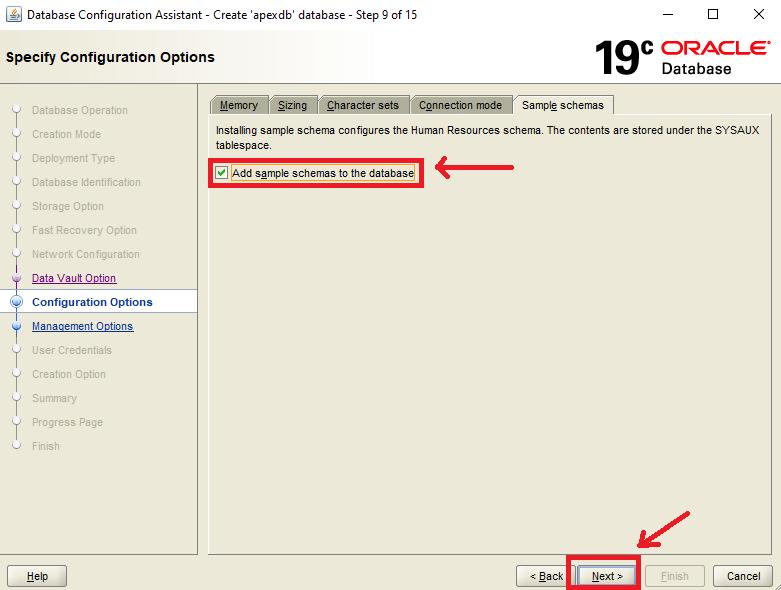
- Step 31: In the Sample Schemas Tab, mark the ‘Add sample schemas to database’ and click on the next.’
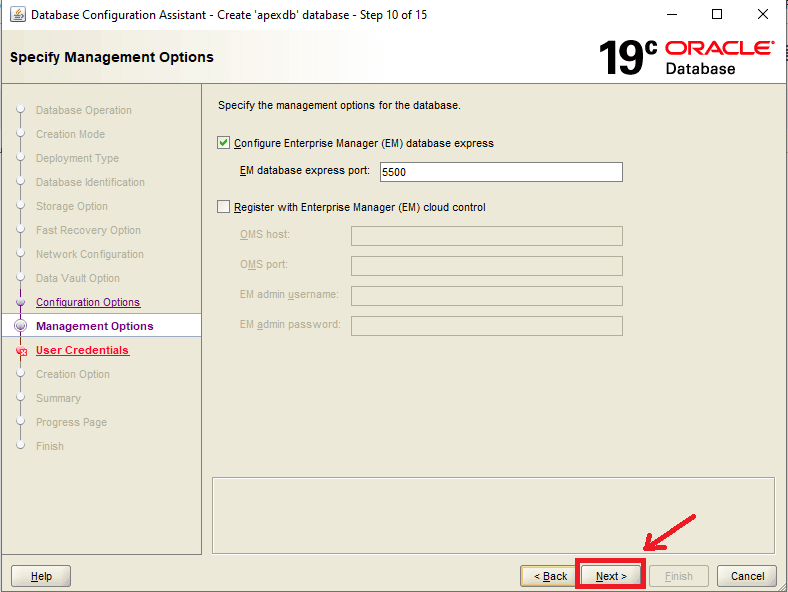
- Step 32: Leave the port as default and click the ‘Next’ button to continue.
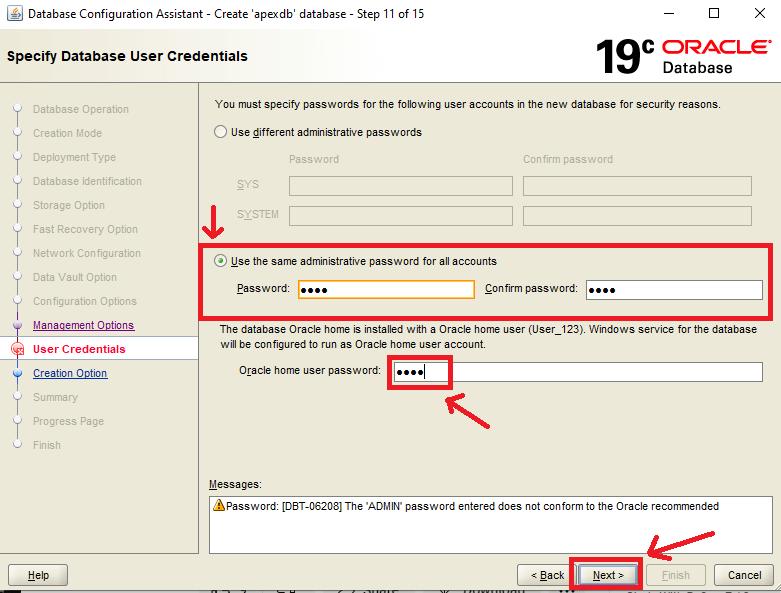
- Step 33: In this step, we are adding the same passwords for all kinds of administrative accounts, for simplicity. You can prefer passwords according to preference.
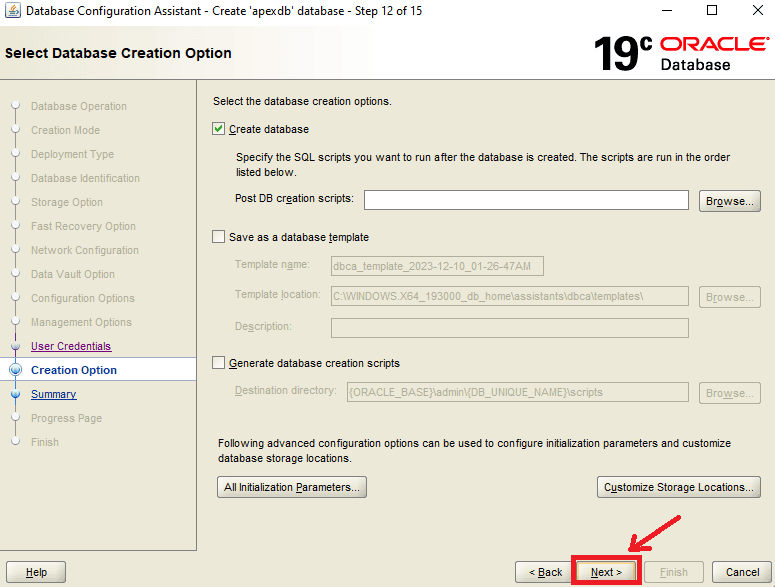
- Step 34: Click on the ‘Next’ button to continue.
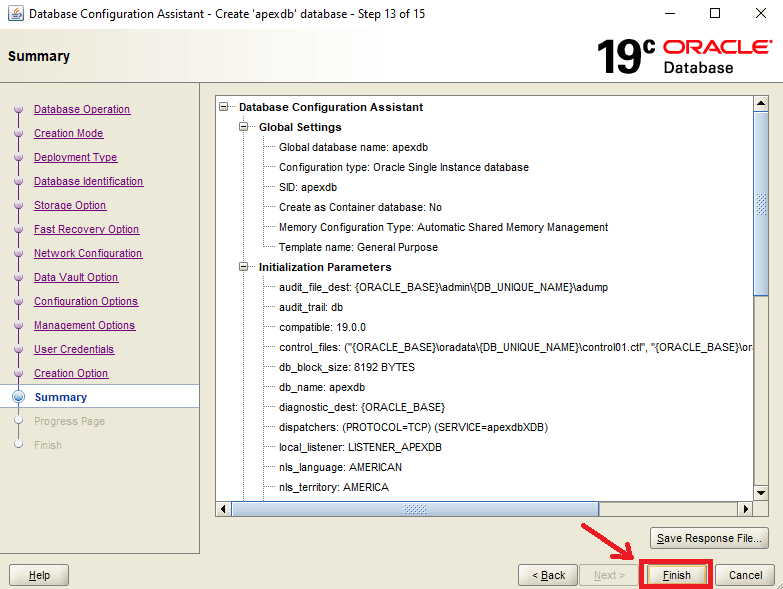
- Step 35: Click on the ‘Finish’ button.
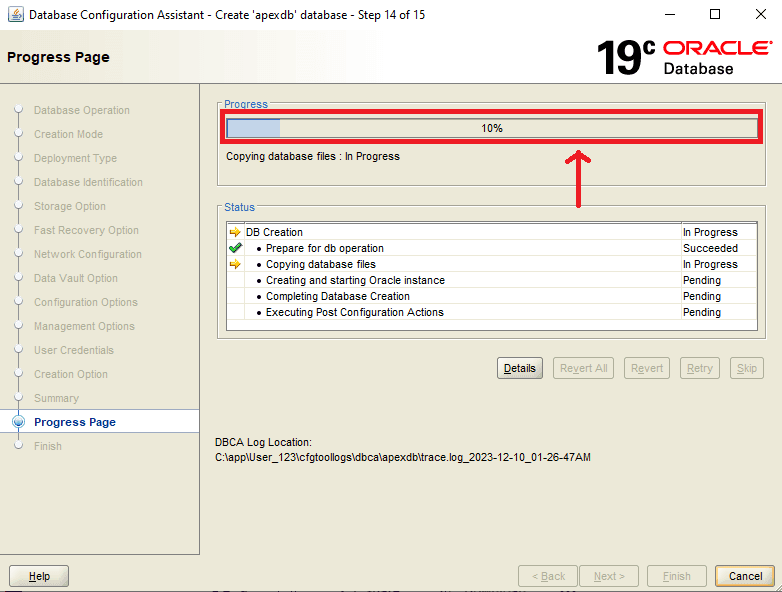
- Step 36: The setup starts creating the database as demonstrated below:
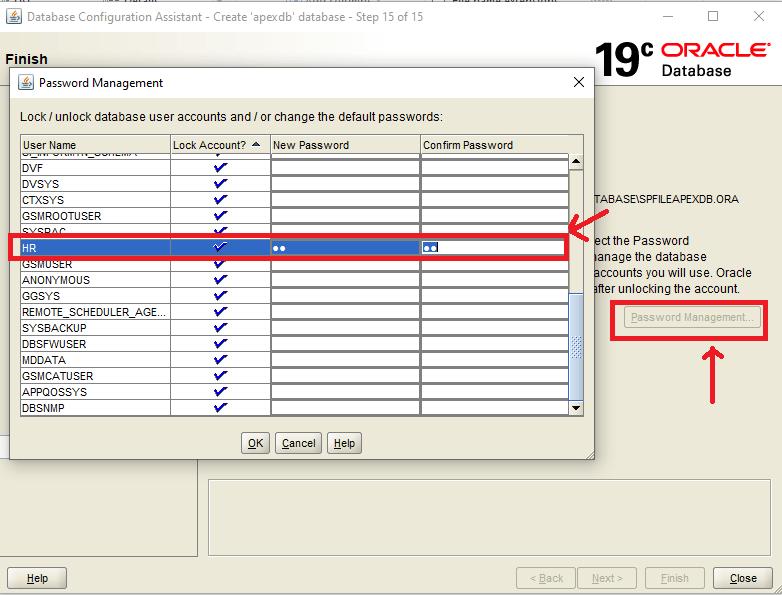
- Step 37: After the setup is done, click on password management. Set a password for the ‘HR’ user as shown below:
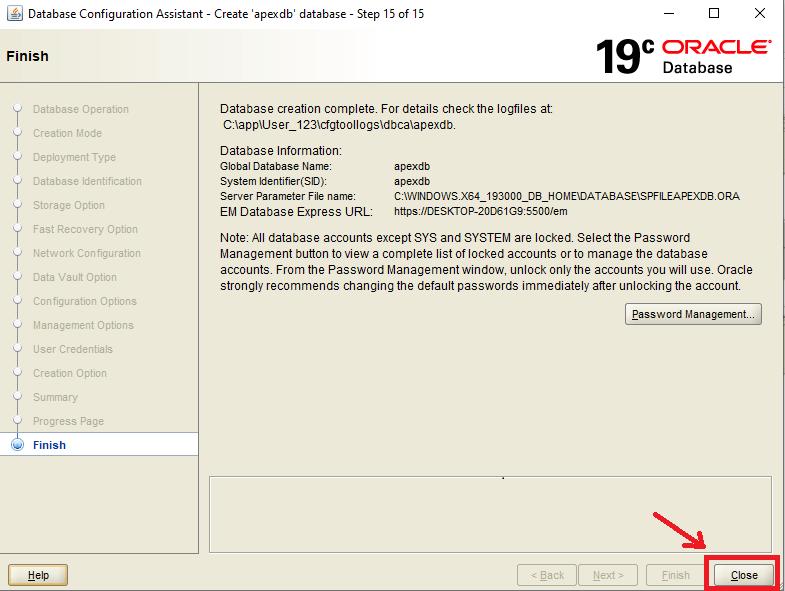
- Step 38: Therefore, the database has been successfully created.
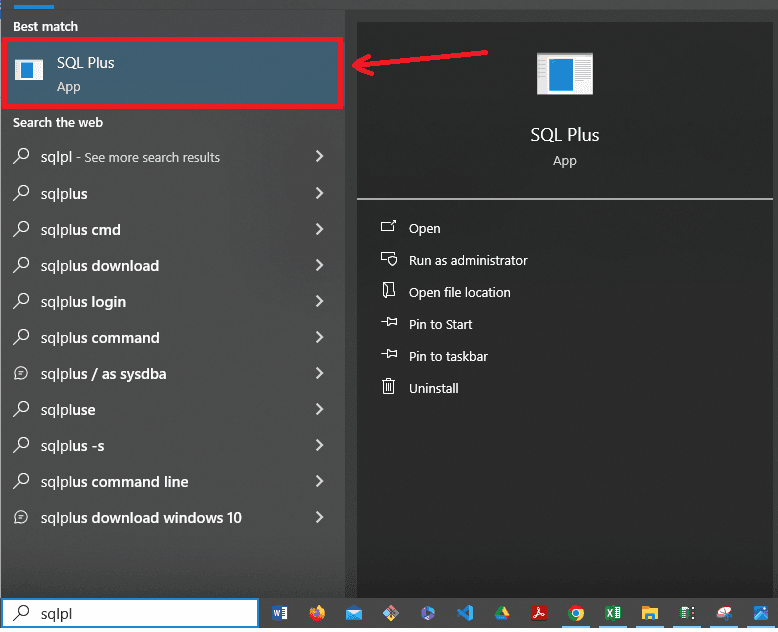
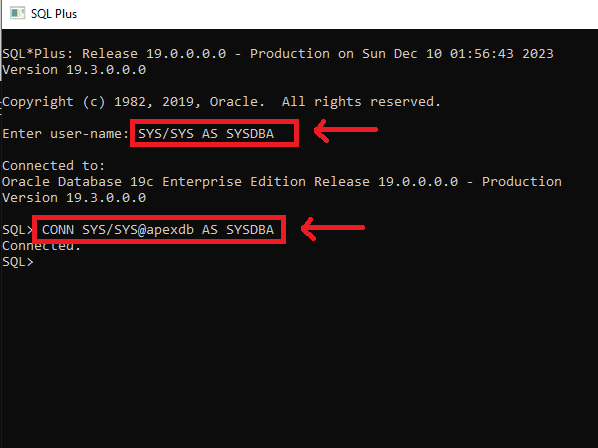
- Step 39: Now, we will connect to our database. Open the SQLPlus CLI Interface as shown below:
- Step 40: First, execute the command ‘SYS/SYS AS SYSDBA’ and connect the database. Then, run the ‘CONN SYS/SYS@apexdb AS SYSDBA’ command to connect to the ‘apexdb’ database that we created. The terminal should appear as shown below.
JDK Installation
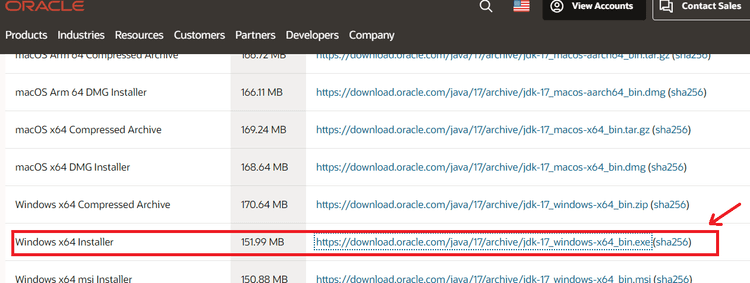
- Step 1: Visit the official site https://www.oracle.com/java/technologies/javase/jdk17-archive-downloads.html. Then, scroll down to find the JDK 17 archives and click on the link for JDK 17 as shown below:
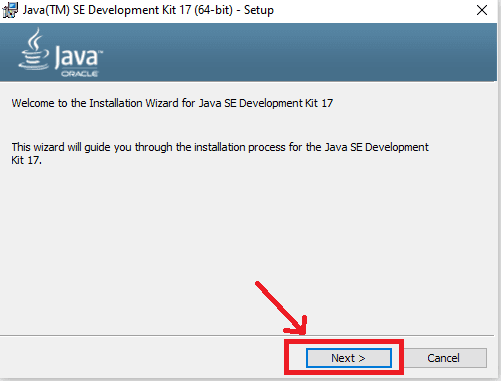
- Step 2: Locate the file and double-click on it to start the installation. After the installation wizard launches, click on the ‘Next’ button.
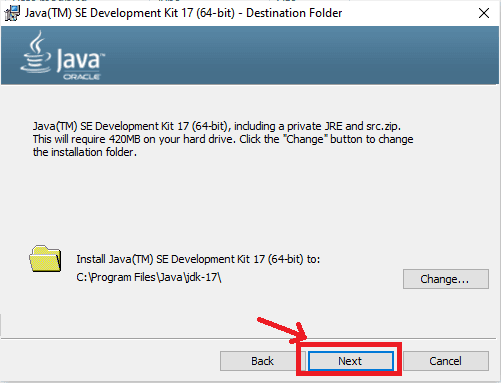
- Step 3: Specify the destination path where the JDK will be installed. Then, Click on the Next Button.
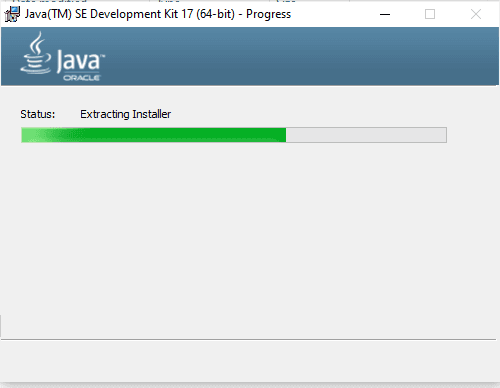
- Step 4: The installation process begins as outlined below.
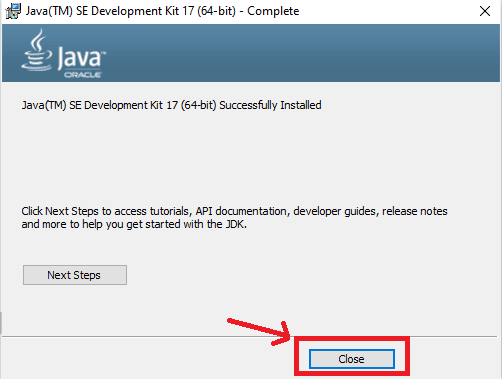
- Step 5: Close the wizard after the installation is done successfully. Now, we need to configure the environment variable of our system so that the necessary libraries and modules for the Java Program execution can be easily found.
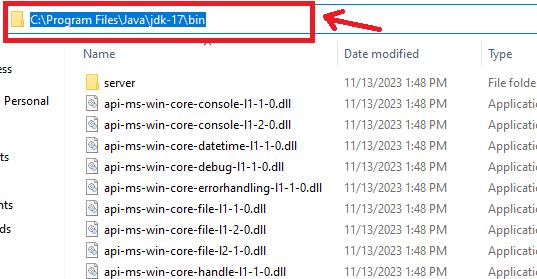
- Step 6: Find the bin folder inside the JDK 17 directory and copy its path.
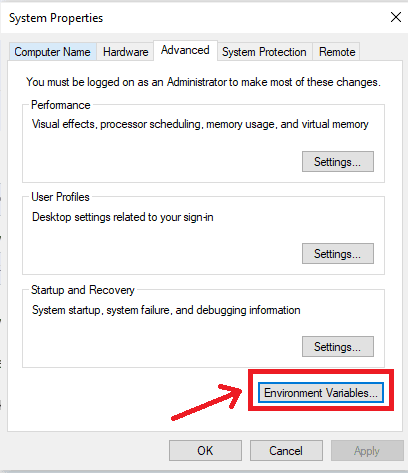
- Step 7: Open the control panel then, go to the advanced system settings, and click on the ‘Environment Variables’ as outlined below.
- Step 8: Select the ‘PATH’ under the System Variables. Click on the ‘Edit’ button.
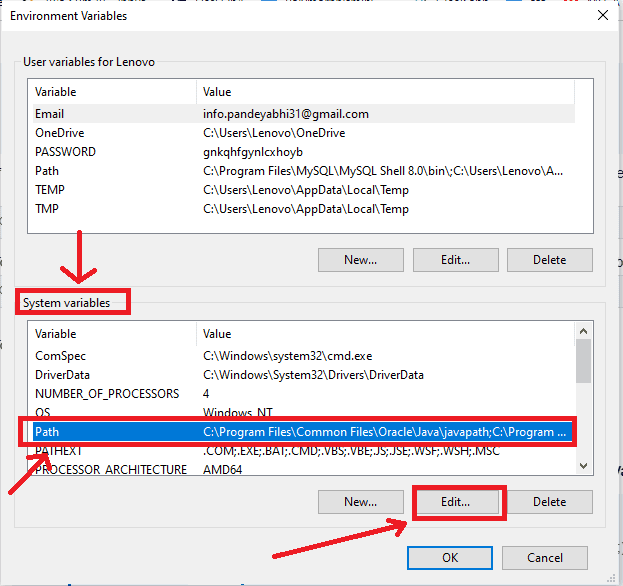
- Step 9: Now, click on the ‘New’ option and add the location of the bin folder of the JDK folder to the PATH variable as illustrated below.
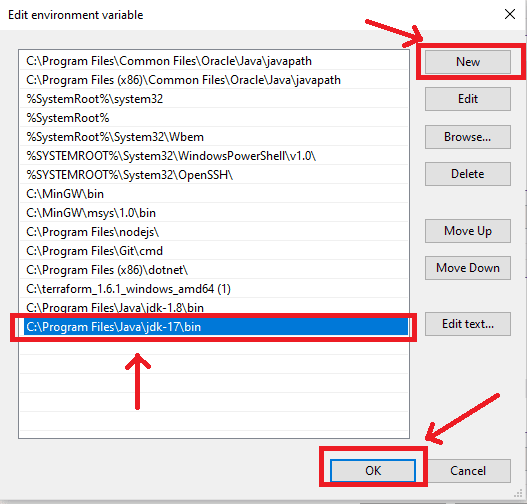
After this, close the Advanced System Settings wizard.
- Step 10: To verify your installation, pen the command prompt and run the command ‘java -version’ outlined below.
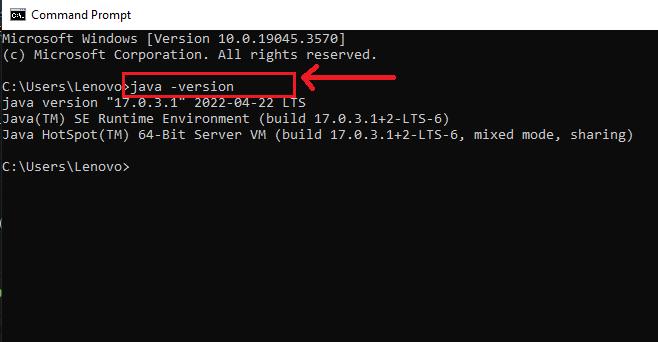
Thus, JDK has been successfully installed on our system.
Steps to Install Oracle APEX
Apex Installation and Configuration
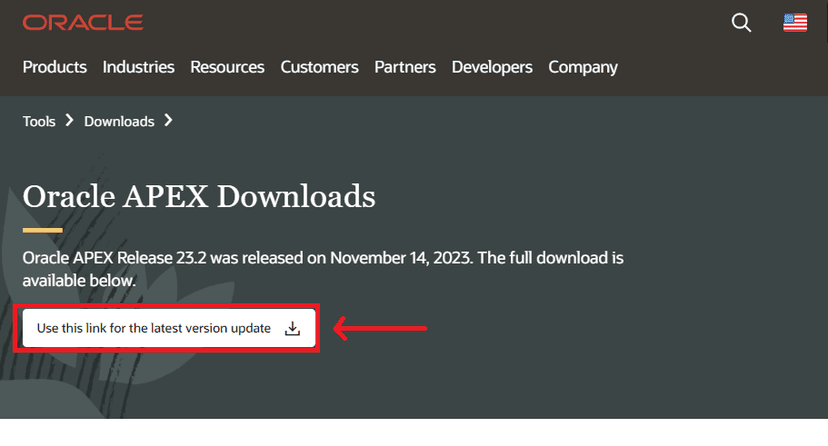
- Step 1: Go to the official website https://www.oracle.com/tools/downloads/apex-downloads/ and click on the download link of the latest version as shown below.
- Step 2: Locate the zip folder and extract its contents as shown below. After the contents have been extracted, rename the folder to ‘oracle_apex’ for simplicity.

- Step 3: Now, navigate to the ‘apex’ subfolder folder inside the main directory ‘oracle_apex’ as shown below:

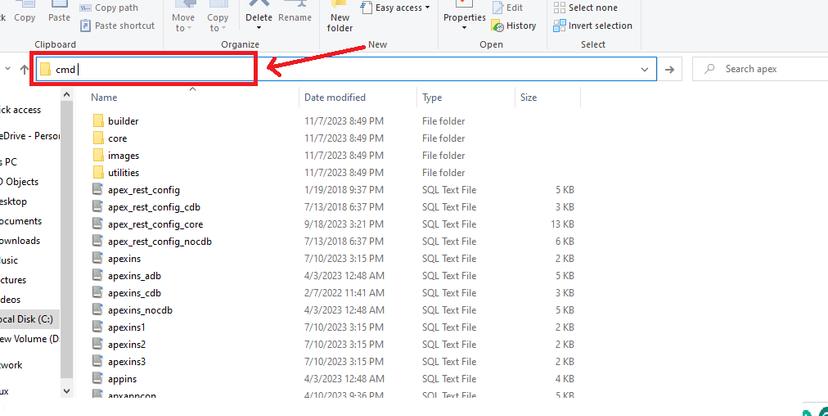
- Step 4: In this location, type ‘cmd’ and press ‘Enter’ to open the ‘command prompt’ as shown below.
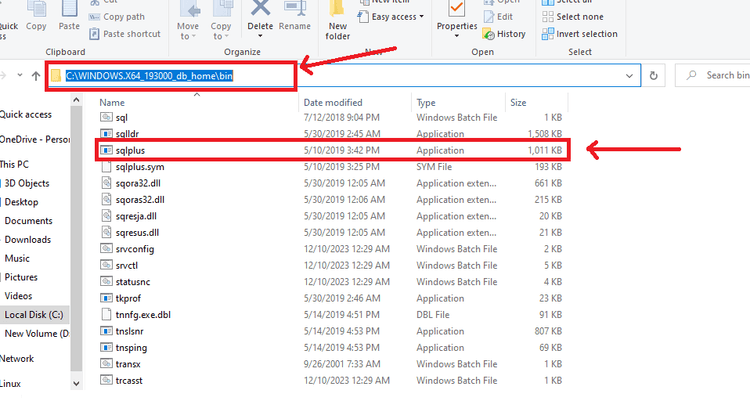
- Step 5: Now, we will connect to the database in this location. Minimize the command prompt, then go to the bin folder of the Oracle database 19c folder and locate the file ‘sqlplus.exe.’ This will be used to connect to the database to install the Apex on your system.
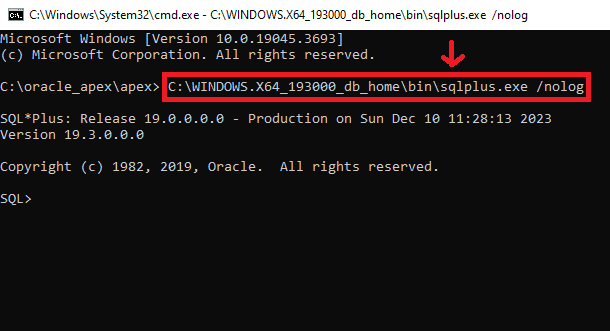
- Step 6: In the command prompt (inside the apex folder), execute the command ‘C:\WINDOWS.X64_193000_db_home\bin\sqlplus.exe /nolog’ to use the Oracle database. The terminal should appear as shown below.
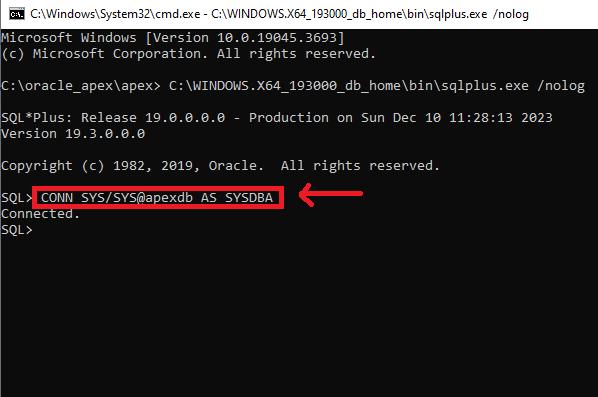
- Step 7: Run the command ‘CONN SYS/SYS@apexdb AS SYSDBA’ to connect to the database.
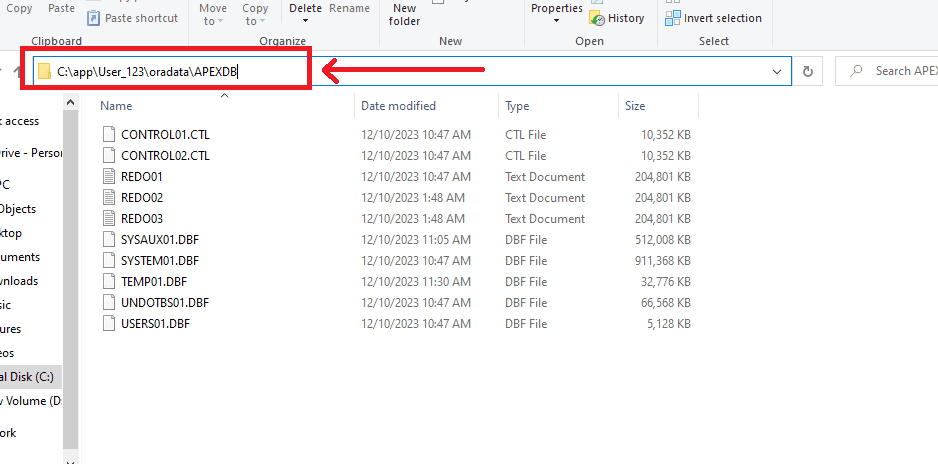
- Step 8: We will now create a tablespace to handle the APEX installation. Use the location to database location that we specified in step 9 of the ‘Oracle Database installation’ to create the table space. You can find the location as shown below.
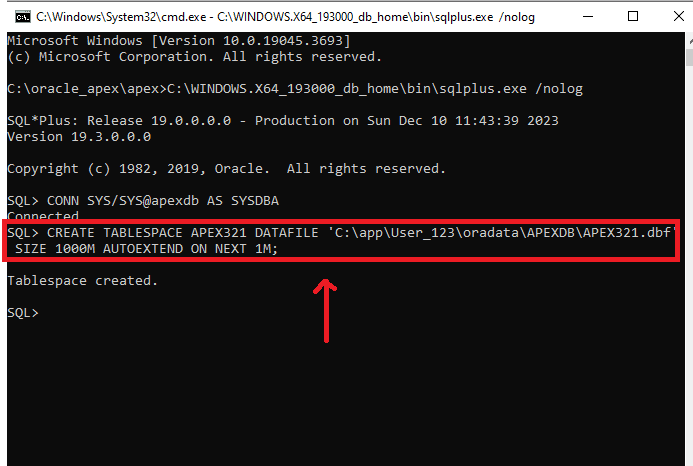
- Step 9: Run the query ‘CREATE TABLESPACE APEX321 DATAFILE 'C:\app\User_123\oradata\APEXDB\APEX321.dbf' SIZE 1000M AUTOEXTEND ON NEXT 1M;’ to create the table space as outlined below.
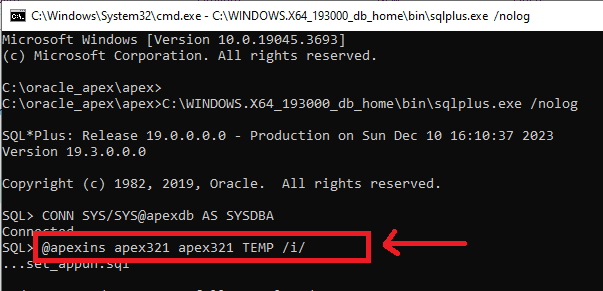
- Step 10: Run the script ‘@apexins.sql APEX321 APEX321 TEMP /i/’ to start the apex installation.
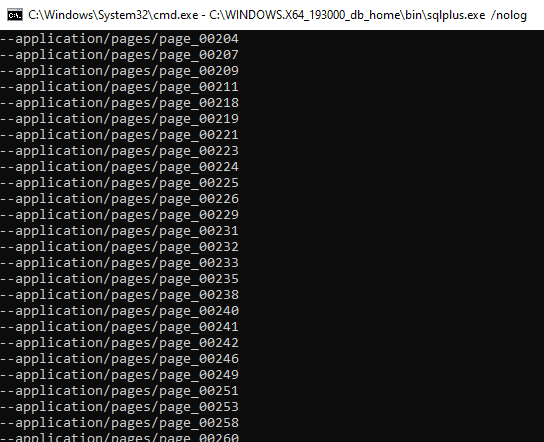
- Step 11: The installation begins as outlined below.
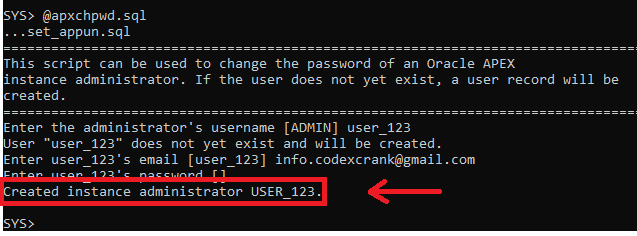
- Step 12: After the installation has been done, run the command ‘@apxchpwd.sql’ to specify the administrator’s username and password. You have to make sure that the password must be according to Oracle’s password policy.
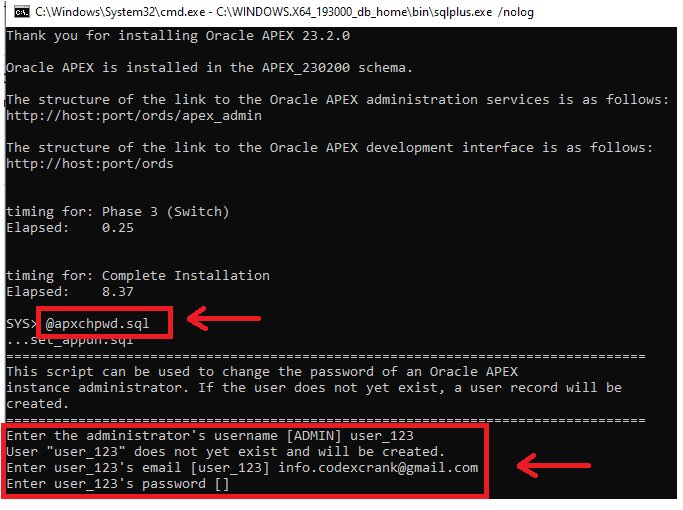
- Step 13: After the instance is created, the terminal should appear as depicted below.
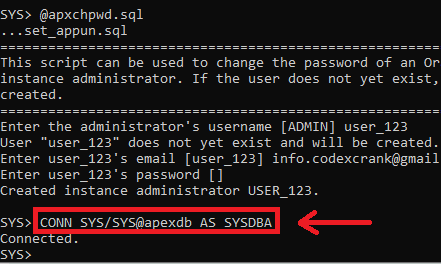
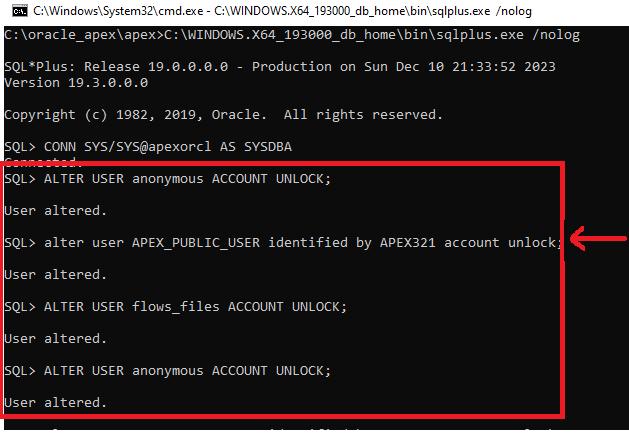
- Step 14: Now, again run the command ‘CONN SYS/SYS@apexdb AS SYSDBA’ to connect to the database.
- Step 15: Run the following SQL commands one by one to unlock the database accounts.
- ALTER USER anonymous ACCOUNT UNLOCK;
- alter user APEX_PUBLIC_USER identified by APEX321 account unlock;
- ALTER USER flows_files ACCOUNT UNLOCK;
The terminal should appear as shown below.
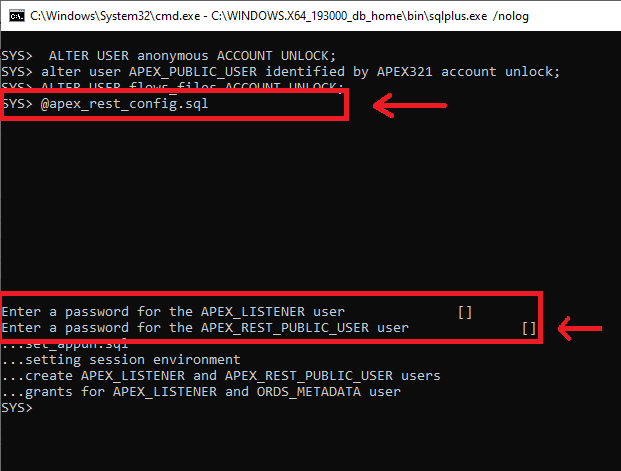
- Step 16: Now, we will create the required users for the ORDS web listener. Run the command ‘@apex_rest_config.sql’ and enter the passwords as illustrated below.
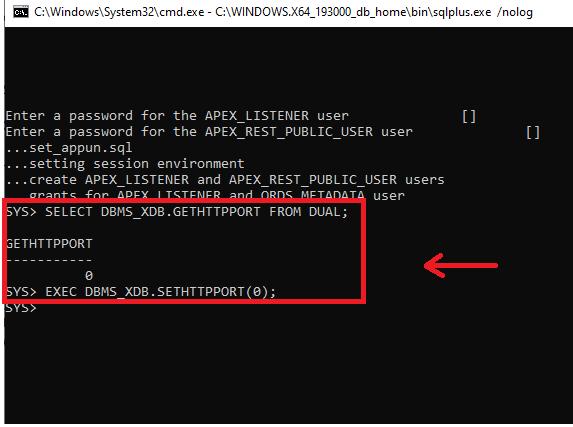
- Step 17: Now, disable the Oracle XML DB Protocol Server by using the following commands:
- SELECT DBMS_XDB.GETHTTPPORT FROM DUAL;
- EXEC DBMS_XDB.SETHTTPPORT(0);
The terminal shows the output as demonstrated below.
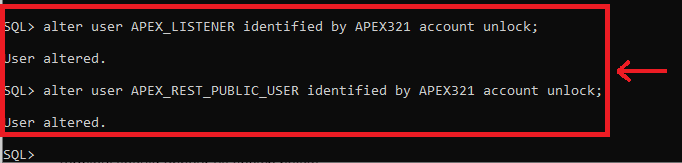
- Step 18: Now, execute two more SQL queries which are stated below:
- alter user APEX_LISTENER identified by APEX321 account unlock;
- alter user APEX_REST_PUBLIC_USER identified by APEX321 account unlock;
The terminal should appear as shown below.
Configuring ORDS Server
Now, we will need to configure the Oracle REST Data Server so that our Oracle APEX can run on the server using the browser.
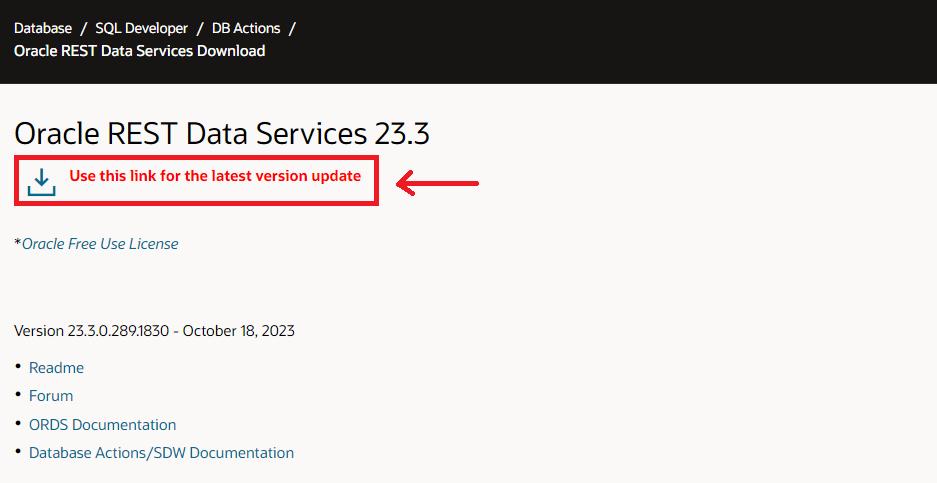
- Step 1: Go to the website https://www.oracle.com/database/sqldeveloper/technologies/db-actions/download/ and download the ORDS Zip file as shown below:
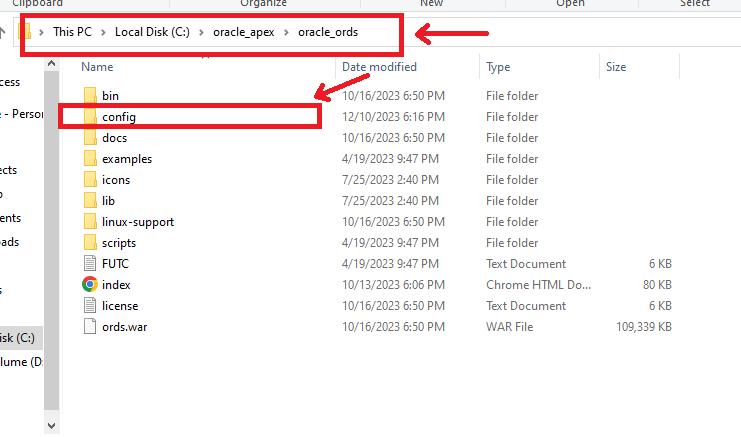
- Step 2: Locate the file and extract its contents in the same location. Then, rename the folder to the ‘oracle_ords.’ After this, move that folder inside the ‘oracle_apex’ folder.

- Step 3: Also, inside the ‘oracle_ords,’ create a new folder with the name ‘config’.
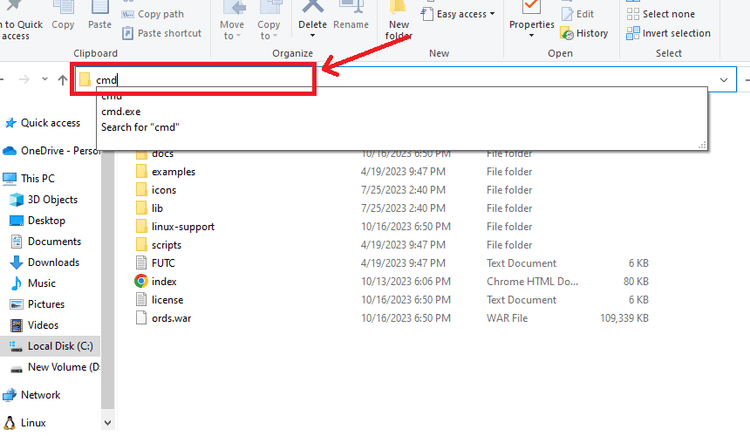
- Step 4: Navigate to the folder ‘oracle_ords’ and type ‘cmd’ in the path specifier. Then, press enter to open the command prompt.
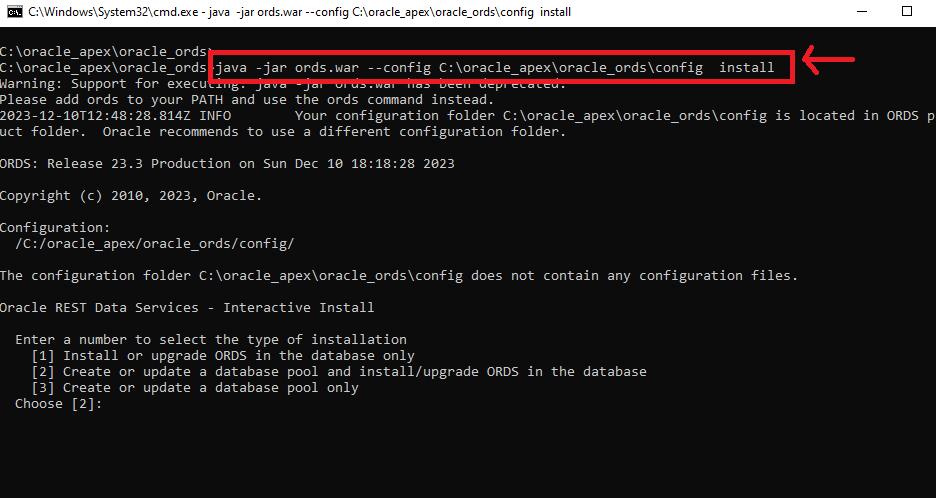
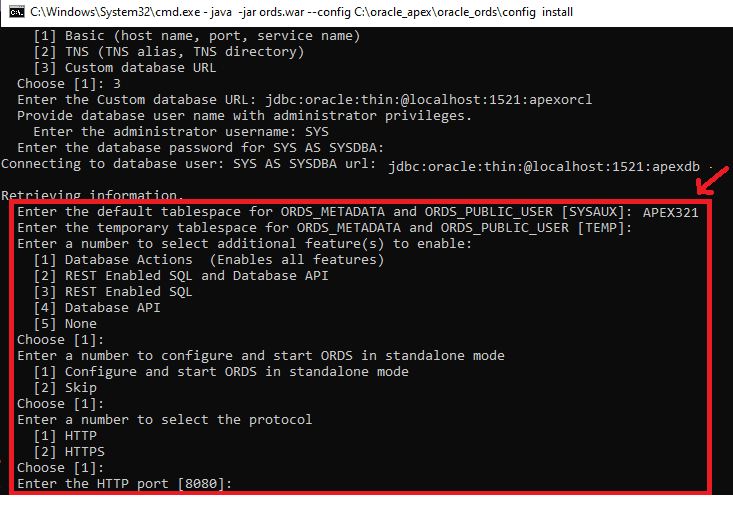
- Step 5: Now, execute the command ‘ java -jar ords.war --config C:\oracle_apex\oracle_ords\config install ’ to start ORDS installation. The installation begins as demonstrated below.
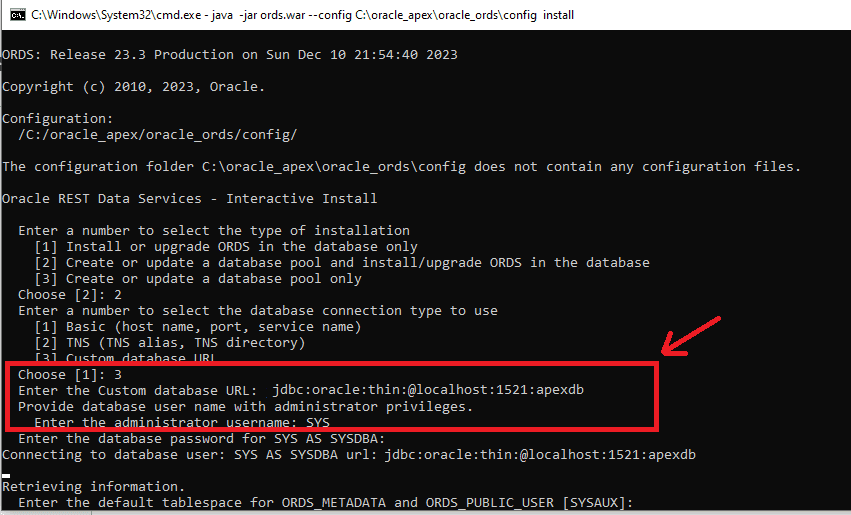
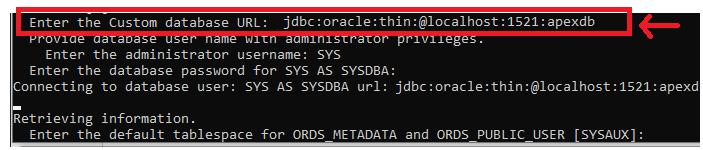
- Step 6: Enter 2 for the first option and press the ‘Enter’ button. In the option for making the request, choose to make a request with a custom database string which is ‘jdbc:oracle:thin:@localhost:1521:apexorcl’ as demonstrated below.
- Step 7: Now, enter the default table space we created. Then, press ‘Enter’ in all of the options.
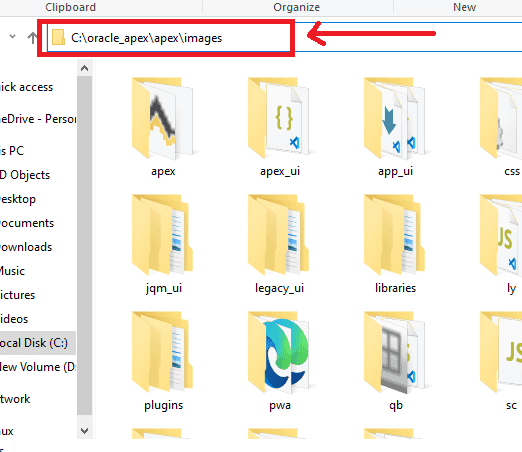
- Step 8: Now, in the Apex directory, locate the ‘images’ folder and copy its path as shown below.
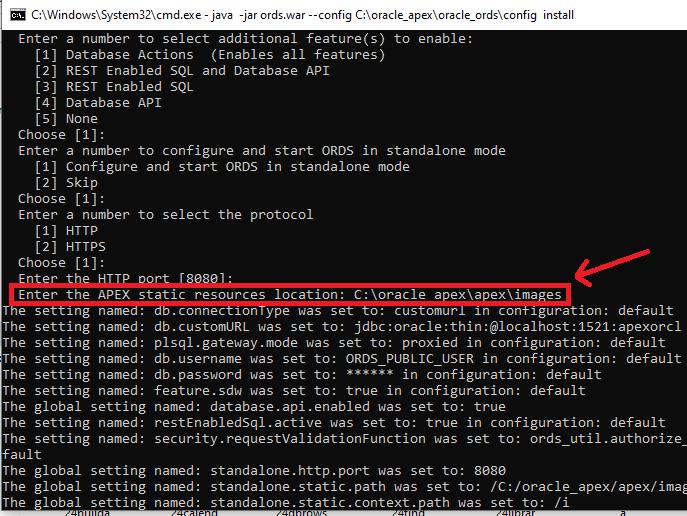
- Step 9: Specify the copied path in the destination for static resources as demonstrated below. Then, press ‘Enter.’ The ORDS installation starts as shown below.
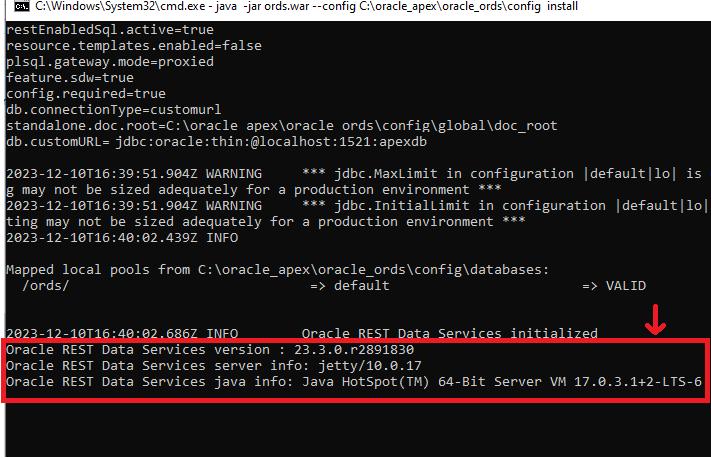
- Step 10: Once the installation is done, the terminal appears as depicted below.
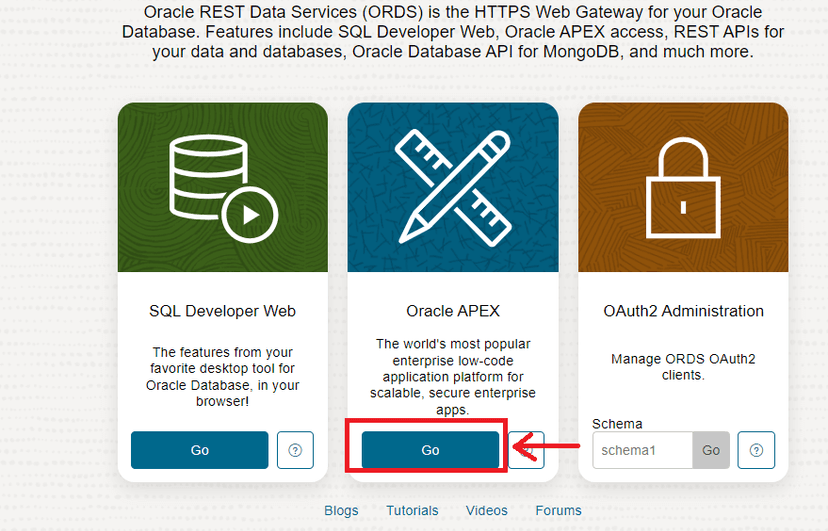
- Step 11: Open the ‘ http://localhost:8080/ords/apex_admin ’ on your browser. The home screen of the ORDS server is demonstrated below. Click on the ‘Go’ button in the Oracle APEX section.
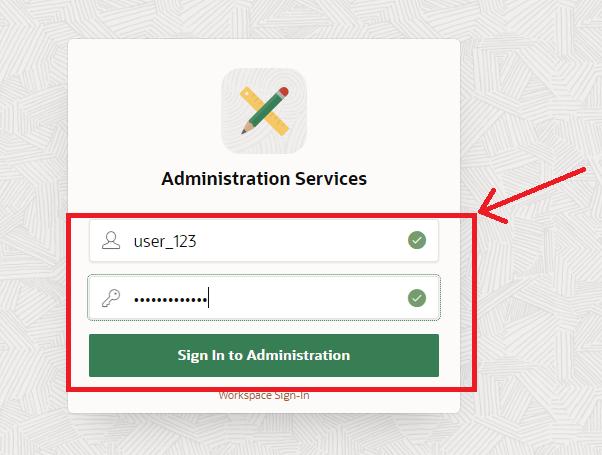
- Step 12: Enter the administrator name and password and sign in to your account.
- Step 13: The homescreen of the Oracle APEX appears as outlined below.
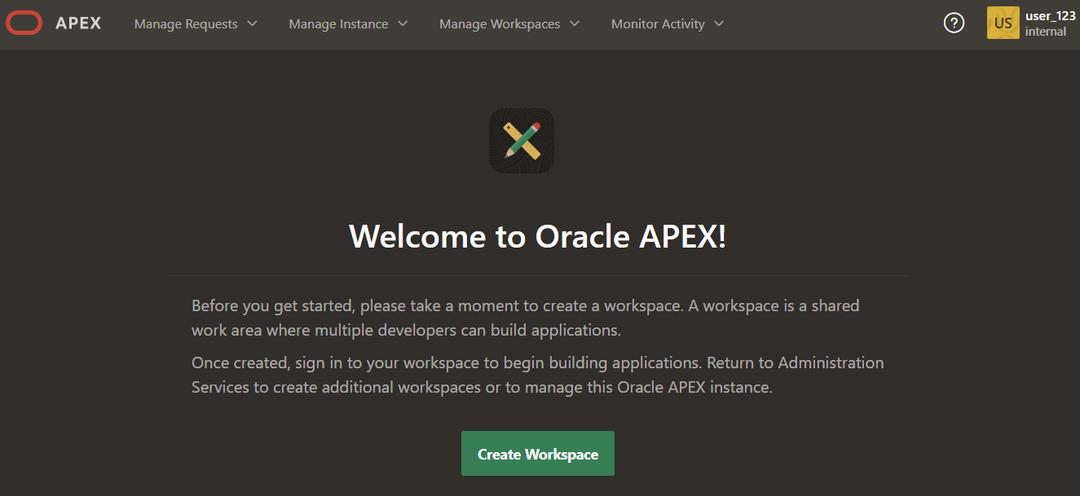
Now, you have successfully installed Oracle APEX on your Windows System. You are now capable of accelerating your low-code development with APEX.
Oracle Apex Frequently Asked Questions
1. What is Apps and Plugin Support in APEX?
Apps and Plugins extend the capabilities of the application which are not available in the native platforms. Oracle APEX has Sample App support for Charts, Map, Data Loading, Grid, etc. It also has Action Plug-Ins, Region Plug-Ins, and REST Source Plug-Ins support.
2. Can I connect MongoDB with the application?
The Oracle Rest Data Services provides API for MongoDB which you can easily integrate with your NoSQL database for data transfer.
3. What libraries of JavaScript are supported in APEX?
APEX supports various JavaScript libraries such as Backbone.js 1.4.1, DOMPurify 3.0.5, FullCalendar 6.1.8, jQuery Migrate 3.4.1, lodash 4.17.21, and many other libraries to enable the advanced functionalities for application development.
4. Should I purchase a license for Oracle Database and Oracle APEX separately?
No, if you have purchased a license for Oracle Database, you do not need to purchase the license separately for the APEX. You can use it without any additional cost. However, if do not have an Oracle Database license, then you can download its free version or you should purchase its license.
5. How to find the resource or course to learn Oracle APEX?
Oracle Provides resources so that you get started with the Oracle APEX. It provides documentation support, certifications, and other learning materials. We recommend visiting the official site https://apex.oracle.com/en/learn/training/ for more information about learning Oracle APEX.
Troubleshooting for Oracle APEX Installation
1. How to resolve the ‘ora-12514: tns:listener does not currently know of service requested in connect descriptor’ error
This error occurs because the service requested through the command line interface is not registered in the listener. The error message is shown below.
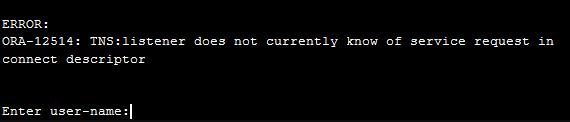
To solve this issue, make the request with the customs connection database string with the format “jdbc:oracle:thin:@[HOST][:PORT]:SID” as demonstrated below:
2. How to resolve the ‘The tablespace TEMP/i/ does not exist’ error while Oracle APEX Installation?
This error can occur because of the incorrect format of the Apex installation script command. If you run the ‘@apexins APEX123 APEX123 TEMP/i/’ command, the error message appears as shown below.
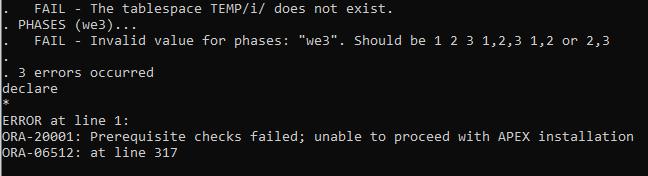
The correct script is ‘@apexins APEX123 APEX123 TEMP /i/’ There is a space between ‘TEMP’ and the ‘/i/’ parameter.
3. What is the solution for ‘ORA-20001: Prerequisite checks failed; unable to proceed with APEX installation, ORA-06512: at line 317’
This error can occur if the the APEX has already been installed. It is shown below.
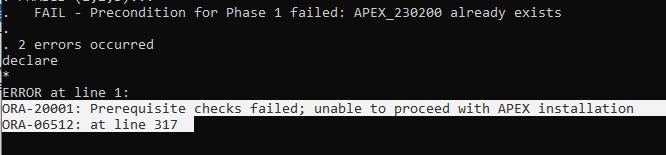
If you want to reinstall the Oracle APEX, then remove it using the command ‘@apxremov.sql’ as the admin user. And, then install it using the command ‘@apexins APEX123 APEX123 TEMP /i/’ where ‘APEX123’ is the name of your tablespace in the database.
Conclusion
Oracle APEX helps us to easily implement various complex business logic such as routing, engaging user approvals, user action tasks, calling REST or PL/SQL APIs, and sending an email or push notifications. Hence, it becomes very easy for us to develop our enterprise application with less time. We can also convert our spreadsheet into an interactive web app within a short amount of time. Its new Workflow Component provides a fully functional interface to design, execute, and monitor the components of our application.
 On-Job Support Service
Online Work Support for your on-job roles.

Our work-support plans provide precise options as per your project tasks. Whether you are a newbie or an experienced professional seeking assistance in completing project tasks, we are here with the following plans to meet your custom needs:
- Pay Per Hour
- Pay Per Week
- Monthly
| Name | Dates | |
|---|---|---|
| Oracle Apex Training | Jul 18 to Aug 02 | View Details |
| Oracle Apex Training | Jul 21 to Aug 05 | View Details |
| Oracle Apex Training | Jul 25 to Aug 09 | View Details |
| Oracle Apex Training | Jul 28 to Aug 12 | View Details |

Madhuri is a Senior Content Creator at MindMajix. She has written about a range of different topics on various technologies, which include, Splunk, Tensorflow, Selenium, and CEH. She spends most of her time researching on technology, and startups. Connect with her via LinkedIn and Twitter .


