- Home
- Blog
- Hyperion DRM
- Hyperion Tutorial for Beginners

Hyperion Software is a business division of Oracle that is popularly known for business intelligence systems and corporate performance management. The Oracle Hyperion portfolio contains products like financial reporting, financial management, planning and forecasting, database management, financial reporting, and analytics.
The complementary tools and applications of Oracle Hyperion remain the market leader in Enterprise Performance Management and provide an excellent platform for financial budgeting and planning; financial operational planning, and close management.
The oracle Hyperion enables us to integrate and handle the strategies, goals, and execution, and it is mainly used for financial reporting and analysis. Leading companies from different industries like Manufacturing, Retail, Banking, and Financial Services, and Life Sciences use Oracle Hyperion. So, to pursue a dream career in Enterprise Performance Management, you have to learn Oracle Hyperion.
If you want to master the Oracle Hyperion platform, join our Oracle Hyperion training. As per Ziprecruiter.com, the average salary of an Oracle Hyperion Consultant in the US is around $127K per annum.
Oracle Hyperion Tutorial for Beginners
In this Oracle Hyperion tutorial, you will first learn what Oracle Hyperion is and study HFM and its administration. Before we start, let us have a look at what we will be discussing in this article:
| Table of Content - Hyperion Tutorial for Beginners |
What is Hyperion?
Oracle Hyperion is a BI(Business Intelligence) and BPM(Business Process Management) tool. It is the market leader in Operation, Strategic, and Financial Planning. It has various financial consolidation applications, score carding, planning, reporting, analysis workspace, and dashboards.
Oracle Hyperion Financial Management(HFM)
What is Oracle Hyperion Financial Management(HFM)
Oracle Hyperion Financial Management is an extensive and web-based application that provides financial consolidation, global collection, analysis, and reporting in a highly scalable solution. Following are the features of the Oracle Hyperion Financial Management:
- An integrated view of the business financial information consolidates operating metrics and key performance from global sources in a scalable and web-based application.
- The “virtual close” comprises trim days and weeks of your close cycle through web-based intercompany consistent and reconciliations data set and business measures.
- Powerful multi-dimensional analysis reports and identifies the latest sources of cash flow and profitability at cost center, corporate, brand, product, customer, and channel levels.
- Preformatted and High-volume reports provide accurate and timely financial data for external regulatory, government bodies, and internal management from the same application.
- Prepackages features are implemented cost-effectively, quickly, and out-of-box features like multicurrency translations, robust data integration, and world-class allocations with legacy applications, CRM, and ERP systems.
- The extensible and customizable application resolves our issues cost-effectively and rapidly through industry-standard tools.
Architectures
Financial Management is useful for operating as a multitier system:
- The client tier comprises the ability and user interface for interacting with the application tier. We can display metadata and data and enter data in this tier.
- In the webserver tier, we can access the web-enabled portions of the financial management.
- The middle tier comprises domain connections and intelligence to the relational database.
- The data tier comprises the Financial Management data and relational database, and metadata.

Starting Financial Management
We can start financial management through a web browser or web desktop. We can also start the Financial Management through Netegrity SiteMinder as the Web Security Agent.
1. Starting the Financial Management from Windows Desktop
When we start the financial management, we will see the Logon dialog box. Financial Management utilizes windows passwords and usernames for authentication. We enter our Windows Password and Login ID and the name of the domain server used by our enterprises.
When we log on, the system saves the login information in the memory on or workstation. When we try to open the application, financial management evaluates whether you are a valid user according to the password and user ID that you entered.
| Related Article: Hyperion Training in Hyderabad |
Follow these steps to start Financial Management from the Windows desktop:
Step1:
From the windows desktop, implement one of these actions:
- Double-click the “Financial Management” icon.
- Choose “Start/Program/Hyperion/FinancialManagement/Financial Management”
Step2:
For Domain, enter the domain to which to logon
Step3:
For the user, enter the username
Step4:
For the password test box, enter the password that corresponds with our username.
Step5:
Optional: Choose “Remember Password” so that the system saves our password and we do not require to type it every time we log in.
2. Start Financial Management from the web
On the web, we work with financial management in the Workspace environment. Follow these steps for starting Financial Management from the web:
Step1:
Assure that the webserver is started and the web application server is working in the services panel.
Step2:
In our browser, provide the URL for the Workspace Log in the page.
Stpe3:
Enter our system username.
Step4:
Enter our password.
Step5:
Press “Login.”
Step6:
In the Workspace, Choose “Navigate/Applications/Consolidation” and choose all the applications.
Opening Applications
The application is a group of dimension numbers and dimensions that satisfy a group of reporting or analytical requirements. For instance, we can have an application for reporting the tax data and another application for sales reporting. We can open one application for each financial management session that we are implementing. Though, we can have various financial management sessions open, with distinct applications available in each session. To access the application, we must be allocated as an application user.
Consolidating Data
Consolidation is defined as the process of collecting the data from the dependent entities and aggregating the data to the parent entities. After entering or loading the data into the base-level entities, adjusting, and calculating the data, we implement the consolidation for chosen period and scenario for aggregating the data across the organization.
As the data consolidate, the system carries out the required currency translation and intercompany eliminations, minority ownership calculations, and equity adjustments if required.
The Oracle Hyperion Financial Management offers a default method for data consolidation method. To allow the statutory consolidations, we have to personalize the consolidation process. When we create the application, we can set the Consolidate rules to attribute.
Translation Process
The Currency Translation transforms the account data from one currency to another currency. The data available in the local currency of the dependent entity is converted into the parent currency through the local currency exchange rate. We can enter currency rates by the entity for the base entities.
Data Forms
We can type the data in the application through the Forms that our administrator created. The data forms allow us to enter the data for the predefined view like specific accounts and periods. The data forms support nested rows and columns for the multidimensional analysis and will enable you to drill into more details.
The sample data form scripts are covered when we choose the sample applications during the HFM client installation and situated in the “FinancialManagement/SampleApps” directory. We can see the data forms list. The list displays the description, last-modified date, and description. If we have the Manage Data Forms security role, we can see the security class for every form.
Forms may also be stored in the folders. The data forms administrator can create the folders for organizing the forms in the application. We can see the forms in the folder, but only an administrator can delete or create the folders.
Open the Data Forms
We can open the data form for opening, viewing, and editing the data. For opening a state, we need to have access to the security class. For opening the data form:
- Choose “Consolidation,” and after that, “documents.”
- From the data forms list, choose a form.
- Press “Open Selected Document,” or choose Actions or double-click form.
| Related Article: Hyperion Interview Questions |
Hyperion Reporting
Workspace allows us to display the Hyperion financial reporting documents like books and reports from the exploring module. We can display the books and reports in PDF or HTML format.
Workspace Tasks
Other than displaying, we can perform the following tasks through Workspace:
- Customizing book and report elements. For instance, we can modify the POV after or before running the book or report.
- Snapshot reports, Export reports, PDF, XML, HTML, PowerPoint, or Excel.
- Utilize the Related content for linking to the Financial reporting reports and Workspace URLs.
- Subscribing the Financial Reporting documents for receiving the e-mail notifications when reports are changed and inserting notifications to our favorites.
- Change the permissions to the financial reporting documents.
- Arrange the E-mail Recipient list.
Types of Books and Reports available from Explore Module:
- Snapshots: It includes the static data for a particular point of time, populated with the data when saved.
- Reports: Populated with the data from the data sources, users can personalize by choosing members.
- Snapshot Books - Includes a group of snapshot reports, and optionally, a table of contents can be accessed for multiple POVs.
- Books: It includes a group of dynamic reports and, optionally, a table of contents, which can be accessed for multiple POVs.
Tips Panel
Tips panel available in the lists tasks, viewer, details, and tips relevant to the existing documents and to objects chosen in Workspace content areas:
For instance, if we choose the financial reporting book:
- Object tasks are cataloged in the Financial Reporting book:
- A list of the objects-associated help topics is offered in the Tips section.
- We display the file properties in the details section.
Reports
In Oracle Hyperion Financial Management, we can generate the following kinds of reports:
- Journal Reports: It displays data for a Journal or list of Journals according to the criteria that we choose in the Journals module.
- Data Explorer Reports: It displays data from data grids.
- ICP(Intercompany Partner) Matching Reports: It displays the intercompany transactions that are to be removed during the consolidation.
- Intercompany Transaction Reports: It reports the list of intercompany transactions.
- IC Matching by Transaction ID Reports: These reports display intercompany transactions by transaction ID.
- IC Matching by Account Reports: It reports intercompany transactions as per the chosen accounts.
- IC Matching templates: These contain the settings that we frequently utilize for auto-matching intercompany transactions.
For creating the reports, Go To “Hyperion Financial Management/ System 9 Administrators Guide.”
We can open a report that is stored on our computer or the one that is saved remotely on the server. When we open the reports that are saved on the server, we can choose to display the reports developed by the users. We can only open the reports on the server to which we have Read or all the security access.
Windows Procedures
For opening the reports locally:
- From the System Reports Module, choose “File/Open Local.
- Enter the browser or file name for locating the file, and press “open.”
For opening the reports stored remotely:
- From the system report module, choose “File/Open Remote.”
- Optional: For seeing the reports by all the users, choose “Show Reports for all users.”
- From “Reports of Type,” choose a report type.
- From “Files of Type,” choose a file type.
Web Procedures
For Opening the Reports:
- Choose “Administration/Manage Documents,” or press “Manage Documents” and choose “Reporting.”
- From “Report Type,” choose the report type for opening.
- From the “File Type,” utilize the default option: “Report Definition.”
- Press the name of the report for opening.
Creating Journal Reports
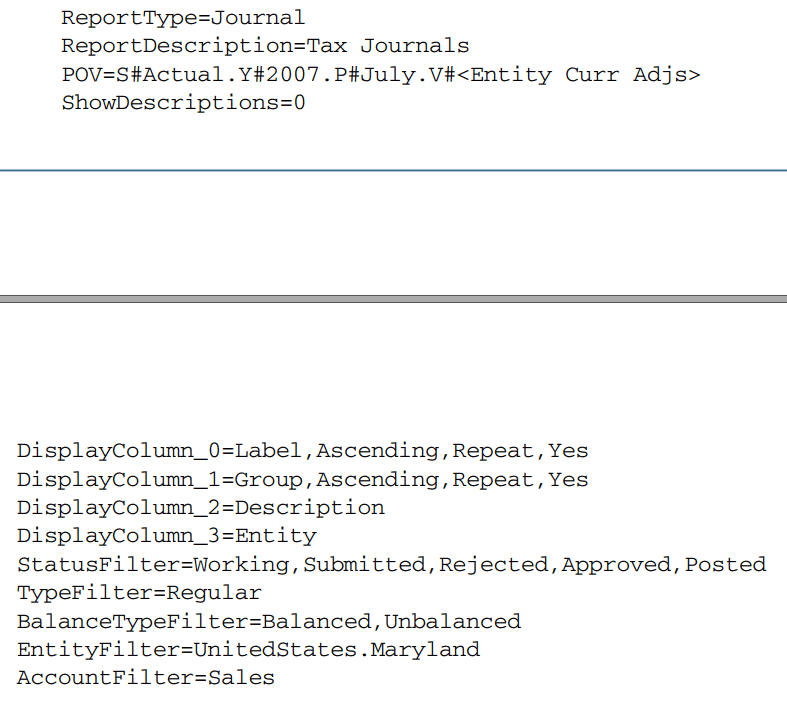
We will create the journal reports to check the status of the journal and review the journal adjustments. We can create a journal report for displaying the information for a particular journal or journal list as per the criteria that we choose in the journals module. For instance, we can choose for displaying only journals with a particular status, balance entity, account, or type. We can also choose the columns that display in the report and modify their sorting order. We can set a single entity and account filters for the journal reports in the report definition.
Journal Report Example:
Hyperion Financial Management Administration
Application Administration
We can define the application in five steps:
- Create the application profile that contains language, calendar, and frequency definitions for the application.
- Create the application shell, in which we define the application server where the application stores an application description and label, an application profile, and the location for the log file.
- Define the security for the applications comprising which the users can access the applications and which kind of access every user has.
- Define the metadata for the applications like entities, accounts, custom dimensions, and scenarios, including application settings, currencies, and consolidation methods.
- Data Forms, Load Data, Journals, Rules, and Member Lists to the applications.
We can open only one application at a time, although we can have multiple instances of Financial Management open with various applications on every instance.
Creating Application Profiles
The application profile comprises the calendar, frequency, period information, and language for the application. We can use one profile for multiple applications. For every application that we create, we should specify the application profile. For creating the application profile:
Step1:
Through the Financial Management windows desktop, choose “Define Application Profile.”
Step2:
Choose one of the below options:
- Create the new application profile
- Choose the “Existing Application Profile” and press the “tools menu” for locating the file.
- Press “Next.”
Entering Languages
We can specify up to 10 languages for the labels that we can use across the applications. We can utilize different languages for creating the descriptions for items in our application. For configuring the applications:
Step1:
In the grid, type the language, and click the “Tab” key for moving down to the following line.
We can give up to 10 languages, and every language can have a maximum of 20 characters.
Stpe2:
Press “Next.”
Defining Calendars
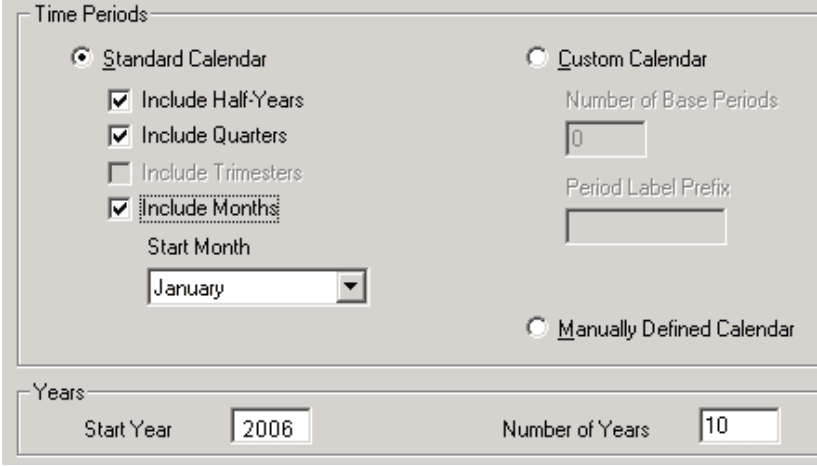
When we choose the kind of calendar and time periods for the application profile, default frequencies are generated for the application profile. For instance, if we choose a standard calendar and include months, quarters, and half-years as the time periods, the system generates the below frequencies: half-yearly, monthly, yearly, and quarterly. We can also choose the manual calendar or custom calendar. If we select to specify a custom calendar, we should specify the period label prefix and number of periods. For configuring the calendar:
1] Choose a type of calendar:
- Custom Calendar
- Standard Calendar
- Manually Defined Calendar
- Do any of the following:
2.1] If we have chosen the standard calendar:
- Choose the time periods for including quarters, months, half-years.
- If we have included the months in the calendar from the “Start Month” drop-down list, choose the first month in the calendar.
2.2] If we have chosen Custom Calendar:
- In the “Number of Base Periods” text box, type the number of periods in the years.
- In the “Period Label Prefix” text box, type the prefix for the period for including.
The label contains a maximum of 10 characters and can have spaces.
2.3] If we have chosen the “Manually Defined Calendar,” continue with the next step
- In the “Start Year” text box, type the starting year of the calendar.
- In the “Number of Years” text box, enter the total number of years for including.
- Press “Next.”
Editing Frequencies
Frequencies and their respective views are generated according to the time periods that we have chosen while specifying the calendar. We can insert, change, and delete the frequencies. We can also type the descriptive label for every view and frequency in every previously specified language.
While editing the frequencies, we cannot modify the YTD frequency label, which is included in the first column of the Frequency 1 row. Although, we can type the description of YTD frequency for every language that we define. To set up frequencies:
- From the “Language” drop-down list, choose a language.
- Edit or Enter the Values in the view column and enter the view description. We can enter up to six frequencies.
- Press “Next.”Star Schema
The extended analytics module of Hyperion allows us to generate multiple star schemas in one application. The table names in every star schema start with the prefix that we define. We can choose the multiple numbers in all the dimensions for creating the star schema that reflects the information to report. The data amalgamation in the star schema is created according to the dimension members that we choose for exporting.
The more dimension members chosen, the more possible data amalgamations that have to be generated in the star schema, and the more time required for completing the export process. We can compute the amount of data combinations by-product of the number of members chosen for every dimension.
Star Schema Formats
We choose one of the following aggregation options when we create the star schema:
- Standard Essbase Schema: We use this schema for Standard, Metadata, and chosen metadata-only aggregation types.
- SQL and Essbase Aggregation Schema: We use this schema for the Essbase aggregation type.
- Warehouse Normalized Hierarchy Schema: We use this schema for the data warehouse aggregation type.
Explore Hyperion Sample Resumes! Download & Edit, Get Noticed by Top Employers!
Conclusion
Oracle Hyperion is a suite of applications used for enterprise performance management. The Hyperion Financial Management(HFM) platform is used to report and analyze an enterprise's financial aspects. This Oracle Hyperion tutorial delivers the expertise required for an Oracle Hyperion consultant.
If you have any queries, let us know by commenting in the below section.
Recommended Courses:
- Oracle Hyperion EPM Training
- Hyperion Planning Training
- Oracle Hyperion DRM Training
- Hyperion Essbase Training
- Hyperion Financial Management Training
 On-Job Support Service
Online Work Support for your on-job roles.

Our work-support plans provide precise options as per your project tasks. Whether you are a newbie or an experienced professional seeking assistance in completing project tasks, we are here with the following plans to meet your custom needs:
- Pay Per Hour
- Pay Per Week
- Monthly
| Name | Dates | |
|---|---|---|
| Hyperion Planning Training | Jul 25 to Aug 09 | View Details |
| Hyperion Planning Training | Jul 28 to Aug 12 | View Details |
| Hyperion Planning Training | Aug 01 to Aug 16 | View Details |
| Hyperion Planning Training | Aug 04 to Aug 19 | View Details |

Ravindra Savaram is a Technical Lead at Mindmajix.com. His passion lies in writing articles on the most popular IT platforms including Machine learning, DevOps, Data Science, Artificial Intelligence, RPA, Deep Learning, and so on. You can stay up to date on all these technologies by following him on LinkedIn and Twitter.


