- Dell Boomi vs MuleSoft
- Mulesoft Interview Question And Answers
- Introduction to the MuleSoft Anypoint
- Mulesoft vs Zapier - Key Difference
- Mulesoft vs WebMethods - Key Difference
- Mulesoft vs Alteryx - Key Difference
- What is Mulesoft
- Mulesoft vs Informatica - What's The Difference?
- Mulesoft Architecture
- MuleSoft API Led Connectivity
- MuleSoft vs TIBCO - The Key Differences
- Mulesoft Connectors
- What is MuleSoft Developer?
- How to Install Anypoint Studio on Windows
- Mulesoft Integration with Salesforce
One of the most popular enterprise service buses (ESB), Mule has the features of being Java-based, light-weight, and it functions as the runtime engine of a complete hybrid enterprise integration platform for SOA, SaaS and APIs called the Anypoint platform.
MuleSoft ESB Tutorial For Beginners
What is MuleSoft?
MuleSoft is a lightweight enterprise service bus, which is an integration framework provided by MuleSoft. This is a complete JAVA-based platform but it can connect to any other platform and APIs such as Facebook, Twitter, Linked In, and many more applications.
MuleSoft allows developers to connect and interact with any application regardless of whatever language is used to build that application in a very flexible manner.
It builds an active communication channel between the integrated application to send and exchange data over a reliable and secure platform.
Who can benefit from this tutorial?
The information is targeting the developer who wants to build and integrate APIs, Databases, and other applications into an advanced ecosystem.
A developer working on ESB and the enterprise looking to migrate their already existing application to the Mule environment will be the main focused audience of this tutorial.
Along with these two, this tutorial is beneficial for students and researchers who have an interest in technology.
| Do you want to get certified and build your career in Mulesoft? Then enroll in "Mulesoft Online Training" this course will help you to achieve excellence in this domain. |
Introducing MuleSoft ESB
MuleSoft ESB (stands for Enterprise Service Bus) is a middleware tool created by MuleSoft to integrate the N number of the application over a linear bus-like infrastructure.
It is an efficiently designed infrastructure that supports uniform communication and data exchange through various applications.
This ESB enables you to connect the N number of the application over a Mule Bus and build the communication between one and another application without any interruption.
Ways to implement ESB
The purpose of the Mule ESB is to separate applications from each other and activate them to communicate in a highly scalable and speedy network Bus.
It’s full proof controllable network system that also minimizes the risk of data loss. ESB can be implemented using the Adaptor and the BUS as below.
Mule uses messaging servers like JMS and AMQP which allows the implementation of BUS connectivity by separating the application from each other. The Bus implementation is only can be achieved through Mule Servers.
Adaptors are responsible to act similar to a telephone network which allows you to communicate from one person to another. Similarly, the adaptor allows you to build a communication network to exchange data between the applications.
ESB Bus allows consistent passage of data and information from one application to another. This way Mule achieves a great level of application communication over a single platform.
Rather than using multiple different applications and APIs over the different networks to manage your application, Mule offers cloud-based application interaction and communication networks to support application interactions.
Adaptors are not single-end operation controller, rather it also controls security, network errors, monitoring, and message routing activities.
| MuleSoft Interview Questions |
Guiding Principles provided by ESB
The guiding principles of ESB are also called as Core Principle of Mule in general.
- Orchestration: This is a process of synchronizing two or more applications with each other to achieve a continuous flow of data and process.
- Transformation: This is a process of transforming data from the raw format to a specific application process data format.
- Transportation: This is a process similar to the transportation layer which allows the transport of messages using FTP, HTTP, JMS protocols for network transmissions.
- Mediation: It provided multiple interfaces to support multiple application interactions with multiple versions of services.
- Non-Functional Consistency: This guideline ensures mechanical support for handling transactions and security within the integrated environment.
Why ESB is needed?
ESB has a vast integration architecture, which allows us to integrate and operate N number of applications through a single platform. Let’s see some of the important areas where you can use ESB features.
- Integrating Multiple Applications on a single platform: Whenever is the need for integration of one or more services or application Mule ESB fulfills the needs of the requirement.
- Migrating the application to the cloud or scaling large in the future: It makes it easier to scale as per the increase in service demand by the users. It handles scalp up and scales down the process of the application with ease. You can easily deploy a new application or migrating the existing one without any infrastructure issues related to another application.
- Utilizing the benefits of multiple network protocols: ESB usage FTP, HTTP, JMS internet transfer protocols to ensure secure transmission of data from one application to another.
- Message routing feasibility: ESB also transmits messages between the applications and ensure a smooth communication network. The message header, body, and message content can be transmitted from one end to another in this ecosystem.
- Consumption and Composition: It is useful when if you need to publish services with composition and consumption.
| Related blog: Differences between Dell Boomi and MuleSoft |
Difference between Point to Point integration and ESB integration
For a middle or higher level application the number of integrations increases rapidly with the requirement to provide services, web hosting, messaging, database manipulation, storage, and so many other related concerns.
With the P2P integration technique, you can build the architecture to support the application but at the same time, the architecture will become complex when the number of applications increases.
Also, P2P has allotted restrictions over platform compatibility and language support. Let take an example to understand this.
EXAMPLE OF P2P COMPLEXITY
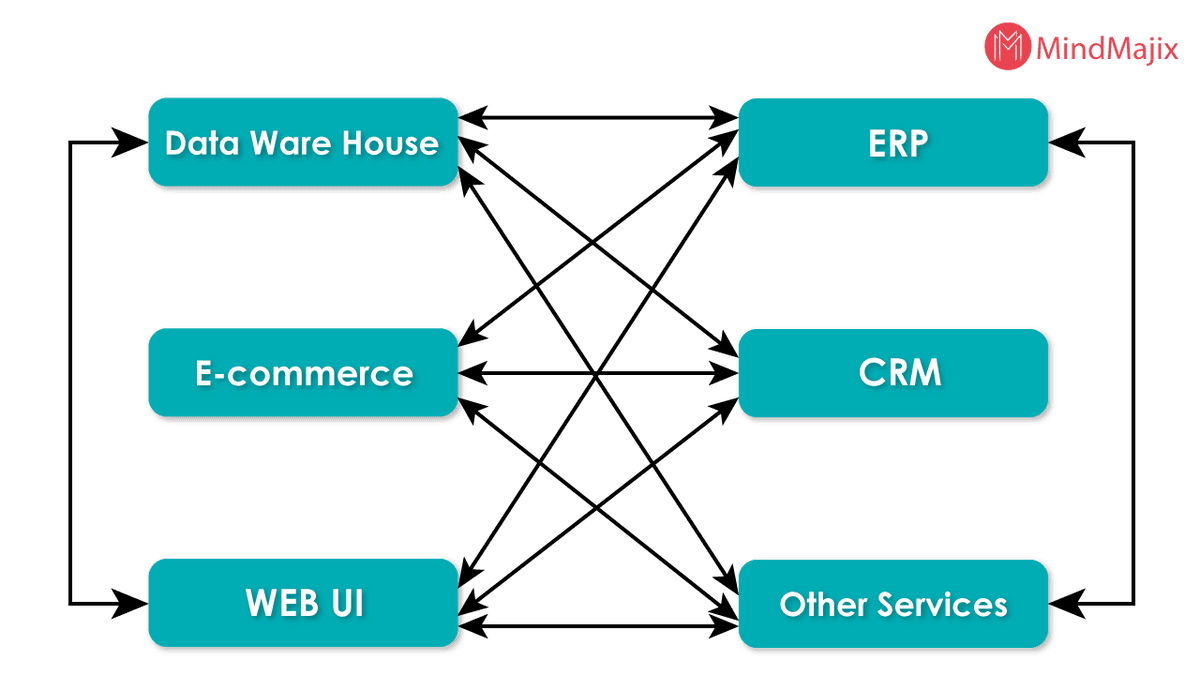
The restriction of connectivity to a different platform and the complexity with multiple application integration create the need of using Mule ESB.
Mule ESB provides word-class flexibility to integrate without having concerns about language support and compatibility issues with different application architectures.
It enhances the reusable capability of the application by encapsulating functionalities together in a single platform. Applications can be easily integrated into a synchronized manner as shown in the below image.
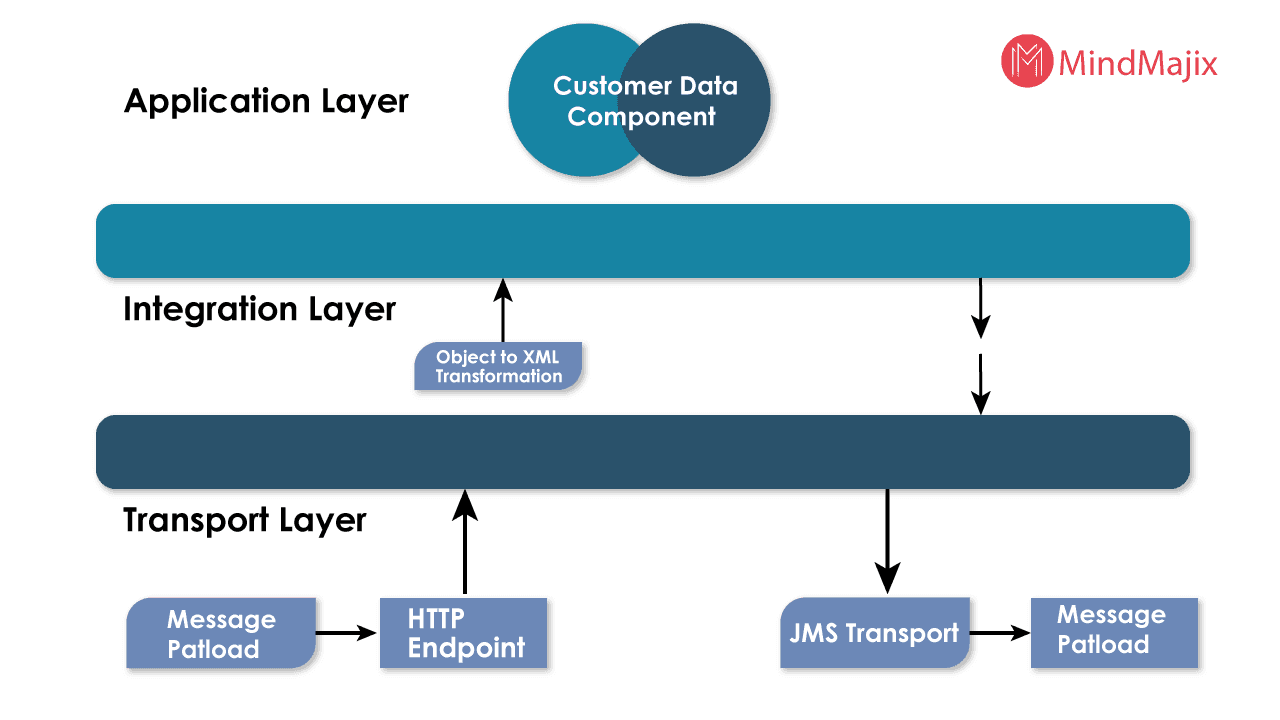
Mule ESB Consists of Two Components For Managing Integrations
Service Registry
All the services exposed to Mule ESB are stored, registered, and published from the service registry. It’s a repository that allows you to consume and access services and application capabilities as per your requirement.
Centralized Administration
It is a transparent administration unit where all the access and capability of application through services get controlled and monitored as a centralized unit of services.
Functionalities of ESB
Validate (V): Schema validation is handled by Validate. ESB usage a validation parser and updated schema to validate the schema outlines. For example, you can check the XML document confirming a schema.
<?xml version="1.0" encoding="UTF-8"?>

<note>

<to>Jony</to>

<from>America</from>

<heading> Caller Reminder </heading>

<body>Lets learn Mule this weekend! </body>

</note>
Enrich (E): The purpose of enriching is to add additional data to a message. It simply adds more meaning to the destination user.
Transform (T): The process of converting data into a sequential format that is easily accessible to the requesting application is called transformation.
For example, when you travel abroad you require to exchange your currency into the destination country currency which makes the currency easily movable into that country.
Similarly, data also requires being transformed into a specific format for the acceptance of the requesting application.
Routing (R): You can call it an endpoint or gatekeeper of the service which provides a route to the services to commute between the source and destination.
Operate (O): The word operates itself defines the functionality performed by the component. It either invokes required services or communicates with the targeted application for the service processing.
Visit here to learn MuleSoft Training in Hyderabad
Overview of Mule ESB
As discussed earlier in the introduction Mule ESB is a lightweight Enterprise Service Bus that allows interaction between the application over a single platform.
Mule is a widely used cloud service provided by MuleSoft Org to serve the corporate and individual developer who is serving the clients with a wide range of software applications.
Mule ESB gives you the flexibility to create a communication channel between various applications that are critical for service operation.
It also simplifies the need for huge hardware configuration to support such a large-scale application by simplify integrating to the cloud-based platform.
MuleSoft is a SaaS-based platform that minimizes the use of large-scale hardware setup and reduces hardware installation costs as well. You can get the below editions of MuleSoft as per your need.
- Community Edition
- Enterprise Edition
A high level of scalability is also the most eye-catching advantage of the MuleSoft platform where you can buy community addition and later scale as enterprise addition as per your need.
Advantages of Mulesoft ESB
Mule ESB offers a wide range of application support features such as
- It offers a simple drag and drops graphical design to ease UI design complexities
- It supports visual data mapping ad transformation to give to data insights by making it more effective and meaningful.
- You can get the flexibility to access more than 100 pre-built connectors for applications.
- It gives you one end centralized monitoring and administration.
- It gives to robust enterprise security features to operate in an ultra-secure platform.
- ESB gives to the accessibility of N number APIs for your application support and enhancement needs.
- MuleSoft allows you to operate through a secure Gateway connection and protects you from on-premises/ Cloud data treats.
- Service Registry manages the publication of data and services through registered access.
- You can get access through the web-based management console.
- A service flow analyzer allows you to rapidly test the applications and services.
| Looking for Best Mulesoft Online Training Platfrom in Bangalore? To Enroll a Free Demo Click Here. |
Mulesoft Architecture
MuleSoft follows three-layer architecture for application integration and data processing. Application Layer, Integration Layer, and Transport Layer. The architecture can be seen in the below diagram.
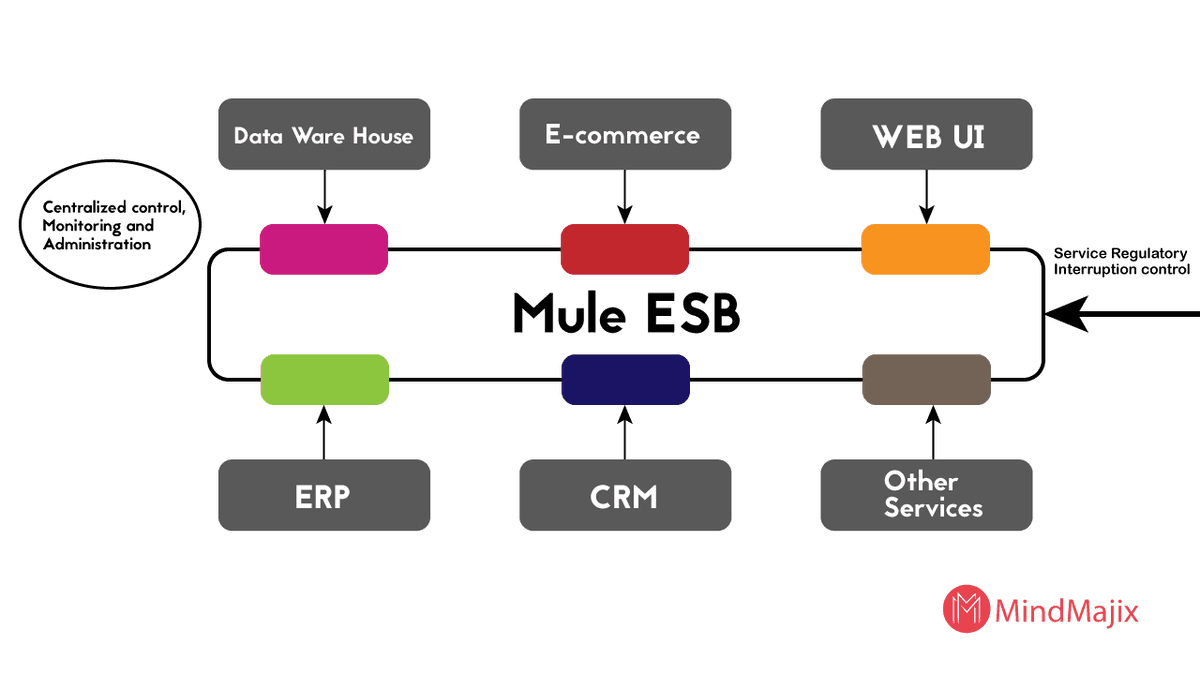
Mule Development can be configured and customized in three categories of tasks.
Service Component Development
This task involves encouraging the reusability of the POJOs and spring beans. Developers who have the spring development knowledge can easily understand the POJO and Spring Beans usabilities.
POJO is a spring-generated class which allows the use of getting and set methods along with cloud connectors. Spring beans contain business logic for application development and message enrichment.
Service Orchestration
It performs as a service mediation which allows integration of configuring the message processors, Adaptors, and routers with transformers and filters.
Integration
The integration of various applications is crucial for the large-scale application development process. It gives great flexibility to connect over many differently build applications regardless of protocols used by them.
Using the transport method simply allows the messages to travel from one end to another in the source and destination channel. It builds a high level of communication association between the applications to transmit messages within the environment.
You can use any available transport method or you can customize the transport method as per your needs.
| Related Article: What is MuleSoft Developer? |
Mule configuration architecture
Mule configuration consists of below components
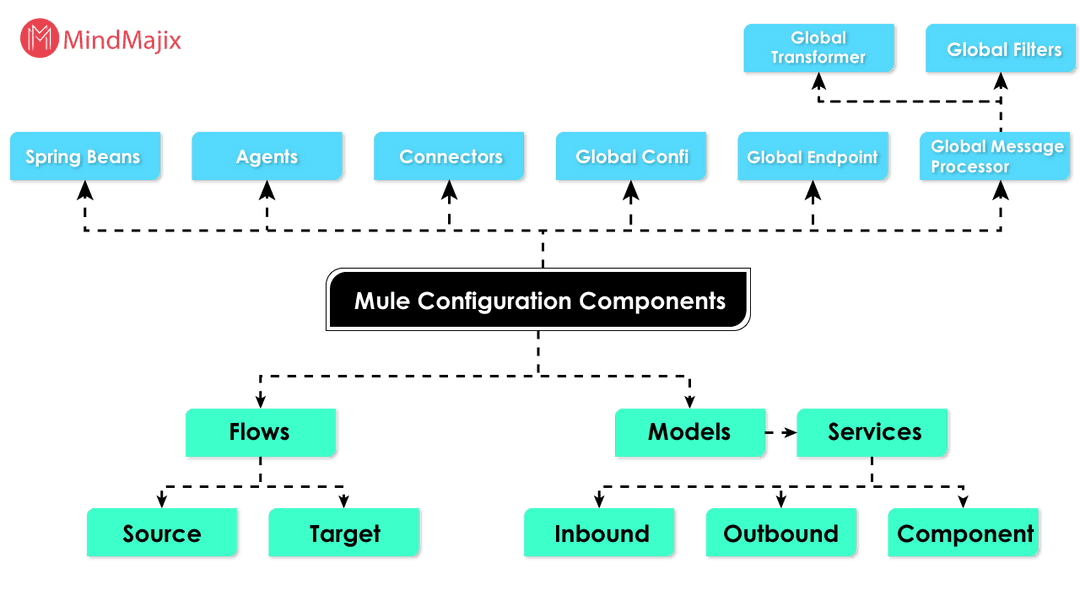
Mule Message components
Mule message is the data that passes through Mule flaws and is wrapped under mule object. Mule message consists of below components
Header:
Like any normal header, the Mule header holds the metadata of the information. It holds below two properties.
Inbound Properties:
Inbound is the property that represents the directly sent messages by the source application. The value and structure of the message cannot be changed or modified as per the user's needs.
It's consistent throughout the journey from source to destination. Technically it is an immutable message which cannot be changed at any phase of processing.
Outbound properties:
These are the messages which contain the metadata similar to the inbound message but can be changes and mutable during the flow. It can be either set by Mule or can be modified by the users of the application.
If the message passage through an inbound source endpoint then it becomes immutable. The message passage as outbound flows from one end to the inbound flow to the other end, when it becomes immutable.
Users cannot change or modify the context of the message. The message gets transmitted through the transport method.
Payloads
The payload is a message carrying an object which holds the actual message of the business.
Variables
Variables are the user-defined metadata about the messages. Variables are the temporary representation of the information kept by the messages.
Variable is not required to be passed with the message into the message flow to the destination. ESB variables are defined into three different categories.
- Flow variables
- Session variables
- Record Variables
So, now you are ready with the basic fundamental knowledge about what, where, and how Mule operates let's check out the basic configuration to know, How to run Mule in your system?
Let’s get started by understanding the system and application configuration required to run a Mule code.
First, you need to verify that your system has JAVA JDK installed in it. You can download JDK 8.1.0 to support the Mule configuration.
Mule support a wide range of operating system check the below list to know that your system contains any of them.
OS supported by Mule
- Windows 10
- Windows 8.1
- Windows 2016 Server
- Windows 2012 R2 Server
- MacOS 10.11.x
- Ubuntu Server 18.04
- Linux Kernel 3.13+
- HP-UX 11iV3
- Solaris 11.3
- AIX 7.2
- RHEL 7
Once you are ready with the Mule let’s check the Database required for running the Mule application.
Database
Mule runs its standalone server so you do not require any additional database application support for this.
But if you are required to process data, or access the data store in Mule you require the below server to be configured. It will allow you to use the application server.
- Oracle 12c
- Oracle 11g
- MySQL 5.5+
- IBM DB2 10
- PostgreSQL 9
- Derby 10
- Microsoft SQL Server 2014
- System configuration to run Mule
- Minimum 2 GHz CPU or 1 Virtual CPU in virtualized environments
- At least 1 GB RAM
- At least 4 GB storage
How to Download Mule
You can download Mule from its official Website at https://www.mulesoft.com/lp/dl/mule-esb-enterprise
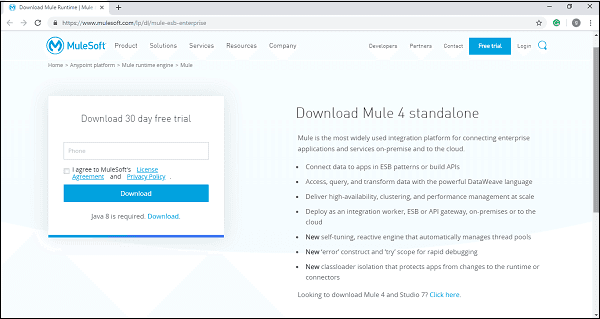
Download Mule 4 Zip file into your local system by providing the above information.
Installing
Unzip the downloaded file and run the Mule 4 binary exe. Set the environment variable as Mule_Home and create a Mule directory under the folder where you have extracted the downloaded file.
Let’s take an example of a windows environment and see how you can set the environment variable.
You can set the variable in windows, Linux/Unix environment for version 4.1.5
Windows Environment Variable Example
$ env:MULE_HOME=C:Downloadsmule-enterprise-standalone-4.1.5Linux/Unix Environment Variable Example
$ export MULE_HOME=~/Downloads/mule-enterprise-standalone-4.1.5/Once the environment variable is set now, you are ready to RUN the command to check whether Mule is working fine or generating an error in your system.
Windows Command for Mule Testing
$ $MULE_HOMEbinmule.batLinux/Unix for Mule Testing
$ $MULE_HOME/bin/muleUsing the above command you will be able to RUN the Mule into the foreground Mode. Once this command is activated you cannot run any other command in the terminal. If you want to stop the running command use the key ctrl-c.
The process to start Mule services
There are two ways to start Mule services. Either you can start as windows services or you can choose to start as Linux/Unix demon services.
Let’s start with windows services:
Follow the below-given steps to start windows services.
Install windows services by using this command
$ $MULE_HOMEbinmule.bat installRun windows services using the below command
$ $MULE_HOMEbinmule.bat startLet’s take another example to start Linux/Unix Demon services using Mule
Install Linux/Unix services by using this command
$ $MULE_HOME/bin/mule installOnce installed you can run the Linux/Unix services by below command
$ $MULE_HOME/bin/mule startExample of starting Mule as demon services
$ $MULE_HOME/bin/mule startMULE_HOME is set to ~/Downloads/mule-enterprise-standalone-4.1.5
MULE_BASE is set to ~/Downloads/mule-enterprise-standalone-4.1.5Starting Mule Enterprise Edition...
Waiting for Mule Enterprise Edition.
running: PID:87329How you can deploy Mule Apps
Follow the steps to deploy the first Mule App
Setup and start you, Mule.
Once Mule is started, you can deploy the Mule app by moving the JAR package file to the Apps directory in $Mule_Home
Stopping Mule services
There is two way using which you can stop or remove the running Mule from your terminal.
You can use the remove command to remove the running Mule services from the terminal.
$ $MULE_HOME/bin/mule removeMULE_HOME is set to /Applications/mule-enterprise-standalone-4.1.5
MULE_BASE is set to /Applications/mule-enterprise-standalone-4.1.5
Detected Mac OSX:
Mule Enterprise Edition is not running.
Removing Mule Enterprise Edition daemon...
Run the STOP command to stop the Mule App. Below is an example of stopping mule in Linux/Unix demon services.
$ $MULE_HOME/bin/mule stopMULE_HOME is set to /Applications/mule-enterprise-standalone-4.1.5
MULE_BASE is set to /Applications/mule-enterprise-standalone-4.1.5
Stopping Mule Enterprise Edition...
Stopped Mule Enterprise Edition.
Mule Anypoint studio
Mule Anypoint Studio is an IDE (Integration Development environment) created for testing and designing of the Mule Applications. It’s a user-friendly Eclipse Based IDE.
Mule Anypoint studio is an eclipse-based IDE to manage application development and flow.
Process of Downloading Mule AnyPoint studio
First, you need to have JDK accessibility in your system to support it. Verify and match that you have the correct supported version of JAVA JDK in your system.
Every operating system has its process to download and install new applications and services. Let's check how you can install Anypoint studio in your windows system.
Anypoint Studio Windows downloading process
Click on the link https://www.mulesoft.com/Ip/dl/studio to download windows Anypoint studio and choose windows compatible setup to download.
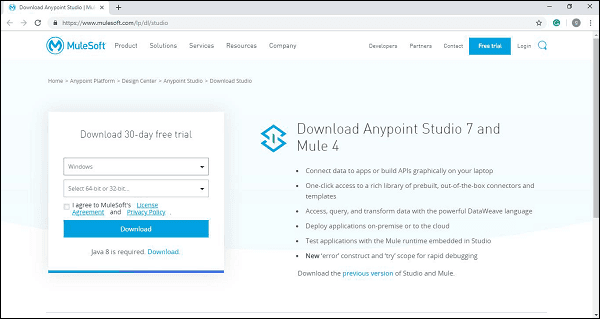
Extract the download bundle into the root folder of your system ‘c:’.
Open the setup file
Click ok to accept the default workspace or customize it as per your need. The welcome message will flash on the screen once it’s installed properly.
Click on Get Started button and here you are ready to go with Anypoint studio.
Key Features of Anypoint Studio
Mule Anypoint studio helps in enhancing the productivity of your application while building mule applications. There is a variety of features available to support Mule development by Anypoint Studio.
Let’s see some of the key features of Anypoint Studio.
- Mule Anytime studio provides an instant run environment for mule development.
- It gives you a visual editor using which you can configure API definition files and Mule Domains.
- Mule Anypoint studio comes with an embedded unit testing framework that enhances productivity.
- It provides built-in support to develop and deploy CloudHub.
You can integrate with an exchange for importing templates, examples, definitions, and other resources from an organization which is having access to Anypoint studio services.
MuleSoft is one of the most widely used application integration platforms which simplify integration complexities. It allows you to do an N number of experiments with your applications.
You can either build on the Mule platform or you can easily migrate using the vast compatibility features of Mule. It’s easier to manage the large number of the application using the single platform.
It provides flexibility to integrate, build, deploy, and communicate with errorless processing capabilities. MuleSoft also has a high level of security features which makes the transition of information secure and efficient over the Mule environment.
Transport methods of mule make it easier to pass the messages into different flows as per the user's need. You can control, monitor, and administer data security in a centralized setup.
It is a lightweight purely java based application infrastructure that reduces the cost of on-premises hardware installation need by switching you to a cloud-based SaaS product. You get n number or SaaS product benefits and cloud reliability at the same point.
You can either customize the mule into in premises cloud or you can use it on the global cloud. It empowers developers, and enterprise owners to develop and deploy large-scale applications in a user-friendly environment.
It’s designed to provide just plug and play support to the developer, researchers, enterprise owner, and students. Subscriptions and migration to Mule were simplified to reduce the extra setup-related issues.
 On-Job Support Service
Online Work Support for your on-job roles.

Our work-support plans provide precise options as per your project tasks. Whether you are a newbie or an experienced professional seeking assistance in completing project tasks, we are here with the following plans to meet your custom needs:
- Pay Per Hour
- Pay Per Week
- Monthly
| Name | Dates | |
|---|---|---|
| MuleSoft Training | Feb 07 to Feb 22 | View Details |
| MuleSoft Training | Feb 10 to Feb 25 | View Details |
| MuleSoft Training | Feb 14 to Mar 01 | View Details |
| MuleSoft Training | Feb 17 to Mar 04 | View Details |

Satish is a Data Management and Governance Practitioner with over 16 years of IT experience supporting enterprises to develop and optimize solutions that result in high value. He has an experience spanning across Data Warehouse ETL leveraging Informatica PowerCenter & Custom Tools, Databases like Teradata, Oracle, MS-SQL & Greenplum, Integrations design with MuleSoft, and Implemetation of Data Catalog, Governance and lineage applications such as Alation, Collibra & Manta at an Enterprise level. Satish was associated with GE, Dell & E2Open with successful implementation of Supply Chain integration solutions for several AMER & APJ region organisations. Currently, he is a Tech Lead at Dell within Information Governance space who plays a key role in setting up governance practice from grass-roots that traverse maturity through stewardship with a Business rules framework for data quality, metadata, and governance access capabilities. Satish is also actively involved in mentoring students at various levels from high school and Engineering as part of CSR by associating with various organizations such as FFE, to impart knowledge that would help gain insights on skills essential to be successful in their professional journey.


