- Home
- Blog
- Primavera P6
- How to Install Primavera P6

Software professionals are always in search of efficient tools that can enable them to manage complex projects and workflows. Primavera P6, developed by Oracle’s product addresses this issue and provides planning, execution, and monitoring of projects across diverse industries. It uses the hierarchical Work Breakdown Structure to organize and visualize the components. In this article, we will learn about Primavera and the steps to install and configure it on your Windows system so that you can easily manage complex project workflows.
Table of Contents
- Overview of Primavera P6
- Features of Primavera P6
- Prerequisites for Primavera Installation
- Steps to Install Primavera p6 on Windows
- Frequently Asked Questions
Overview of Primavera P6
Primavera P6 is a Project Management Tool that provides scheduling and resource management tools for Projects and helps users to optimize project timelines, allocate resources, and control costs. It breaks the Project into small manageable tasks and supports the critical path method (CPM) to prioritize tasks for project completion.
Project Managers can also use its reporting and analytics features to get real-time insights about the project performance. Thus, it enhances collaboration and communication with different stakeholders. Before we install and run this tool, it is important to look at some of its features.
| Learn how to plan, manage, and execute projects, as well as allocate resources, track project progress, and foster team collaboration through Mindmajix’s "Primavera p6 Certification" Enroll in Free Demo |
Features of Primavera P6
- It helps to break down complex projects
Users can manage complex projects by breaking them into smaller tasks. This is possible due to the Hierarchical Work Breakdown Structure (WBS) supported in Primavera
- It supports analytics and reporting capabilities
Primavera has reporting features using which users can create custom dashboards to gain project insights. It also provides analytics support to identify the trends in the project execution,
- It has integration features
You can take advantage of integrating the Primavera with other systems such as Oracle databases to manage projects in a better way.
- It provides Role Based Access Control
In Primavera, users can get the information only as per the roles and access assigned to them. This ensures that your project execution is secure and data is consistent.
- It has advanced scheduling features
You can schedule the timelines using advanced algorithms such as the Critical Path Method (CPM) to manage the project execution
Prerequisites for Primavera Installation
Before you install the Primavera P6, ensure that your system fulfills the minimum system requirements shown below:
- Operating System: Windows XP/Vista/7/8/8.1/10
- Memory (RAM): 1 GB of RAM required.
- Hard Disk Space: 900 MB of free space is required for full installation.
- Processor: Intel Pentium 4 Dual Core GHz or higher.
Along with these, you will need to create an account on the Oracle Software Delivery Cloud Platform to download the Primavera P6 files on your system. The account creation steps are covered in the next section.
Steps to Install Primavera P6 on Windows
- Step 1: Visit https://edelivery.oracle.com. Choose “Sign in” or create an account, if you don’t have one. Here, we are creating a new account as shown below.

- Step 2: After, you created an account, click on the verification link received in the mail. Your account verification resembles the pop-up as shown below.

- Step 3: Type “Primavera P6” on the search bar as shown below.
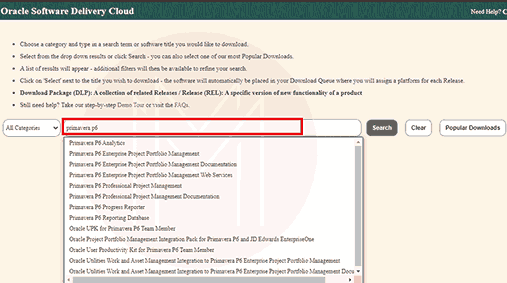
- Step 4: Then, choose “Primavera P6 Professional Project Management” as the required file to download.

- Step 5: After you choose the required version, the file should be visible in the ‘view items’ section as outlined below:

- Step 6: Then, hover on “View Items”, It will show the selected version, and click on “Continue” to download Primavera.
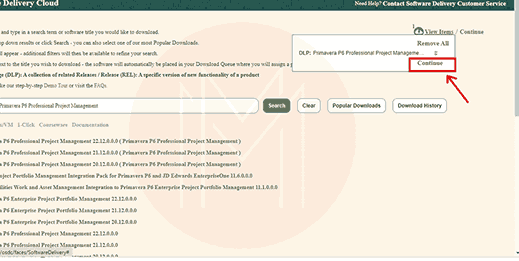
- Step 7: After clicking on “Continue”, the page appears as mentioned below. Make sure all the formats are the same then click on “Continue”.
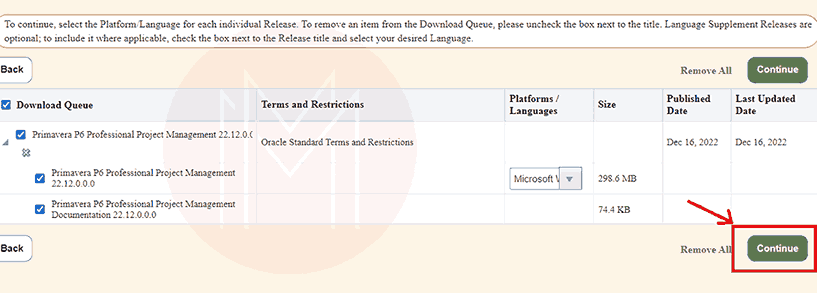
- Step 8: Accept “Oracle Standard Terms and Restrictions” by clicking on the “Continue” button.

- Step 9: Click on “Download” and the Primavera will be downloaded on your system as outlined below.

- Step 10: Navigate to the folder where the file has been downloaded. Double-click on it to run the wizard. Click on the “Next” option to start the download process of Primavera P6 on your system.

- Step 11: Choose the folder where you want to download the files related to Primavera P6 as depicted below.

- Step 12: After, you specify the folder, the downloading of the necessary files will start. Do not close the window till it finishes downloading all the files. Once the download is finished, the pop-up appears as illustrated below.
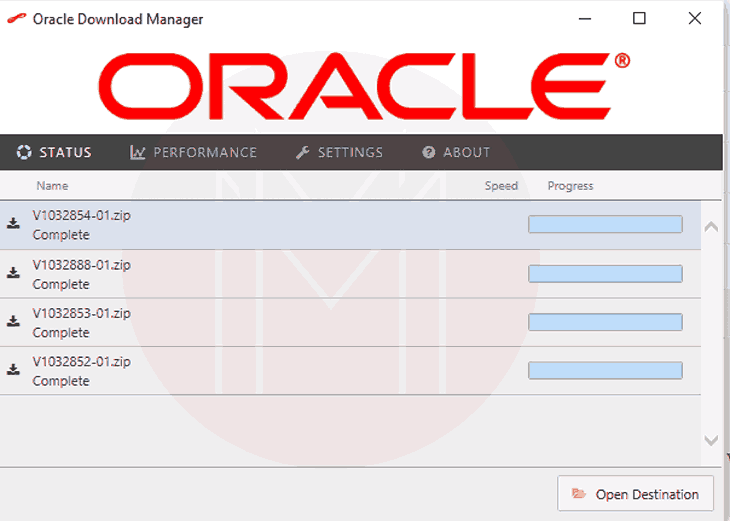
- Step 13: Go to the destination where all the files have been downloaded. Extract them as shown below.

- Step 14: After the files are extracted, various folders and files are visible within the folder as shown below. Among them, ‘P6_Pro-R2212’ is the main folder where you have to navigate.

- Step 15: In the main folder, double-click on the ‘P6ProfessionalSetup’ file to start the installation process.

- Step 16: After you start the installation, the setup appears as shown below. Let the checkbox be selected on the ‘Typical’ option and click on the ‘OK’ button.
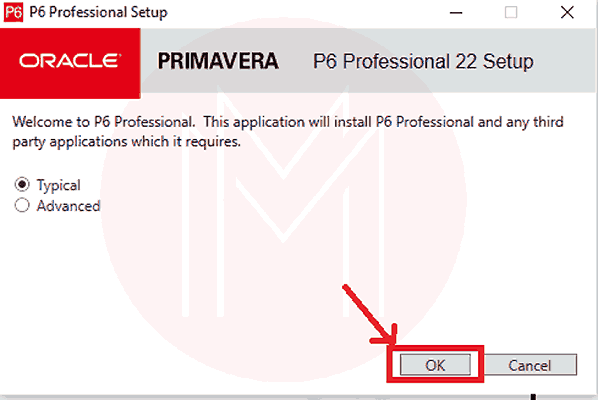
- Step 17: Now, click on the ‘Install’ button to start the installation process as depicted below

- Step 18: The installation starts as shown below:

- Step 19: Once, the installation is finished, click on the ‘OK’ button to configure the database connection.
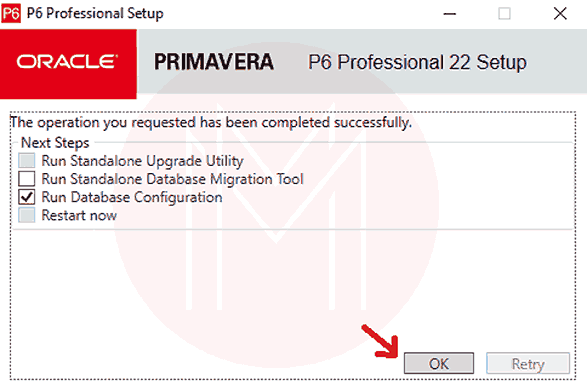
- Step 20: In the database configuration, click on the ‘Add’ button then choose ‘the P6 Pro Standalone (SQLite)’ and select the ‘Next’ option as demonstrated below:

- Step 21: Now, choose “Add a new Standalone database and Connection” and select the ‘Next’ option.
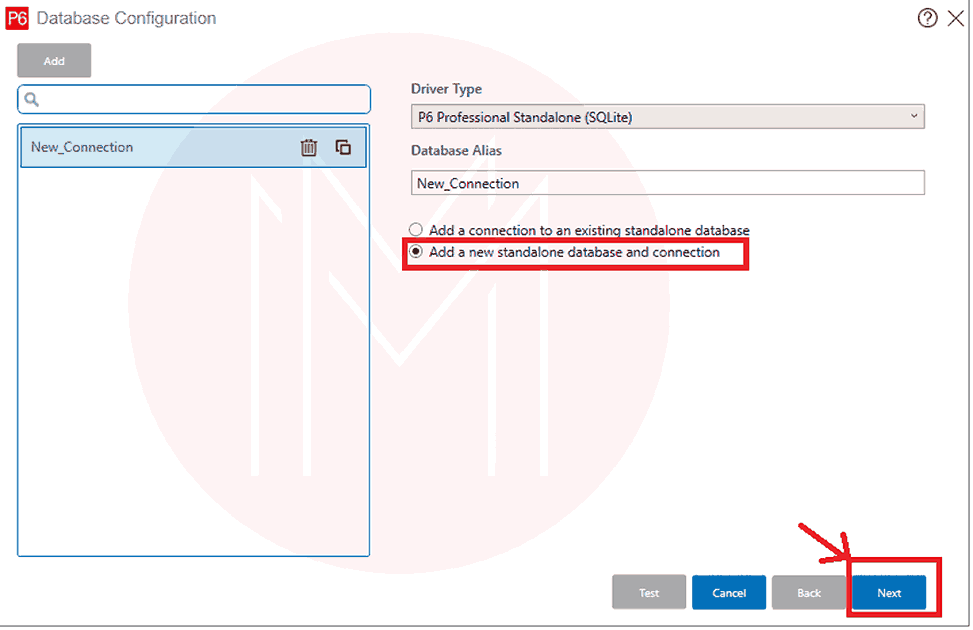
- Step 22: Choose the admin name and password and click on the next option to continue as shown below:
- Step 23: Specify the path where you want to store the data and then select the ‘save’ option to complete the database configuration.
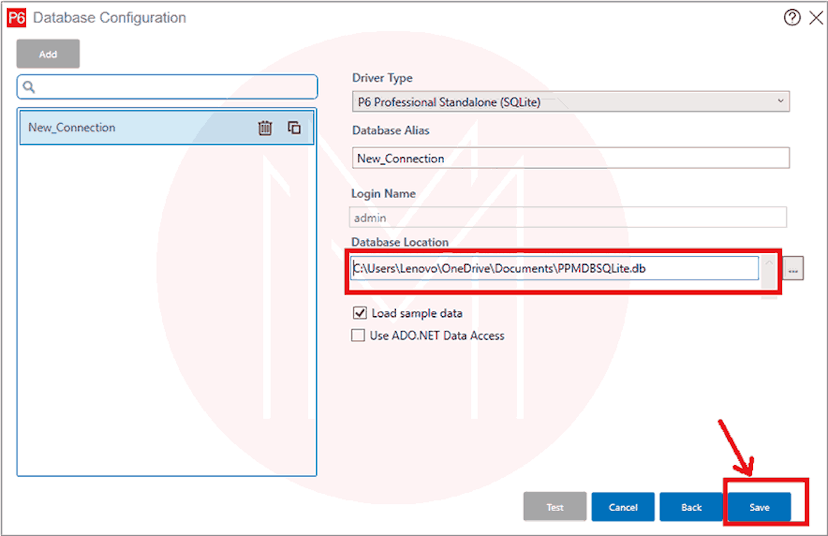
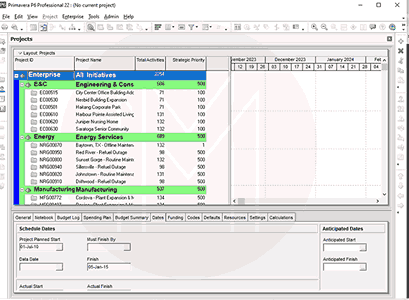
- Step 24: After the database configuration is completed, type P6 Professional on the search bar open the application, and enter the credentials. The Primavera P6 appears as shown below:
Frequently Asked Questions
1. Is Primavera P6 free or paid?
You can download the Primavera P6 for a 30-day free trial. After that, you have to pay the renewal charges to use the Primavera P6.
2. What is the difference between Primavera P6 professional and Primavera EPPM?
Primavera P6 Professional is a standalone desktop-based application while the Primavera P6 EPPM (Enterprise Project Portfolio Management) is a web-based platform for collaborative project management.
3. Is Primavera available on the Cloud?
Yes, Primavera P6 is available on the Cloud platform which has different pricing plans based on the services like scheduling, management service, progress cloud service, and portfolio planning service.
4. Can I use Primavera P6 on Mac?
No, Primavera P6 is not available for Mac Operating systems. It is available only for Windows systems.
5. Do I need a database for Primavera P6 installation?
Yes, Primavera requires the database configuration to store the project data. You can add a new database connection or add the files to the existing database using the database configuration wizard.
6. Can I use Primavera on Mobile?
Yes, Primavera P6 is available on the Play Store as a mobile app. You can install it and use it for project management.
Conclusion
Primavera P6 is a versatile Project Management tool using which you can manage complex projects, plan the timelines and execution, get insights about project performance, and all these features in one place. Thus, it enables us to manage multiple Project Portfolios through a user-friendly interface and mobile accessibility. Now, you have successfully installed Primavera P6 on your Windows System and gained all the information, from its overview to its features. You are all set to simplify your complex project portfolios with Primavera P6.
 On-Job Support Service
Online Work Support for your on-job roles.

Our work-support plans provide precise options as per your project tasks. Whether you are a newbie or an experienced professional seeking assistance in completing project tasks, we are here with the following plans to meet your custom needs:
- Pay Per Hour
- Pay Per Week
- Monthly
| Name | Dates | |
|---|---|---|
| Primavera P6 Training | Feb 10 to Feb 25 | View Details |
| Primavera P6 Training | Feb 14 to Mar 01 | View Details |
| Primavera P6 Training | Feb 17 to Mar 04 | View Details |
| Primavera P6 Training | Feb 21 to Mar 08 | View Details |

Madhuri is a Senior Content Creator at MindMajix. She has written about a range of different topics on various technologies, which include, Splunk, Tensorflow, Selenium, and CEH. She spends most of her time researching on technology, and startups. Connect with her via LinkedIn and Twitter .


