- Home
- Blog
- Software Testing
- TestComplete Tutorial

Software testing is a mechanism of assessing and checking whether a software application or product does what it is intended to do. As software testing is becoming more popular among organizations, automation has become a prerequisite. TestComplete is a powerful automated testing tool released by SmartBear, which tests different application types including Web, Android, iOS, Windows, HTML5, and more.
Leading MNCs like McAfee, CISCO, J.P.MORGAN, THOMSON REUTERS, etc., use TestComplete for testing their Desktop and Web applications. Thus, by learning TestComplete, you can build a promising career in the Automation Testing field.
In this TestComplete tutorial for beginners, you will learn What is TestComplete and how to test different web and mobile applications through TestComplete. Before we start, let us have a look at what we will be discussing in this article:
| Table of Content - TestComplete Tutorial |
What is TestComplete?
TestComplete is the testing tool designed by SmartBear for automating desktop, mobile, and web applications. Through this tool, we can generate, handle, and execute the tests. The supported scripting languages are VBScript, Python, JScript, C++, and DelphiScript.
In TestComplete, we have the option for playback and record test creation. We record the manual testing process, and we can playback and handle it as automated testing, unit testing, keyword testing, and regression testing.
| If you would like to learn TestComplete, then visit Mindmajix - A Global online training platform: " TestComplete Training ".This course will help you to achieve excellence in this domain. |
Why use TestComplete?
TestComplete is a user-friendly tool, and it enables software testing teams of all skills to quickly build and run automated test cases for mobile, desktop, and web applications. It allows us to accelerate testing cycles, enhance software quality, and assure our applications function as designed.
The following are the primary reasons for using TestComplete:
- For testing Android-based devices, the automation tool must click the physical buttons and listen to the events as a part of the automation testing process. The test complete tool is suitable for such test requirements to touch the physical buttons.
- TestComplete tool is famous for providing extended support for Android and iOS operating systems. We can test the applications that are running on physical devices, emulators, and Android x86 virtual machines. The TestComplete tool enables us to playback and record the recorded signals on android devices enabling multi-touch features.
- For testing the Android-based applications, the automation tool should have an Android agent for invoking internal methods and properties of the applications. TestComplete Android Agent can support geolocation testing, working with the in-built sensors of devices, and pretending the local symbol input.
- Through TestComplete, we can run the exact testing script multiple times on multiple mobile devices and emulators. It allows us to install, launch, test, delete applications, and record actions on the devices under testing.
What are the Capabilities of this tool?
Following are some of the capabilities of TestComplete:
- Scripted Testing: The tester can develop the test scripts from scratch or change the recorded test scripts in an in-built editor.
- Keyword Testing: Utilizing the in-built keyword test-driven editor, the testers can create keyword-driven frameworks easily.
- Test Record and Playback: It offers the fundamental mechanism of record and playback for creating test cases. We can modify the test cases as per the requirement.
- Data-Driven Testing: Simple data extraction from database tables, CSV files, excel sheets, etc.
- Integration to Bug tracking software: TestComplete can integrate with bug tracking software like Bugzilla, Jira, etc. We can use it for creating or modifying the items in bug-tracking software through the issue-tracking template.
- Test Visualizer: During the test execution, TestComplete captures screenshots to differentiate between actual and expected screens.

TestComplete Limitations
In TestComplete 14.0, we can generate platform web tests. We use them for checking how our website performs or a web application on the platforms and in browsers and devices that TestComplete does not directly support.
The following are the Limitations of TestComplete:
- TestComplete does not support executing tests for Electron and CEF applications in remote environments.
- Contrary to the classic web tests, TestComplete does not offer any unique script objects the third-party web controls in the cross-platform web tests.
- Object Spy does not assist in locating the objects in the object browser.
- In the cross-platform web tests, we can access properties, methods, and native attributes of the tested web page and execute the Javascript expressions on the page.
- Test Visualizer never gathers the data in the implicit properties of the tested images whose images it captures.
- In remote environments, executing the test cases that utilize OCR for recognizing the web objects by their text contents is supported only for desktop versions of the web browsers.
- When our tested web application is executing in the remote environment, its emergence may vary from what it has in our local desktop computer.
Advantages and Disadvantages of TestComplete
Advantages of TestComplete
- It is straightforward to use.
- TestComplete offers scripting support for various languages.
- We can see the properties of the objects from the screen through Object Spy.
- We use Keyword tests for executing the individual operations.
- We will get a more elaborate report after the execution has been completed.
- It offers integration with Jenkins, Bugzilla, Selenium, etc.
- It has incredible technical support from SmartBear on issues and questions.
- It utilizes database checkpoints, and we verify the data fetched from the database against baseline data.
Disadvantages of TestComplete
- It cannot identify the elements in the technologies like PEGA and SAP.
- Debugging the Code.
- Integrating with the business tools for CI.
- The license cost of TestComplete is very expensive.
- The user interface of TestComplete can be more intuitive.
- It needs manual steps for updating the test cases.
- We must enhance the object recognition of TestComplete for better recognition of custom or third-party controls.
TestComplete Installation
TestComplete Installation Process
Follow these steps to install TestComplete:
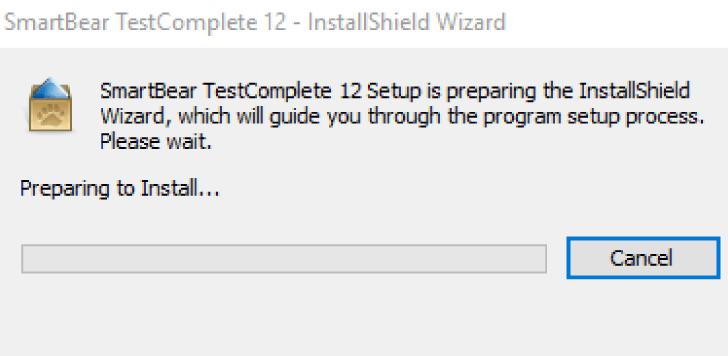
Step 1: First, download TestComplete from the “SmartBear” website through the following link:
Step 2: Double-click the downloaded setup file to start the TestComplete installation. Later, accept the license agreement.
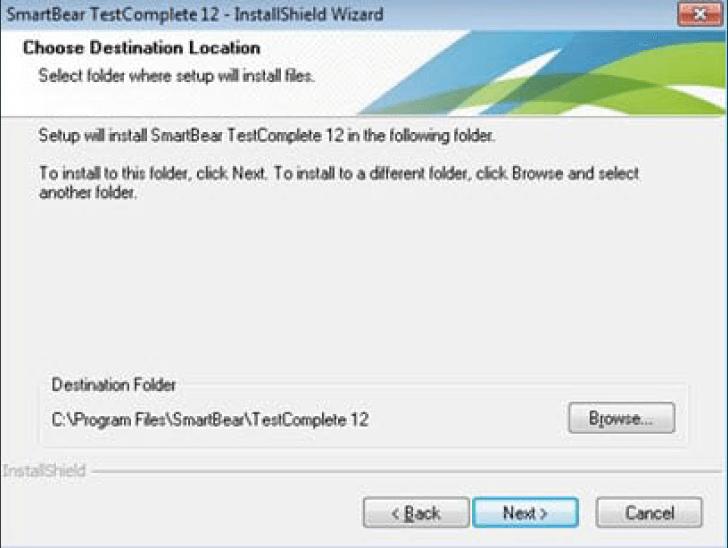
Step 3: Define the folder path where you have to install the software.
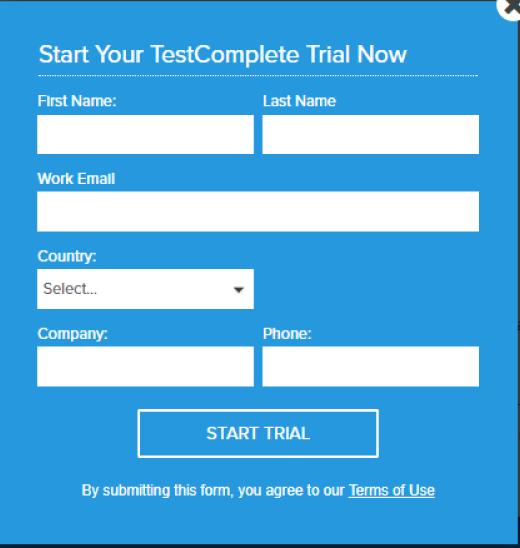
Step 4: After that, activate the license by pressing the 30-day trial license.
Step 5: After restarting the computer, we completed the TestComplete installation.
[Related Article: TestComplete Interview Questions]
Creating the first project on TestComplete
Step 1: Open the File Menu.
Step 2: Press “New Option” from the Menu.
Step 3: Press the “New Project” option.
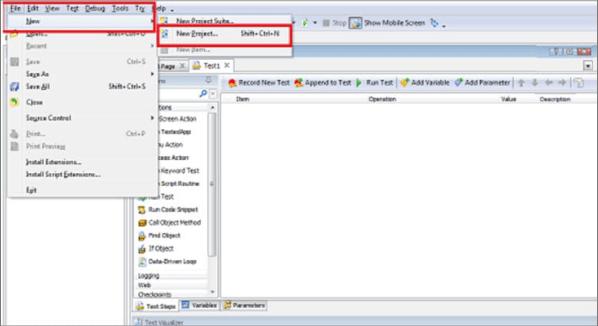
Step 4: On the other hand, we will utilize the shortcut key(shift + Ctrl + N) for creating the new project.
Step 5: Windows will emerge; provide the name of the project.
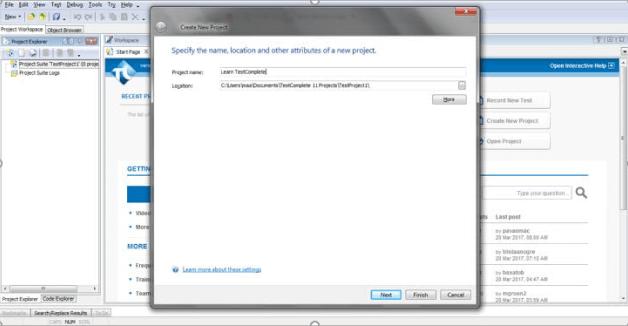
Step 6: Press Finish.
Step 7: Finally, we have created the First Project on TestComplete.
Testing Approaches in TestComplete
TestComplete offers various testing approaches. They are:
- Unit Testing: When we have to test only a particular part of the application, we will create the unit test. We can invoke implicit methods of the applications.
- White-Box Testing: We will use this when we have to test the application as per the access. This testing has been carried out with the access not higher than the user.
- Functional Testing: When we have to test the form from the customer's point-of-view, like checking What the way does for every user action.
- Parallel Testing: It is used for testing the multiple subcomponents of the applications in parallel. It reduces the testing time.
- Load Testing: It is utilized to put the predetermined load on the application and check the response.
- Regression Testing: It is utilized for reusing the test on the project when modifications are made to the code. We can compare the latest results with the old results.
Creating the test cases for the web application
TestComplete enables testing of the web applications and offers support for AJAX, ASP.NET, HTML5, etc. If we do not have the web applications for testing, TestComplete gives a sample application. We can use the application using “ http://services.smartbear.com/samples/TestComplete14/smartstore/”. First, we have to add the extension “Smart Bear” for performing the test. In the TestComplete Integrated Development Environment(IDE), press “Test/Keyword/Record Keyword Test.”
Select “browser” and “web option” and provide the URL of the application. Allow “Cross-platform web testing” if we have to record the tests in different browsers or in a remote environment, which TestComplete does not support.
Follow these steps for creating the test cases for a web application:
Step 1: Choose “File | New | New Project” as displayed in the following screenshot.
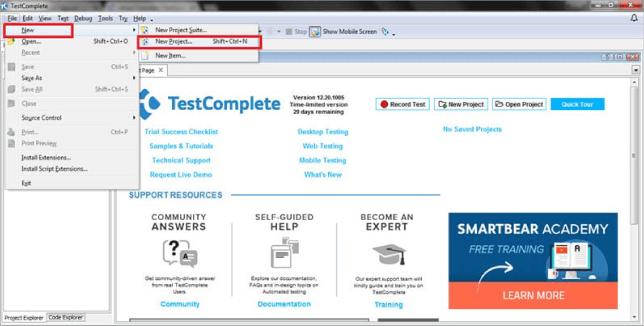
Step 2: Enter the Project Name; we can change the location if needed.
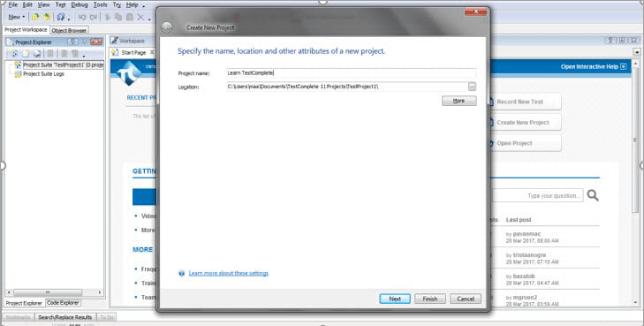
Step 3: Press the “Next” button.
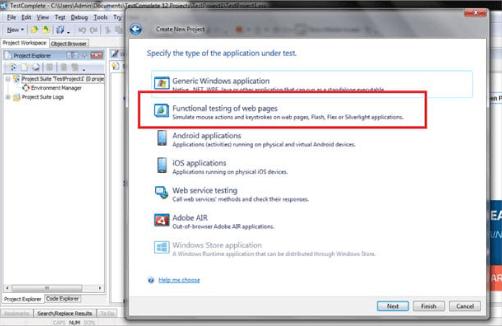
Step 4: First, test the web application, hence choose “Functional testing of the web pages” and press “Next.”
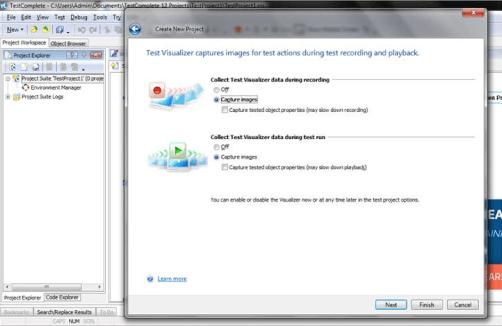
Step 5: After selecting the platform, we will enable or disable test visualizer functionality. Press “Next.”
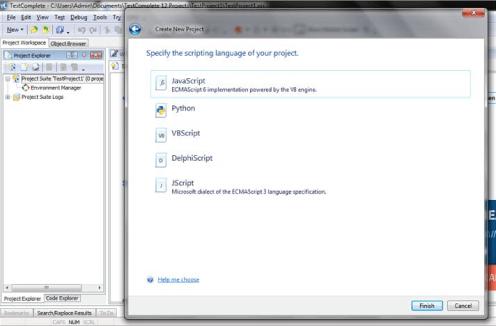
Step 6: We have to define the scripting language for the project. After choosing the scripting language, press “Finish.”
Test your First Test Case
Running the Test Cases
First, open the “TestComplete” IDE. The test cases generated previously will be displayed in the project explorer. Right-click on the script and press “run.” The test starts executing, and we can also fetch options for stopping and pausing. We will use the pause option to debug the tests to undergo logs. We can utilize the stop option for halting the tests before it has ended. If we encounter any errors during the test execution, TestComplete stops the test execution, and we store the related information in the test logs. From the “TestComplete” IDE, we can:
- Run the complete “Project” or “Project Suite.”
Step 1: In the “Execution Plan” editor, configure the test run order.
Step 2: If required, set up the project run order on the test items page of the project suite.
Step 3: Choose “Run/Run Project” or “Run/Run Project Suite” from the “Test Engine” toolbar.
- Run the Keyword Test
Step 1: Right-click the required test in “Project Explorer” and choose “Run” from the context menu.
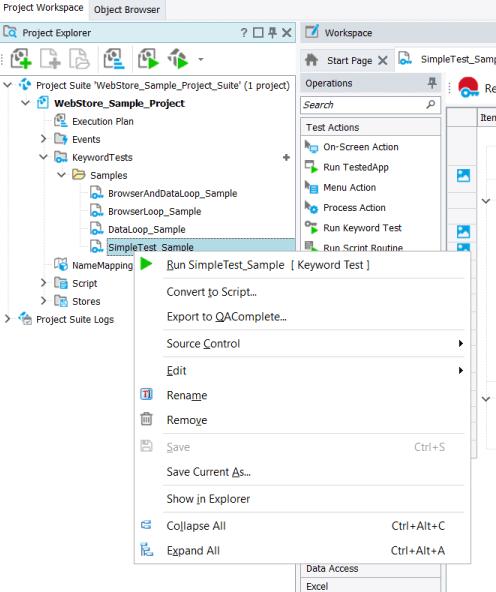
Step 2: Open the test case in the “Keyword Test Editor,” and after that, press “Run” in the editors’ toolbar.

- Run a Script Routine
Step 1: Right-click the required script unit in Project Explorer and Choose “Run/Run RoutineName” from the context menu.
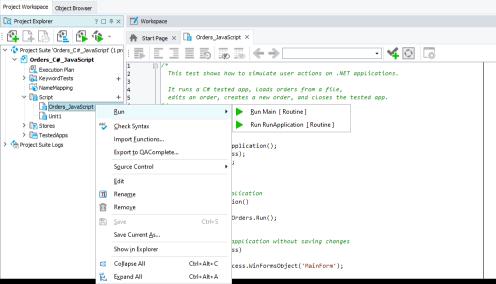
Step 2: In “Code Editor,” put the insertion point in the routine code, and after that, press “Run This Routine” in the toolbar of the “Code Editor.”
Debugging the Test Cases
Debugging allows you to resolve logical errors and verify whether our test cases execute correctly. TestComplete contains two kinds of debuggers:
- Keyword Testing Debugger(debugger of keyword tests)
- Script Debugger.
These debuggers will have all the advanced debugging features like breakpoints, tracing into routines, call stack, expression evaluation, watch list, etc.
Although the functionality of these debuggers varies a little, debuggers are the same. They use the same technique and share similar dialogs, menu items, and panels. Further, the keyword and script test debuggers are closely incorporated. For instance, if we debug the keyword test and run the operation executing the script code, the keyword test debugger will automatically trigger the script debugger; therefore, we will continue with the debugging of the scripting code.
Activating Trigger from Test Cases
While executing the script or Keyword test, the testing engine automatically terminates the breakpoints. The engine emphasizes the operations or lines where we ended it and triggers the step-by-step execution mode. We can create conditional breakpoints for stopping the execution only if particular conditions are satisfied. In some cases, it can be handier for activating the debugger from keyword or script test. For doing this, we can utilize the Pause test execution in posting the error option or “Runner. Pause” Method.
The pause test execution on posting the error option available in the “Engines - General Option” window. If we enable this option, TestComplete activates the debugger whenever the error message is posted to the test log.
The “Runner” object includes the “Pause” method that stops test case execution. For calling the method from the keyword test, we can use the “Run Code Snippet” or “Call Object Method Operations.” If we call the method from the script, the execution terminates on the line that we can execute after the line storing the instruction of the method call.
Best Practices
To have the maximum test coverage through the automation scripts, we must follow some best practices to optimize the test scripts through TestComplete. Following are some best practices that we must follow:
1. Build Test Cases with Maximum Test Coverage
Our test cases must be concrete, built in an easy way, which covers the maximum test coverage. If we carry out data-driven testing, we must provide the needed test data in the test storage, like covering all the test scenarios.
2. Using Traceability Matrix
Traceability Matrix is a column and row relationship where rows have the columns, and test cases have the needed test scenarios. At the intersection point, we can complete which test case covers which requirement. Through the traceability matrix approach, we can identify which test case is getting uncovered and duplicated at all.
3. Optimizing Test Scripts
While developing the test scripts, we must ensure that they are not wordy, there is no dead code, and satisfy the agreed coding standards. A test script developer must be cautious while working with the testing data loops to ensure that the loop end condition is adequately satisfied.
4. TestComplete Interaction
The application under test must find out how TestComplete interacts with it. For an open or white-box app, a tester can use the fields, methods, and properties. For the black-box application, we create image-based tests. We can save the images in the image repository. Selecting the correct procedure for testing our application can result in the exact script and accurate test results.
5. Recording the Test Scripts before using programming
It is always best to record the test scripts before using the programming for enhancing them. In this way, we will get the skeleton code to work on and not code everything from the beginning. This reduces a lot of coding time.
How to analyze the tests
In the testing process, we store all the operations as logs. We can identify the log file in project explorer in “Project Suite Logs/SmartStore Log.” Every test run will create a code, and the node icon depicts the message type, i.e., warning, error, success, etc. Therefore, we can identify the testing history for the project in SmartStore Log. After completing the test case execution, the equivalent log will be opened automatically.
The log node consists of actions carried out along with the time when it has been carried out, a description, and may also include images. The picture panel displays the projected screen that was grabbed while recording the test cases and the actual screengrabbed in the testing process by using “View Comparison Results” for comparing both images of the screen.

Run Tested App is the command we use for launching our application. As we perform our tests on the “notepad.exe,” the notepad displays the name in the “Operating Column.” TestComplete records the operation when we launch the application.

We have entered the software testing help in the displayed window of the notepad; therefore, we use the edit command for setting the text in the application.
Conclusion
In this TestComplete tutorial, we have learned what TestComplete is, the Advantages of TestComplete, TestComplete Capabilities, and TestComplete Installation. Moreover, we have studied how to create, analyze, and record the test cases in TestComplete.
If you have any queries, let us know by commenting in the below section.
 On-Job Support Service
Online Work Support for your on-job roles.

Our work-support plans provide precise options as per your project tasks. Whether you are a newbie or an experienced professional seeking assistance in completing project tasks, we are here with the following plans to meet your custom needs:
- Pay Per Hour
- Pay Per Week
- Monthly
| Name | Dates | |
|---|---|---|
| TestComplete Training | Jul 18 to Aug 02 | View Details |
| TestComplete Training | Jul 21 to Aug 05 | View Details |
| TestComplete Training | Jul 25 to Aug 09 | View Details |
| TestComplete Training | Jul 28 to Aug 12 | View Details |

Viswanath is a passionate content writer of Mindmajix. He has expertise in Trending Domains like Data Science, Artificial Intelligence, Machine Learning, Blockchain, etc. His articles help the learners to get insights about the Domain. You can reach him on Linkedin