
- Android Interview Questions and Answers
- Android Tutorial
- Android vs IOS
- Absolute Layout in Android
- Adding buttons & adding a list in Android
- Background Services In Android
- Dialog Boxes of User Interface Components in Android
- FrameLayout & LinearLayout in Android
- Android lifecycle callbacks
- Installation of Android
- Android Menus
- RelativeLayout & TableLayout in Android
- Android Services
- Status Bar Notification in Android
- Toast Notification in Android
- Android Development Tools
- Kotlin Interview Questions
- Kotlin Tutorial
- Kotlin vs Java
- Kotlin vs Python
- Kotlin Projects and Use Cases
Dialogs are the most popular and easiest ways of interactions with users. Almost every application contains some dialogs in it. In Android, Dialog is a small window that implies users to decide or enable them to enter particular details. A dialog does not occupy the entire screen and is used for events requiring users to proceed further in the application.
If you would like to Enrich your career with an Android certified professional, then visit Mindmajix - A Global online training platform: “Android training” Course. This course will help you to achieve excellence in this domain.
One of the most popular implementations of Dialog in Android is AlertDialog. It is used to alert the user before performing a particular task. For example, suppose you want to delete some pictures from the Gallery. In that case, the Gallery application will alert you about pressing the delete button, which is the positive button to perform the action in this case, and the image will be deleted permanently.
In this blog, you’ll learn everything about Android AlertDialog, its methods, and how to create it with an example. So, let’s get started.
Following are the topics we will be covering in this article
Android Dialogs
Android contains various dialogs as listed below:
| Dialog | Description |
| AlertDialog | This dialog is used to display prompts to the user with a title, max of three buttons, a custom layout, or a list of selectable items. |
| DatePickerDialog | This dialog provides us with a predefined UI that allows users to select Date. |
| TimePickerDialog | This dialog provides us with a predefined UI that allows users to select Time. |
| Custom Dialog | This dialog allows us to create our custom dialog with custom characteristics. |
Android AlertDialog
In Android, AlertDialog prompts a dialog to the user with messages and buttons to perform an action to proceed further in the application. It displays the Alert message to warn users, and according to their response(yes/no), the next step is processed.
Android AlertDIalog is the sub-class of Dialog class.
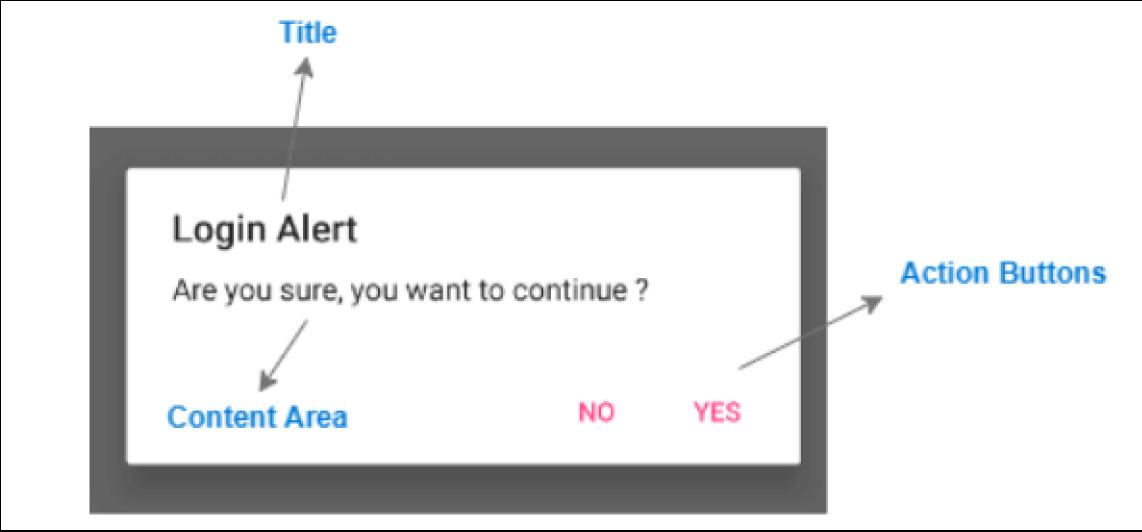
AlertDialog in Android application comprises three regions: Title, Content area (Message), Action Button.
-
Title - In Android Alerts, you can display a title with up to 3 buttons, a custom layout, a list of selectable items, or a message based on the need. And the title is optional. If you want to present a simple message or question, then the title is not required.
-
Content Area - This displays a message. It can be a list or custom layouts depending on the necessities.
-
Action Button - This displays action buttons for user interaction. There should not be more than three action buttons in AlertDialog, and they are positive, negative, and neutral. Positive is used to accept and continue with the action. Negative to cancel the action. Neutral is used when the user wants to proceed with the action but unnecessarily intends to cancel.
Checkout Android Interview Questions
Methods of Android AlertDialog
AlertDialogs in Android can be build using different methods in the activity file.
| Method Type | Description |
| setIcon(Int) | This method is used to set the icon of the AlertDialog. |
| setMessage(CharSequence) | This method is used to display the message. |
| setTitle(CharSequence) | This method set the title to appear in the Dialog box |
| setCancelable(boolean) | This method sets the property such that the dialog can be canceled or not |
| setOnCancelListener(DialogInterface.OnCancelListener onCancelListener) | This method Sets the callback such that it will be called if the dialog is canceled. |
| setMultiChoiceItems(CharSequence[] items, boolean[] checkedItems, DialogInterface.OnMultiChoiceClickListener listener) | This method sets a list of items to be displayed in the dialog as the content. The listener will notify the selected option. |
To create AlertDialog, you need to make an object of AlertDialog.Builder class provides APIs that allow you to work with any kind of content, including a custom layout.
Syntax:
AlertDialog.Builder alertDialogBuilder = new AlertDialog.Builder(this);
Then you need to set the positive (yes) or negative (no) or neutral button to the AlertDialog box.
Syntax:
|
After creating and setting the dialog builder, you will create an alert dialog by calling the create() method of the builder class.
Syntax
|
AlertDialog alertDialog = alertDialogBuilder.create(); |
This will create the alert dialog and will show it on the screen.
Android AlertDialog Example
Follow the below steps to create an Android AlertDialog application.
-
Step 1: Create a new Android application using Android Studio and name it as MyApp.
-
Step 2: Next, you’ll have a Java and XML file. Open XML file and text message.
-
Step 3: Now open an activity_main.xml file from reslayout path and write the code like as shown below
activity_main.xml
|
We have defined one-button control in RelativeLayout to display the alert dialog on the Button click in the XML layout file.
-
Step 4: Now load the XML layout resource from the activity onCreate() callback method.
For that, open the main activity file MainActivity.java from javacom.Mindmajix.MyApp path and write the code like as shown below.
MainActivity.java
|
-
Step5: From the above code, you might notice that setContentView is used to call the layout in the form of R.layout.layout_file_name. And the activity_main file is used to show AlertDialog on Button click.

The output of AlertDialog Example:
When the above code is executed using Android Virtual Device (AVD), you’ll get the result as shown below.
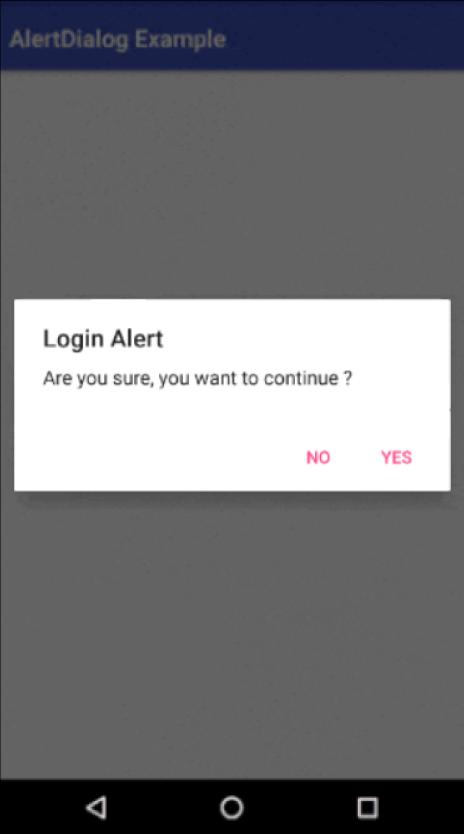
This is how you can use AlertDialog control in Android applications to show AlertDialog based on the requirement.
Conclusion:
This brings us to the end of this blog. You’ve learned what Android AlertDialog is and how to create an AlertDialog application. We hope the information shared is informative.
Attention readers! Don’t stop learning now. Gain all the relevant skills of Android Dialogs with the Android Certification Course and build a rewarding career.
 On-Job Support Service
Online Work Support for your on-job roles.

Our work-support plans provide precise options as per your project tasks. Whether you are a newbie or an experienced professional seeking assistance in completing project tasks, we are here with the following plans to meet your custom needs:
- Pay Per Hour
- Pay Per Week
- Monthly
| Name | Dates | |
|---|---|---|
| Android Training | Jul 18 to Aug 02 | View Details |
| Android Training | Jul 21 to Aug 05 | View Details |
| Android Training | Jul 25 to Aug 09 | View Details |
| Android Training | Jul 28 to Aug 12 | View Details |

Ravindra Savaram is a Technical Lead at Mindmajix.com. His passion lies in writing articles on the most popular IT platforms including Machine learning, DevOps, Data Science, Artificial Intelligence, RPA, Deep Learning, and so on. You can stay up to date on all these technologies by following him on LinkedIn and Twitter.


