- Home
- Blog
- Java Spring
- Java Spring Tutorial

- Spring Boot Interview Questions
- Spring Boot vs Spring MVC
- Spring Cloud Tutorial
- Spring Tutorial
- Java Spring Interview Questions
- What is Bean in Java Spring
- Spring Cloud Interview Questions
- Spring Boot Tutorial
- Spring MVC Interview Questions
- Spring Boot Projects and Use Cases
- Spring Boot Installation on Windows
- Java Spring Projects and Use Cases
According to Statista, Java Spring is one of the top three Java tech stacks widely used by software development companies to build web applications. This is why the demand for Java Spring developers is soaring everywhere constantly.
Gaining expertise in Java Spring will help you get hired by big companies. Keeping this in mind, MindMajix experts have developed this Java Spring tutorial for learners to elevate their knowledge of Java Spring. This Java Spring tutorial dives deep into core Java Spring concepts and offers a few hands-on practices.
Table of contents:
- What Is Java Spring?
- Java Spring Architecture
- Java Spring Features
- Spring Bean
- Spring Bean Lifecycle
- Environment Setup for Java
- Create Spring Maven Project
- Spring –Hello World Example
- Advantages of Spring Framework
- Disadvantages of Spring Framework
- Summary
- FAQs
What is Java Spring?
Java Spring is a robust framework that offers a comprehensive infrastructure for developers to build Java applications. Java Spring framework employs Plain Old Java Objects (POJOs) to develop high-quality Java applications.
Know that Java Spring is a flexible and secure framework that allows developers to utilize resources efficiently. The significant thing is that Java Spring reduces configuration tasks drastically. So developers can devote their time to building powerful web applications.
Well! You have got some glimpses of Java Spring. Let’s explore the Java Spring architecture in the following section.
| If you want to Enrich your career with an Java Spring Certified Professional, then visit Mindmajix - A Global online training platform: “Java Spring Certification Course”. This course will help you to achieve excellence in this domain. |
Java Spring Architecture
The Java Spring architecture has 20 modules. Out of the 20 modules, many modules are organized into different groups. The groups are data access or integration, spring core containers, and spring web. The other modules, such as AOP, instrumentation, Aspects, and test, work individually inside the architecture.
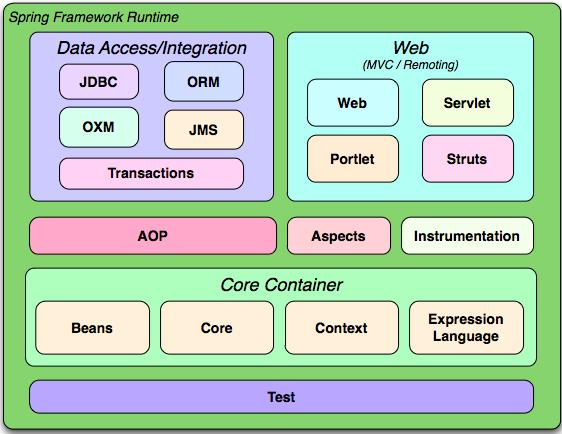
Let’s learn more about the groups one by one in the following.
Data Access or Integration:
This group contains JDBC, OXM, ORM, JMS, and transactions modules. The JDBC module offers a JDBC abstraction layer. This layer avoids making complex JDBC coding. The ORM module provides an integration layer for object-relational mapping.
The OXM module offers an abstraction layer. This layer helps to make object or XML mapping. The Java Messaging Service (JMS) module supports generating and managing messages.
Aspect Oriented Programming (AOP)
Java Spring's AOP module supports alliance-complaint AOP implementation. This module helps developers to define method-interceptors. So, developers can include behavioral information in their code using the source-level metadata functionality.
Spring Web
The web group contains several modules such as web, web struts, web servlet, and web portlet. The web module offers many web-oriented integration features like web-oriented application context, multipart file-upload functionality, etc.
The web servlet module offers the MVC design pattern for developing web applications. The web struts module includes the support classes. The classes help to integrate web tiers in spring applications. The web portlet module supports the MVC design implementation for the port environment.
Aspects, Instrumentation, and Test
The aspects module supports integration with AspectJ. The instrumentation module offers class instrumentation support for developers. It also provides a classloader object that developers can use in application servers.
The test module supports testing spring components such as TestNG and JUnit. It also supports consistent loading and caching of Spring ApplicationContexts.
Nice! You have got the big picture of the Java Spring architecture. Next, we will jump into the features of Java Spring.
Java Spring Features
Java Spring offers many incredible and impressive features to developers. Let’s take a closer look at the features in this section.
Spring IoC Containers
Spring IoC is a process that defines dependencies for objects. IoC is essentially an inverse process in which a bean controls its instantiation and injects its dependencies. The service locator pattern plays a vital role in this process.
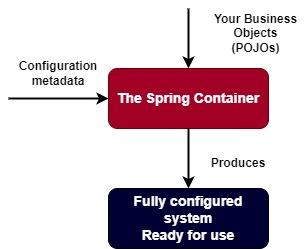
The role of the IoC container is to inject the dependencies into Java beans once they are instantiated. IoC containers instantiate, configure, and assemble beans. They create objects, taking necessary information from the configuration metadata.
AOP in Spring
Aspect-Oriented Programming (AOP) is a complementary programming language to Object-Oriented Programming. AOP provides a different type of program structure when compared with OOP. Class is the basic unit of modularity in OOP, whereas aspect is the basic unit of the AOP.
Java developers adapt AOP for multiple reasons. AOP provides declarative enterprise services – an alternative to the EJB declarative services. Additionally, AOP allows developers to implement custom aspects.
Spring Web Service
The Spring Web service supports creating and managing web service endpoints in Java applications. This service provides a layered approach that you can manage using the XML language. Moreover, the layered approach provides mapping for web requests for specific objects.
Data Access Framework
Hassle-free database communication is one of the biggest challenges for Java developers. Java Spring communicates seamlessly with Java data access frameworks like Hibernate and JPA. As a result, developers can speed up their application development.
The Java data access frameworks offer features like efficient resource management, resource wrapping, exception handling, etc. The features make the development process more simple and quick.
Great! You have gone through the key Java Spring features. Next, get ready to learn Spring Bean in the coming section.
Spring Bean
Spring Bean is essentially an object that acts as the backbone for creating Java applications. IoC containers instantiate, assemble, and manage beans. Generally, beans are created using configuration metadata. The IoC containers have configuration metadata in the form of XML definitions.
The configuration metadata typically has the following elements:
- A package-qualified class name – It represents a bean’s actual implementation class.
- Collaborators or Dependencies – They are the references required for beans to relate with other beans.
- Bean behavioral configuration elements – These elements define the behavior of beans.
- Other configuration settings – These may include the number of connections a bean uses to manage a connection pool, the size limit for the pool, etc.
Okay! Coming up is the section that digs deep into the Spring Bean Lifecycle.
Spring Bean Lifecycle
A Spring bean's lifecycle starts from the instantiation of a bean. The lifecycle continues with the actions the bean performs throughout its life. The lifecycle ends with the destruction of the bean.

As you know, IoC containers manage the lifecycles of Java beans. First, the Spring container starts, then instantiates beans based on requests. After that, dependencies are injected into the beans. When the container is closed, the beans are also destroyed simultaneously.
Methods to implement Bean Lifecycle
You can implement bean lifecycle in three methods as follows:
- By XML Method
While defining a Java bean, you must register the init () and destroy () methods in the spring configuration file. It allows you to apply the methods on the bean. It can be done in three steps, as shown below:
- First, create a bean and write the init () and destroy () methods in the class.
- Then, configure the spring XML file and register the init () and destroy () methods into the file.
- Lastly, create a driver class to run the bean.
- By using the Annotation Method
You need to annotate the init () method along with the @PostConstruct annotation in the annotation method. Similarly, you must annotate the destroy () method with the @PreDestroy annotation.
- By Programmatic Approach
The created bean will invoke the custom init () method while starting a container. Similarly, the bean will invoke the destroy () method while closing the container. It can be done in three steps, as shown below:
- Creating a bean by using InitializingBean and DisposableBean. It also includes overriding the destroy () methods and AfterPropertiesSet () on the bean.
- Then, configure the Spring XML file and define the bean
- Create a driver class to run the bean.
Good! It’s time to dive into some hands-on practices that will help you get started with the Java Spring framework.
Environment set up for Java:
In this Java Spring tutorial, you will learn to set up an environment to build Java applications using the Java framework. Let’s go through the step-by-step procedure to set up the environment.
Step 1: Setting up the Java Development Kit (JDK)
- First, use the below link to download the latest version of JDK.
https://www.oracle.com/java/technologies/downloads/
- Download and install the JDK file and complete the configuration.
- Next, you need to set PATH as well as JAVA_HOME environment variables. It directs you to refer to the directory that has Javac and Java. Javac is a Java compiler that converts Java files into bytecode class files.
- If you have installed the JDK file in the C:\jdk1.6.0_15, you must add the below lines in the C:\autoexe.bat file.

- If you use an IDE other than IntelliJ IDEA and Eclipse, you must run a simple Java program to find where Java is installed.
Step 2: Installing Apache Common Logging API.
- First, download the latest Apache Commons Logging API version using the link below.
https://commons.apache.org/logging/download_logging.cgi
- Once you download and install the API, store the binary distribution on your machine.
- If you are running the Windows operating system on your machine, you must store the API in the directory – C:\commons-logging-1.1.1. This directory will consist of many JAR files and other supporting documents.
- If you are running the Linux operating system on your machine, then you must store the API in the directory – /usr/local/commons-logging -1.1.1
- Another crucial thing is that you must accurately set the CLASSPATH variable on the directory.
Step 3: Setting up Eclipse IDE
- It is essential to set up the Eclipse IDE on your machine. It allows you to run Java programs like the JDK platform on this IDE.
- You can use the below link to install the Eclipse IDE on your machine and download the latest Eclipse binaries.
https://repo.spring.io/ui/native/release/org/springframework/spring
- After that, you can install the binary distribution on your machine as you have done in the previous step.
- Now, you can start Eclipse IDE by running the below commands on your machine with the Windows operating system. Another way is to double-click on the eclipse.exe file to start the platform
 If you want to start the Eclipse IDE on the Linux operating system, you need to run the commands below.
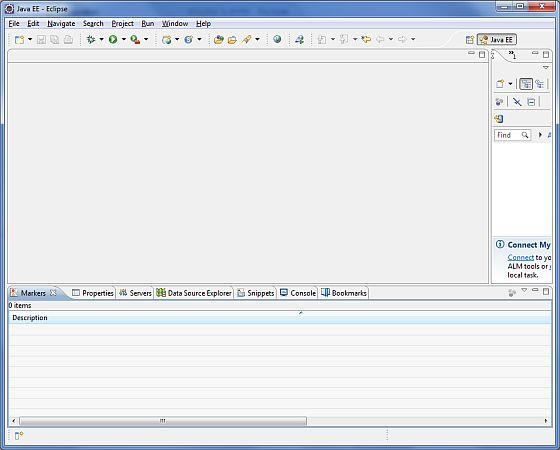
- Finally, you will see the display on your computer screen below.
Step 4: Setting up Spring Framework Library
It’s perfect to set up the spring framework now. The following steps will help to install the framework smoothly.
- First, use the below link to download the binaries of the Spring framework
https://repo.spring.io/ui/native/release/org/springframework/spring
- Download the zip file if you want to download the framework on a Windows machine. On the other hand, download the .tz file to install the framework on a Linux machine.
- Once the download ends, you can unzip the file and store it in the directory path – E:\spring directory.
- You can find all the spring libraries in the directory path – E:\spring\libs
- Additionally, you need to set the CLASSPATH variable on this directory.
Celebrate! You have completed the environment setup for Java Spring through this Java Spring tutorial. Right now, you are ready to work on Java Spring projects.
Create Spring Maven Project:
This Java Spring tutorial will walk you through the simple step-by-step procedure to create a maven-based Spring project. Maven is an automation tool. Besides, it is the dependency manager for Java applications.
Before starting this project, you need to install the Apache Tomcat server on your machine in addition to JDK and Eclipse IDE platforms.
Step 1: Creating a Maven Project
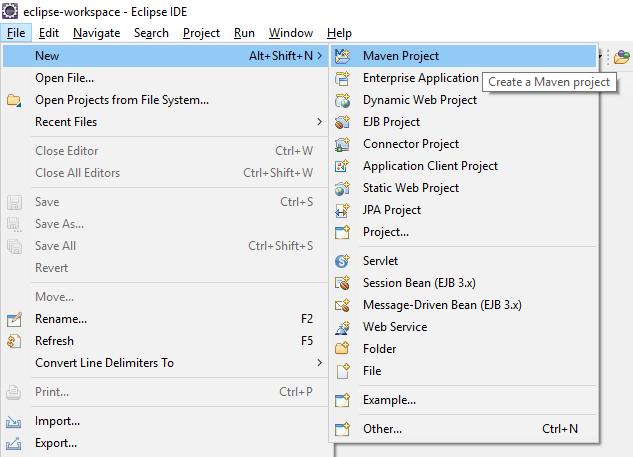
- First, start the Eclipse IDE platform. Click on the file menu. Select New and then Maven project.
- Now, a window will pop up. Check the box near ‘create a simple project’. Similarly, check the box near ‘use default workspace location’.
- Next, click the next button.
Step 2: Configuring the Project
- Enter the artifact ID and group ID for the project in the respective fields
- Choose the packaging that clearly shows the plugin goals
- Almost there! Click the Finish button to make the Maven project ready.
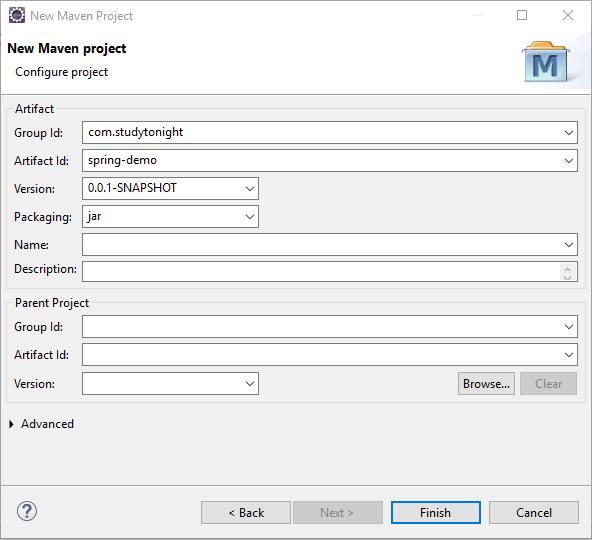
Step 3: Maven Project Structure
- Now, the new project is ready for the Eclipse platform.
- The project folder structure is shown below
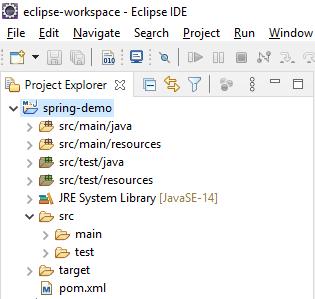
- The project includes the pom.xml file that you can use to configure the project.
Well done! You have successfully created your Maven project structure.
What next? Ready to go with another Java Spring hands-on practice?
Spring – Hello World example:
This Java Spring tutorial will take you through the step-by-step procedure to create a Java Spring application that will print – Hello World. Before starting the project, you must configure the spring beans configuration file.
Step 1: Creating a Java Project
- First, create a Java project using the Eclipse IDE platform. Then, click new → file → project in the IDE platform.
- Select Java project from the wizard list. Name the project as – HelloSpring.
- Once the project is created, you can view the items in the image below by clicking the Project Explorer tab.
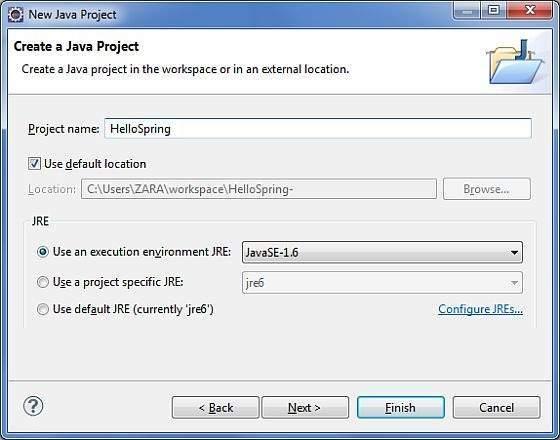
Step 2: Adding the required Libraries
- In this stage, you will add the spring framework and the common logging API libraries to the project.
- Right-click on the project name – HelloSpring. Then, click the Build Path → Configure Build Path. This step will enable the display of the configured build path on the computer screen.
- Next, open the libraries tab. Click the JAR external libraries button to add the JARs from the spring framework. Not only that, you can add the common logging APIs as well.
Step 3: Creating Source Files
- You need to create source files for the HelloSpring project at this stage.
- Right-click on the src in the package explorer section.
- After that, click new →package
- Now, you can name the package as – com.mindmajix
- Create MainApp.java and HelloWorld.java files under this package
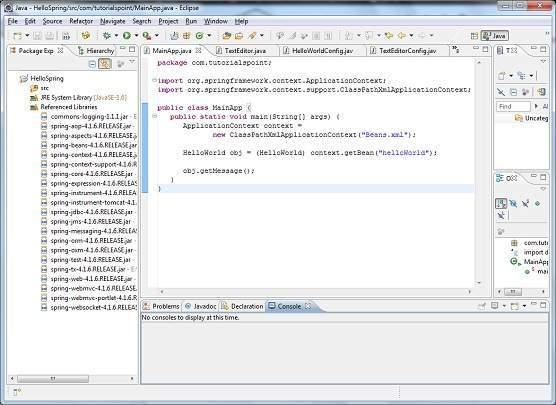
- The content of the Helloworld.java file will be as follows.
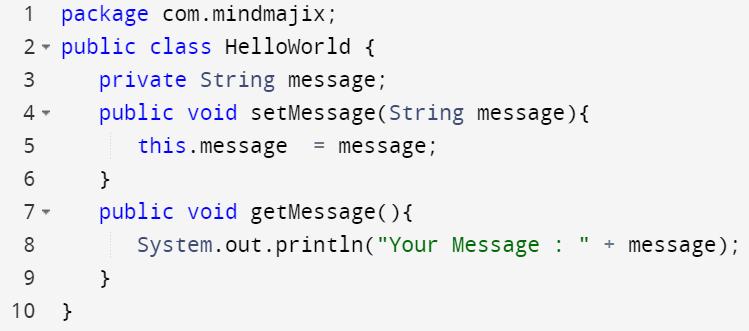
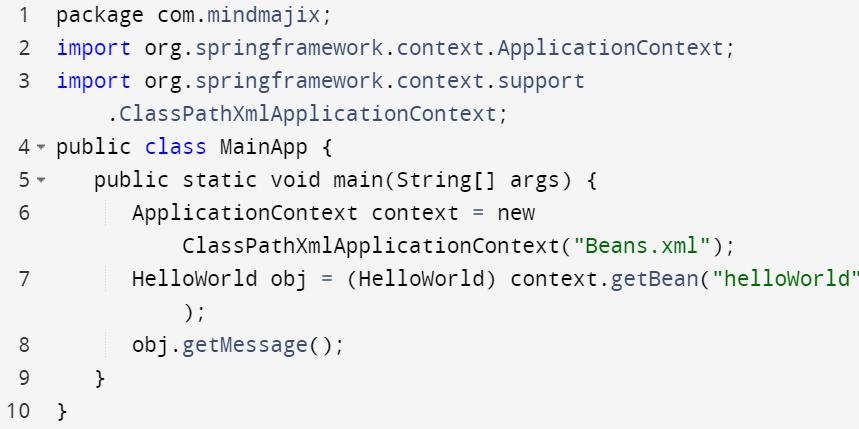
- The content of the MainApp.java file will be as follows.
Step 4: Creating Bean Configuration File
- In this step, you will build a configuration file – an XML file. You can use this file to combine classes together.
- This configuration file is created under the src directory, as shown in the below image.
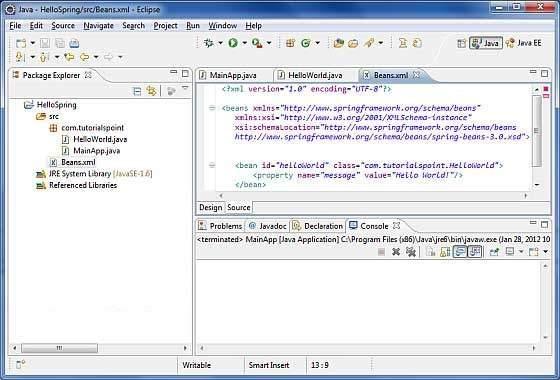
- You can name this configuration as beans.xml. The important thing is that the file must be available in the CLASSPATH.
You can use the beans.xml file to assign unique IDs to various beans. You can also control the creation of objects that come with different values. So, this approach doesn't affect the Spring source files.
Step 5: Running the Program
- Make sure the source and configuration files are perfectly functional
- Keep the MainsApp.Java file active
- Use the run button available in the Eclipse IDE to compile and run the program.
- Alternatively, you can use the Ctrl+F11 option to run the program
- Done! You will finally get the 'Hello World' message in the Eclipse console.
Congrats! You have created your first Java Spring application successfully. Next, we will read through the advantages and disadvantages of the Spring framework in the next section.
Advantages of Spring Framework
The Spring framework has many advantages. Some of the advantages are outlined below.
- Flexibility: Java Spring provides many flexible libraries for developers to build Java applications. Also, the IoC and dependency injection features offer robust functionalities to the applications.
- Quick Delivery: This framework contains all the necessary resources and tools to create Java applications faster.
- Portability: Java Spring supports both server-side and client-side application development.
- Secure: The frequent updates on the framework make it a secure and consistent platform.
- Testing: Testing is simplified in Java Spring due to dependency injection.
Disadvantages of Spring Framework:
Every coin has two sides. So, it’s not a surprise that spring has some cons as well. Let’s list the drawbacks in the below.
- You cannot find clear-cut guidance on cross-site and XSS scripting from the Java Spring documentation.
- The learning curve is steep for Java Spring. You must invest a lot of time and energy to become a master in Java Spring.
- You must have strong expertise in the spring framework to perform hassle-free application development.
- You need to use plenty of XML configuration files while developing applications. Inevitably, it slows down the process of application development.
Though Java Spring has some drawbacks, it is one of the go-to tools for developers to build Java applications.
Summary:
- Java Spring is a robust framework that provides the necessary infrastructure to create and run applications
- The Java Spring architecture has over 20 modules in which many modules are grouped together and perform specific tasks
- Java Bean is one of the crucial elements of Java Spring. Java beans are instantiated and managed by IoCs.
- Java Spring framework supports building fast and secure web applications
- this framework comes with core features such as inversion of control, AOP, dependency injection, and much more
- A Java bean cycle starts from the instantiation of a Java bean and its various actions during its life and ends with the destruction of the bean.
FAQs:
Is learning Java Spring easy?
Learning Java Spring is easy if you purely devote your time to learning. MindMajix conducts Java Spring training with industry-designed course curricula and experienced trainers. No doubt your learning experience in MindMajix will be exciting and fruitful.
Is it worth learning Java Spring?
On average, entry-level Java Spring developers can earn up to 8 LPA in India. In the USA, they can earn around 92k USD annually on average. These figures showcase that a career in Java Spring is promising and lucrative.
Is Java Spring a lightweight framework?
Yes, Java Spring is a lightweight framework. This is because Java Spring supports POJO implementation. Developers don’t need to implement any interface or inherit any class while using the Java Spring framework.
Why is Java Spring loosely coupled?
Java Spring framework has the Inversion of Control and dependency injection features. The features make the platform loosely coupled, which makes testing and managing Java applications easy.
What is the key difference between Java Spring and Spring Boot?
Java Spring is a Java EE environment that supports developing web applications. On the other hand, Spring Boot is a framework that supports developing REST APIs. You must configure manually in Java Spring, whereas Spring Boot has default configurations.
Conclusion:
Long story short, Java Spring is a powerful framework that provides the infrastructure to develop Java applications. Java Spring offers excellent features for developers, such as Spring IoC, Spring AOP, dependency injection, etc. It allows them to build powerful web applications seamlessly.
Well! This Java Spring tutorial must have given you a wonderful experience in learning Java Spring from ground to advanced concepts. The hands-on practices must have improved your practical skills to the next level. If you wish to elevate your skills further, you can check out a Java Spring course in MindMajix. You will get certification at the end of the training and gain a competitive edge in the job market.
Explore Java Spring Sample Resumes! Download & Edit, Get Noticed by Top Employers!
 On-Job Support Service
Online Work Support for your on-job roles.

Our work-support plans provide precise options as per your project tasks. Whether you are a newbie or an experienced professional seeking assistance in completing project tasks, we are here with the following plans to meet your custom needs:
- Pay Per Hour
- Pay Per Week
- Monthly
| Name | Dates | |
|---|---|---|
| Java Spring Training | Feb 14 to Mar 01 | View Details |
| Java Spring Training | Feb 17 to Mar 04 | View Details |
| Java Spring Training | Feb 21 to Mar 08 | View Details |
| Java Spring Training | Feb 24 to Mar 11 | View Details |

Anjaneyulu Naini is working as a Content contributor for Mindmajix. He has a great understanding of today’s technology and statistical analysis environment, which includes key aspects such as analysis of variance and software,. He is well aware of various technologies such as Python, Artificial Intelligence, Oracle, Business Intelligence, Altrex, etc. Connect with him on LinkedIn and Twitter.


