- Home
- Blog
- Project Management
- MS Project Tutorial - What is MicroSoft Project?

- Prince2 Interview Questions
- Prince2 vs PMP
- How to cope with Different Project Management Methodologies in an Organization?
- Project Management Interview Questions
- Top 10 Project Management Knowledge Areas
- Top Project Management Methodologies
- Project Management Tools And Techniques
- MS Project Interview Questions
- Project Manager Job Description
MS project software is basically used for the management of projects. This software can be used by a business as well as home users to manage their projects efficiently without any error. After going through this tutorial, you will build up your MS project skills and will learn to perform different functions using MS project.
MS Project Tutorial For Beginners
- MS Project - Getting Started
- MS Project - Create a New Plan
- Switching Task – Manual to Automatic
- MS Project - Settings
- Useful Resources
- Useful Books on MS Project 2013
What is Project Management?
Project management is a process to initiate, plan, execute, control, and close the project in order to meet the specific requirements and achieve the desired goals. Project management allows us to organize and manage the resources that are important for completing any project.
MS Project is a Project management software that allows the users to manage the project, budget, and resources. This software is very popular for personal and professional use. The latest version of MS Project software supports features like portfolio management, advanced analytics, web access, and reporting functions. These features make the management task simpler and easier.
| If you want to build your career as a Project Management professional, then visit Mindmajix - A Global online training platform for the “MS Project Training” Course. This course will help you to achieve excellence in this domain. |
MS Project Tutorial - Getting Started with MS Project
Here, we will discuss the MS Project User-Interface in more detail:
MS Project UI
- Windows 7 - From your Desktop, click on the ‘Start’ menu and go to the ‘All Programs’ option. Now, click ‘Microsoft Office’ and then ‘Project 2013’.
- Windows 8 - From your ‘Start’ screen, click on the ‘Project 2013’.
- Windows 10 - Click the ‘Start’ menu and after that click on ‘All Apps’. Now, go to the ‘Microsoft Office’ and then ‘Project 2013’.
Once you have followed all the steps with respect to your Windows version, the below given Project Start Screen will display on your PC. Here, you will get the different options to open the new plan, plan template, or the other plans as shown in the image displayed below.
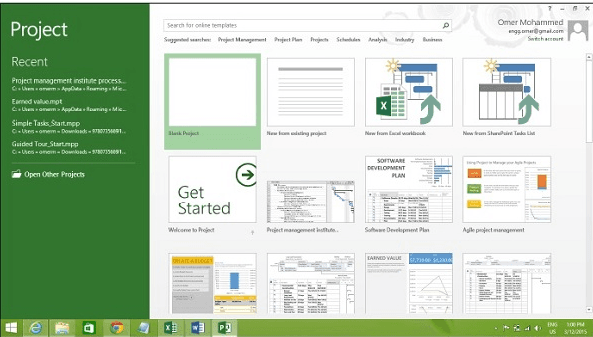
On Project Start Screen, when a user will click the ‘Blank Project’ tab, the following screen will appear on your PC. The below-mentioned screen is displaying the interface of MS Project.
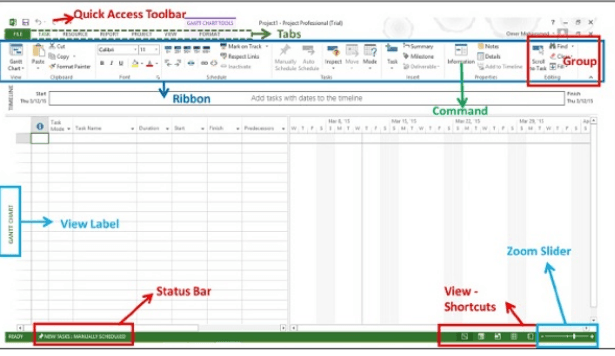 The main components included in MS Project Interface are discussed below:
- Quick Access Toolbar: The Quick Access Toolbar is the customizable toolbar that consists of a set of different commands which are not dependent on the ‘ Tab on the Ribbon’. A user can include the buttons to represent the Toolbar Commands.
- Tabs on the Ribbon, Groups: Microsoft Office 2007 version has introduced a Fluent User Interface. This interface has replaced the customizable toolbars and menus with a single ‘Office’ Menu, a small toolbar referred to as ‘Quick Access Toolbar’ and known as a ribbon with different tabs. Every toolbar consists of buttons and other controls. Toolbar Controls are classified into groups that can be visually distinguished and having different sizes. Groups are basically the collection of different commands. The division of the tab is done in multiple groups.
- Commands: Commands are used to perform specific actions in the MS Project. Every tab consists of multiple commands. When a user puts the cursor on any command, its description can be viewed in the tooltip.
- View Label: The view label is present on the left side of ‘Active View’ which is present on the main window. There are different types of views included in the MS Project such as Gantt Chart View, Diagram View, and many more. View Label provides the information that which view the user is presently using.
- View Shortcuts: View Shortcuts allow the users to switch between the views that are being frequently used in the MS Project.
- Zoom Slider: With the help of Zoom Slider, a user can zoom in and out of the Active View.
- Status Bar: The status bar displays the information like new tasks scheduling mode ( manual or automatic) and provides the information related to filters used in the active view.

MS Project - Create a New Plan
When a user works on an MS project, he or she is required to provide one of the dates from the start and end date. It is necessary to provide this information as, when a user enters the dates with other project constraints such as tasks, dependencies, the MS project start calculating the other date.
Launch MS Project
- Windows 7- From your home screen, click the ‘Start menu and go to ‘All Programs. Select ‘Microsoft Office’ and then ‘Project 2013’.
- Windows 8- Open the MS Project from Start Screen.
- Windows 10- Click on the ‘Start’ button then All Apps>>Microsoft Office>> Project 2013.
Creating a Blank Project & Project Information
MS project includes the list of options mentioned below in the Project Information. When you open the MS Project, from the available templates, you need to click on the Blank Project as shown below.

The project sets the start date of the plan to the current date. This date is indicated by the green thin vertical line in the chart part of the Gantt Chart View as shown in the picture below.

Project Information
Let’s get more information about the project:
Step 1: Start Date
- Click on Project Tab>> Properties Group>> Project Information.
- A Dialog Box will appear on your screen. In the box for a Start date, enter the start date. For example- the start date is 11/5/15. You can click the down arrow and choose the date from the calendar.
- Tap on Ok to confirm.
Step 2: Set up Calendar
- Click Project Tab>> Properties Group>> Project Information.
- Click on the arrow present on the current date drop-down box. Here, you will see the list with three base calendars.
- 24 hours- Calendar having 24 hour working time.
- Standard - Regular working hours from Monday to Friday with a 1-hour break. (8 AM to 5 PM).
- Night shift - It includes the timing from 11 PM to 8 AM. The night shift includes the nights from Monday to Friday.

As mentioned in the picture above, you have to choose the Standard Calendar as a Calender for your project. Tap on ‘Ok’ or ‘Cancel’ for closing the dialog box. Now, you have to add the exceptions.
Step 3 - Adding the Exceptions to the Calendar
Exceptions are used for modifying the Project Calendar to have a non-working day or non-standard workday. A user can also fix unique work hours for an individual resource.
Example of creating a non-working day for any office celebrations or holiday:
Click Project tab>> Properties Group>> Change Working Time.
The Change Working Time Dialog box will get displayed on your screen. Under the Exception Tab, click ‘Name Field’, enter the event as ‘ Company Anniversary’. Enter ‘11/22/15’ in the Start field and then enter the same in the finish field. This day will be scheduled as the project’s non-working day as shown below in the picture.

Step 4 - Setup Resource Calendar
You can modify the Standard Base Calendar, in the same manner, you can also modify the working and non-working time of every resource. A user can make the modifications in the resource calendar to accommodate vacation time, flex time, training time, etc.
Resource Calendar can be set only for work resources not cost or material resources.
Step 5 - Change the working time for resource
- Click on the Project Tab and then go to Properties Group>> Change working time. The ‘Change Working Time Dialog Box’ will display on the screen.
- Click the down arrow for the ‘For Calendar’ drop-down box.
- Choose the resource for whom you want to modify the work schedule.
- Click the ‘Works Week’ tab.
- Double-click the [default] cell present just below the Column heading.
- Under the ‘Selected day(s)’, select any day for changing the work schedule.
- Click on Set day(s) to these particular work times as shown in the image below.

Step 6 - Create Non-Working days
- Click on the Project Tab and then go to Properties Group>> Change working time. The ‘Change Working Time Dialog Box’ will display on the screen.
- Click the down arrow for the ‘For Calendar’ drop-down box.
- Choose the resource for whom you want to modify the work schedule.
- Click the ‘Work Weeks’ tab.
- Double click the default cell present below the ‘Name Column Heading’.
- Under the Selected day, select the day for which you want to change the work schedule.
- Click on any day. Use the radio button ‘Set days to non-working time’.
- Tap on the OK button and close the dialog box.
After following these steps, you will be able to see the below-mentioned screen on your PC for setting up nonworking days.

Change File Properties
Just like you can manage the file properties in your MS office, you can also manage all the information in your MS Project file through the following ways:
Launch MS Project
- Windows 7-From your home screen, click the ‘Start menu and go to ‘All Programs. Select ‘Microsoft Office’ and then ‘Project 2013’.
- Windows 8-Open the MS Project from Start Screen.
- Windows 10- Click on the ‘Start’ button then All Apps>>Microsoft Office>> Project 2013.
Save the Properties
Click on the ‘File tab’. In ‘Info’, select the option ‘Project Information’. Click on the arrow to present nearby Project information and then click on the Advanced Properties. A dialog box will appear on your screen. Here, you can type in the modification as needed. Tap on ‘OK’ and click ‘Save’ to save the changes as shown in the picture below...

Build Task List
To accomplish the project goals, the (WBS) Work Breakdown structure is developed. In WBS, work refers to the deliverables. WBS identifies the lowest level of deliverables as a work package. The decomposition of the work package is done in tasks and activities. The task is action-oriented whereas the work package is the result or deliverable of tasks being performed.
Enter Task
Below the simple Gantt Chart View is displayed.
A user can click directly on Cell present below the ‘Task Name Column’.
The following screen is displaying 5 distinct tasks.

Enter the Duration: Task duration is the time estimation in which the task will get completed. The task duration time is estimated by the project manager by using the previous information, expert, and other important parameters.
A user can enter the task duration in weeks, hours, weeks, days, and months as shown in the given table.

Change Default Time Dimensions: Click on the Project Tab>> Properties Group>> Change working time>> options.
A user can change the default time dimensions for all the projects or the project in which a user is currently working as displayed in the image below.

Enter Task Duration" In the Gantt chart, a user can click on the cell present below the Duration column heading and enter the task duration.
A user can enter the Start and End date for the project and then the MS project itself calculates the duration as shown on the screen below.

In the above-mentioned screenshot, Task 6 has been scheduled for Sunday which is not comes on a working day and the task will end on Wednesday. Here is important to note that duration will not be calculated as 3 days, it will be 4 days.
Elapsed Duration: Elapsed duration is the time duration that elapses during the event execution which is not using any resource. A normal workday includes 8 hours, elapsed workday includes 24 hours as mentioned below in the image.

A user can enter this time duration by preceding any duration with an ‘e’ abbreviation. Thus, 1ew is 24 hours 7 days.
Create Milestone: Milestones are particular points in the timeline of the project. Milestones are used as the main progress points for managing the project success and expectations of stakeholders. These are basically used for budget, input, and reviews.
As per the Mathematics, Milestone is a task of 0 duration. A user can insert a milestone in two different ways:
Method 1 - Insert Milestone
- Click the task name to insert Milestone.
- Click Task Tab>>Insert Group>> Milestone.
MS Project will name the new task as the ‘New Milestone’ having a 0-day duration.
Click on the New Milestone option to change the name.
Method 2 - Convert a Task to Milestone
- Click on a specific task or enter the new task under Task Name Heading.
- Under the heading Duration, type ‘0’ days.
Method 3 - Convert a Task to Milestone
- Double-click on a specific task name.
- Task Information dialog box will appear on your screen.
- Click on the Advanced tab and choose “Mark Task as Milestone” as mentioned in the picture below.

Create a Summary Task
A user can roll up the different tasks in the project schedule into a Summary Task. This will help the users to manage the plan in a better way as a user can organize the plan into phases.
For example- if a user wants to group Task 4 and Task 5 into the summary Task, a user can follow the given steps:
- Select the name of both tasks.
- Click the Task tab and then click on Group Insert.
- Click summary.
- MS project will create the New Summary task. Name it as Task 1.
Link Tasks
you have made the task list for accomplishing targeted goals, you are supposed to link tasks with task relationships known as dependencies. For example - After completion of task 1, task 2 will start, these dependencies are referred to as Links.
There are 4 types of task dependencies as mentioned below:
- Finish to Start (FS)
- Finish to Finish (FF)
- Start To Start (SS)
- Start to Finish (SF)
Methods to link tasks
Method 1
Select the tasks that you want to link. For example Task 1 and Task 2. Here is the process to link tasks
- Click on the task tab.
- Schedule group.
- Link the tasks selected.
- Task 1, as well as Task 2, is linked to the FS-Finish to Start.
Important - The Start Date of Task 2 will be a day come after the finish date of Task 1as shown below.

Method 2
You need to Double Click on the targeted successor task for linking.
For example - If you have clicked Task 4.
- The task information dialog box display on your screen.
- Click on the ‘Predecessors’ tab
- Now, you have to click on the empty cells in the table which are displayed below ‘Task Name Column.
- A drop-down menu will appear where all the tasks defined in the project are mentioned.
- Choose a Predecessor task and tap on OK.
Here we will choose task 3.

Method 3
Here, you need to choose the task group and link them to Finish to Start relationship.
Choose multiple tasks >>Task tab >>Schedule group>> Link the Selected Tasks.
Respect Links
If you are working in a Manual Schedule Mode then, if you make any changes in the Predecessor task, the changes won’t get reflected in the start date of Task 4. For example - If task 4 starts at the same that which is the next day as the Task 3 finish date. Then, the Task 3 duration will be changed from 5 to 7 days.
Task 4 start date will not be updated automatically.
| Related Article: Frequently Asked MS Project Interview Questions |
Switching Task – Manual to Automatic
MS Project set all the new tasks to be scheduled manually by default. A user can control the scheduling in two different ways
Manual Scheduling -Manual Scheduling provides complete control to the user on task scheduling. With manual scheduling, a user can control the Start and finish date, duration. The program will not modify the dates of tasks that are manually scheduled.
Automatic Scheduling- Automatic Scheduling schedules the task automatically. It makes the calculation by considering the different values like duration, start, and end date automatically. They take all the links, calendars, and constraints into the account.
Converting Task to Automatic Schedule
A task can be converted to an Automatic schedule by following the three different methods:
Method 1
If a user wants to change a specific task mode, let’s say Task 5 then, the user needs then click on the Task Mode cell present in a similar row. After that, open the dropdown menu by clicking on the down arrow and select ‘Auto Scheduled’ as shown below.

Method 2
- Click on Task.
- Choose Task Group and then select Auto-Schedule and the output will be.

Method 3
- Switch to Auto-Schedule Mode completely.
- Click on the New Task Status bar to toggle the plan’s scheduling mode.
- Select ‘Auto Scheduling Mode’.
The output will be:
If a user wants to change the default Scheduling Mode for all-new Project Plans then:
Go to the ‘File’ tab.
- Click ‘Options’ and after that select ‘Scheduled’ Tab.
- Select ‘All-New Project’ from the scheduling option.
- From the Dropdown menu, choose ‘Auto Scheduled’ under the New Task creates as shown below.

Image source - https://www.tutorialspoint.com/ms_project/ms_project_settings.htm
MS Project - Settings
Every user has different Settings for their MS Project. To make sure that you get the expected outcomes without any hassle, you need to perform the following settings in your MS Project.
Important- All these are the Default Settings that come with MS Project installation.
Step 1: Go to File>> Options. Click on the General Tab, select the Project view >> Default View.
From the Dropdown menu, choose the ‘Gantt With Timeline’ option as mentioned below.

Step 2: Go to ‘Files’>>’ Options’>>’ Display Tab’>>’ Show Indicators and Option Button for’.
Check all the available options as shown on the given screen.

Step 3: Go to ‘File’>>’Optios’>>’ Scheduled tab’>> ‘Schedule’>>’ Show Assignment Units’.
From the drop-down menu, select the ‘Percentage’ option as given below in the picture.

Step 4: Go to ‘Files’>>’Options>>’ Schedule tab’>>’ Calculation’>>’Calculate Project after each Edit’.
Check the ‘ON’ button.

Step 5: Go to ‘Files’>>’Options>>’ Save Tab’>>’ Save Projects’>>’ Save Files In this format’.
Choose ‘ Project (*.mpp)’.

Step 6: Go to ‘File’>>’Options’>>’Advanced Tab’>>’Edit’.
Check All Options.
Step 7: Go to ‘File’>> ‘Options’>> ‘Advanced tab’>> ‘Display’>> ‘Show Status Bar’>> ‘Show Scroll Bar’.
Check the option ‘Scroll Bar’ and ‘Status Bar’ as shown in the picture.
Step 8: Go to ‘Resources’>> ‘Level’>> ‘Leveling Options’>>’ Leveling Calculations’.
Set it to the manual and you will see the following screen.

Step 9: Go to ‘Resources’>> ‘Level’>> ‘Leveling Options’>>’ Leveling Calculations’>> ‘Look for the Overallocations’.
From the drop-down menu, choose ‘Day-by-Day’ as shown below
MS Project - Useful Resources
To get additional information about the MS project, you can go through the following resources. These resources will help you to gain an in-depth knowledge of MS Project 2013.
Official website of MS Project 2013 - https://www.microsoft.com/en-us/evalcenter/
Wikipedia Reference of MS Project 2013 - https://en.wikipedia.org/wiki/Microsoft_Project
Useful Books on MS Project 2013
Microsoft Project 2013 - The missing manual
-By Bonnie Biafore.
Microsoft Project 2013 - Plain and Simple
-By Howard B.
Microsoft Project 2013 Step by Step
-By Chatfield.
Conclusion
MS Project 2013 allows the users to schedule the tasks, assign the resources, analyze workload, track progress, and manage the budget in an effective manner. This software comes with different features that let the user execute every task in a proper manner. There are different views supported by the MS project which let users divide the project into subtasks so that each task can be executed as per the scheduled date and time. A user can also have automatic as well as manual scheduling for task execution. Thus, with the help of MS Project software, a user can manage the project efficiently.
 On-Job Support Service
Online Work Support for your on-job roles.

Our work-support plans provide precise options as per your project tasks. Whether you are a newbie or an experienced professional seeking assistance in completing project tasks, we are here with the following plans to meet your custom needs:
- Pay Per Hour
- Pay Per Week
- Monthly
| Name | Dates | |
|---|---|---|
| MS Project Training | Jul 14 to Jul 29 | View Details |
| MS Project Training | Jul 18 to Aug 02 | View Details |
| MS Project Training | Jul 21 to Aug 05 | View Details |
| MS Project Training | Jul 25 to Aug 09 | View Details |

Ravindra Savaram is a Technical Lead at Mindmajix.com. His passion lies in writing articles on the most popular IT platforms including Machine learning, DevOps, Data Science, Artificial Intelligence, RPA, Deep Learning, and so on. You can stay up to date on all these technologies by following him on LinkedIn and Twitter.


