- Power Automate Interview Questions
- What is Microsoft Intune?
- what is Microsoft Access - A Complete Tutorial Guide
- What is FSMO Roles?
- Powerapps Lookup
- PowerApps Components
- PowerApps Variables
- ClearCollect PowerApps
- Patch Function in PowerApps
- Power Apps Patch – Functions and Syntax with Examples
- Logic Apps vs Power Automate
Power Automate is an automation tool released by Microsoft that comes with no-code/low-code and easy drag and drop options. Mainly it automates repetitive processes and mundane works, thereby simplifying business operations. It supports creating workflows and streamlining tasks to achieve optimum productivity. For this, Power Automate uses flow designers, templates, hundreds of connectors, and many other features.
The most important thing about Power Automate is that it allows anyone to create flows according to their needs in no time. It means that this tool is in no way harder to design and requires not much technical competency. Besides, Power Automate supports automation across diverse platforms such as web, mobile, and desktops.
Let’s look over some vital statistics to understand the worth of Power Automate in the automation sector.
According to the Gartner Magic Quadrant (2021), Power Automate is named a leader in RPA – Robotics Process Automation. Additionally, according to Forrester Wave 2021 Q1, Power Automate is named a leader in RPA as well as Digital Process Automation in Q4.
In this tutorial, we can learn about Power Automate for desktops, its features, how to create flows, add triggers, and so on. Before diving deeper into these topics, let’s discuss workflows, desktop flows, Cloud flows, and Process flows in detail.
Power Automate Tutorial Table of Contents:
What are Workflows?
A workflow or flow consists of a sequence of steps that generate desired outputs by processing your data. Workflows are usually created in the form of flowcharts or process maps. They help users to understand process steps easily and quickly. Know that the process of creating workflows by connecting the required tasks in a specific order is known as workflow orchestration.
There are three types of flows in Power Automate. They are given as below:

What are the Desktop Flows?
Desktop flows use RPA technology to automate repetitive work processes on desktops. With RPA, you can automate processes in both legacy and modern systems. Here, a desktop flow designer is used to build workflows using simple drag and drop options. For example, documents can be saved automatically in dedicated folders.
Similarly, by using desktop flows in Power Automate, you can extract the required data from websites and store them in excel sheets. From home users to large enterprises, you can automate desktop flows to carry out their day-to-day processes very simply. You can use either simple or complex rules to design desktop flows based on your needs.
What are the Cloud Flows?
Cloud Flows perform data transfer between the Cloud, on-premises, and databases. With Cloud Flows, you can effectively connect data, apps, and services, improving productivity. In Power Automate, you can find three types of Cloud flows – Automated flows, Instant flows, and Scheduled flows.
Here, an automated Cloud flow gets triggered when there is an event such as an incoming email, message, or notification on social media. Instant flow is enabled when you click a button in the application. The last one, scheduled flows, automatically perform tasks such as daily data upload and data transfer between resources.
| Want to enhance your skills in dealing with the world's best Power Automate, enroll in our: “Power Automate Training” Course. |
What are the Business Process Flows?
Business Process Flows consist of stages and steps to perform business processes to meet the desired outcomes. Note that each stage will have many steps. You can move to the next stage in the process flow by clicking the ‘next stage’ button. With Process flows in Power Automate, employees can understand business processes from start to end and discover areas where their role is involved. As a result, they will perform their tasks effectively and efficiently. In a way, business process flows help skip training employees and reduce spending time familiarising them with business processes.
What is Power Automate for Desktop?
With visual designer and RPA capabilities, Power Automate creates and manages flows in desktop applications efficiently. With Power Automate, mundane desktop processes can be no longer a big problem, but you can quickly solve them through automation. The prebuilt actions and user-friendly interface supports reducing bottlenecks in your desktop applications.
Power Automate along with Window 11, is capable of doing wonders in desktop automation. In addition, connectors and templates play a vital role in desktop applications. Let’s see what they do in detail below:
Power Automate and Windows 11: When Power Automate comes with Windows 11, it simplifies automating your daily mundane and repetitive activities in your desktop applications. Also, it automates data exchange between different applications as well as web pages. For example, copying and exporting data can be automated using desktop workflows. Moreover, you can automate scheduling, reporting, and data entry by saving time and energy. And you can create weekly reports or monthly reports, etc., by consolidating data from many documents that may be in excel form, PDFs, etc.
Connectors: You can connect data, services, and apps for Cloud Flows using connectors. Dropbox, Dynamics 365, Google Calendar, Office 365 Outlook, and OneDrive – to name a few popular connectors in this regard. Apart from all these connectors, there are many connectors such as Tuxmailer, Uber Freight, in Quba Journey, Domain Tools for Iris Enrich, Tribal, Domain Tools for Iris Investigate, My Acclaro, and Exasol are recently added with Power Automate.
Templates: Power Automate comes with hundreds of templates to ease business processes. Here, you can get plenty of templates for remote work, daily planning, daily remainders, welcoming new members, scheduling replies, and many more.

Features of Power Automate?
Power Automate has many crucial capabilities that play significant roles in automating workflows and delivering maximum efficiency. Following is the list of features provided with Power Automate.
- Digital Process Automation
- Robotics Process Automation
- Business Process Automation
- Process Advisor
- AI Builder
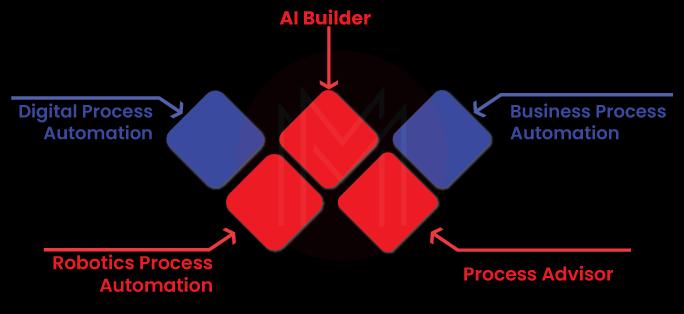
Now, let's discuss the features in detail:
Digital Process Automation (DPA): In Power Automate, DPA is the intelligent automation tool that functions with an intuitive interface, hundreds of connectors, and templates. This feature empowers everyone involved in the business by providing simple procedures to create workflows – no matter their technical competency. In a way, Power Automate is the API-based automation tool that reduces repetitive tasks by connecting with various data sources through connectors. With DPA capability, you can improve the security of your resources and reduce mistakes in the processes through built-in governance and data loss prevention technology.
Robotic Process Automation (RPA): RPA is the UI-based automation technique used to connect new and legacy systems. It reduces repetitive and mundane tasks in processes using desktop flows. For example, it simplifies copying and pasting operations on desktops, significantly saving users' productive hours. RPA supports connecting with other products and running on virtual machines. Also, RPA allows recording keypad and mouse actions, which will be used to build workflows effectively. Note that desktop flows in Power Automate can be automatically run on both attended and unattended modes of RPA.
Business Process Automation (BPA): The BPA technique in Power Automate helps streamline sales, marketing, and other business processes regardless of their complexity. In this regard, Microsoft Dataverse is the feature that connects all data sources and streamlines business processes effectively. Also, Power Automate's ready-to-use business processes help speed up business operations by eliminating the time required to build new workflows.
Apart from the above-mentioned, BPA offers a few more internal features.
Let’s see them one by one.
Process Designer - This feature helps to map business process flows
Visual Guide - It ensures the current progress in business operations
Action Center - It helps to make approvals and view the next business steps
Access Control - It ensures enough security for resources
Above all, BPA provides insights about business processes, which will help make informed decisions for executives. As a result, it ensures consistency in business processes.
Process Advisor: The process advisor in Power Automate identifies workflow bottlenecks using task mining and process mining capabilities. In addition, it also identifies opportunities to improvise workflows by which increase efficiency. With the help of the process advisor, we can visualise workflows from beginning to end.
Let’s understand the role of process mining and task mining in Power Automate a little brief below:
Process Mining: With process mining, you can connect various data sources effectively. And it helps to visualise process maps and get insights out of them. As a result, it pinpoints the inefficiencies in complex business processes and resolves them quickly.
Task Mining: This technique is used to capture and analyse desktop activities. Like process mining, it visualises tasks, generates insights, and improves the efficiency of processes.
AI builder: AI Builder helps to build AI models easily and quickly. Not just that, it empowers everyone to build AI models quickly without writing any codes or writing low codes. In this regard, connectors play a crucial role in connecting data with AI models. AI builder can process any data using intelligent document automation. Using this feature, you can simplify processes such as form processing, category classification, object detection, entity extraction, etc.
| Check out: Top Power Automate Interview Questions |
How to Create a Flow in Power Automate?
Creating a flow and automating it is a very simple task in the Power Automate tool. Let’s now look at the following steps to create a flow.
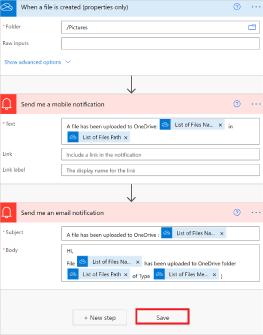
- Select the template according to your needs. For example, you can choose the template like – sending notifications and emails when a new file is uploaded to the selected one drive.

- Find the elements to be connected in the flow. According to our example, we select one drive and notifications.

- Choose the one drive folder for which we need to track the updates.

- Now, save the flow designed to send a notification to either mobile or email once the selected one drive folder is updated with any data.
How to Add a Trigger in an Existing Flow:
You can add triggers with an existing flow using Power Automate. To achieve this, you need to do the following steps:
- Select the existing flow and add a new step to that.
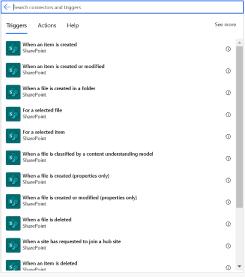
- Search for the connector and consider the suitable one.
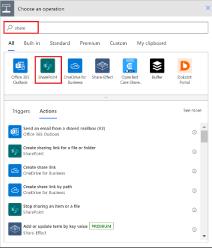
- After selecting the connector, the corresponding actions and triggers will be shown in the list. Now, choose the right trigger from the list according to your needs.
How to Create a Desktop Flow in Power Automate?
Creating a desktop flow in Power Automate is a simple process. Let's see the below steps to create a desktop flow.
- Open the Power Automate application and click the ‘new flow’ on the page.
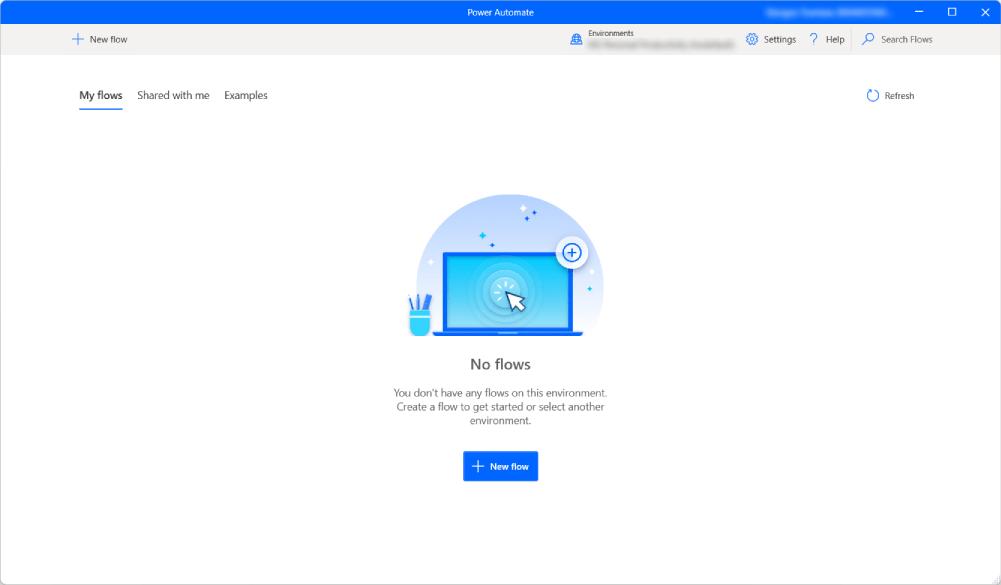
- Now, enter the desktop flow name and then click ‘create’.
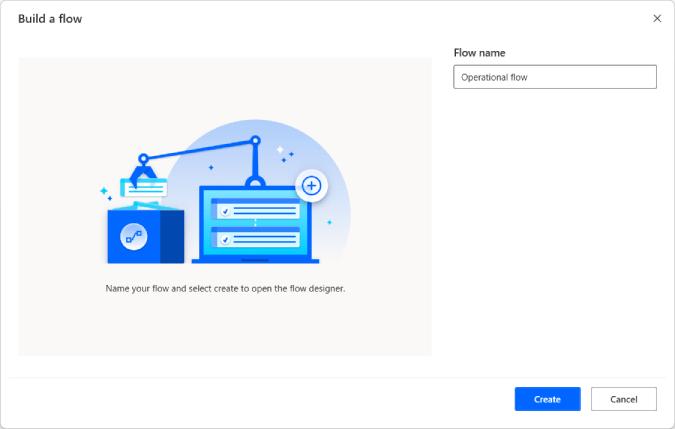
- Create the desktop flow using ‘Flow Designer’ and save the flow. Now, close the flow designer and see the created desktop flow.

How to Create a Business Process Flow in Power Automate?
Making a business process flow requires the following steps. Let’s see them now as to how to create a business process flow:
- In the Power Automate, select ‘My Flows’, and select business process flows
- Select New and enter the name of the flow
- Choose the table in the designer and click the ‘create’ button
- Now, you will create a new business process flow, and you are allowed to edit the first stage.

- Now, you can add more stages as per your requirement. For this, you can drag stages from the components tab and then drop them in the Flow designer.

- Now, you can step the properties. In this, you can enter the display name and select the category of the stage, such as 'Qualify or ‘Develop’, etc. Once the properties are set, you can click the apply button.

- Now, you add steps for the stages. For this, you can drag steps from the components tab. As you have done for stages, you can set properties for steps also. Once the properties are set, click the apply button.
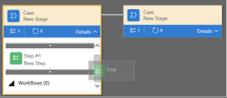
- You can add a condition to the processes. For this, you can drag the condition from the components tab and place it between two stages. Then set properties for the conditions and click apply button.

- You can add a workflow to a process by dragging a workflow component from the component tab. You can place it in a stage or a ‘global workflow’ in the flow designer. If you would like the workflow to be triggered by the entry or exit of a stage, then the workflow must be dragged into a stage. Similarly, if you would like the workflow to be triggered when the Process is activated, the workflow must be dragged into the global workflow.
- As you have done in earlier stages, set properties for workflow and click the apply button.
- Now, validate and save the business process flow.
- Finally, activate the business process flow on the action bar.
How to Add Intelligence using AI Builder in Power Automate?
With AI builder, adding intelligence to processes can be achieved by the following steps:
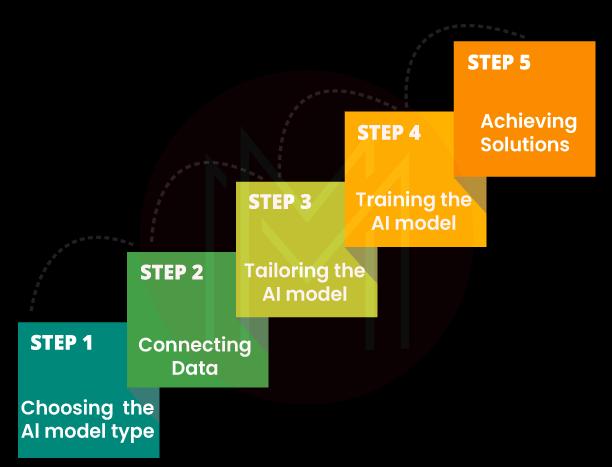
Choosing AI Model Type: You can choose the AI model type based on the business needs.
Connecting Data: Choose the right data required to perform your processes and provide business solutions.
Tailoring the AI Model: You can change the custom AI models according to your requirements by which you can optimise AI performance accurately.
Training the AI Model: In this step, customised AI models are trained to achieve the needed business solutions. As a result, the AI models will generate useful insights by processing the data.
Achieving Solutions: Using the insights derived from the AI models, you can optimise business processes and resolve business problems.
Benefits of Power Automate
Power Automate provides plenty of benefits to users. Here, you can find the listicles of key benefits of Power Automate.
Simple and Secure Automation: Power Automate empowers every user to automate workflows simply and securely with low code and easy drag and drop operations. No single employee has left aside without knowing how to use this tool. This tool is as simple as creating flows and managing them.
Increased Efficiency: The process advisor provides deep insights and recommendations about processes. With these insights, you can boost the efficiency of processes.
Improving Workflows: With the support of AI builder, you can create new forms and process the forms quickly, and detect images and text using document automation. In addition, you can make quick process approvals.
Increased Productivity: Smart workflows help save time by simplifying day-to-day activities, creating reminders, etc., and increasing productivity.
Prioritising Tasks: When high-priority emails reach your inbox, notifications are enabled to alert you and respond to them quickly.
Monitoring Social Media: You can monitor your social media accounts all the time by receiving alerts whenever there are important notifications are enabled.
Conclusion
It’s now time to wrap. On the whole, Power Automate helps to focus on crucial tasks by automating repetitive tasks and mundane tasks for individuals and businesses. As a consequence, it helps to optimise business processes and increase efficiency. It’s worth keeping in mind that Power Automate allows everyone to work on it very easily since it is a user-friendly tool. After reading this tutorial, we hope you must have learned about different types of flows, how they contribute to automation, how to automate processes using desktop flows and business process flows, and many more.
 On-Job Support Service
Online Work Support for your on-job roles.

Our work-support plans provide precise options as per your project tasks. Whether you are a newbie or an experienced professional seeking assistance in completing project tasks, we are here with the following plans to meet your custom needs:
- Pay Per Hour
- Pay Per Week
- Monthly
| Name | Dates | |
|---|---|---|
| Microsoft Power Automate Training | Jul 14 to Jul 29 | View Details |
| Microsoft Power Automate Training | Jul 18 to Aug 02 | View Details |
| Microsoft Power Automate Training | Jul 21 to Aug 05 | View Details |
| Microsoft Power Automate Training | Jul 25 to Aug 09 | View Details |