
Power Apps is one of the excellent tools used for creating business apps rapidly. Using Power Apps, we can low-code powerful apps to quickly modernize business processes and improve performance. Power Apps come with numerous functions to perform various operations rapidly. Power Apps Patch is one of the powerful functions of this tool.
With the Power Apps patch, we can modify and create records in a table using the power apps patch function. Not only that, we can merge records, alter and create multiple records, Upsert records, and many more. Note that data source, records, and data to patch are the three elements of a Power Apps patch function.
This tutorial discusses the Power Apps patch function and its uses in depth. You can learn Power Apps patch syntax, how to modify and create records using the patch function, and how to create and modify a record in the SharePoint list in greater detail.
Power Apps Patch - Table Of Content
Patch function in Power Apps
We can use the Power Apps Patch function to modify and create records in data sources. The significant thing about the Power Apps Patch function is that we can update the fields of records without affecting other properties of data sources. We can use the Power Apps Patch function when updating records where no user interaction is allowed. Also, we can use this function while using forms with multiple screens.
Know that we can modify records in data sources using the Power Apps Patch function directly. But if we want to create records, we need to use the Patch function along with the defaults function.
Like modifying and creating records, we can use the Power Apps Patch function to merge records outside a data source. The return value of this Patch function will be created or modified records. Suppose the Power Apps Patch function creates a record and stores it in a data source, then the fields of the record will have the properties of the data source.
Modify or create a record in a Data Source using Power Apps Patch Function:
We can create and modify a record using the Power Apps Patch function. And we can create base records using the defaults function.
If we want to modify a record, the record must be in a data source. Also, the record must have some additional information to easily identify the record in the future if we need to modify the record.
Know that when we update a data source, errors may occur. So, we can apply IfError as well as IsError functions on the return values of the Power Apps Patch function to find and respond to the errors. Along with that, we can use the Errors function to deal with the errors that occur while working with a data source.
Modify or create a set of records using the Power Apps Patch Function:
Similar to creating or modifying a single record, the Power Apps Patch function can create and modify multiple records in a single call. In this Power Apps Patch function, the table of base records is included in the second argument. Also, change records are included in the third argument of the function. It is essential to note that the number of records in the base table must be equal to the number in the change table.
The return value of this Power Apps Patch function is a table with records. And the records in the table correspond to the records in the change and base tables.
Merge Records Outside of a Data Source using Power Apps Patch Function:
Know that we can merge two or more records using the Power Apps Patch function. Here, the records denoted in the Patch function are processed sequentially from the first argument to the following records. The result value of this Patch function is the merged records. Note that this Power Apps Patch function doesn’t modify the fields of records in data sources.
| If you want to enrich your career and become a Programming & Frameworks Courses, then enroll in the "PowerApps Course" - This course will help you to achieve excellence in this domain. |
Power Apps Patch Function Syntax
Let’s look at the syntax of the Power Apps patch function for different cases in the following.
Create or modify a record in a Data Source:
Using the Power Apps Patch function, we can create or modify a record using the following syntax.

Note that all the arguments in the Power Apps Patch function are mandatory.
- DataSource: This is where we can find the record to modify and create.
- BaseRecord: It is the record that we want to create or modify. We can change the record that comes from a data source. At the same time, we can create a record that is the result of the ‘Defaults’ function.
- ChangeRecord (s): They are one or more records used to change the properties of the base record. Usually, the change records are processed from the first argument to the following arguments sequentially.
Create or modify a set of records in a Data Source:
We can use the following syntax to create or alter more than one record.

All the arguments in this Power Apps Patch function are mandatory.
- DataSource: This is where the records we want to modify are stored. Also, this is where we can find the records that we want to create.
- BaseRecordsTable: It is the table of records that you want to modify or create. Note that we can change a table of records stored in a data source. We can create records only if we use the result of the defaults function.
- Change RecordTable (s): The tables with properties to update the records in the BaseRecordsTable.
Merge Records:
We can use the following syntax if we want to merge two records.

Record: It is a mandatory field of this Power Apps Patch function. Note that we need a minimum of two records to perform the merging operation. This Power Apps Patch function processes records from record1 to the succeeding records.
Examples: PowerApps Patch function
Let us Look at some of the PowerApps Patch Function Examples:
Example: Power Apps Patch function - Modify or create a record
We can change one or more records in a data source using the Power Apps Patch function. Mainly, we can perform this action without affecting other attributes of the records.
Now consider the below table stored in a data source.
Table name: IceCream
| ID | Flavor | Quantity |
| 1 | “Chocolate” | 200 |
| 2 | “Strawberry” | 300 |
Note that this table generates IDs automatically.
If you want to modify the quantity of chocolate flavor ice cream from 200 to 600, then you need to write the Power Apps Patch function as follows:
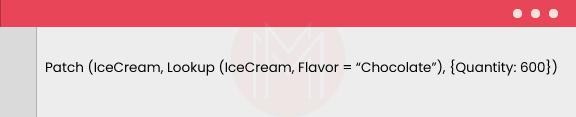
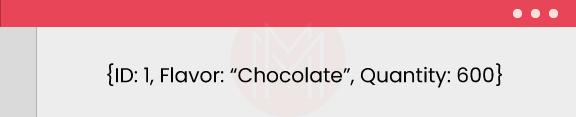
The result of this Patch function will be as follows:
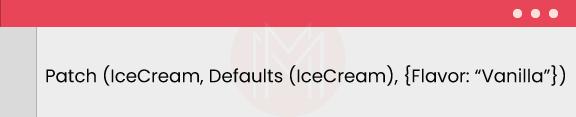
If you want to create a record in the IceCream to add ‘Vanilla’ flavor to the table, then you need to write the Power Apps Patch function as follows:
The result of this Power Apps Patch function will be as follows:
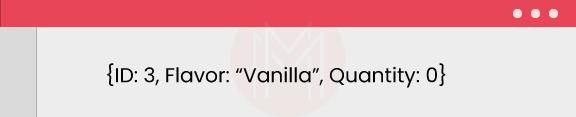
You can observe from the above result that the Power Apps Patch function automatically generated the ID and assign the quantity as 0 for the created record.
Finally, after the execution of these two Power Apps Patch functions, you can get the updated table as shown below:
| ID | Flavor | Quantity |
| 1 | “Chocolate” | 600 |
| 2 | “Strawberry” | 300 |
| 3 | “Vanilla” | 0 |
Consider another example. You can use this Power Apps Patch function to modify the fields in a record.

Consider one more example. It helps to create a new record in the SharePoint List as ‘employee details’.


Example: Modifying multiple records using Power Apps Patch function:
Know that you can change or update multiple records using Power Apps Patch function.
Consider the below ‘Employees’ table. If you want to change a few fields of the records of the table, then you can perform this using the Power Apps Patch function as follows:
Table Name: Employees
| ID | Employee Name | Employee Number | Year of Joining |
| 1 | Alice | 1001 | 2010 |
| 2 | Benjamin | 1003 | 2013 |
| 3 | Catrina | 1005 | 2015 |
| 4 | David | 1007 | 2017 |
| 5 | Einstein | 1009 | 2019 |
You can use Power Apps Patch function along with the ClearCollect function to modify multiple records in the following way.
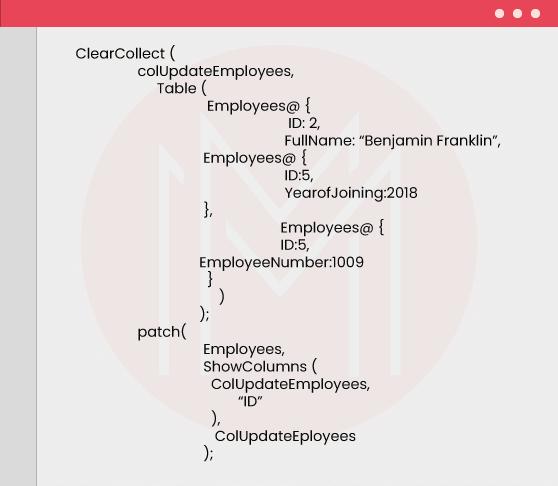
The result of this path function will be as follows. The updated fields are shown in bold case.
| ID | Employee Name | Employee Number | Year of Joining |
| 1 | Alice | 1001 | 2010 |
| 2 | Benjamin Franklin | 1003 | 2013 |
| 3 | Catrina | 1005 | 2015 |
| 4 | David | 1007 | 2018 |
| 5 | Einstein | 1009 | 2019 |
Example: Power Apps Patch function - Merging Records
You can merge two records using the Power Apps Patch function. Note that the records exist outside of a data source.
Are you planning to build a career in PowerApps? Sign up for this PowerApps Certification Training in Hyderabad to begin your journey today!
Consider the example in which the Power Apps Patch function merges two records.

The result of this Power Apps Patch function will be as follows:

Example: Power Apps Patch function – Creating multiple records using the ForAll function
If you want to create multiple records using the Power Apps Patch function, you can accomplish this using the ForAll function.
Consider the following example. SharePoint, a data source, contains the ‘Employees’ table. Now, you need to add a few records in the following table with the existing records using Power Apps Patch function.
Table: Employees
| Employee Name | Employee Number | Year of Joining |
| Alice | 1001 | 2010 |
| Benjamin | 1002 | 2011 |
| Catrina | 1003 | 2012 |
| David | 1004 | 2013 |
| Einstein | 1005 | 2014 |
If you want to add three records to this table, you must write the code in the following way.
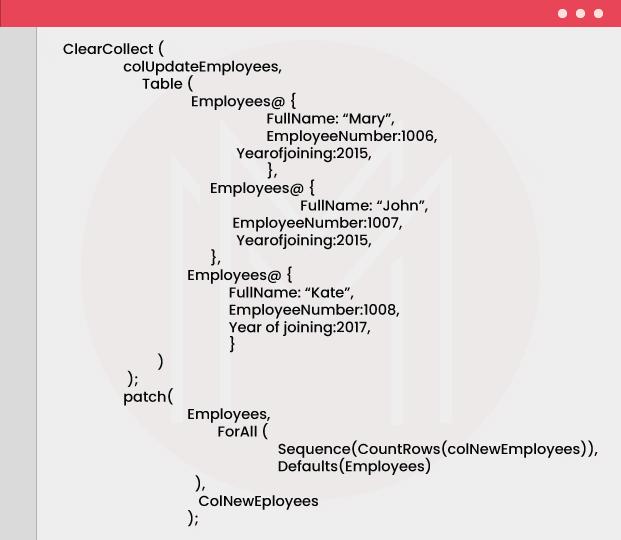
As a result, you will get the updated table as follows:
| Employee Name | Employee Number | Year of Joining |
| Alice | 1001 | 2010 |
| Benjamin | 1002 | 2011 |
| Catrina | 1003 | 2012 |
| David | 1004 | 2013 |
| Einstein | 1005 | 2014 |
| Mary | 1006 | 2015 |
| John | 1007 | 2016 |
| Kate | 1008 | 2017 |
Power Apps Patch function with return value and choice field
If you want the item ID of a product, you can use the Power Apps Patch function for the same. You need to use the following Patch function for this case.

As a result, you can get the ID of the item.
We can use the Power Apps Patch function below to create a new record with a choice field. The record type must have "id and value" for the choice field. Similarly, you can patch a record with the choice field using the Power Apps Patch function.

In this Power Apps Patch function, ‘Job Title’ is the chosen field. It will have the record that is selected from the dropdown list.
| Would you like to ace Power Apps job interviews? Top PowerApps Interview Questions from MindMajix are exclusively for you! |
Power Apps Patch function with Upsert
If you want to upsert records in a table, you can use Power Apps Patch function to perform the same.
Consider the below example. The table contains the records of employees.
| ID | Employee Name | Employee Number | Year of Joining |
| 1 | Alice | 1001 | 2010 |
| 2 | Benjamin | 1003 | 2013 |
| 3 | Catrina | 1005 | 2015 |
You can write the Power Apps Patch function in the following way with the upsert function. By applying this patch function, you can modify the existing records as well as create new records in the table.
The result of this patch function is shown below. The modified and created records are shown in bold letters. ID is generated automatically.
| ID | Employee Name | Employee Number | Year of Joining |
| 1 | Alice | 1001 | 2010 |
| 2 | Martin | 1002 | 2013 |
| 3 | Catrina | 1005 | 2015 |
| 4 | John | 1006 | 2017 |
| 5 | Shankar | 1008 | 2019 |
| Looking for Best PowerApps Online Training Platfrom in Bangalore? To Enroll a Free Demo Click Here. |
How to create and modify a record in a SharePoint list using the Power Apps Patch?
Let’s look at the procedure for how to create and modify a record in a SharePoint list below:
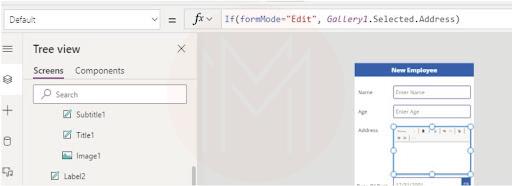
- First, create an ‘Employees’ list in SharePoint with the details such as name, address, Date of Birth, age, salary, and profile.
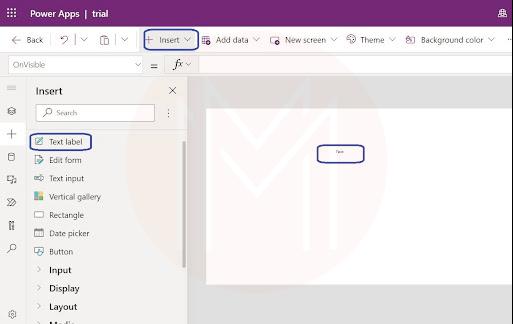
- Now, open Power Apps and go to the ‘insert’ menu.
- After that, click the ‘insert’ tab on the top of the page, and click text labels for open text boxes. You need the text boxes for different attributes of the employees list. You can change text properties using the page's left pane.
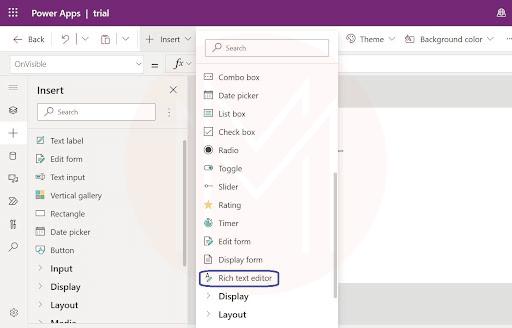
- You can add a 'rich text' feature required to add the address of the employees.
- While adding a text box for DOB, you can use the ‘date picker’ feature from the input options.
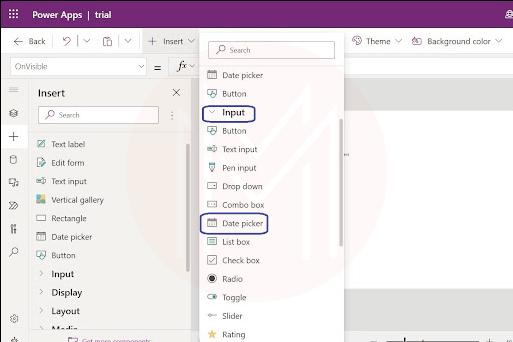
- If you want to add a profile, you can open a text box and add links for LinkedIn or others.
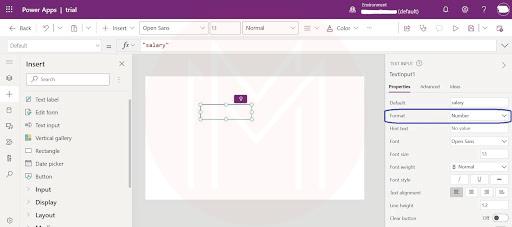
- For adding salary, add ‘Text label’ and mainly enable number format as text input in the properties section.
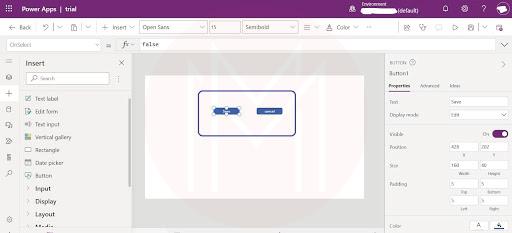
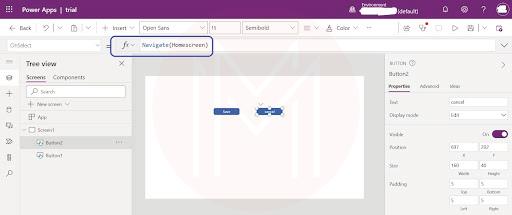
- Now, you can insert additional buttons to save and cancel edits in the Employees list.
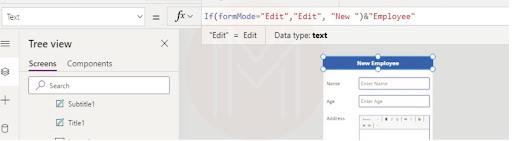
- Now click the ‘save’ button and write the patch code in the code bar.
- For example, enter ‘Navigate (home screen)’ in the function bar
- Next, you can run the page and add details.
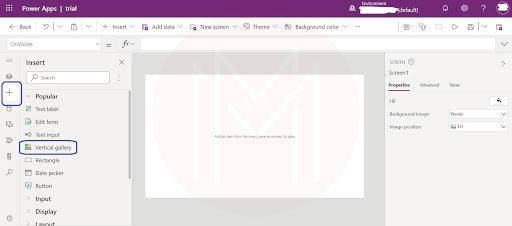
- Now add a screen which will display all data of employees. To perform this operation, you use the following option - new controls> add the vertical library to create a new gallery.
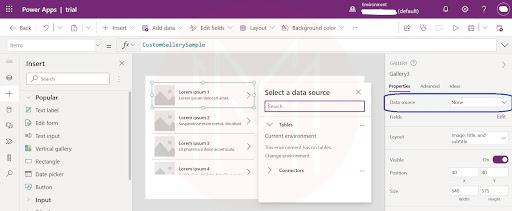
- Then, select ‘gallery’ and the right panel to select ‘data source’ as employees.
- Now you can add a new icon. To perform this operation, you can add Navigate ( ) function with FormMode.
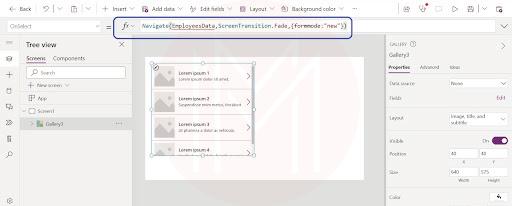
- Next, select the ‘next arrow’ icon in the gallery list and add navigate ( ) function with FormMode - edit.

- Then, navigate to the ‘EmployeeData’ screen and set ‘gallery’ for text values.
- Also, set conditions for the header to display edit or new employee.
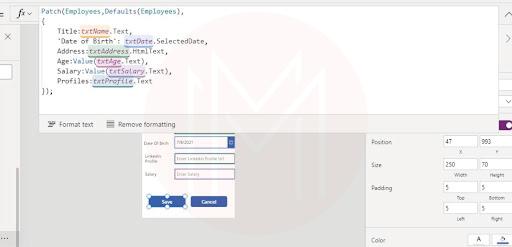
- Now you can update Power Apps Patch function as follows:
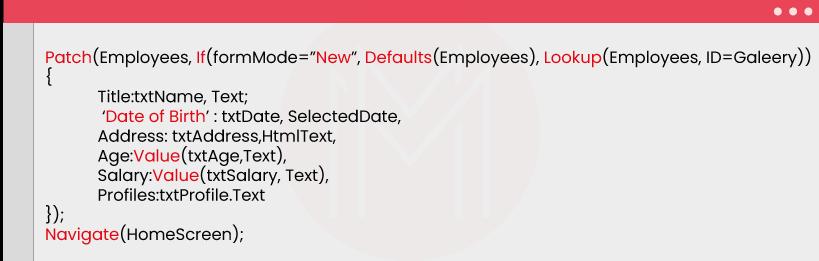
- Run the application and update all fields with data and save.
- Finally, you can see the updated data on the screen.

FAQs
- What is a patch in Power Apps?
Ans: A patch is a function used in Power Apps to modify and create records in data sources without affecting the other properties. You can change and create multiple and merge records using the Power Apps patch function. - How do I add a patch in Power Apps?
Ans: We can add a patch in Power Apps using the following syntax.
Patch (DataScource, BaseRecord, ChangeRecord1 [, ChangeRecord1,.....])You can add patches or records in a data source using the above patch function.
- What is the difference between batch and submit functions in Power Apps?
Ans: We can use the patch function for making complex updates, whereas we can use submit forms for easy editing. For example, if data is shared across multiple SharePoint lists, then using submit forms is not suitable. We need to use the patch function. - How do I patch a collection in Power Apps?
Ans: When you want to modify many records at a time using the patch function, you need to use the collection to accomplish the same. - How do I patch multiple records in Power Apps?
Ans: If you want to patch multiple records, you can use the following syntax to perform the same.
Patch (DataSource, BaseRecord Table, ChangeRecordTable1 [, ChangeRecordTable2,.....])
Conclusion
Let’s wrap off! We can conclude that the Power Apps patch function is used to modify and create a record in a data source without changing the other properties of the data source. you can use the Power Apps patch function for various uses, such as merging, choice fields, return values, and so on. We hope that the examples shown in the blog might have helped you to understand the concepts clearly. The tutorial must be helpful to create a record in a SharePoint list easily. If you want to learn more about Power Apps and patch function, then no worries. MindMajix offers courses on PowerApps Training. We are sure that you can attend the courses and enhance your knowledge level to greater heights, undoubtedly.
If you have any doubts, reach out to us in our MindMajix Community
 On-Job Support Service
Online Work Support for your on-job roles.

Our work-support plans provide precise options as per your project tasks. Whether you are a newbie or an experienced professional seeking assistance in completing project tasks, we are here with the following plans to meet your custom needs:
- Pay Per Hour
- Pay Per Week
- Monthly
| Name | Dates | |
|---|---|---|
| PowerApps Training | Aug 01 to Aug 16 | View Details |
| PowerApps Training | Aug 04 to Aug 19 | View Details |
| PowerApps Training | Aug 08 to Aug 23 | View Details |
| PowerApps Training | Aug 11 to Aug 26 | View Details |

Madhuri is a Senior Content Creator at MindMajix. She has written about a range of different topics on various technologies, which include, Splunk, Tensorflow, Selenium, and CEH. She spends most of her time researching on technology, and startups. Connect with her via LinkedIn and Twitter .


