
Power applications have a feature called ClearCollect that enables users to delete all the records from a file and then add new entries back in. Therefore, the ClearCollect function is a combination that facilitates carrying out two tasks simultaneously, namely clearing and collecting data in the form of a table.
Unless you are familiar with the unique methods required to surpass that limit, Power Apps collections are only allowed to include a maximum of 2,000 records. This is due to the fact that the delegation limit only permits the ClearCollect and Collect functions to return a certain number of entries. For performance reasons, it is usually better to read data directly from a datasource like SharePoint, but there are occasions when you need to put all of your data into a collection in order to allow offline mode or shape tables.
We will discuss the collect and clear functionality in power apps, the development of ClearCollect, as well as its applications and advantages, in this article. The uses of power app features will then be highlighted, as well as how to clear the collection within a power app.
ClearCollect PowerApps - Table of Contents
- What is PowerApps?
- PowerApps Functions
- What is ClearCollect in PowerApps?
- Benefits
- Create and Use the ClearCollect in PowerApps
- PowerApps Canvas Apps
- FAQs
What is PowerApps?
Power Apps is a collection of apps, connectors, services, and a data platform that offers a quick development environment for creating unique apps for your company's requirements. Power Apps make it simple to build one-of-a-kind business apps that connect to data stored in a number of online and on-premises data sources(such as Dynamics 365 , SharePoint, SQL Server, Microsoft 365, and so on), including the Microsoft Dataverse data platform.
Applications built with Power Apps have powerful business logic and workflow features that can help you transform your manual business operations into digital, automated ones. In addition, Power Apps-made apps have a responsive design and can work flawlessly in browsers and on mobile devices (tablet or phone). Power Apps "democratises" the process of constructing unique, feature-rich business apps by allowing consumers to do it without writing any code.
The versatile platform offered by Power Apps enables expert developers to programmatically interact with data and metadata, apply business logic, build unique connectors, and link with external data.
| If you want to enrich your career and become a professional in PowerApps, then enroll in "PowerApps Training". This course will help you to achieve excellence in this domain. |
What are PowerApp Functions?
PowerApps has various predefined functions that require us to input a parameter in order to carry out an action and receive the result. Following is a long list of powerApp features:
Function #1: Color Functions
- RGBA: Green, Red, or Blue are the colours that are returned by the it property.
- Color: a built-in colour value is set.
- ColorValue: It facilitates the translation of a hex code or CSS term used to specify a colour value.
- ColorFade: The colour value is faded by this attribute.
Function #2: DataSource Functions
- Revert: This attribute aids in record error clearing and reloading.
- RecordInfo: It aids in supplying details about a record.
- DataSourceInfo: This characteristic aids in supplying details about the data source.
- Refresh: It assists in updating a record.
- Defaults: This attribute aids in the data source's default values being returned.
Function #3: Data and Time Functions
- Month: It gives the monthly value back.
- DateAdd: This feature can add information to the records, such as months, days, etc.
- Calendar: This asset contains details about the local calendar.
- Date: Based on the month or year, this property gives the date as well as the time.
- Today: The current date value is returned by this attribute.
- Now: It gives back the current date and time values.
- DateDiff: This trait facilitates the subtraction of two date values. the outcome is expressed in terms of days or months.
- Clock: Two date values can be subtracted thanks to this attribute. days or months are the form that the outcome takes.
- DateValue: The date is changed into a date-time value using this attribute.
- Hour: It gives the hourly value back.
Function #4: Error Functions
- IfError: This recognises the incorrect values and provides a different value by taking the necessary action.
- Errors: All error information between the data values is provided by this attribute.
- Error: The specific values for a data source are stored in this attribute.
[ Learn Complete PowerApps Tutorial ]
Function #5: Information Functions
- IsEmpty: This attribute verifies whether the table is empty.
- IsNumeric: The numeric value is verified using this attribute.
- IsMatch: This property uses regular expressions to match the patterns.
- IsType: This property verifies the record reference type.
- IsBlank: This property looks for a value that is either empty or black.
- IsError: This characteristic verifies the incorrect value.
Function #6: Logical Functions
- Not: examines whether the argument is false
- Match: determines whether the patterns correspond to the regular expression
- And: determines whether or not each value is true.
- Or: examines the truth of one of the arguments
- If: Checks if the value is true or not.
Learn more about PowerApps from this Best PowerApps Training in Hyderabad to get ahead in your career!
Function #7: Math Functions
- Log: checks a numerical value's log value.
- Exp: checks to see if a constant numerical number has increased.
- Ln: checks the value of the natural log
- Abs: checks a numerical number's absolute value.
- Int: checks a numerical number's rounding value.
Function #8: Navigation Functions
- Exit: checks to see if the application is open.
- Navigate: goes to the modified screen
- Back: examines the previous display.
Function #9: Offline Function
- SaveData: This characteristic deletes the app's collection.
- ClearData: The collection is cleared by this property.
- LoadData: This setting deletes the app's collection.
Function #10: ReadNFC
This setting deletes the app's collection.
Function #11: Blank
This property makes it easier to input a NULL value by returning a blank value.
Function #12: Notify
This characteristic facilitates showing the banner.

What is ClearCollect in PowerApps?
1. Collect
Power applications' gather feature is used to add records. The elements listed below may be included in the clear function:
A single value: The value entered into the field found in a new record is called a single value. Only this field is filled in; the others are all blank.
- A record: There is a new record for each property with a specific name. The other fields are blank other from this.
- A table: Every new record that is added to the table creates a separate record of the data. The table can be reformed by wrapping the table that was present in the first record because it can never be present as a nested table.
- ClearCollect Function: Power applications have a feature called ClearCollect that combines the functions of collecting and clearing each item separately. It enables the user to delete every record from a file and then re-store new entries in that same file.
When the data source is not present, a new collection is created, which can occasionally be used to store the global values. They may also create a temporary duplicate copy of the data source. For adding records to the database, there is another procedure called patch().
The syntax for the function collect() is as follows:
Collect( Data_Source, items_number , ... )- DataSource: The user must always provide the data source he wishes to add in this area, which is a requirement. If the information is new, it is added to the collection from a new source.
- Items: While adding several records to the data source's table, this column is always necessary.
2. Clear
The clear function aids in erasing every record from the file or, more accurately, it deletes every record from the collection without erasing the fields' columns.
Data sources cannot be used with the clear function; it only functions with collections. For the same reason, a function called RemoveIf exists (Source of Data, true). This function has a propensity to remove all data from the data source's storage, which causes errors in other users' records. In this case, if the user wishes to remove a few records, he can do so by using the Remove() function. Because it has no return value, this function can only be used in the behaviour formula.
The syntax for the function clear() is as follows:
Clear(Collection)Collection: Where the user can construct a collection that he wants to create, this field is always necessary.
3. ClearCollect
Power applications have a feature called ClearCollect that enables users to delete all the records from a file and then add new entries back in. Therefore, the ClearCollect function is a combination that facilitates carrying out two tasks simultaneously, namely clearing and collecting data in the form of a table.
The syntax for the ClearCollect() method is as follows:
ClearCollect(Collection, item)- Collection: The user can always clear the collection before adding the necessary data in this field, which is always required.
- Item: This field, where the user can add more than one table or data source to the collection depending on his needs, is always necessary.
[ Check out the PowerApps Components ]
Benefits of ClearCollect in PowerApps
- It facilitates speedy and efficient app creation.
- With the 365 Office tool, it offers a simple connection process.
- It has a Capitible Universal User interface.
- Supports multiple languages
- It can function while being offline.
- It has very strong data management and storage capabilities.
- It is quite effective and comes with an optimization app.
- It can integrate with more than 200 integrators and many different systems.
- It has many automated, flexible systems with Microsoft workflow.
- Hybrid systems can maintain uninterrupted connectivity.
How to Create and Use the ClearCollect in PowerApps?
A few conditions must be satisfied in order to develop and use ClearCollect in power programmes.
- A sign-up and sign-in are necessary for power apps.
- If the user already has an app, he or she can log in to it or make a new one.
- To configure, employ the power apps.
The following are the procedures for utilising ClearColeect in power apps:
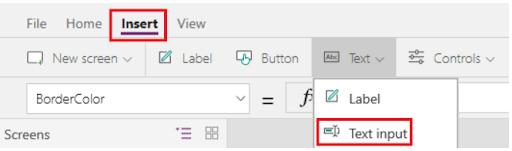
Step 1: Adding a Text input control is the first step. The user can choose to change it by clicking on the three dots located beneath the section, choosing rename, and then entering the desired product name.
Step 2: The next action is to include a dropdown control.
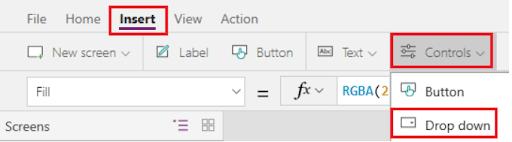
Step 3: The user may also change the drop-name down's as they see fit. The attribute should always be chosen by the user as Items in the list.
Step 4: A text-filled ProductName column has to be created, and colours need to be chosen.
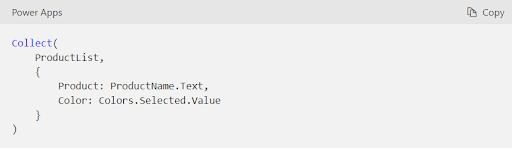
Step 5: A text-filled ProductName column has to be created, and colours need to be chosen. Click "Add".

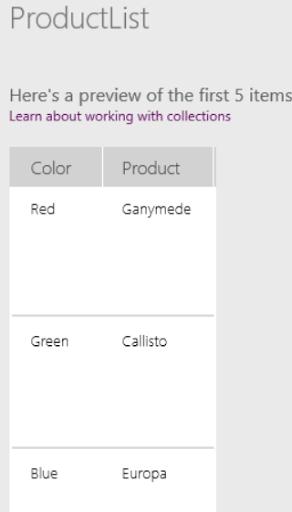
Step 6: The previous step must be performed twice or more.
Finally, the menu will appear as follows:
Remove More Than One Item:
Step 1. The user must select a template from the collection by clicking at the bottom of the gallery. After that, click the pencil icon that shows up in the upper-left corner. Select, then select trash.
Step 2. Clicking OnSelect will allow you to Add (RemoveProductList,Item).
Step 3. There is a button that can be used to clear the product list using the Clear feature (productList).
Step 4. The item will be taken out of the collection upon removal.
In PowerApps Canvas Apps, Clear a Collection Inside For All
Let's imagine that the user wishes to remove a few entries from his collection that he does not want there. He can utilise PowerApp to accomplish this after that. Only one particular record is removed from the collection when the remove() function is used by the user. The user must repeatedly hit the bin button to clear the data while selecting each item separately. The item is removed from the collection when the user clicks on the submitted data after making their choice.
Other techniques might potentially remove every item from the collection, which is a somewhat hazardous action. There are two basic methods for eliminating the information from the database.
- Remove only one item: The PowerApp Gallery must be chosen by the user. then he must click on the pencil-shaped icon located in the upper-left corner. He must click the add button after selecting the insert tab. The button has been renamed to delete, making it simple for the user to remove the item (details, item1).
- Remove everything: In order to remove the collection, a user must put a button. Add a property called clear(Details), where details is the name of the collection. The user will be able to erase the entire collection by pressing this.
| Check out Top PowerApps Interview Questions and Answers that help you grab high paying jobs |
ClearCollect PowerApps FAQs
1. What is ClearCollect in PowerApps?
All of the records in a collection are removed using the ClearCollect function. and after that updates the same collection with a new batch of records. ClearCollect combines the functions of Clear and Collect into a single function.
2. Is ClearCollect delegable?
Collect and ClearCollect only return the non-delegable row limit you've defined in the experimental feature because they are not delegable functions.
3. How do I remove an item from a collection in PowerApps?
To delete a specific record or records from a data source, use the Remove function. The complete record must match for collections. A record can be deleted in its entirety by using the All argument; otherwise, only one copy of the record is deleted.
4. Can you refresh a collection in PowerApps?
If all you want to do is "refresh" the collection, add a button, duplicate the formula that generated the collection, and paste it into the button's OnSelect field. Refreshing a collection in Power Apps Canvas apps entails starting again with the collection.
5. How do I clear my PowerApps cache?
You can clean the cache to reflect recent data changes in the PowerApps portal by selecting the clear cache option. The Clear config button can be used to clear cached configuration data as well. When you clear configuration, these configuration elements are updated.
6. What is concurrent in PowerApps?
If a formula contains connector or Dataverse calls, the Concurrent function enables several formulas defined within a single property to be evaluated concurrently. The ; (semi-colon) operator is typically used to chain together many formulas and evaluate them all sequentially.
7. How do I overcome PowerApps delegation limit?
The amount of records is 500 by default, however you can alter it for a whole app: Choose Settings. Change the Data row limit setting under General from 1 to 2000.
8. What is the difference between refreshing a collection and updating a collection?
Update Membership analyzes the collection membership for the chosen one. This update may take some time to complete for collections with lots of members.
Once the update is complete, use the Refresh action to update the display with the members of the new collection.
9. How do I refresh data in PowerApps?
- Start editing your PowerApp.
- Go to data perspective, click on the three dots to the right of your data source, and then select "Refresh" from the list that appears.
10. How do I auto-refresh data in PowerApps?
Find the desired screen by navigating. From the Insert tab of the Input group, add a Timer control to the screen. Change YourDataSource to the name of your real data source. Turn on the Repeat and Auto start settings in the Timer properties tab.
Conclusion
The three primary functions—collect(), clear(), and CollectClear—have been extensively covered in this article. All three of these functions, together with their syntax and applications, have been covered. The ClearCollect function actually combines two actions, clearing the data first, then collecting it into a table, to accomplish two tasks simultaneously. The main CollectClear functions, including logical functions, mathematical functions, colour functions, data source functions, etc., were then covered. The two primary methods of removing a collection were covered last.
If you have any doubts, reach out to us in our MindMajix Community
 On-Job Support Service
Online Work Support for your on-job roles.

Our work-support plans provide precise options as per your project tasks. Whether you are a newbie or an experienced professional seeking assistance in completing project tasks, we are here with the following plans to meet your custom needs:
- Pay Per Hour
- Pay Per Week
- Monthly
| Name | Dates | |
|---|---|---|
| PowerApps Training | Jul 28 to Aug 12 | View Details |
| PowerApps Training | Aug 01 to Aug 16 | View Details |
| PowerApps Training | Aug 04 to Aug 19 | View Details |
| PowerApps Training | Aug 08 to Aug 23 | View Details |

Viswanath is a passionate content writer of Mindmajix. He has expertise in Trending Domains like Data Science, Artificial Intelligence, Machine Learning, Blockchain, etc. His articles help the learners to get insights about the Domain. You can reach him on Linkedin


