- Power Automate Interview Questions
- What is Microsoft Intune?
- what is Microsoft Access - A Complete Tutorial Guide
- What is FSMO Roles?
- Powerapps Lookup
- PowerApps Components
- PowerApps Variables
- ClearCollect PowerApps
- Patch Function in PowerApps
- Power Apps Patch – Functions and Syntax with Examples
- Logic Apps vs Power Automate
Microsoft Power Apps is a popular choice for developers to build low-code apps. Leading IT research firms like Gartner and Forrester also ranked Power Apps as a leader for low-code application platforms in its recent release.
It is the only solution of its kind in the industry that brings together low-code/no-code app development, self-service analytics, and automation into a single, comprehensive platform. This What is Power Apps article will cover what Power Apps is, its features, how to build apps using Power Apps, and more.
What is PowerApps - Table of Contents
- What is Power Apps?
- Microsoft Power Apps Features
- What is a Power Platform for Power Apps?
- How Does Power Apps Work?
- How to Build an App with Power Apps?
- Power Apps Maker Portal
- Creating a Canvas App
- Dataverse
- AI Builder
- Copilot
- Power Apps Limitations
What is Microsoft Power Apps?
Power Apps is an initiative by Microsoft that lets you quickly build and share powerful low-code applications. It’s a suite of apps, services, and data platforms that enables rapid application development to build custom apps based on business requirements.
You can quickly create custom business apps that connect to your business data either on-premises (Excel, Office 365, SharePoint, and more) or data platform (common data source for apps) or
Power Apps at its core is a platform as a service that enables you to create applications that run on any mobile device or browser. The purpose behind developing Power Apps is to make users build applications with new capabilities without having coding expertise. Microsoft touts an initial visual design for PowerApps, with drag-and-drop functionality.
Power Apps has connections with various Microsoft-based and third-party applications, including SharePoint, SQL server, and OneDrive in the Office 365 productivity suite and Google Docs, Dropbox, Dynamics CRM, and Oracle.
What sets Power Apps apart from other offerings is both developers and non-technical teams can use it.
| If you want to enrich your career and become a professional in Power Apps, then enroll in " Power Apps Certification Training " This course will help you to achieve excellence in this domain. |
Microsoft PowerApps Features
Power Apps comes with features that allow you to build apps without coding. Below listed are the powerful features of Power Apps:
- Easy integration with other Microsoft services: One of the primary reasons for using Power Apps is that it’s easily connectable with other Microsoft services like Excel, OneDrive, SharePoint, etc.
- User-friendly Interface: Power Apps supports a user-friendly interface. With this, you can build an app easily, even if you don’t have any development experience. Create interfaces that can perform CRUD operations
- Canvas Apps and Model-driven Apps: There are two ways by which you can develop apps in Power Apps - Canvas and Model-driven Approach. You can design an app just by dragging and dropping elements onto a canvas. With model-driven apps, much of the layout is determined and designated by the components you add.
- Cloud Connectivity: It’s extremely easy to connect to cloud services like SQL, Dropbox, Google Drive, etc., with Power Apps.
- App creation and sharing: Supports an easy drag-and-drop interface for the creation of apps. You can easily share with anyone you want with Power Apps.
- Cost-effective: If you want to develop rich business applications but can’t afford developers, start using this fantastic tool. Power Apps is cost-effective.
- Common Data Service (CDS): CDS allows you to store and manage data securely used by business apps. Data within CDS is stored in the form of entities. An entity is a set of records that stores data similar to a table in a database. CDS for Apps contains a set of legal entities that cover typical scenarios. You can still create custom entities particular to your company and populate them with data using Power Query. Developers use Power Apps to build rich apps using this data.
[ Learn Complete PowerApps Tutorial ]
What is a Power Platform For Power Apps?
Microsoft Power Platform comprises Power BI, Power Apps, and Flow. These three services provide tools to manage the data of any enterprise process.
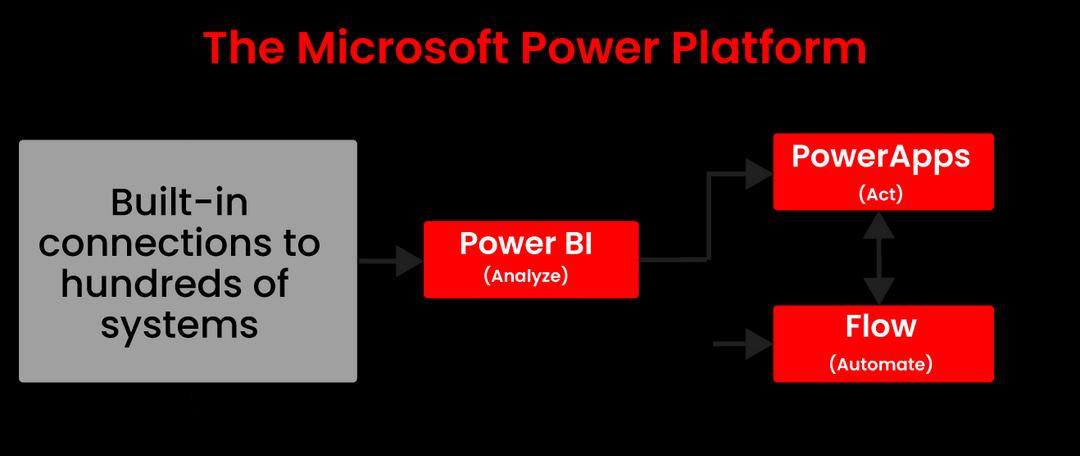
- Power BI is used to display and analyze the data. It’s a real-time, interactive data visualization BI tool.
- PowerApps are used to modify data. It builds apps with less code in no time for the web, Android & iOS devices.
- Microsoft Flow is used to automate data. It offers powerful workflow automation with a no-code approach and easy integration.
How Does Power Apps Work?
PowerApps facilitates app creation by offering various templates, connectors, and third-party apps for business users.
The primary reason that makes it popular among developers is connectors. It allows you to perform CRUD operations and supports the majority of on-premises data sources.
Go through the PowerApps Certification Training in Hyderabad to get a clear understanding of PowerApps!
How to Build an App with PowerApps?
The easy way to build an app with Power Apps is to start from the data source.
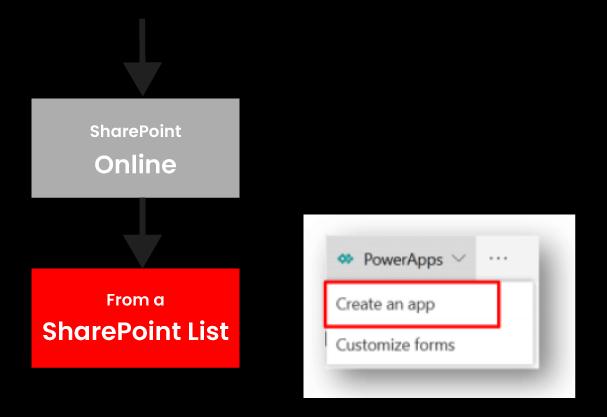
- First, start from the SharePoint list that stores the consulting interventions.
- Next, select Create an app option in the Power Apps menu as below:
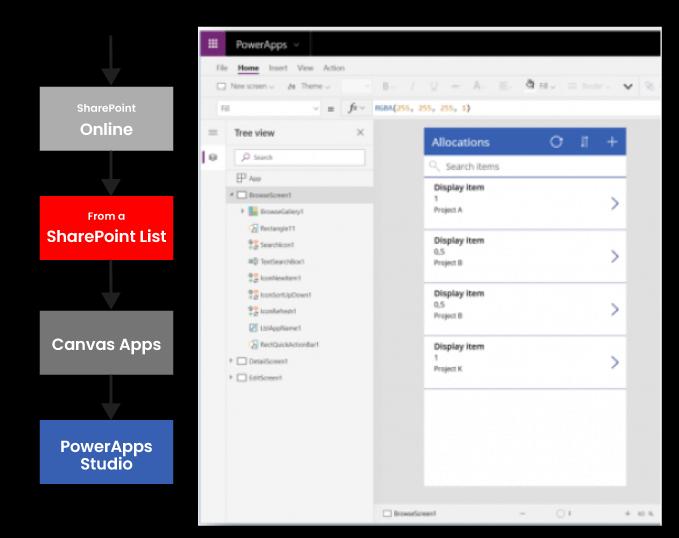
- It takes us to a Power Apps Studio as shown below:
The below steps guide you on how to build an app using Power Apps:
Step 1: Select Your Environment
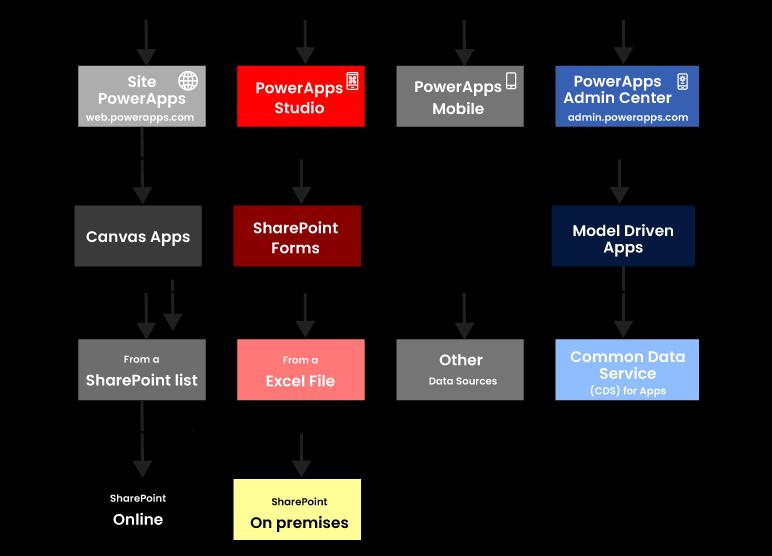
There are four environments in which you can work with Power Apps, and they have their capabilities.

- Power Apps Website: This is where you can create and manage apps.
- Power Apps Studio: It allows you to design and adapt apps that you create to specific business needs.
- Power Apps Mobile: This is available handy on both mobiles and tablets and enables you to execute all your Power Apps apps.
- Power Apps Admin Center: Admin.powerapps.com allows you to create and manage environments, Data Loss Prevention (DLP) strategies, and user roles.
Step 2: Select your Power Apps Application Type
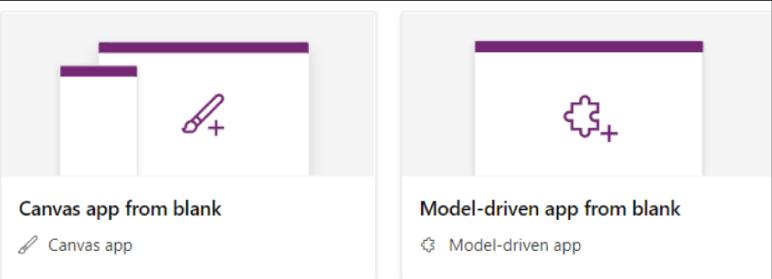
PowerApps supports two types of apps - Canvas and Model-driven.
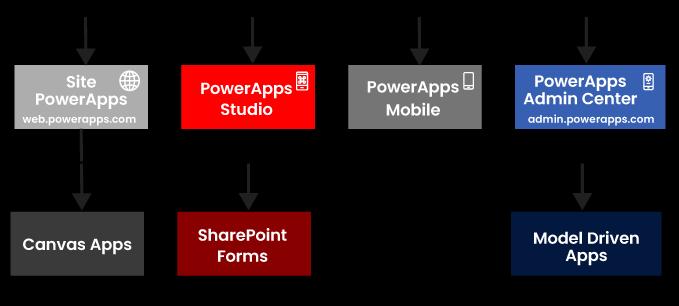
i. Canvas apps allow you to interface easily with positioning controls and fields in a “pixel-perfect” user experience. It targets lightweight apps.
ii. Model-driven apps are built on top of CDS (Common Data Services) to rapidly create processes, forms, and business rules. It focuses on building heavier apps.
Step 3: Select your Storage Type
Choosing the right data source is impactful while designing an app.
Step 4: Connect the app to on-premise Data Source or online
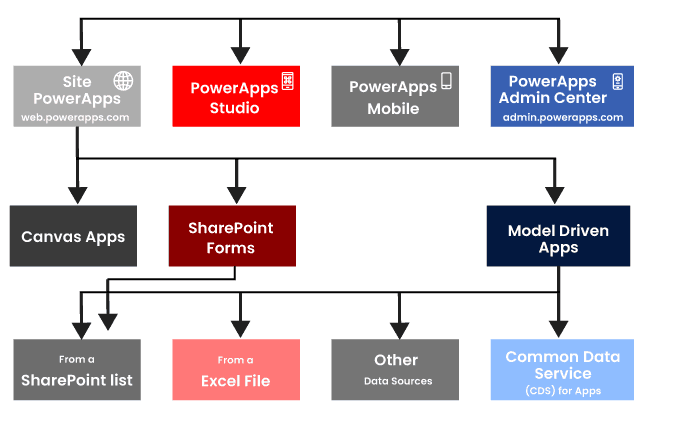
PowerApps is born in the cloud and can connect natively to any cloud data source. For that to happen, you need to configure the on-premises data gateway. For this, you need to use a data source from one of the following - SQL Server, Oracle, SharePoint, Informix, Filesystem, and DB2.
Now that you understand how to create an app using Power Apps. Now, let’s see which companies trust Power Apps to modernize their app development.
Power Apps Maker Portal
To work with Power Apps, we have to go to "maker.powerapps.com." This web address will take you to the Power Apps Maker portal, where we can start creating the application. In the top center of the screen, we can see the "Copilot entry field "and a menu on the left-hand side.
Copilot provides a way to explain what you want your application to do every day. To start developing the app on the data source, we choose the "Create" button from the left-hand menu. Power Apps also offers a shortcut to begin building the application from the most common data sources, like Excel and SharePoint. Both are available in the enterprise Microsoft 365 account. Additional costs are charged to connect to Dataverse and SQL data sources.
Scrolling down the "Create" option lets us see the templates available for use. Templates are the best way to see how the application behaves with data. Some templates will be model-driven applications, which are form-based and not included in the learning module. In the "Learn" tab, we can see the links to Microsoft training and news, Discussion Forums, Blogs, instructional videos, and how-to articles.
The "Apps" tab will include a listing of all your applications and buttons for starting a new app, similar to the "Create" tab.
Creating a Canvas App
Step 1: In the Power Apps Maker Portal, Choose the "Create" tab and select "Blank app."
Step 2: In the "Create" popup window, under "Blank canvas app," choose "Create."
Step 3: Name the "Student App" app and set the Format to "Tablet." Choose "Create."
Step 4: Now, we can see the "blank screen" with the Welcome to PowerApps Studio message or popup on it. It prompts to "Add the item form connect to data or Insert pane." We start by creating a gallery to view the data records. Choose the gallery option. If you don't see the popup, then choose the "Insert" button from the command bar and find/select "Vertical gallery."
Step 5: A control known as "Gallery1" appears on the screen. Since it is not connected to the data, thus Power Apps alerts us to "Select a data source." Out of all the different kinds of data, we must tell the PowerApps what type of data we must connect to. In this example, we have to connect to an Excel spreadsheet that we saved to Onedrive. We achieve it through the "OneDrive for Business" connection. It enables us to use the documents from the business OneDrive account and the SharePoint library we can access.
Step 6: Find or Select "OneDrive for Business." We can quickly locate OneDrive by typing it in the search field. We may have to choose "Add a connection" and authenticate our connection with it.
Step 7: After completing the connection to OneDrive for Business, a panel appears on the right side of the screen, urging you to "Choose the Excel File." Search for and select the Excel document we copied to OneDrive for Business, known as "Student.xlsx."
Step 8: After choosing the "StudentMarksData.xslx", the panel will urge you to "choose a table." Choose the box next to "StudentMarks" and then choose the "Connect" button from the panel button.
Step 9: After selecting the gallery, we can see the properties panel for the gallery control on the right. Ensure that "Data Source" is set to StudentMarks. Now, we can see pictures, prices, and titles in the gallery.
Step 10: Now, we resize the gallery to stretch the bottom of the screen and touch the screen's left side.
Step 11: Now we have to add the form control, which will update the display in the gallery. Choose the "Insert" button from the header menu. Search and Choose "Edit Form."
Step 12: The control "Form1" displays on the screen. Drag it to the right side of the screen and resize and reposition it so that it occupies half of the screen.
Step 13: The new form now leads us to "Connect to Data." In the chosen form control, we can see "Data Source" and the dropdown saying "None" under "Properties." Choose the dropdown and choose your "StudentMarks" table.
Step 14: Now, we can add the fields to the form, which is currently blank. In the "Properties" panel, choose the link to "Edit Fields," which is below the Data source dropdown.
Step 15: In the " Fields " popup panel, choose the "Add Field" button.
Step 16: Check the box next to each field in "Choose a Field." Then, choose "Field." Your form now displays the input fields arrayed in a three-column form. Every field must be blank.
Step 17: After that, we have to label the data item displayed in the form. The gallery shows all the students' marks, so we have to display one of these. With the chosen form, open the formula bar at the top of the screen. On the left side of the formula bar, there will be a dropdown menu to search the Form control properties. Choose the dropdown menu and search, or choose the Item property.
Step 18: In item field in fx formula input box, type "Gallery1.Selected." We can instantly see data inhabiting fields of the form.
Step 19: By choosing the "Play 'icon of the Command bar, we can preview our application at any time.
Dataverse
Dataverse is the data platform introduced in Power Apps that allows you to store and model enterprise data. We can create Dynamics 365 apps using this platform.
What are Environments in Dataverse?
In Dataverse, the Environment acts as a method to create and handle the instance of the Dataverse Database. It also enables you to handle the security settings, user access, and storage related to the Dataverse database within the environment. The environment also allows you to install the applications developed with the Power Flows or Apps that we create using Power Automate into that environment.
Every Environment is built under a Microsoft Entra ID tenant, and only its users can use its resources. An environment is compelled to be a geographic location, like London. When we create the Dataverse Database in the environment, that database will be created in the data centers available in that geographic location.
Use Cases to Create an Environment in Dataverse
There are several reasons to create an environment through Dataverse for the tenant. We have to remember that once we create the environment in the Dataverse, we can also access that Dataverse database from other environments. Dataverse creation in the environment reserves upto 1GB in storage. Thus, we should have a plan while building the Dataverse environments.
A use case with a single instance of the Dataverse for two environments can be when we have a testing environment and a development environment. We may have to share the saved dataverse's database between two environments in this use case. We can create two separate environments for testing and development. Our development environment can have the dataverse's database, while the testing environment cannot, and vice versa. We can build the applications in a development environment. When we move to testing environment, we can link the similar dataverse database built in development environment.
Creating and Managing an Environment
When we sign up for Power Apps, a default environment is automatically created.
Steps to Create an Environment in Dataverse
Step 1: Sign up for the "Power Platform Admin Center."

The above image shows the steps to create an Environment in Dataverse.
Step 2: Choose “Environments” from the left-hand side.
Step 3: Choose the "New" button from the top left side of the command bar
Step 4: In the "New Environment" panel on the right side of your screen, we can name a new environment, choose the region and type, and explain the purpose. The "Add a Dataverse data store" option available only for the production or sandbox environments. By setting this option to "Yes", we can include the ability to utilize Dataverse tables developed into the environment. So, if we are creating the sandbox environment, then set it to "yes."
The "Pay-as-you-go" feature of Azure comes with the option to pay for the selected Power Platform services like Power Apps and Dataverse, if we have an Azure subscription, then set it to "No."
Step 5: The "Add Dataverse" panel will appear in any environment that has pending Dataverse environment creation. This tab finishes the new process initiation in Dataverse.
- Currency and Language options are set by default to the region chosen in the previous tab, however, we can choose other options also.
- We should choose a "Security Group."
- We also have the option of creating a custom URL, enabling Dynamics365 apps, and deploying the sample applications with data.
To adjust our selection in the "New Environment" tab, we can choose the back arrow at the top left of the panel.

The above image displays the “Add Dataverse” tab
Step 6: We should choose “Security Group” for creating the environment. Through the security group, we can limit access to the environment to the members of that security group.
In the above image, we can see the Security Group's options.

In the open access, we can choose "None" if we want to provide unrestricted access throughout the tenant. After selecting the security group option, choose "Done" to continue.
Step 7: After selecting the security group option, we can choose the "save" option for creating the new Dataverse environment.
AI Builder
In Power Apps, we use AI Builder to create and utilize the AI models that maximize the business processes. We can either use the in-built model that is suitable for general scenarios or create a customized model that satisfies your requirements. AI Builder will help enterprises automate the processes and get insights from the data in the power apps.

The above image shows the Home Page of Power Apps AI Builder.
Use of AI Builder in Power Automate
Power Automate provides AI Builder actions that allow the utilization of all types of models in view. By adding the AI Builder actions in the following, you can:
- Perform Model Interface through the outputs of the stream actions
- Process the Model Inference in the downstream actions
The following example shows the business flow with three simple stages:
- Receive the email in the Microsoft Outlook.
- Identify the email body sentiment through AI Builder sentiment analysis model.
- Transmit the email notification with the sentiment identified in email through the "Overall text sentiment" output from the AI Builder model.

Copilot
In Power Apps, Copilot will stream the application creation process. Creating applications with the Copilot starts when you enter your idea in general language. For instance, we can instruct Copilot to “Create the Login and Logout application to allow my employees to report their Login and Logout time.” After that, Copilot will transform that prompt into a Dataverse table.

The above image shows editing an application using Copilot.
By using Copilot, we can edit that table through the provided suggestions like “Add a Column for” and “Refresh the Data.” After editing the table as per your requirements, Dataverse will transform that table into a functional application with backend logic.
Companies using Power Apps to modernize app development:
- Standard Bank
- Leonardo Global Solutions
- TransAlta
- SNCF
- Autoglass
- National Trust
- IPS (Integrated Power Services)
- DriveTime.
| Check out Top PowerApps Interview Questions and Answers that help you grab high paying jobs |
Power Apps Limitations
- With Power Apps, you can retrieve a max of 500 items by default, but extendable up to 2000 (performance reduces).
- Only one developer can work at a time if operating on the Canvas Application.
- If SharePoint runs in the back end, attachment control will work fine. But if custom SQL runs in the backend, then attachment control will be disabled.
- JavaScript integration is not possible in Power Apps forms.
- Power Apps cannot be shared with external users of your organization. It is designed to be used internally for your business purposes.
Conclusion
Microsoft Power Apps has bought a revolution in the low-code app development space. The software’s simplicity allows each user from technical to non-technical backgrounds to build apps without compromising quality. If you have any queries in this article "What is Power Apps", you can share them via comments below and help us make this post a good read for Microsoft Power Apps.
 On-Job Support Service
Online Work Support for your on-job roles.

Our work-support plans provide precise options as per your project tasks. Whether you are a newbie or an experienced professional seeking assistance in completing project tasks, we are here with the following plans to meet your custom needs:
- Pay Per Hour
- Pay Per Week
- Monthly
| Name | Dates | |
|---|---|---|
| PowerApps Training | Feb 07 to Feb 22 | View Details |
| PowerApps Training | Feb 10 to Feb 25 | View Details |
| PowerApps Training | Feb 14 to Mar 01 | View Details |
| PowerApps Training | Feb 17 to Mar 04 | View Details |

Madhuri is a Senior Content Creator at MindMajix. She has written about a range of different topics on various technologies, which include, Splunk, Tensorflow, Selenium, and CEH. She spends most of her time researching on technology, and startups. Connect with her via LinkedIn and Twitter .


