
Power Apps is one of the Microsoft products with which you can build custom business apps quickly. It integrates seamlessly with various data sources, such as Dynamics 365 and Microsoft 365.
The Power Apps lookup function is an essential feature. The function identifies the first record in a table that meets the specified conditions.
This blog walks you through the Power Apps lookup function, its syntax, how to apply the lookup function for different scenarios, and much more.
Table Of Contents
- What is Power Apps Lookup?
- LookUp Concepts in Power Apps
- Power Apps Lookup Function Syntax
- Power Apps Lookup Function Examples
- How to read and set up lookup fields of Dynamics 365 in Power Apps
- Frequenty Asked Questions
What is Power Apps Lookup?
The Power Apps lookup function returns the first record in a table that matches one or more conditions or formulas. If no record matches the formula given in the lookup function, it returns ‘blank’.
When running the Power Apps lookup function, the formula is evaluated at each record of a table. Records that satisfy the conditions are evaluated, and the first matching record is returned.
LookUp Concepts in Power Apps:
There are three types of lookups in Power Apps:

Let’s have a look at them in detail.
Simple LookUp:
This is a simple and easy-to-implement Power Apps lookup function. This function selects a single row from a table based on one or more conditions given in the lookup function.
PartyList-type Lookup:
By using this function, you can select multiple records from multiple tables. Every row is added to the result table. Mainly, every time you add a record to the table, it allows searching for the new record. You can’t customize the system or disable views in this lookup type.
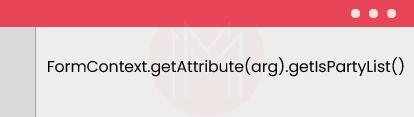
‘getlsPartyList()’ is a client API method that returns a Boolean value indicating whether it is a party-type lookup. If the lookup function returns true, then it is a party list lookup. If it returns false, then it is not a party-type lookup. Party list lookups usually allow multiple records to be set. The syntax for this lookup type is given as follows:
Regarding type Lookup:
You can use this Power Apps lookup to find a single record from multiple tables. If you want to use this lookup type, you must enable the ‘activities’ of a table. It also supports intelligent authoring, which plays a pivotal role in application development.
Once the type lookup function is enabled, you can find the function in the lookup columns and create forms easily. Also, you can change settings and sort rows. Besides, you can change tables within a lookup column.
You can customize this function by using client APIs. For example, you can create a new view for the dialog box. You can also remove functions defined for the PreSearch event. Similar to removal, you can add custom filters using client APIs.
| If you want to enrich your career and become a Programming & Frameworks Courses, then enroll in the "PowerApps Course" - This course will help you to achieve |
Power Apps Lookup Function Syntax:
The syntax of the Power Apps LookUp function is given below:

Let’s look at the arguments of this function in detail below.
A table is one of the mandatory parts of the Power Apps lookup function. It is the location or database where you will search for records. You can find the syntax as ‘source’ above the function box in the user interface.
A formula is another mandatory part. It helps identify records that match one or more conditions or criteria. It also evaluates every record in tables. You can find the syntax as ‘condition’ above the function box.
The reduction formula is the optional part in the Power Apps lookup syntax. You can use this part if you want a single value resulting from a lookup function instead of a record or records.
Furthermore, the reduction formula converts a single record into a single value. You can find the syntax as ‘result’ above the function box.

Delegation capabilities of the Power Apps lookup
Let’s go through the delegation capabilities of the Power Apps lookup.
- Server-side query processing – Power Apps supports server-side query processing, directing operations to the backend database. It allows applications to work efficiently with millions of records, overcoming the drawbacks of local processing.
- Dataverse performance – Power Apps with Dataverse supports server-side queries that help you retrieve only required records, use indexed columns, execute filters, and so on.
- SharePoint optimization – Delegation works well for SharePoint lists when filter() is used instead of complex formulas, and large lists are properly indexed. It also works well when index columns are used, and StartsWith() is used instead of unsupported text search functions.
Key AI Capabilities in Power Apps Lookup
Microsoft Power Apps, along with Copilot, provides excellent AI capabilities for LookUp () fields and data selection.
Let’s take a look at them now.
- Creating a formula using natural language – Power Apps allows you to create Power Fx formulas by describing your requirements in plain English. This approach helps avoid manually writing complex expressions.
- Explaining the existing formula – You can select a control or property with a lookup formula. Then you can choose ‘explain this formula’ and get the explanation with the help of Copilot.
- Smarter record matching – Power Apps lookup supports contains-based matching, partial text matching, and fuzzy search to help users find records. Even if you misspell or use incorrect words, it still helps users to find records.
- AI-generated Power Formulas – You can type your requirements in plain English, then Copilot will suggest a Power Fx formula.
- Automatic app generation – If you create an app using a natural language prompt, Copilot generates lookup fields and relationships based on the underlying Dataverse schema.
- Improved data discovery – You can quickly locate related records with AI suggestions. It helps avoid manually navigating large datasets.
Power Apps Lookup Function Examples.
As you know, you use the Power Apps lookup function to retrieve the first record from a table. You can use one or more formulas to achieve the same.
Let's look at some examples here.
Example: 1
Consider the table below. The Table name is Marks.
Table Name: Marks
| Student Name | English | Maths | Science |
| Mary | 65 | 75 | 98 |
| Neeraj | 67 | 85 | 56 |
| Omar | 75 | 65 | 84 |
| Peter | 92 | 55 | 75 |
| Qumayun | 75 | 84 | 85 |
| Roberts | 52 | 95 | 64 |
Now we’ll discuss the different implementations of the lookup function in the coming:
Power Apps Lookup function with a Single Condition:
You can apply the lookup function with a single condition in the ‘Marks’ table as follows:

You can identify multiple values in the ‘Marks’ table based on the formula. But this Power Apps lookup function returns only the first record.
The result of this function is Mary.
With multiple conditions:
You can apply this lookup function with multiple conditions in the ‘Marks’ table. In this case, the lookup function is written as follows.

The conditions or formulae in the Power Apps lookup function can return two records. However, the lookup function will return a single output, the first record in the table.
The result for this lookup function is Neeraj.
For the maximum value:
If you need to get the maximum value of a column from the ‘Marks’ table, you can use the following lookup function.

This lookup function will return a value that is the highest in the ‘Maths’ column of the table.
The result for this function is Roberts.
For the last record:
The Power Apps lookup function usually returns the first record of any table. But, if you want to get the last record of the table, then you must apply a sort in the result table to return the last record.
The logic behind this operation is very simple. We need to reverse the result table so that the last record appears first.
The Power Apps lookup function for this condition is given as follows:

The result of this function is Roberts.
Example: 2
Let’s have a look at another example to understand how to use this function.
Consider the table below:
Table Name: Ice-cream
| Flavor | Quantity | OnOrder |
| Chocolate | 150 | 80 |
| Vanilla | 250 | 60 |
| Strawberry | 400 | 0 |
| Teaberry | 80 | 120 |
Power Apps Lookup function for a single condition:
Consider the following lookup function.

This lookup function searches for the chocolate flavor in the ice cream table. There is only one record in the table for this condition. The quantity of chocolate ice cream is 150. The lookup function returns this value.
The result for this function is 150.
With multiple results:
Consider the following lookup function:
LookUp(IceCream, Quantity > 250, Quantity + OnOrder)This Power Apps lookup function searches for flavors with a quantity greater than 150. So, the result table will have two records since the ice cream table has two flavors with more than 150. However, the lookup function will return the first record in the table – Vanilla.
The result of this function is 310.
With a single condition and a blank result:
Consider the following lookup function:

This lookup function searches for the ‘Butter Pecan ice cream flavor' in the table. The table doesn't have this flavor. There are no records for Butter Pecan in the table. As a result, the lookup function will return a ‘blank’ result.
The output of this function is ‘blank’.
With no reduction formula:
Consider the example below.

This function searches for the vanilla flavor in the table. There is only one record in the table. The lookup function doesn’t include any reduction formula. That’s why this lookup function returns the complete record.
The result of this function will be as follows:
| Vanilla | 250 | 60 |
Example: 3
Are you still wondering how to catch up with using Power Apps lookup functions? The following example will help you.
Consider the example below.
Table name: Employee List
| Employee Name | Role | Department |
| Aliya | Staff | Accounts |
| Benjamin | Line Manager | Production |
| Chandra | Assistant Manager | Marketing |
| Deepak | Associate Manager | Sales |
| Eby | Line Manager | Logistics |
With a single condition:
If you need the records of the associate manager, then you can write a lookup function as follows;

The result of this LookUp function is as follows:
| Employee Name | Role | Department |
| Deepak | Associate Manager | Sales |
No reduction formula is included in this lookup function. That’s why the function returned the complete employee record.
With the person column of the lookup column:
In the given table, 'Employee name' is the person column. You can use the following lookup operation to retrieve only the employee's name.

The result of this function will be Chandra.
With multiple conditions:
As you know, you can apply multiple conditions or formulae in a Power Apps lookup function. The Power Apps lookup function only returns records that satisfy the conditions.
Consider the lookup function below.

The result of this function will be Eby.
| Would you like to ace Power Apps job interviews? Top PowerApps Interview Questions from MindMajix are exclusively for you! |
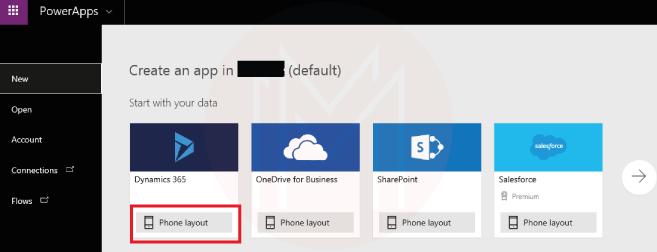
How to read and set up lookup fields of Dynamics 365 in Power Apps:
We’ll explore how to read and set up lookup fields in Dynamics 365.
Before learning and setting up the lookup field in Power Apps in Dynamics 365, you must perform the steps below.
- First, select the phone layout in the new Power Apps.
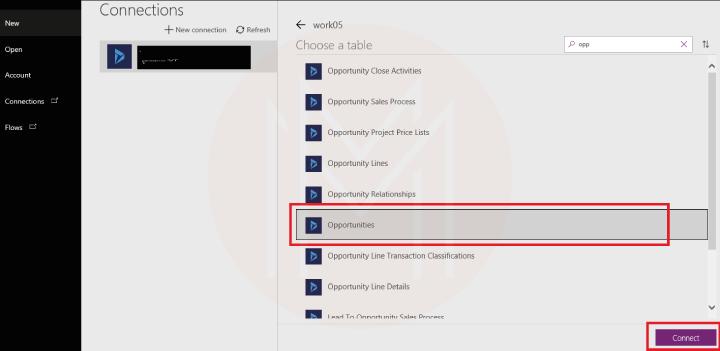
- Next, you need to select the database. To achieve this, navigate to the Connections tab on the new page and select ‘Opportunities’.
- You can also see the parent account's GUID.
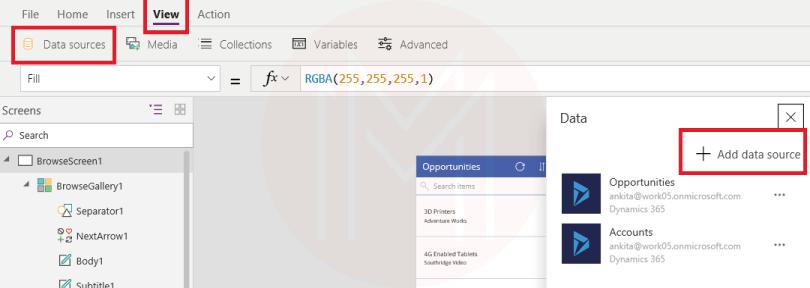
- If you need to display the parent account name, you need to add a ‘Data source’ account. To do this, you must open ‘View’ and then ‘Data sources’. Then you must add a ‘new data source’.
- If you click the browse screen, then you will see the list of opportunities on the page.
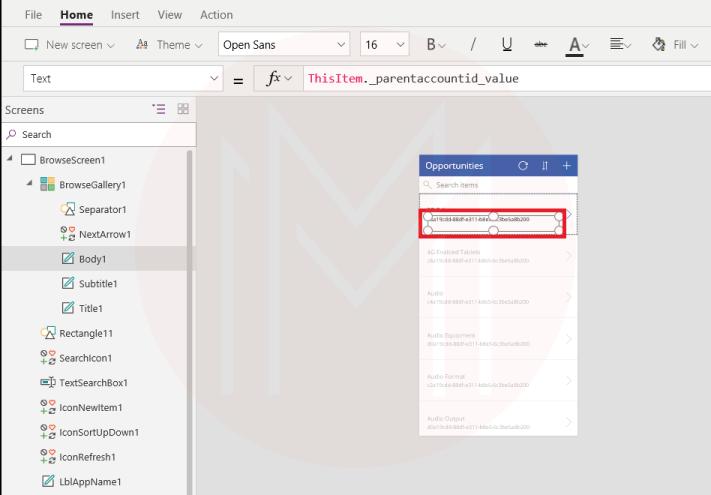
- You can also see the parent account's GUID.
- If you need to display the parent account name, you need to add a ‘Data source’ account. To do this, you must open ‘View’ and then ‘Data sources’. Then you must add a ‘new data source’.
- Then enter the following lookup function in the Text body to display the name of the parent account.
Once you complete all the steps above, you can view the parent account in the Opportunities section.
To assign lookup values in Power Apps, follow these steps.
- In the DataCard tab, click on the ‘edit’ screen. Then, insert the ‘Search’ icon.
- You can insert another list screen. Also, you can add ‘data source’ as ‘accounts’.
- Now, you can see the list of all accounts that exist in the CRM.
- Set the formula in the ‘OnSelect’ search box.
- You can enter the formula as follows:
- This function will update the ‘searchAccountName’ by value in DataCardValue10.
- Now, enter the following formula in the ‘OnSelect’ property of the icon on the account screen.
- This formula creates a new collection named "accountToBeAdded"
- Add the selected account to the collection and then return to the edit screen.
- Then navigate to the edit form and enter the following formula in the text box of the account.
- This formula helps confirm whether the ‘accountToBeAdded’ collection has an account ID. If the ID is found, it will set the name. Otherwise, it will return ‘blank’.
- Finally, set the following formula on the update property of Datacard:
- This formula helps to update the Datacard value with the selected account.
Frequenty Asked Questions:
1. What does Power Apps Lookup return if no match is found?
If the lookup function doesn’t find a matching record, it returns Blank(). If you want to check whether the lookup found a record, use the IsBlank() function.
2. How is LookUp different from Filter?
A lookup function returns the first record that matches the specified condition, whereas the Filter () function returns a table that contains all matching records.
Similarly, you can use a lookup function when you expect only one result. On the other hand, you can use the filter function to retrieve multiple records.
3. Can Copilot write LookUp formulas for me?
Yes, Copilot can help users write lookup() formulas by converting natural-language instructions into Power Fx expressions.
For example, if you type a natural language prompt as ‘Find the employee whose ID is 101’, then Copilot will create a lookup () formula as ‘LookUp (Employees, Employee ID =101)’.
4. Does LookUp () work with SharePoint and Dataverse?
The lookup function works with both SharePoint and Dataverse. You can use the lookup function to retrieve a single record from a Dataverse table. Lookup () works with SharePoint lists and retrieves a single column.
5. How does lookup work in Power Apps?
The lookup function in Power Apps returns the first record from a table. It returns the record that satisfies the condition or formula given in the lookup function. Using this lookup function, you can get a single record or a single value. If you need to retrieve a single value, use the REDUCE function in the lookup function.
6. How do I use the lookup field in Power Apps?
We can use lookup fields in Power Apps as follows.
- You can browse the lookup column to select a list of items.
- You can identify the most recently used rows with the help of row images.
7. How do I create a lookup in Power Apps?
You can create a lookup using the Power Apps lookup function. The lookup has three essential elements: the table, the formula, and the reduction formula. You need to create a lookup function based on your desired results.
8. How do I filter a lookup field in Power Apps?
We can filter lookup fields in Power Apps as follows.
9. What is the lookup column in Power Apps?
The columns in tables represent the lookup columns. For example, the table includes an employee list that references a lookup column.
Conclusion:
In a nutshell, the Power Apps lookup function returns the first row (record) in a table. It evaluates the table's records based on a single condition or a set of conditions. This blog should help you understand Power Apps lookup concepts, their applications, and more.
If you want to learn more about the Power Apps lookup function, you can visit the MindMajix Power Apps Course and achieve certification. This way, you can deepen your understanding of Power Apps Lookup.
 On-Job Support Service
Online Work Support for your on-job roles.

Our work-support plans provide precise options as per your project tasks. Whether you are a newbie or an experienced professional seeking assistance in completing project tasks, we are here with the following plans to meet your custom needs:
- Pay Per Hour
- Pay Per Week
- Monthly
| Name | Dates | |
|---|---|---|
| PowerApps Training | Jul 18 to Aug 02 | View Details |
| PowerApps Training | Jul 21 to Aug 05 | View Details |
| PowerApps Training | Jul 25 to Aug 09 | View Details |
| PowerApps Training | Jul 28 to Aug 12 | View Details |

Keerthi Sai is a Senior Writer at Mindmajix with tons of content creation experience in the areas of cloud computing, BI, Perl Scripting. She also creates content on Salesforce, Microstrategy, and Cobit.


