
- Comparing Application Servers: Jboss and Tomcat
- Jboss Clustering
- JBoss Interview Questions
- JBoss Tutorial
- JBOSS Admin Console
- Adding a JMS destination
- Adding JSF components
- Advanced deployment strategies
- Clustering entities - JBoss
- Configuring a JBoss AS Domain
- Configuring JBoss Core Subsystems
- Configuring Data Persistence - JBoss
- Configuring Enterprise Java Beans - JBoss
- Configuring Enterprise Services
- Configuring Session Cache Containers in JBOSS
- Configuring the Application Server
- Configuring the application server logging
- Configuring the domain controller
- Configuring the domain.xml file
- Configuring the EJB components
- Configuring The HTTP Connector
- Create an OpenShift Express domain - JBoss
- Creating and deploying a web application in JBoss
- Deploying applications on a JBoss AS domain
- Deploying Applications on JBoss AS 7
- Deploying applications on JBoss AS standalone
- Deploying the web application - JBoss
- JBOSS Dynamic Metrics
- Executing scripts in a file - JBoss
- Installing the JDBC driver
- JBoss AS 7 classloading explained
- JBoss Web Server Configuration in JBoss
- Load-balancing with mod_cluster
- Management interfaces - JBoss
- Managing Mod Cluster With CLI In JBoss
- Securing Web Applications In JBoss
- JBoss SetUp - Cluster Of Domain Servers
- Cloud Computing Vs Grid Computing
- JBoss Testing Mod Cluster
- JDBC Interview Questions
In this tutorial, we will cover the second main concern of clustering, which is the ability to make several servers participate in the same service and do the same work. In other words, how to load-balance the number of requests across the available servers.
Historically, the JBoss AS has inherited the load-balancing libraries from his “cousin” Tomcat, which is itself a part of the application server modules. This module, mod_jk, is still available for use in the new application server era; however, new specific instruments are available for the AS 7. In particular, the mod_cluster project, which is a part of the AS 7 modules, provides a level of intelligence and granularity unmatched in other load-balancing solutions.
Having made this a short premise, we will, at first, introduce the advantages of using a web server in front of your web applications, and then we will cover the following topics:
- Connecting JBoss AS 7 using mod_jk and mod_proxy
- Connecting JBoss AS 7 using mod_cluster API
Using Apache web server with JBoss AS 7
In real-world projects, it’s common to find the Apache web server as a front door to your application server. The advantages of such an architecture are as follows:
Speed: Apache is generally faster at serving static content than the JBoss Web server.
Security: The application server, which contains sensitive data, can then be placed in a protected area and, from a security point of view, you only need to worry about the Apache server. Essentially, Apache becomes a smart proxy server.
Load balancing and clustering: By using Apache as a frontend you can handle traffic to multiple JBoss Web server instances. If one of your JBoss AS fails, the communication transparently continues to another node in the cluster.
Connecting Apache and JBoss AS can be done by means of several libraries: in the past, most projects have adopted either Tomcat’s mod_jk library or Apache’s mod_proxy libraries. Because the installation of either mod_jk or mod_proxy does not differ from earlier AS releases, we will just include a quick setup guide for your reference.
If, however, you are planning to set up a high-performance, a dynamic cluster of web servers, we suggest you migrate to the newer mod_cluster API, which is discussed in the second part of this chapter.

Configuring mod_jk
mod_jk is the most-used solution for fronting JBoss AS with Apache web server. All requests first come to the Apache web server. The Apache web server accepts and processes any static resource requests, such as requests for HTML pages or graphical images. Then, with the help of mod_jk, the Apache web server redirects requests for any JSP or Servlet component to a JBoss Web server instance(s). Sending the request over the network using the AJP protocol performs this redirection.

In order to install mod_jk, at first, download the appropriate Tomcat Connector for your Apache web server installation from
https://tomcat.apache.org/downloadconnectors.cgi.
Then, modify the Apache configuration file (APACHE_HOME/conf/httpd.conf) and add a single line at the end of the file:
Include conf/mod-jk.conf
Next, create a new file named APACHE_HOME/conf/mod-jk.conf, which will contain
the mod_jk configuration:
# Load mod_jk module
# Specify the filename of the mod_jk lib
LoadModule jk_module modules/mod_jk.so
# Where to find workers.properties
JkWorkersFile conf/workers.properties
# Where to put jk logs
JkLogFile logs/mod_jk.log

# Set the jk log level [debug/error/info]
JkLogLevel info
# Mount your applications
# Send everything for context /myapp to worker1 (ajp13)
JkMount /myapp/* loadbalancer
JkShmFile logs/jk.shm
Please note that the following two settings are the most important:
The LoadModule directive must reference the mod_jk library you have just downloaded. Change the modules path to any other path you are using to store libraries.
The JkMount directive tells Apache which URLs it should forward to the mod_jk module (and, in turn, to the web container). In the previous file, all the requests with the URL path /myapp/* are sent to the mod_jk connector. This way, you can configure Apache to server-static contents directly and only use mod_jk for Java applications. If you plan to use mod_jk for every web application, you can also forward all URLs using “/*”.
Frequently asked Jboss Interview Questions
Next, you need to configure the mod_jk workers to file conf/workers.properties. This file specifies where the different web servers are located and, possibly, how calls should be load-balanced across them. For a one-node setup, the file could look like this:
# Define worker list using ajp13
worker.list=loadbalancer,status
# Set properties for worker1 (ajp13)
worker.worker1.type=ajp13
worker.worker1.host=192.168.0.1
worker.worker1.port=8009
# Set properties for worker2 (ajp13)
worker.worker1.type=ajp13
worker.worker1.host=192.168.0.2
worker.worker1.port=8009
worker.loadbalancer.balance_workers=worker1,worker2
worker.loadbalancer.sticky_session=1
For the workers.properties file, each node is defined using the worker.XXX naming convention, where XXX represents an arbitrary name you choose for each web server container. For each worker, you must specify the hostname (or IP address) and the port number of the AJP13 connector running in the webserver.
Configuring mod proxy
Since Apache 1.3, there’s support for an optional module, named mod_proxy, that configures Apache to act as a proxy server. This can be used to forward requests for particular web applications such as Tomcat or JBoss, without having to configure a web connector such as mod_jk.
So, mod_proxy just requires including the following directives in your Apache’s httpd.conf file:
LoadModule proxy_module modules/mod_proxy.so
Then, include two directives in your httpd.conf file for each web application that you wish to forward to JBoss AS. For example, to forward an application at context path /myapp:
ProxyPass /myapp https://localhost:8080/myapp
ProxyPassReverse /myapp https://localhost:8080/myapp
This tells Apache to forward URLs of the form https://localhost/myapp/* to the
JBoss HTTP connector listening on port 8080.
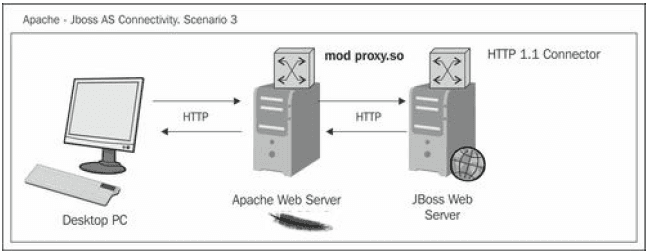
As shown in the previous diagram, Apache’s mod_proxy is TCP-based and uses the HTTP, so you don’t need to add anything else in your JBoss configuration. By definition, this is the simplest way to put Apache in front of JBoss, but also the slowest way to do it.
In Apache 2.2 , there’s support for another module, named mod_proxy ajp, which can be used in much the same way as mod_proxy. However, it uses AJP protocol to proxy Apache requests to JBoss AS. In order to use it, add the following directive to your Apache configuration:
LoadModule proxy_ajp_module modules/mod_proxy_ajp.so
Then, enable proxy pass to JBoss AS with this directive:
ProxyPass / ajp://localhost:8009/
ProxyPassReverse / ajp://localhost:8009/
Here, we are simply redirecting all traffic (“/”) to the web server listening on localhost
at port 8009.
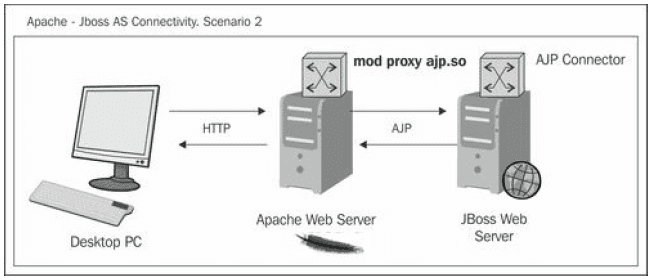
Since mod_proxy_ajp runs on a dedicated port, you have to activate it on your JBoss side:
Explore Jboss Sample Resumes! Download & Edit, Get Noticed by Top Employers! Downlaod Now
 On-Job Support Service
Online Work Support for your on-job roles.

Our work-support plans provide precise options as per your project tasks. Whether you are a newbie or an experienced professional seeking assistance in completing project tasks, we are here with the following plans to meet your custom needs:
- Pay Per Hour
- Pay Per Week
- Monthly
| Name | Dates | |
|---|---|---|
| JBoss Training | Aug 01 to Aug 16 | View Details |
| JBoss Training | Aug 04 to Aug 19 | View Details |
| JBoss Training | Aug 08 to Aug 23 | View Details |
| JBoss Training | Aug 11 to Aug 26 | View Details |

Ravindra Savaram is a Technical Lead at Mindmajix.com. His passion lies in writing articles on the most popular IT platforms including Machine learning, DevOps, Data Science, Artificial Intelligence, RPA, Deep Learning, and so on. You can stay up to date on all these technologies by following him on LinkedIn and Twitter.


