- Home
- Blog
- API Management & testing
- SoapUI Tutorial

API Testing plays a significant aspect of almost every quality analyst in the software industry. There are various tools available for API automation in the market, and SoapUI is one of the top tools which has made API testing easy. It's a cross-platform API or Web Services testing tool that can do both functional and non-functional testing. This SoapUI tutorial gives you detailed knowledge of what SoapUI is and its features, architecture, installation, creating a SoapUI project, and much more.
SoapUI Tutorial
| SoapUI Tutorial - Table of Content |
What is SoapUI?
SOAP is the acronym for Simple Object Access Protocol. SoapUI is the world's most widely-used automation testing tool for soap and REST APIs. It's a lightweight protocol used for information exchange in a decentralized and distributed environment. You can do functional, load, security, and compliance tests on your API using SoapUI.
It was developed by Eviware in 2005 and later acquired by Smartbear in 2011. It's a cross-platform desktop-based application that can run on any operating system.
| If you want to enrich your career and become a professional in SoapUI, then visit Mindmajix - A leading online training platform: "SoapUI Training" This course will help you to achieve excellence in this domain. |
Why use SoapUI?
SOAPUI allows testers to execute automated functional, compliance, regression, load tests, and more on different Web APP. Let's discuss the essential features of SoapUI:
#1. Functional Testing
A powerful tool that allows testers to write functional API tests.
- Provides user-defined scripts that can be customized as per user requirements.
- Supports drag and drop feature to create and run complex test scenarios.
- Supports multi-environment to switch between QA, Dev, and Prod Environments.
- Allows advanced scripting
#2. Security Testing
Security testing plays an essential role in the authentication and authorization of web services and APIs.
- Performs complete vulnerability scans to protect the services.
- Avoids SQL injection to secure the databases.
- Scans and locates the huge documents within XML messages that cause stack overflows.
- Scans for cross-site scripting, when specific parameters in structured messages are exposed.
- Performs boundary scan and fuzzing scan to avoid erratic behavior of services.
#3. Load Testing
In SoapUI, you can create advanced load tests easily on the base of existing functional API tests.
- Distributed load tests across any number of loadUI agents
- Allows advanced custom reposting to capture performance parameters.
- Supports end-to-end system performance monitoring
#4. Compliance Testing
Compliance testing includes source and data authentication license certificates and various service agreements for web service validation.
#5. Regression Testing
In SoapUI, regression testing is used to analyze bugs and malfunctions of web services. In the current release tools, it reverifies the new changes of the web services.

#6. SoapUI supported Protocols and Technologies.
SoapUI supports the following protocols:
- SOAP – Simple Object Access Protocol
- REST – Representational State Transfer
- WSDL – Web Service Definition Language
- AMF – Action Message Format
- HTTPS – HyperText Transmission Protocol Secured
- JDBC – Java Database Connectivity
- HTTP – HyperText Transmission Protocol
- JMS – Java Messaging Service
#7. SoapUI Integration with other tools
SoapUI integrated very well with popular tools:
- Apache Maven Project is a project management tool that manages a project's build, reporting, and documentation from a central repository.
- HUDSON is a Java-based tool integrated with SoapUI to find bugs quickly.
- JUnit is a unit testing framework built in Java that controls the flow of tests from SOAPUI
- Apache - Ant is used to develop projects and run test suites using the command line in SoapUI Tools.
Next up, in this SoapUI Tutorial, we will focus on SoapUI Architecture.
SoapUI Architecture
The following image shows the architecture of SoapUI:
Let's discuss the architecture of SoapUI in detail:
- Test config files: These are the files that provide configurations related to testing data, expected results, data connection, variables, and any other environment setup or test-specific details.
- Third-party API: They help in creating an optimized test automation framework. For example, the JExcel API allows integrating with MS Excel to create a data-driven framework.
- Selenium: These are the Selenium Jars that use UI automation.
- SoapUI Runner: It runs on the SoapUI project and is a handy utility for test automation as it supports you to run the test from the command line. Moreover, it acts as a trigger for test automation.
- Properties: These are the test requested properties that contain any dynamically generated data.
- Groovy: This library enables SoapUI to provide its users with groovy as a scripting language.
- Test Report: SoapUI supports a Junit style report and uses Jasper reporting utility to report test results.
Now in SoapUI Tutorial, we’ll learn about SoapUI Versions.
SoapUI Versions
The following tables show the SoapUI versions and release dates.
| Version Name | Release Date | Release Notes |
| SoapUI 1.0 | 16/10/2005 | Initial Release |
| SoapUI 1.5 | 06/04/2006 | Load Testing Release |
| SoapUI 1.6 | 1/11/2006 | Tools Release |
| SoapUI 1.7 | 10/04/2007 | Mock/Pro Release |
| SoapUI 2.0 | 12/12/2007 | Coverage Release |
| SoapUI 2.5 | 18/11/2008 | REST Release |
| SoapUI 3.0 | 09/07/2009 | Reporting Release |
| SoapUI 3.5 | 01/03/2010 | Protocol Release |
| SoapUI 3.6 | 14/09/2010 | LoadUI Release |
| SoapUI 4.0 | 14/06/2011 | Security Release |
| SoapUI 4.5 | 28/03/2012 | Big Ears Release |
| SoapUI 5.2 | 02/07/2015 | Major New Features Release |
| SoapUI 5.3 | 05/12/2016 | Bundled Plugin Release |
| SoapUI 5.4 | 27/11/2017 | Open Source |
| SoapUI 5.5 | 12/02/2019 | Open Source |
| SoapUI 5.6 | 14/07/2020 | Open Source |
SoapUI vs SoapUI Pro
SoapUI is an open-source, free version tool that offers basic features of testing. At the same time, SoapUI Pro is a commercialized version with advanced reporting features, data-driven functionality, and more.
Let's understand the difference between these two versions:
| Features | SoapUI | SoapUI Pro |
| Supported Technologies | ||
| Soap/WSDL | Yes | Yes |
| REST | Yes | Yes |
| AMF | Yes | Yes |
| JMS | Yes | Yes |
| JDBC | Yes | Yes |
| HTTP | Yes | Yes |
| Reporting | ||
| JUnit Reports | No | Yes |
| Test Suite Coverage | No | Yes |
| Assertion Coverage | No | Yes |
| Test Case Coverage | No | Yes |
| Message Recording Coverage | No | Yes |
| WSDL HTML Report | Yes | Yes |
| Report Data Export | No | Yes |
| General Features | ||
| Standalone Application | Yes | Yes |
| Multi Environment Support | No | Yes |
| Manual test steps | Yes | Yes |
| Unit Reporting | No | Yes |
| Scripting Libraries | No | Yes |
| Data Source Driven Test | No | Yes |
| Test Refactoring | No | Yes |
| Message Assertion | Yes | Yes |
| Request/Response Coverage | No | Yes |
| WSDL Coverage | No | Yes |
| Floating Licence | No | Yes |
| Automation | ||
| Load Tests | No | Yes |
| Functional Tests | No | Yes |
| Mock Services | Yes | Yes |
| Command Line | Yes | Yes |
| Code Generation | Yes | Yes |
| CI and Build Integration | Yes | Yes |
| Maven | Yes | Yes |
Next in SoapUI Tutorial, it’s time we understand the SoapUI Download and Installation.
SoapUI Download and Installation
SoapUI is a cross-platform application and can be used either on Windows, Mac, or Linux/Unix, according to the requirement and preferences. Let's discuss what the steps required to download, install and configure SoapUI on Windows are.
Prerequisite for SoapUI installation:
- Processor − 1GHz or higher 32-bit processor.
- Hard Disk Space − Minimum of 200MB.
- RAM − 512MB of RAM
- JAVA − JAVA 6 or later.
- Operating System Version − Mac OS 10.4 or later, Windows XP or later.
Part A - Download
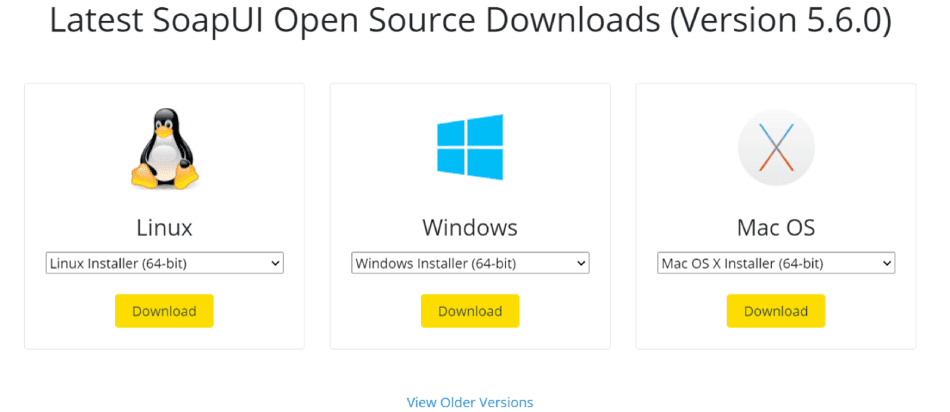
Step 1) Go to https://www.soapui.org/downloads/latest-release/ and choose the Download corresponding to your operating system.
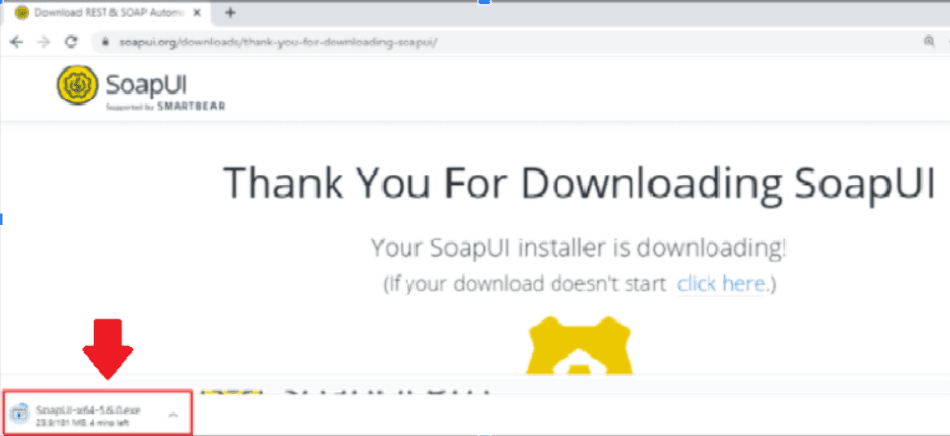
Step 2) Next, it redirects to https://www.soapui.org/downloads/thank-you-for-downloading-soapui/ page and starts downloading.
Part B - Installation
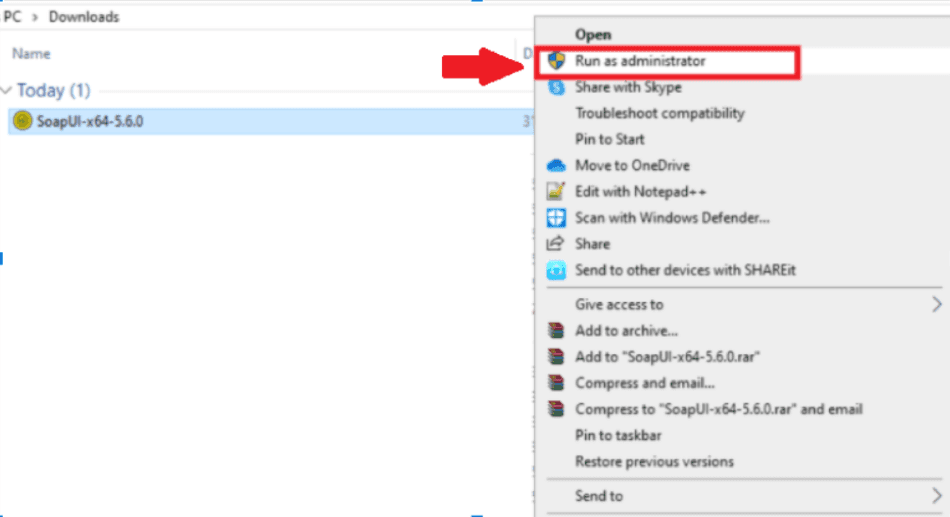
Step 1) After downloading the .exe file, execute it as shown below:
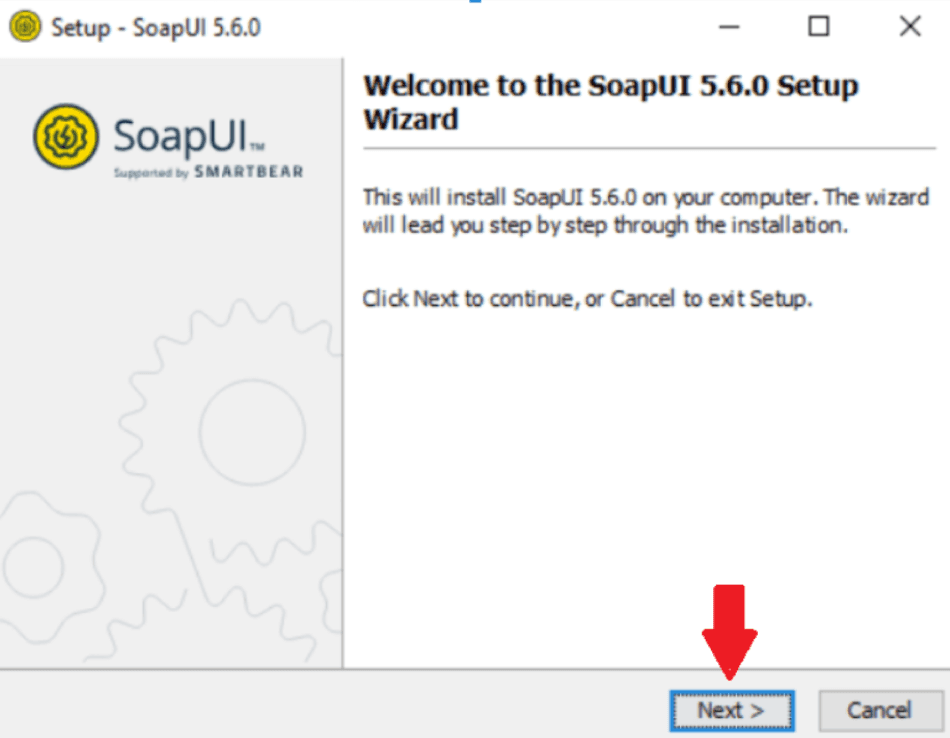
Step 2) In the setup wizard, click Next to continue.
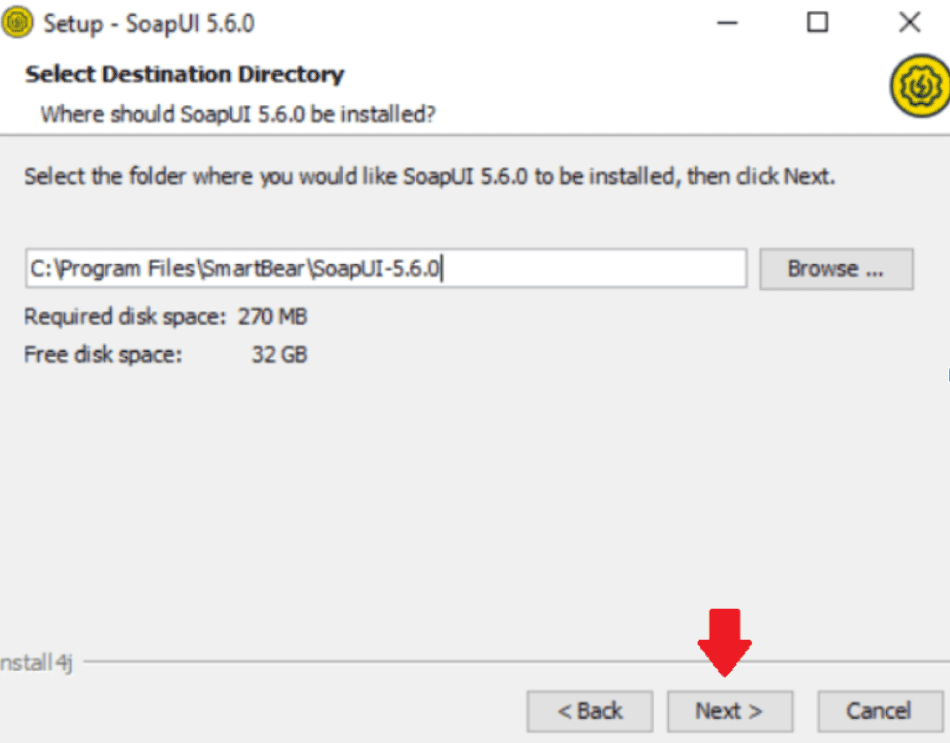
Step 3) Choose the installation directory, and click on the Next button.
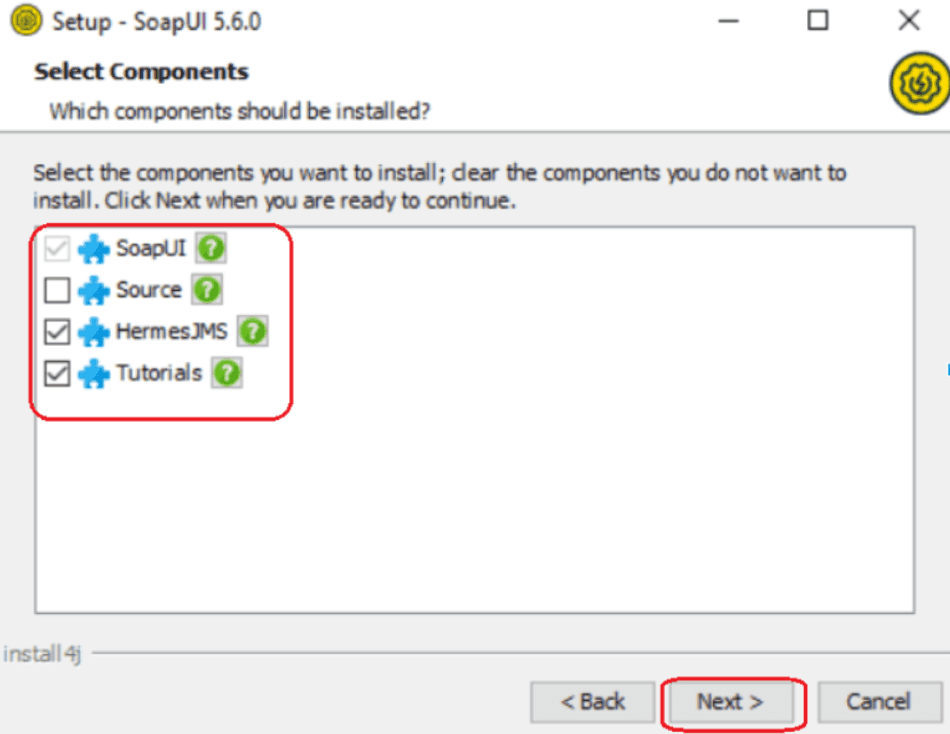
Step 4) Choose the components that you want to install.
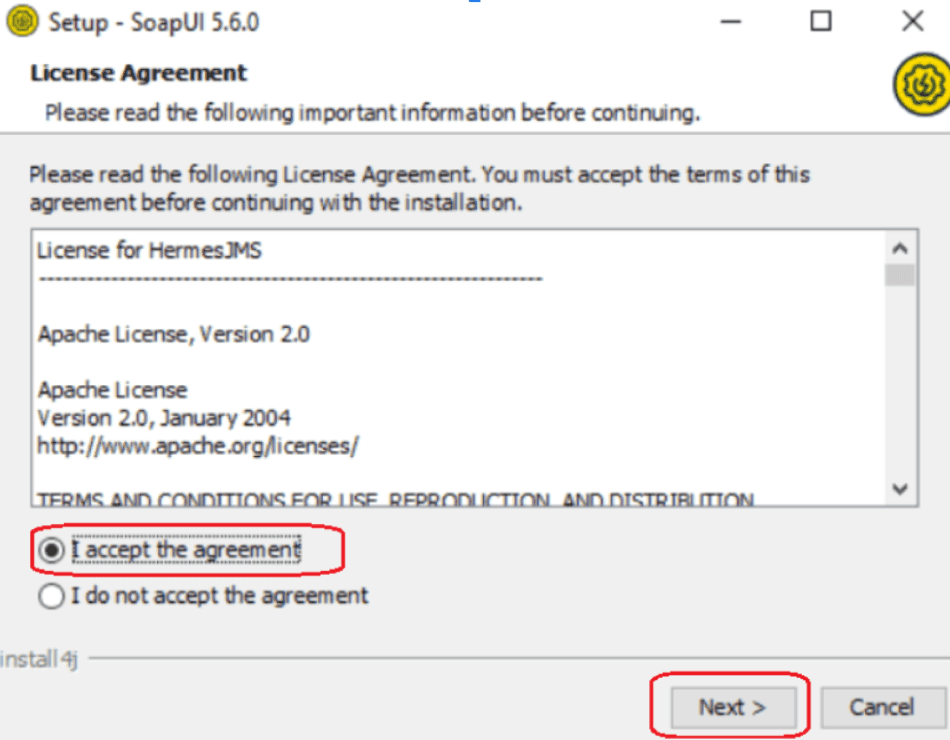
Step 5) Accept the license agreement and click on Next.
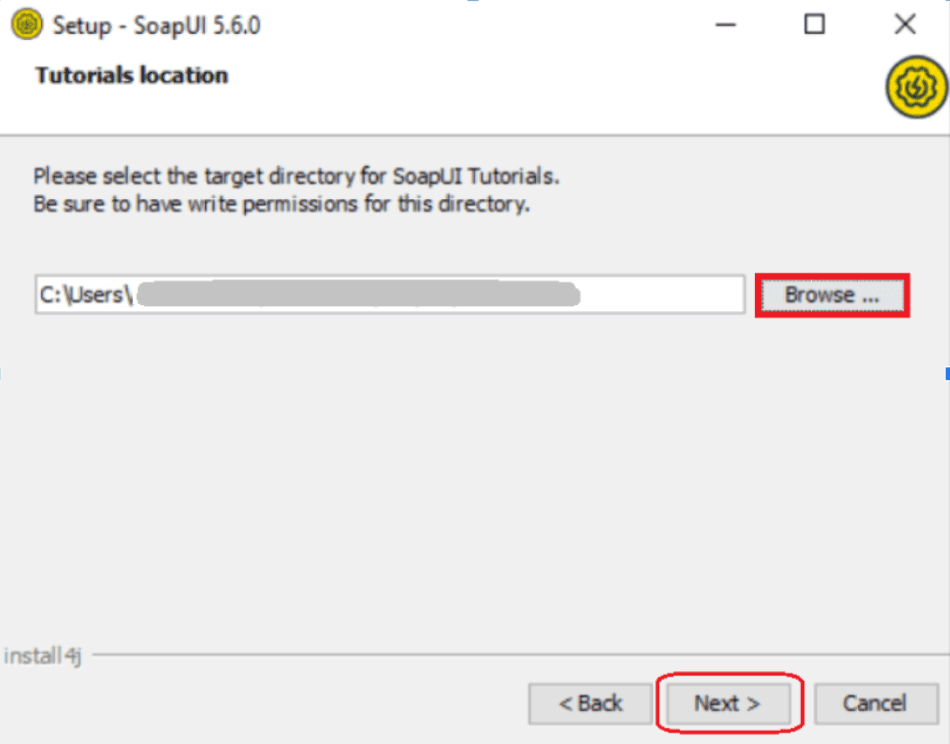
Step 6) Choose the folder location for SoapUI Tutorials or else leave it as the default and then click on the Next button.
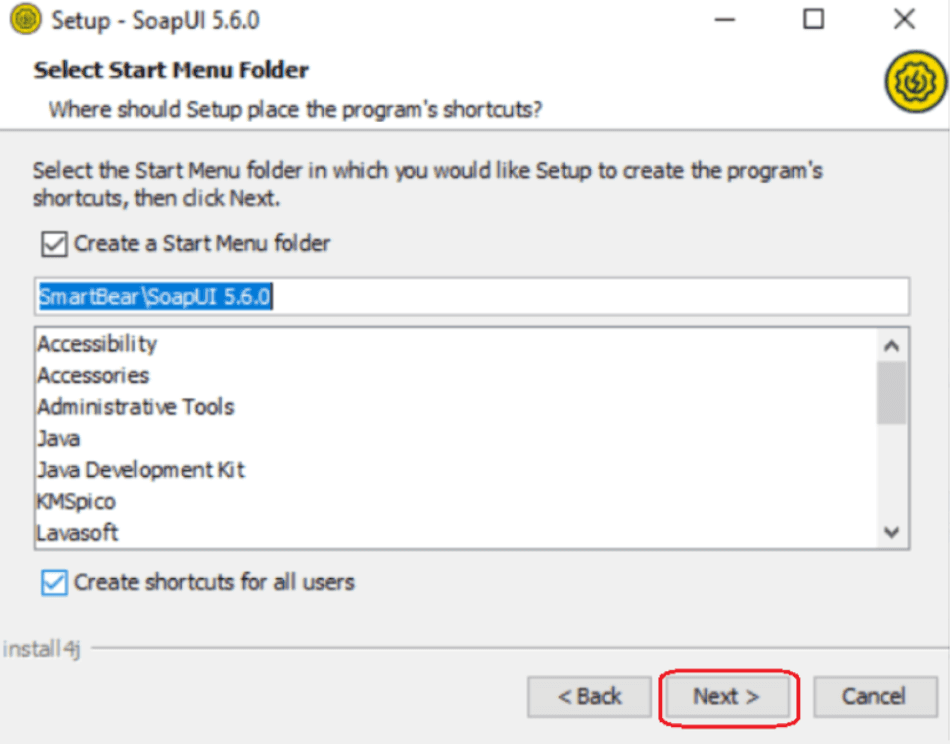
Step 7) Choose the start menu folder or leave it as the default folder and click on Next.
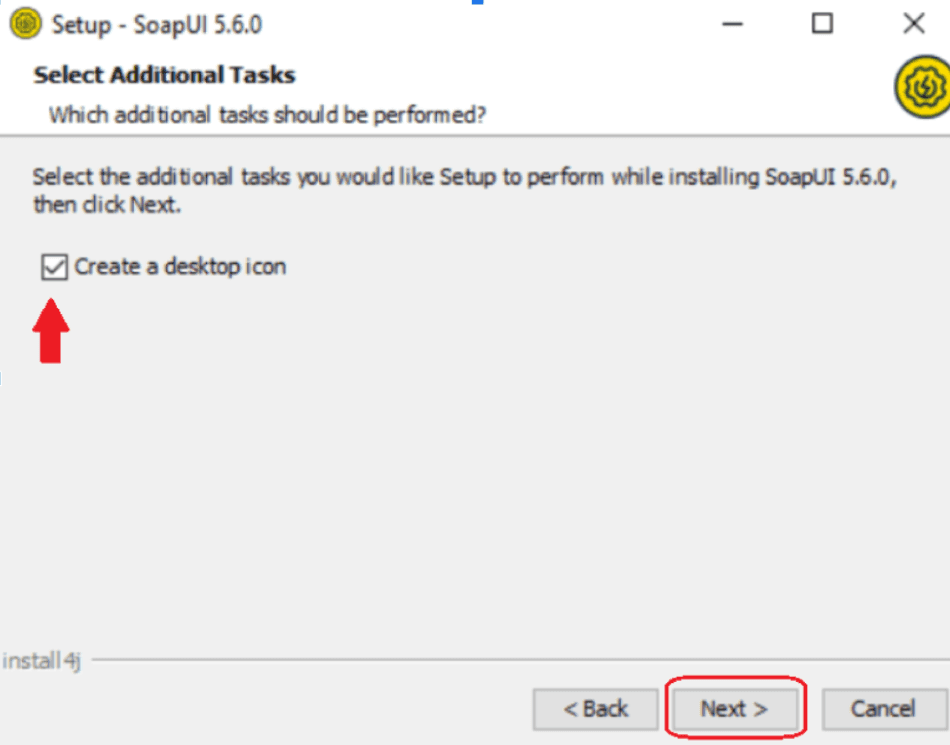
Step 8) Enable the checkbox, create a desktop icon and click Next.
Step 9) The Installation starts as shown below and then click on Finish.
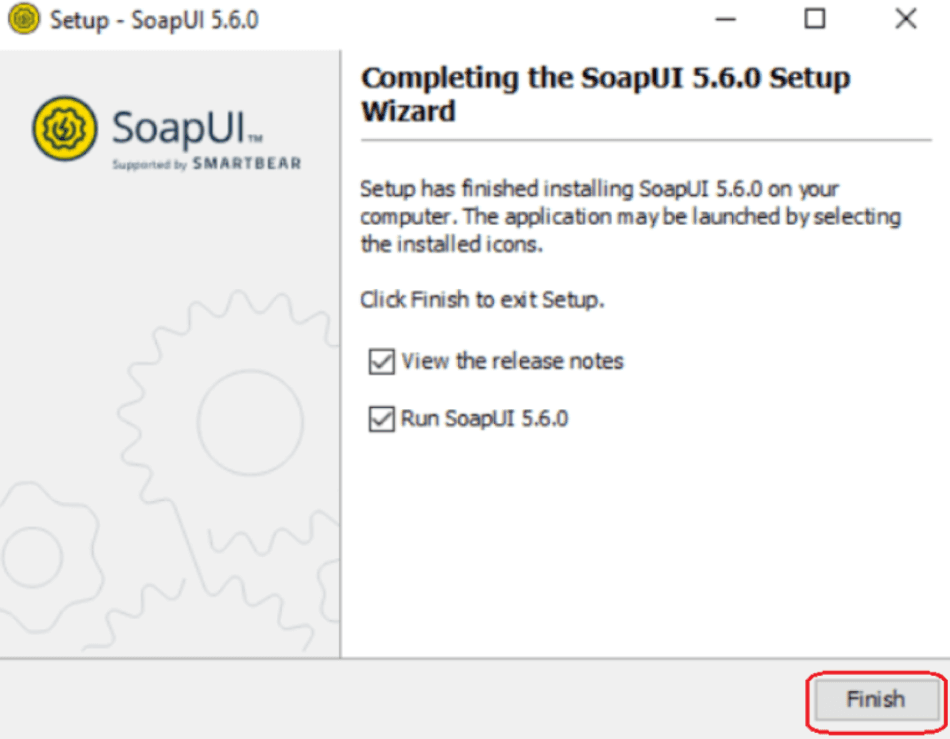
Step 10) It launches the SoapUI.
How to Create a SoapUI project?
It is simple to create a Soap project in the SoapUI tool. First, we need to import the Soap/REST protocol.
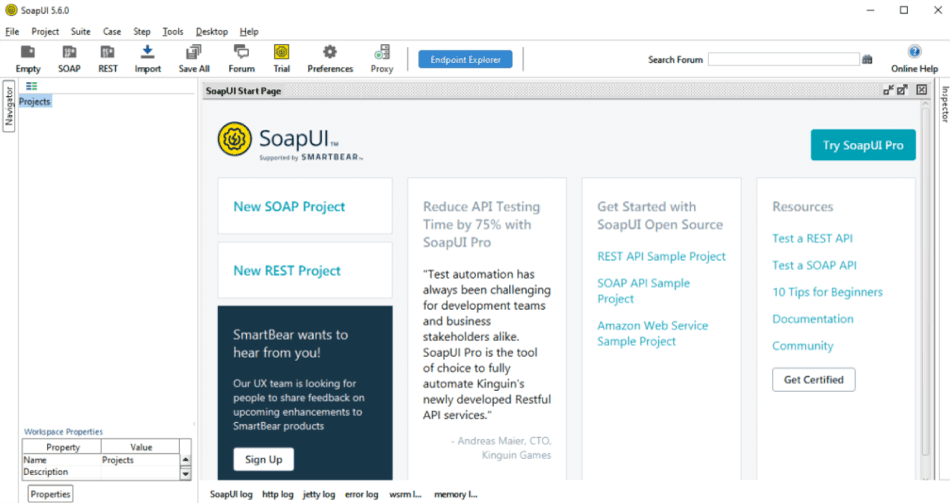
Step 1) Navigate to the File menu and select the New SOAP Project option, as shown below:
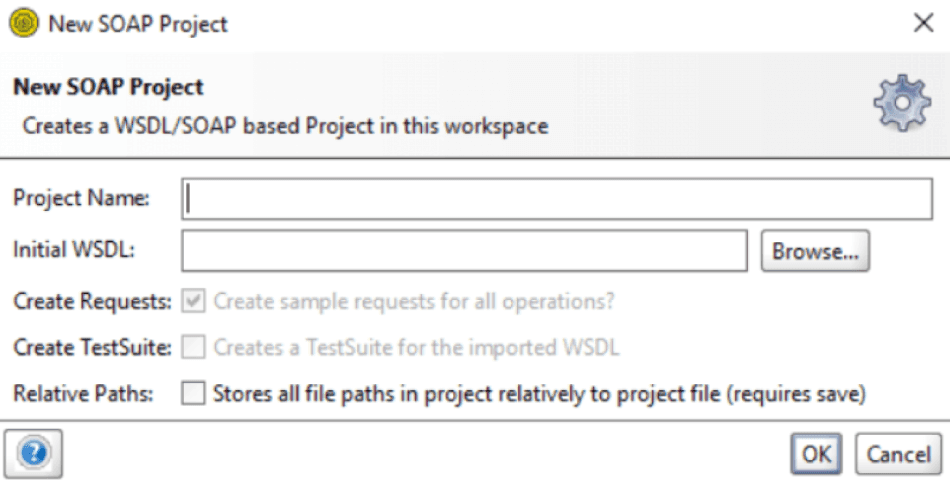
Step 2) Next, it opens the New SOAP Project window, as shown below:
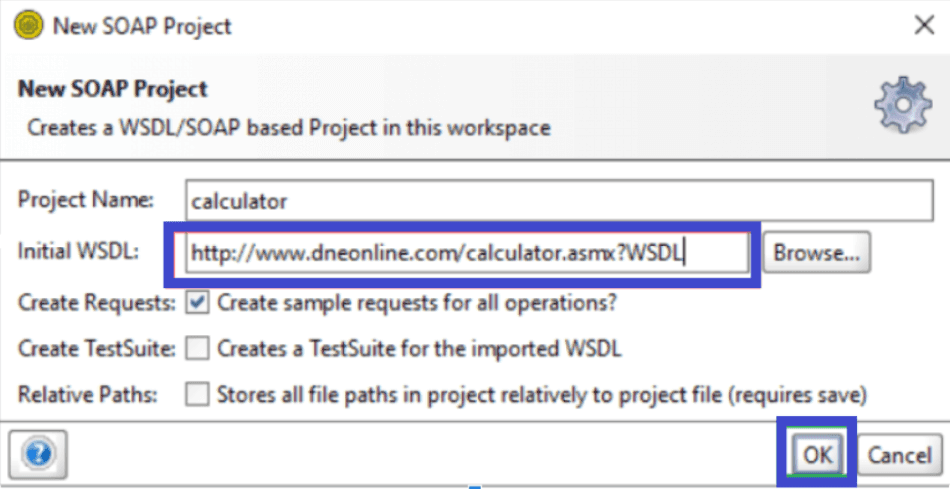
Step 3) Enter the WSDL Web URL in the Initial WSDL text box, and it automatically retrieves the project name.
Step 4) After clicking on the OK button, it processes the WSDL URL for successful execution and displays the project calculator's various services and properties, as shown below.
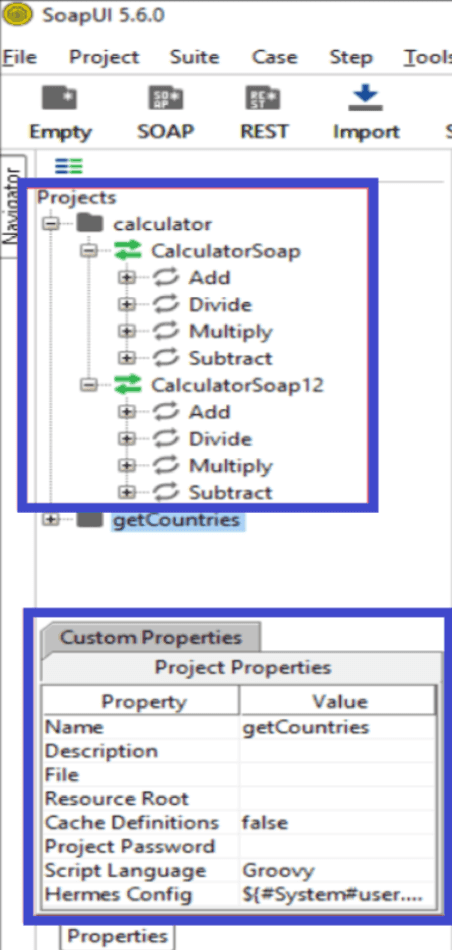
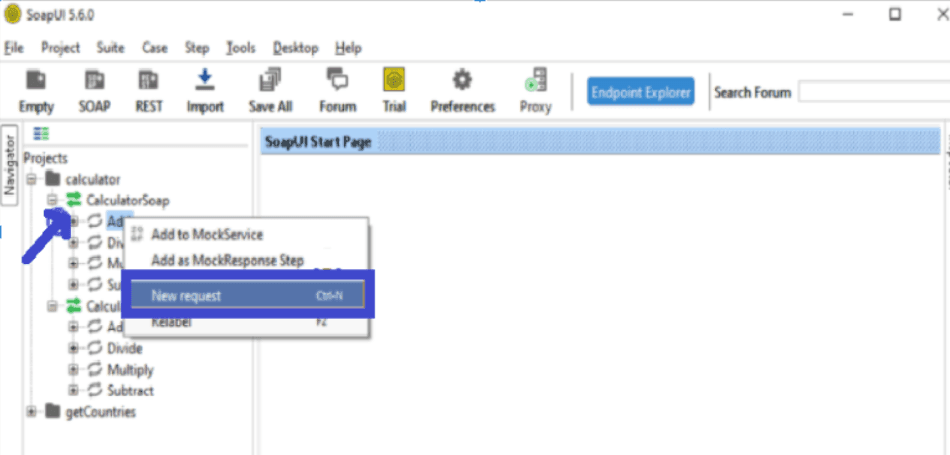
Step 5) Expand the service of the project calculator by clicking on + symbol.
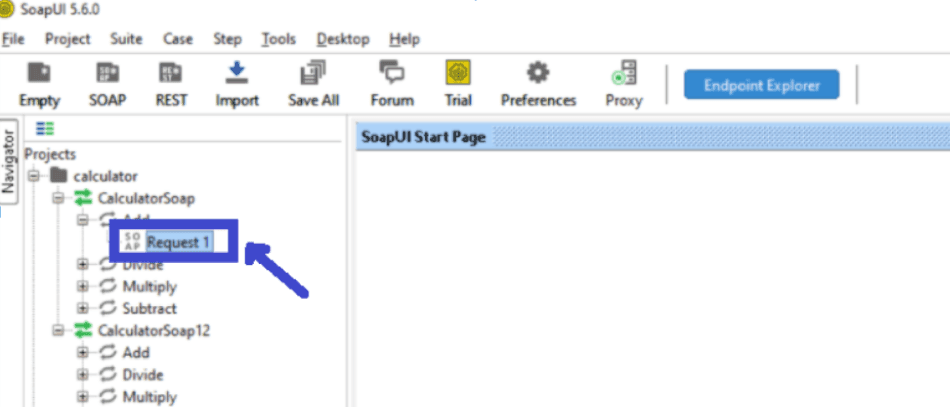
If you want to create more than one Request, right-click on Add service and click on new request option as shown below:
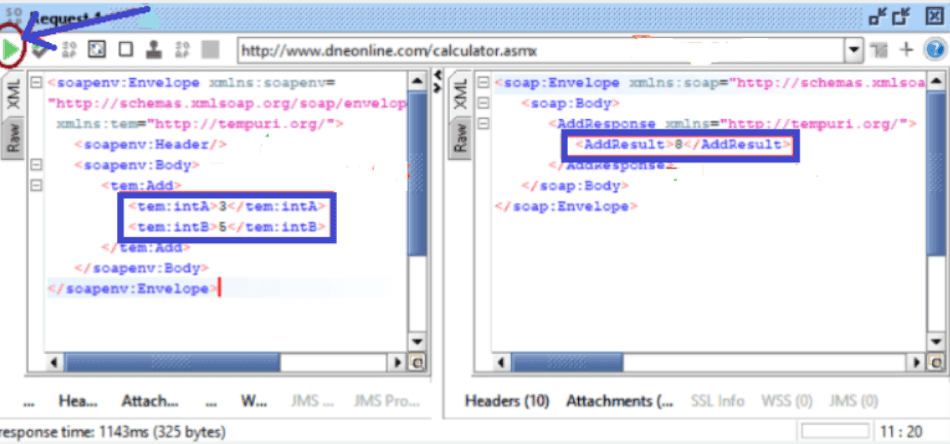
Step 6) Enter the 'intA' and 'intB' and click on the submit button. Response XML displays on the right-side pane.
SoapUI Test Structure
The SoapUI test structure contains three major parts: Test Suite, TestCase, and TestSteps. The following diagram shows the flow diagram of the test structure used in the SoapUI testing tool.
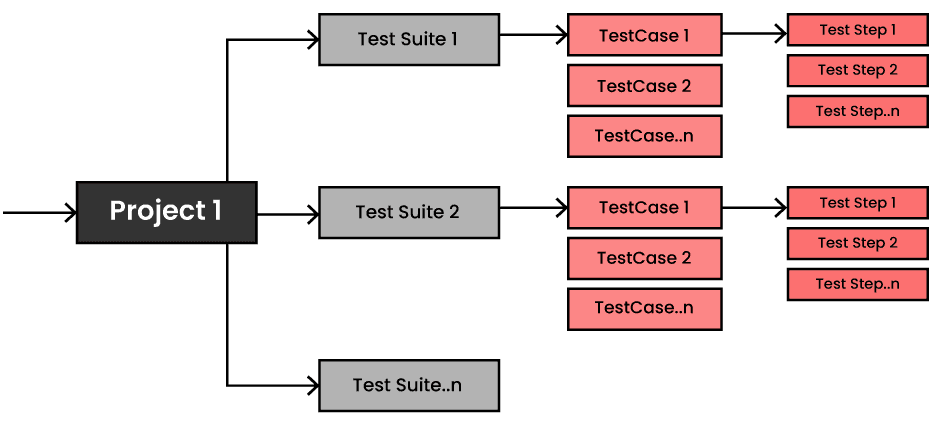
What is a Test Suite?
Test Suite is a collection of test cases used to group functional tests into logical units. Inside the test suite, you can create any number of tests to support large-scale test scenarios. Using the Test Suite in SoapUI, you can perform the regression, performance tests, etc.
What is a Test Case?
A test case is a collection of test steps grouped to perform specific tests according to the required service.
What is a Test Step?
In SoapUI, Test Steps are the building blocks of functional tests. All test steps created inside the TestCase are used to control the execution flow and validate web service functionality.
How to create a TestSuite in SoapUI?
Follow the below steps to create a TestSuite in the SoapUI tool:
Step 1: A TestSuite can be made in two ways:
To create a new project in the SoapUI, add a TestSuite as shown below-
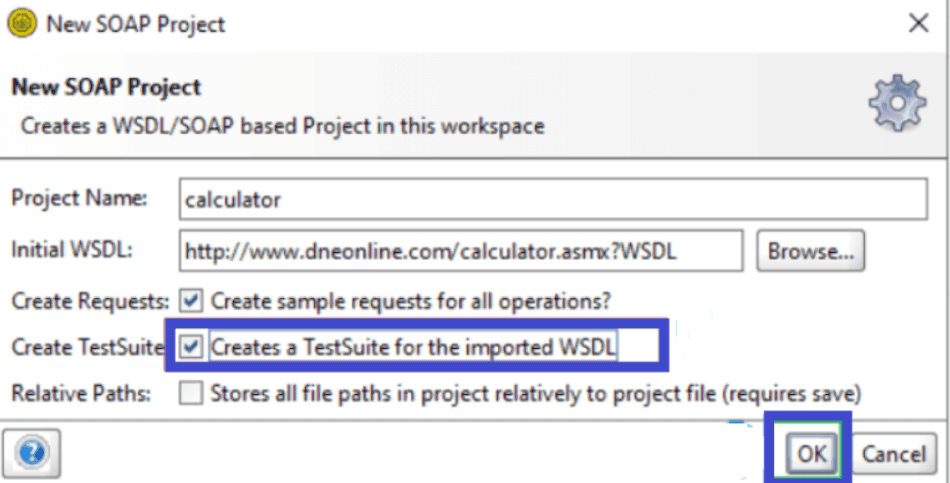
Choose the <create> option from the TestSuite dropdown menu and then click on the OK.
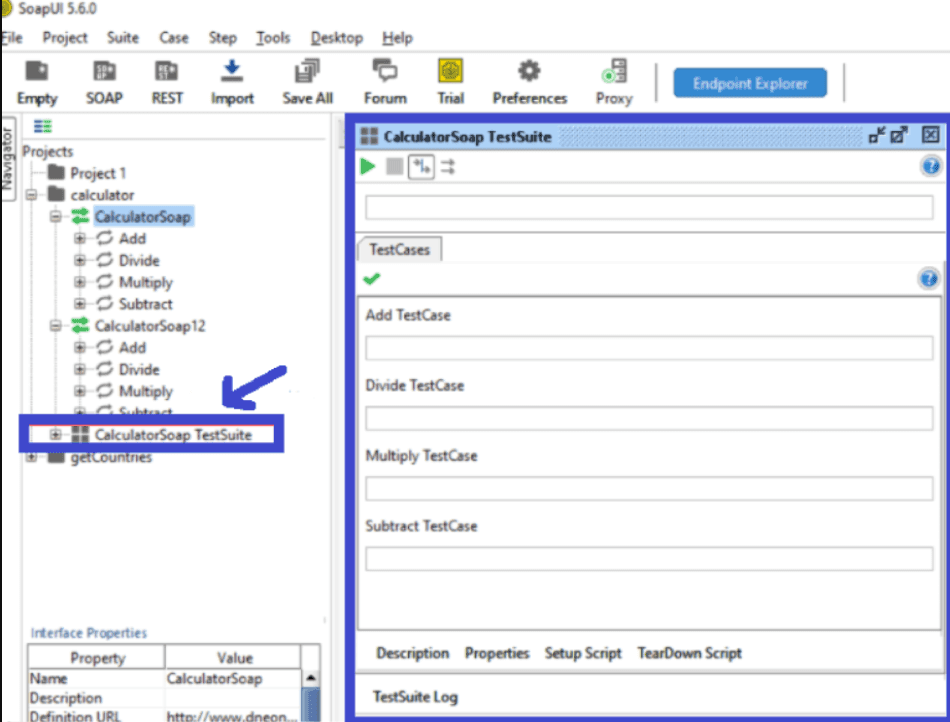
The created TestSuite is shown below:
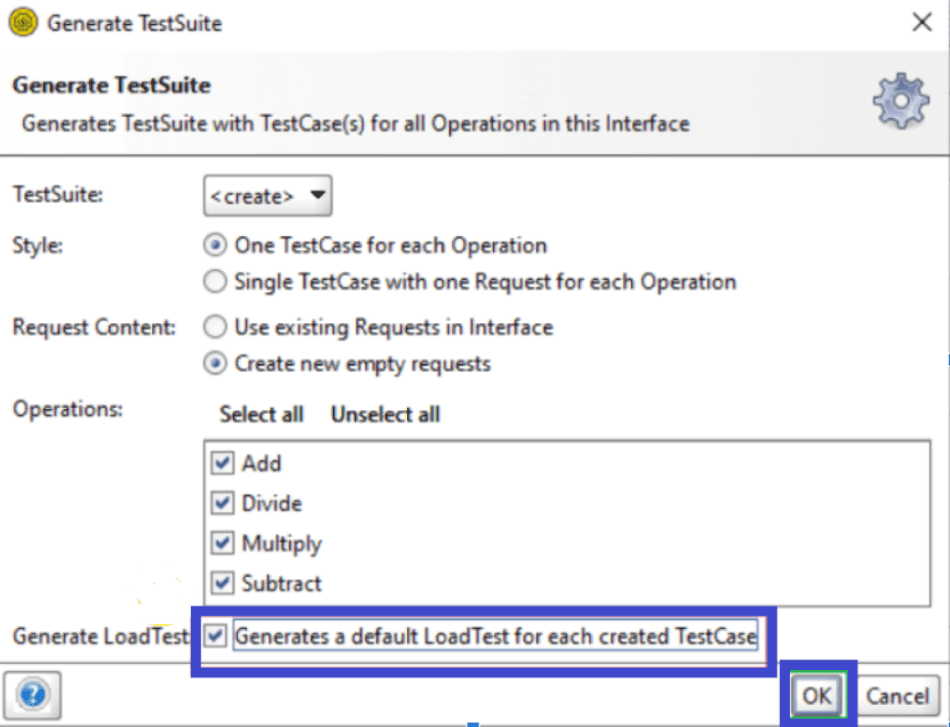
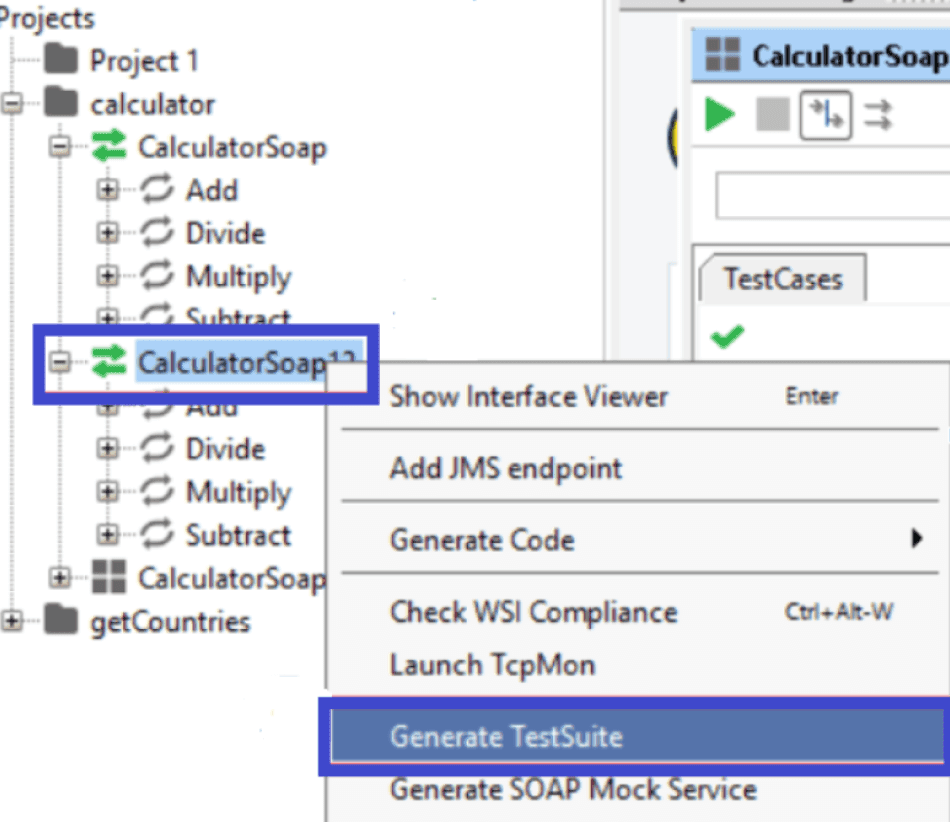
Step 2: We can also create TestSuite for specific services in the project calculator as follows:
- Right-click on a particular service of a calculator and choose the Generate TestSuite option
- Next, click on, OK.
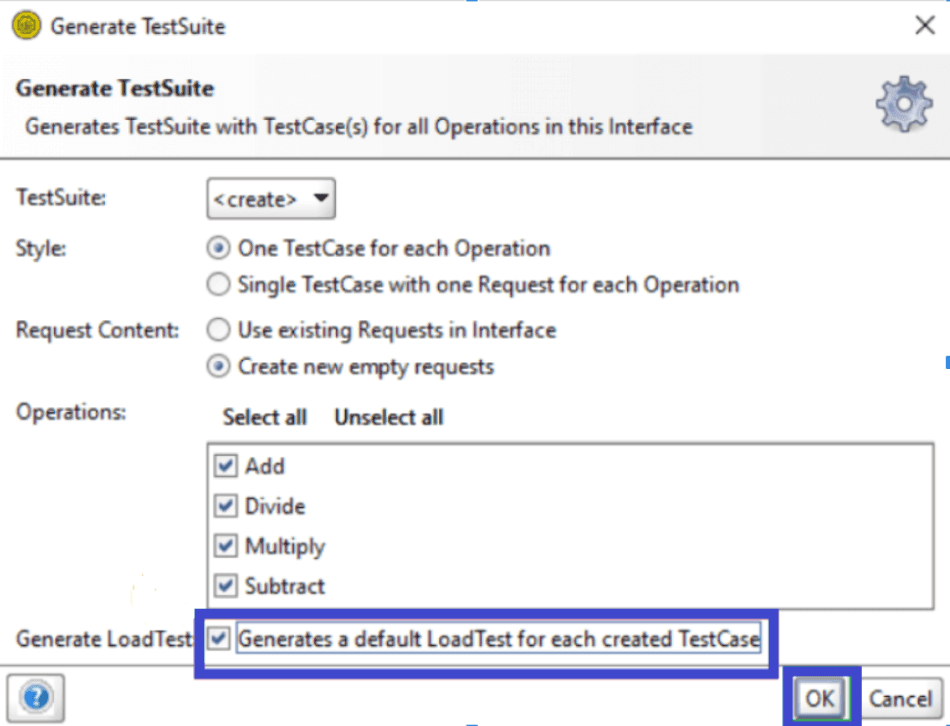
- A popup is displayed, click on OK, and it generates the TestSuite.
How to create a TestCase in SoapUI tool?
Follow the below steps to add a TestCase:
- Right-click on the TestSuite created in the navigation section and select the New TestCase.
- A popup will be displayed, click on OK. It shows all the test cases.
How to create a TestStep in the SoapUI tool?
Follow the below steps to create a TestStep:
- Right-click on test steps and choose the appropriate TestStep service from the list.
- Enter the step name and click on OK.
- Next, a dialog pops up to select the operation to invoke. After choosing the proper operation, click OK.
- A dialog box appears to create a TestStep and click on OK.
| Frequently asked SoapUI Interview Questions |
SoapUI Assertions
Assertions are the validation rules used to claim verification results and check whether the targeted web services work as expected. Assertions validate the messages received by TestStep during execution. SoapUI supports a wide range of assertions in response.
Following are the list of assertions supported by SoapUI:
| Assertion | Description |
| 1. Property Content | |
| Contains | Searches for the existence of specified strings. Also, it defines regular expressions. |
| Not Contains | Searches for the non-existence of specified strings. Also, it supports regular expressions. |
| XPath Match | Selects the specific content from the target property and matches the XPath expression's result with the expected value |
| XQuery Match | Like XPath Match, select the target source content and compare or match the XQuery expression’s result to the expected value. |
| Scripting | Allows the user to run a custom script for performing user-defined verification. |
| 2. Compliance, Status, Standards | |
| HTTP Download All Resource | Downloads all resources related to HTTP and validates them. |
| Invalid HTTP Status Codes | Checks the target TestStep receives an HTTP result with a status code, not in the list of defined codes. |
| Not Soap Fault | Checks the last received message has no-fault. |
| Soap Response | Check the last received message is a valid Soap response. |
| Soap Fault | Checks the last received message has a soap fault. |
| WS-Security | Checks the last received message has a valid WS-Security header. |
| Schema Compliance | Validates the last received XML message is in line with the WSDL or WADL compliance definition. |
| WS-Addressing Request | Validates the last submitted request has a correct WS addressing header or not. |
| WS-Addressing Response | Checks the last received response XML message has the correct WS address header. |
| 3. Script | |
| Script Assertion | Allows users to create custom scripts that perform user-defined validation rules |
| 4. Security | |
| Sensitive Information Exposure | Authenticates the received XML response messages without disclosing the sensitive information. |
| 5. SLA | |
| Response SLA | Validates whether the last received message’s response was within the defined time limit. |
| 6. JMS | |
| JMS Status | Validates whether the JMS request of the targeted test phase is successfully executed. |
| JMS Timeout | Verifies that the JMS specified test steps' description did not take longer than the specified duration. |
| 7. JDBC | |
| JDBC Status | Checks the defined TestSteps request executed successfully in a SoapUI testing tool. |
| JDBC Timeout | Validates that the specified test steps' JDBC statement did not take longer than the specified duration. |
SoapUI Properties
The term properties represent the characteristics of a specific object. They are a central aspect of more advanced testing with SoapUI.
SoapUI properties provide the ability to hold authentication details, making it easy to manage them in a central place of external files.
Types of SoapUI properties:
- Default Properties: These are the properties built in the SoapUI tool, or we can say when a new project is created in a SoapUI.
- Custom / User Defined Properties: These are the properties defined at any project creation point like a global, test case, test steps, etc.
Defining Properties
We can define SoapUI properties at multiple levels in a project:
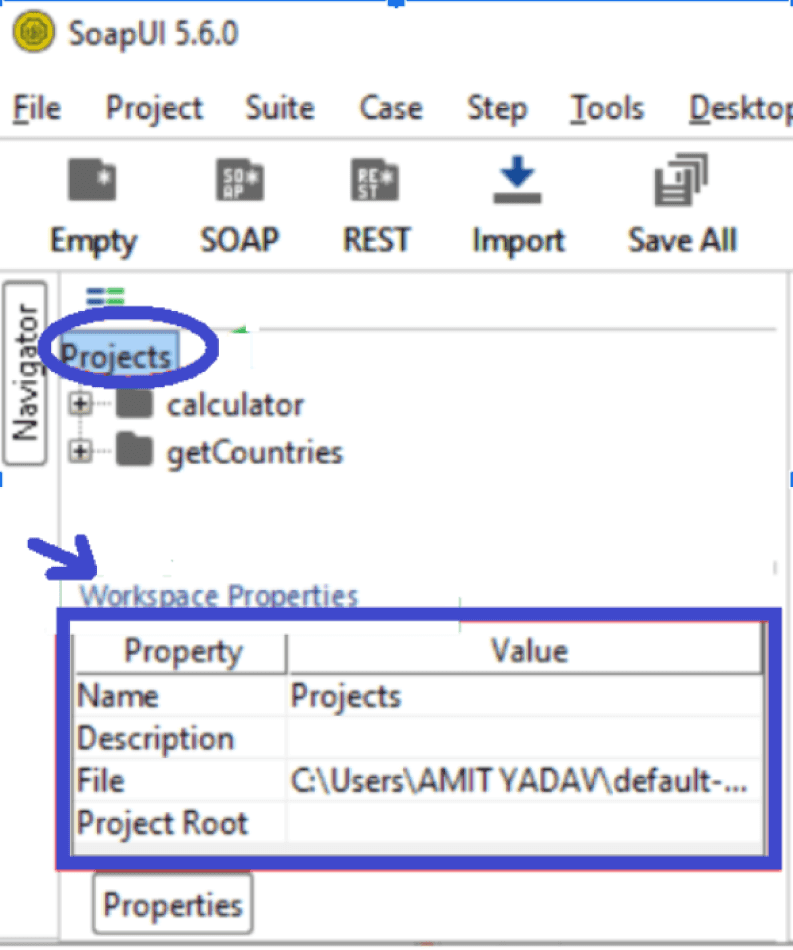
- Workspace Default Properties: For Workspace Default properties, select the Workspace in the Projects Navigator as shown below:
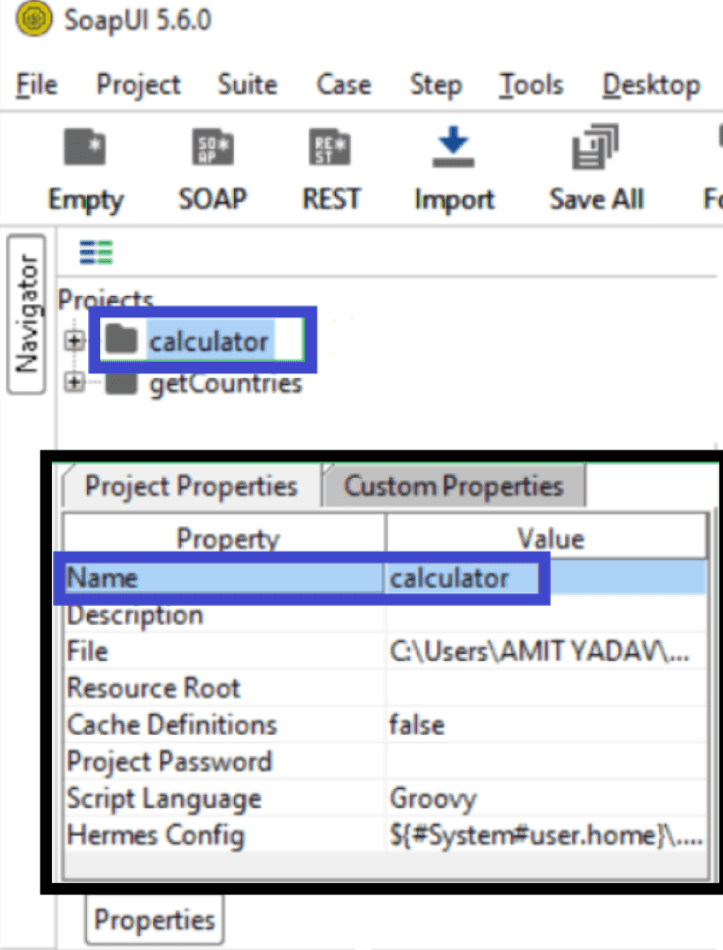
- Project Default Properties: Select a Project in the Projects Navigator to create a project's default properties.
- Service Default Properties: Like mentioned above, select a Web Service in the Project Navigator to define service default properties.
- Operation Properties: Select an Operation property of the Project to define the default properties of the operation.
- Request Default Properties: Select a Web Request from the Operation Properties to define a Request Default property.
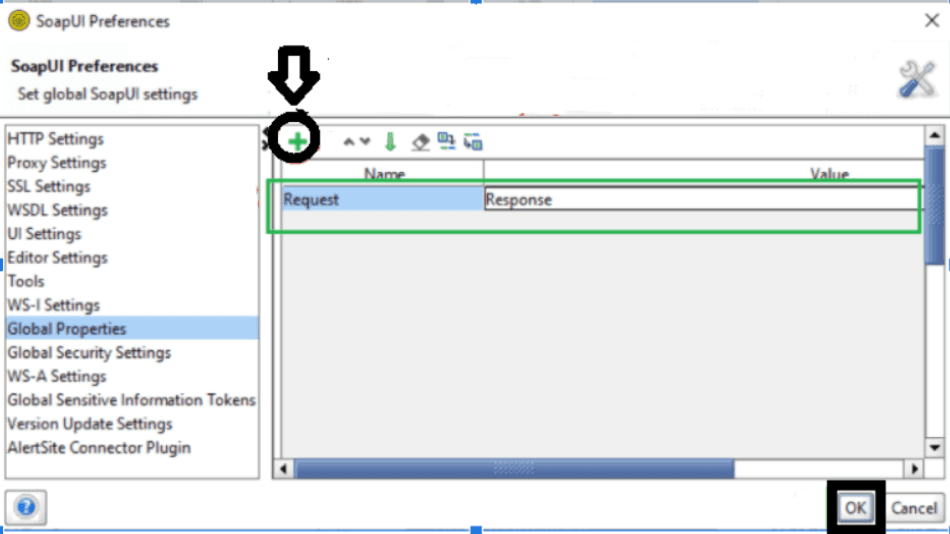
- Global Properties in SoapUI: The global properties are used to define globally associated properties in the SoapUI tool. To define a global property, follow the steps shown below:
1. First, click on the Preferences tab presented in the toolbar

2. The below image appears after clicking on the preferences tab.
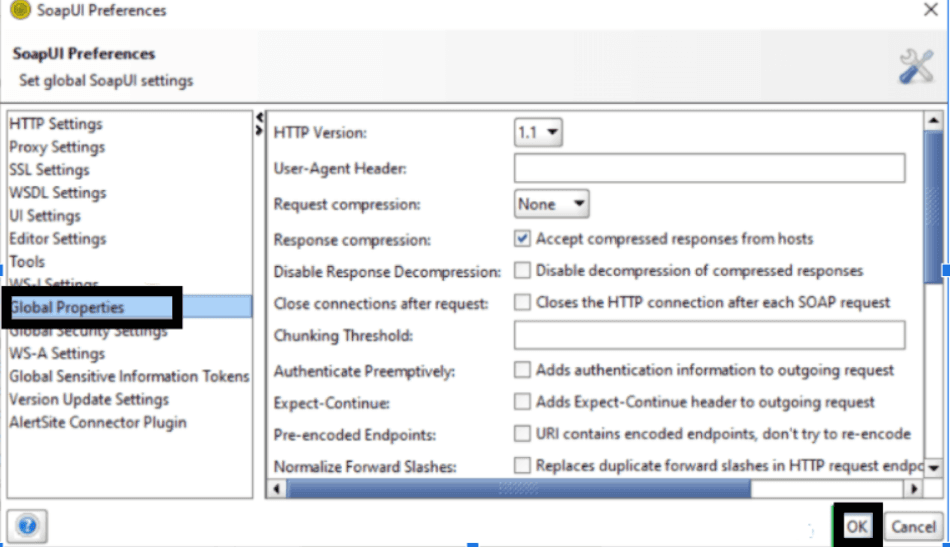
3. Next, select the Global Properties and click on the (+) icon to add global properties.
Conclusion
SoapUI has become the defacto standard for testing APIs in today's service-oriented world because of its powerful and easy-to-use features. By incorporating SoapUI into testing, companies can improve the quality of software. Now, it's the right time for you to start your career in SoapUI, if you're interested.
Do you have any questions regarding this 'SoapUI Tutorial'? If so, then please put it in the comments section below. Our experts will help you solve your queries at the earliest.
 On-Job Support Service
Online Work Support for your on-job roles.

Our work-support plans provide precise options as per your project tasks. Whether you are a newbie or an experienced professional seeking assistance in completing project tasks, we are here with the following plans to meet your custom needs:
- Pay Per Hour
- Pay Per Week
- Monthly
| Name | Dates | |
|---|---|---|
| SoapUI Training | Jul 18 to Aug 02 | View Details |
| SoapUI Training | Jul 21 to Aug 05 | View Details |
| SoapUI Training | Jul 25 to Aug 09 | View Details |
| SoapUI Training | Jul 28 to Aug 12 | View Details |

Madhuri is a Senior Content Creator at MindMajix. She has written about a range of different topics on various technologies, which include, Splunk, Tensorflow, Selenium, and CEH. She spends most of her time researching on technology, and startups. Connect with her via LinkedIn and Twitter .