
- BitBucket Tutorial
- Git Rebase Tutorial
- Branches, Part II – Git
- Centralized Workflow In Git
- Git – Distributed Workflows
- Git Interview Questions And Answers
- Git – Plumbing Commands
- Git – Rewriting History
- Git – Tips & Tricks
- Git Tutorial
- Git – Undoing Changes
- Git – Working With Remotes
- GitHub Interview Questions
- GitLab Tutorial
- Installation of Git
- Patch Workflows – Git
- Git Basic Concepts
- Git vs SVN
Be it an individual or enterprise, facing challenges is an everyday occurrence. Enhancing the quality is one of the ways to overcome your challenges – whether it is software development or any other arena. When developers spend more time on coding than testing and debugging, they can produce quality codes for no reason.
In this way, GitHub is the platform that offers a shared repository to developers where they can build and test codes and merge them with the main codes automatically. GitHub is one of the code hosting platforms which encourages collaboration and manages version control effectively. In other words, developers can work with their team members – no matter where they are and in which time zone. Simply put, GitHub is the platform that breaks the barriers of walls in the office environment without compromising the quality of code development.
In this tutorial, you will learn GitHub CI/CD, its features, GitHub actions, its key components, how to get started with GitHub, how to create a workflow, and many more. Let’s begin:
GitHub CI/CD Tutorial - Table of Contents
- What is GitHub CI/CD?
- Why GitHub CI/CD?
- Features
- Components of the CI/CD Tool Kit
- GitHub Actions
- Components of GitHub Actions
- CI with GitHub Actions
- Get Started with GitHub
- Create a Workflow with GitHub Actions
- Benefits
| If you want to enrich your career and become a professional in GitHub, then enroll in "GitHub Training". This course will help you to achieve excellence in this domain. |
What is GitHub CI/CD?
CI refers to Continuous Integration, and CD refers to Continuous Delivery and Continuous Deployment.
Let’s take a look at CI and CD below:

1. Continuous Integration (CI): CI is a software practice allowing developers to push their codes into GitHub repositories frequently. Once the codes are pushed into the repository, testing is automatically carried out, and errors are flagged. Also, team members can share their suggestions to change the codes if needed. If there are no errors, the codes will be ready to merge with the main codes or project. This process reduces the developer’s time on testing and debugging significantly and allows them to spend more time in code building.
When all the team members of a development project frequently share their codes in the GitHub repositories, correct errors, and merge codes, the speed of code-building will be geared up to higher levels. Know that the CI server supports checking new code commits in a GitHub repository. Here, commit means saving the new codes in the repository.
When it comes to continuous delivery and continuous deployment, they differ by the way the codes are pushed into production. Let’s know them in detail below:
2. Continuous Delivery: In this type, approval is required before GitHub delivers the changes that you have made in the codes to the production.
3. Continuous Deployment: Here, GitHub directly deploys the changes you have made in the codes to the production.
Additionally, Continuous Delivery needs human involvement, which in turn causes some delays in the delivery. On the other hand, Continuous Deployment pushes codes directly into production once the codes pass the testing stages in GitHub. That is why continuous deployment is faster than continuous delivery.
4. GitHub CI/CD Pipeline: It is a series of automated workflows used by GitHub, which helps avoid manual tasks.
Why GitHub CI/CD?
Undeniably, speedy code deployment is the primary benefit of GitHub CI/CD. But how is this achieved? Let’s understand this from the below pointers.
- GitHub CI/CD allows developers to make changes to their codes frequently. You can update them in production once the code is approved rather than waiting for a release. This ability of GitHub accelerates the speed of code deployment.
- Although you continuously make changes in the codes and make the corresponding testing, always the codebase will be stable and ready for release at any time.
- With its automation capability, GitHub CI/CD reduces human involvement significantly. Therefore, businesses can channel their human resources toward innovation tasks and customer management.
[ Learn Complete Git Tutorial ]
GitHub Features
GitHub is nothing short compared to other similar tools in terms of its features. Let’s find the outline of the features of GitHub:
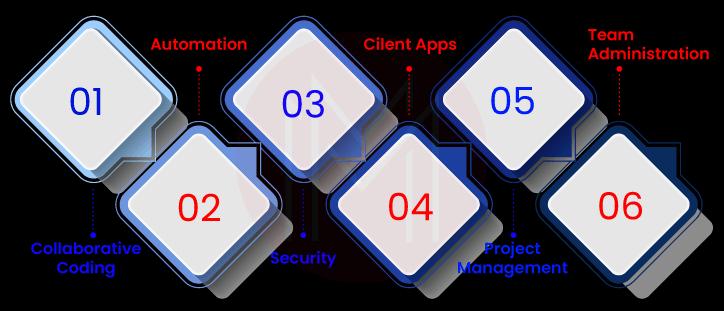
1. Collaborative Coding
GitHub provides an automatic environment through which developers can update their codes by taking feedback from the team members. You can allow the team members to review the pushed codes with pull requests. Through discussion forums, the team members can suggest changes in the codes as soon as you push the codes into the GitHub repository and enable pull requests. In this regard, GitHub Pilot supports getting feedback for your code lines and functions inside the editor itself. As a whole, you can improve the quality of the codes. Note that GitHub allows you to limit the team members who can review your codes.
2. Automation
GitHub automates code development workflows, simplifying writing and testing codes and their deployment. Not only this, GitHub automates essential tasks such as planning, project management, testing, issue labeling, and approvals. You can share and update secret codes across many repositories on GitHub and sync them automatically. Once it is made, it enhances the security of the codes significantly. Besides, you can scale best practices, improve security features, and satisfy compliances in GitHub with its automation capabilities.

3. Security
With GitHub, once you start building codes, simultaneously you start to secure the codes – throughout the code-building process. GitHub supports identifying vulnerabilities before pushing your codes into production. GitHub allows maintaining private repositories, which helps developers to secure their secret codes. Know that only the developers can view the codes in private repositories.
You can apply Multifactor Authentication (MFA) to protect your data on GitHub. MFA provides two-stage authentication for logging in to GitHub, which is the extra layer of protection. Also, notification will be enabled whenever new vulnerabilities are found in the repositories. What’s more! GitHub provides enterprise security through SAML, IP allow list, audit log API, LDAP, and GitHub connect.
4. Client Apps
GitHub supports all types of platforms, such as Windows, Linux, and macOS. GitHub allows you to use a powerful text interface along with using a UI interface. Nevertheless, you can simplify development workflow through GUI without using CLI. It enables you to visualize, commit, and make code changes quickly.
5. Project Management
With the project management tools of GitHub, you can easily organize as well as prioritize your tasks on GitHub. You can mention the priority or category by applying labels to issues and pull requests. Be it a small-scale or big-scale project, GitHub project management helps to coordinate effectively with the support of tools such as project tables, task lists, and boards.
Tracking the progress of group issues and pull requests is simplified in GitHub and easily mapped with the overall project goals. GitHub offers a profile contribution graph through which you can view all your contribution towards GitHub enterprises and others. Sure! Insights like trends generated through the repository activity data are used to make data-driven decisions and quality improvements.
6. Team Administration
GitHub allows you to manage access to repositories and deal with permissions. In other words, you can update permissions, do reviews, add new users, and control the permissions effectively. You can also group users and organize access control both group-wise and individually.
[ Check out Git Tips and Tricks ]
What are the Components of the CI/CD Tool Kit?
Here’s what you can do with the components of the CI/CD tool kit.
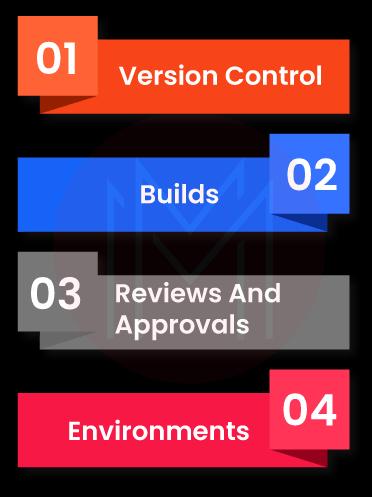
1. Version Control
GitHub Version Control System (VCS) is the tool that keeps tracking all the versions of a software project. Also, VCS keeps tracking the history of changes that developers frequently made on those projects. In one place, you can find all the decisions, progressions, etc., made related to the projects. Therefore, developers can collaborate with the team members irrespective of location and time.
2. Builds
GitHub comes with effective tools for packaging files and running tests. These tools ensure performance, quality, and other code development and enhancement metrics. Once the codes are built, they will be pushed for further testing and staging.
3. Reviews and Approvals
Whenever developers enable pull requests to review their codes, CI/CD workflows get triggered and allow team members to review their codes. Know that it is one of the best practices followed on GitHub. This practice supports developers in boosting the quality of their codes, facilitates collaboration, and allows them to bring out the best outputs. Moreover, team members will approve pull requests after the changes are incorporated into the codes or if they have nothing to suggest. Note that codes can be merged with main codes only after the team members approve the pull requests.
4. Environments
GitHub allows you to configure the environment for CI/CD tests and deployment. Providing the protection rules and secrets, GitHub supports you in configuring an environment meeting the compliance and security requirements.
What are GitHub Actions?
It is a CI/CD platform that automates building and testing codes and deployment pipelines. Here, action refers to the reusable extension used to simplify workflows. With GitHub Actions, you will create workflows that will help to test all the pull requests enabled by developers. Know that GitHub actions allow running workflows automatically though some events are still running on the GitHub repositories. Here, the event refers to creating an issue in the repository, opening a pull request, etc. With the automated workflows, you can deploy merged pull requests to production.
What are the Key Components of GitHub Actions?
You will need to know the different components of GitHub Actions. Here are the functions of the components in detail.
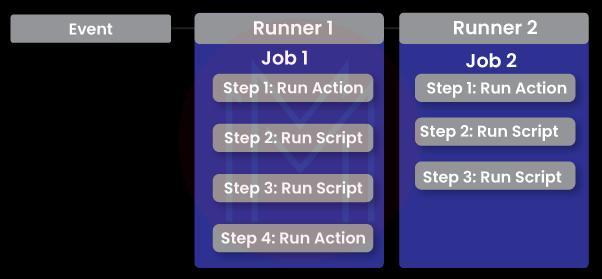
- Workflows: Know that every GitHub repository will have workflows that perform different tasks. And every workflow will have one or more jobs. You can trigger a workflow in different ways – manual, defined schedules, posting to a REST API, or triggered by an event.
- Events: Events are activities that trigger a workflow to run. Following are a few examples of events – pushing a commit to a repository, opening a pull request, creating a new issue, and so on.
- Jobs: Jobs are part of a workflow and run parallelly inside a ‘machine runner’ or container. In general, jobs will have one or more steps of scripts or actions. They need to be executed by the machine runner. Usually, there won’t be any dependencies between jobs. However, some jobs may have dependencies on other jobs. In that case, the dependent job is executed at first.
- Actions: An action is essentially a complex and repeated activity. With actions, you can reduce the repetitive tasks in workflows. Following are a few examples of actions – pulling a repository from GitHub, setting up authentication, setting up a correct toolchain, and many more. You can write your own actions or find actions from a GitHub marketplace with GitHub.
- Runners: Runner is yet another component of GitHub Actions. It is basically a server that runs workflows once they get triggered. And each runner can execute only one job at a time. What’s more! GitHub workflows can be run on Linux, Windows, and macOS platforms.
What is CI with GitHub Actions?
Continuous Integration with GitHub actions creates workflows that test codes in the GitHub repositories. As said earlier, CI workflow is triggered when there are events such as pushing new codes into the GitHub repository. CI workflow runs the pushed codes and checks the errors. Once the codes pass the CI tests of the workflow, they will become ready to be merged with the main codes. Suppose errors are found while running the tests, they have to be rectified before the merging process.
In fact, GitHub offers workflows based on coding languages. Suppose you use the node.js language, GitHub will suggest to you the ‘starter workflows’ and install the corresponding packages and run the tests.
How to Get Started with GitHub?
This tutorial will teach you to create a repository, start a branch, make file changes, and open and merge a pull request in detail. Let’s jump into the steps right away!
Prerequisites: You need to have a GitHub account along with stable internet access.
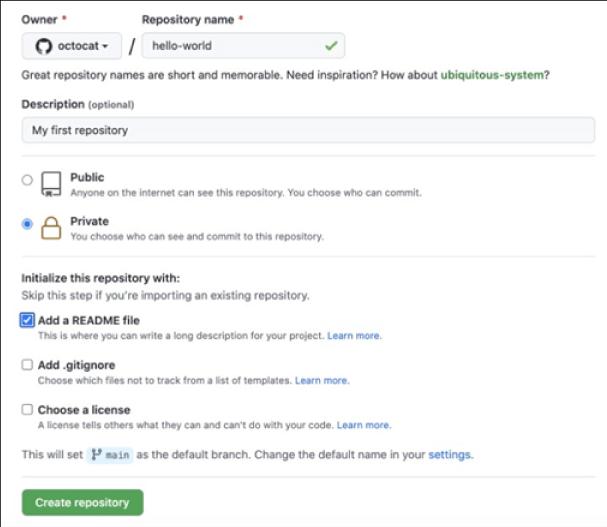
Step 1: Create a Repository:
Know that a repository is a place where you can organize a project. Repositories may contain folders, files, videos, spreadsheets, datasheets, images, etc. Usually, repositories will have a README file where you can find the information about the project. GitHub allows you to create a repository and add a README file simultaneously.
Let’s see how to create a repository below.
- Select ‘New repository’ using the drop-down menu in the upper-right corner of the pages in GitHub.
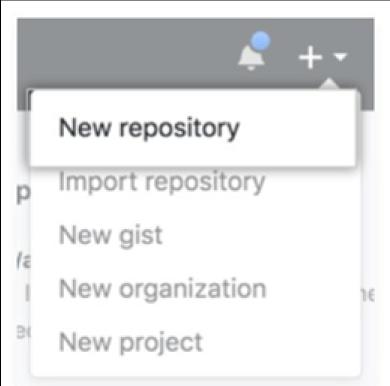
- Enter your repository name in the ‘repository name’ box.
- You can enter a short repository description in the 'Description’ box.
- Choose whether you need a private or public repository
- Now, check the box opposite to ‘add a README file’
- Then, click the ‘Create repository’ button.
Step 2: Create a Branch
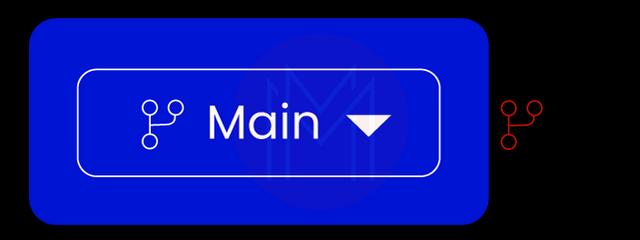
You can have different versions of a project in the repository with branches. Creating a branch allows you not to change the main source code. And you can make experiments or edits using branches. After that, you can commit and open a pull request to get suggestions from team members. Once the changes are incorporated into the branch, you can merge them with the main code.
The below diagram will help you to know the branches. Here, the new branch is named ‘feature’.
Let’s look at the steps below to create a branch:
- Click the ‘code’ button of the new repository
- Open the drop-down menu in the ‘main’ that can be found at the top of the file list
- Enter a branch name like ‘readme-edits’ in the text box
- Now, click the button – ‘Create branch’.
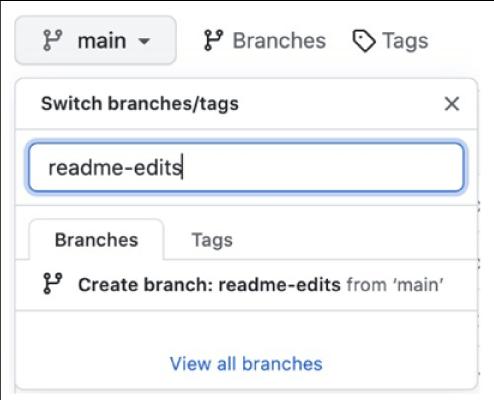
By now, you will have two files – one is ‘main’, and the other is ‘readme-edits’.
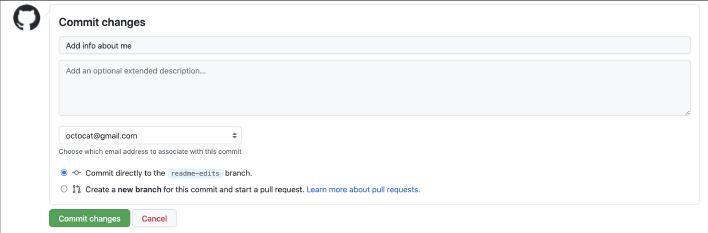
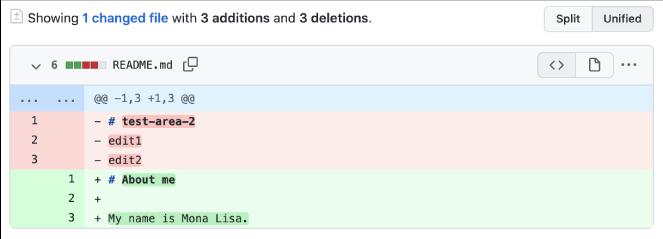
Step 3: Make and Commit Changes
You can save the changes made in the branches, which is known as commit. Every commit is made with a message that will brief the reasons for your changes. This commit message will be helpful for team members to know the reasons behind the commits.
Let’s see how to make commits in repositories as shown below:
- First, click the README.md file under the branch you created.
- Now, you can edit the file by using the editing option
- Next, enter your details in the editor
- Enter your commit message in the ‘commit changes’ box
- Finally, click the ‘commit changes’ button.
Step 4: Open a Pull Request
Pull request is the primary element in GitHub for achieving collaboration. By opening a pull request, you invite the team members to pour in their suggestions for your changes in the branch. Then, you can include their contributions in the branch and merge them with the main code. One of the main advantages of using a pull request is that it considerably saves developers time.
Let’s learn how to open a pull request below:
- In your new GitHub repository, click the ‘pull requests’ tab
- And then, click the ‘new pull request’
- Choose the branch you edited in the ‘Examples Comparisons’ box. It will help you to compare the branch with the 'main' codes.
- On the compare page, you can verify the list of changes you want to add to the pull request.
- You can add a title to the pull request and a brief note about the changes.
- Optionally, you can add assignees, labels, projects, or milestones.
- Finally, click the ‘Create pull request’ button.
Step 5: Merge a Pull Request
This is the last step in which you can merge the branch code with the main code. Once the merging is done, the branch code will be incorporated with the main code. If any conflict occurs while merging, notifications will be enabled by GitHub. Note that merging won’t be successful until all the conflicts are resolved.
Once you have resolved the conflicts, you can follow the below steps to complete merging.
- Click the ‘Merge pull request' button to merge the branch with the main code.

- Then, click the ‘Confirm merge’ button. After that, you will get a message showing that your merging was successful and the pull request was closed.
- Finally, click the ‘Delete branch’ button. This is because the branch is already merged with the ‘main’ codes. So, the branch is no more required. To make further edits to the ‘main’ codes, you must create a new branch and repeat the steps.
| Learn GitHub Interview Questions and Answers that help you grab high-paying jobs |
How to create a Workflow with GitHub Actions
This tutorial will help you to walk through creating a workflow with GitHub Actions.
Know that YAML syntax is used in GitHub actions to define workflows. Generally, workflows are stored in a directory named .github/workflows. You can create an example workflow to check the pushed codes and install the ‘bats’ testing framework. And then, the workflow runs the command to output the bats version.
Okay! Let’s dive into the steps below:
Step 1: Creating a Repository on GitHub
In the GitHub repository, you can create a .github/workflows/ directory where you can store your workflow files.
Step 2: Building a Workflow
In the above directory, you can create a new file named ‘learn-github actions.yml’ and then add the following code.
name: learn-github-actions
on: [push]
jobs:
  check-bats-version:
    runs-on: ubuntu-latest
    steps:
      - uses: actions/checkout@v3
      - uses: actions/setup-node@v3
        with:
          node-version: '14'
      - run: npm install -g bats
      - run: bats -v
Step 3: Committing Changes and Pushing
Finally, you can commit the changes and push them into the repository. Therefore, a new workflow file is created and installed in the repository. Whenever you make a change in the repository due to pushed codes, the workflow will be triggered automatically.
[ Related Article: Centralized Workflow in Git ]
Benefits of GitHub CI/CD
GitHub CI/CD platform offers many benefits to developers. Here are the listicles:
- Automation: Although CI/CD workflows can be processed manually, the efficiency of the code development process is only increased when they are processed automatically. As a result, the code-building time is reduced, and testing and debugging time is also reduced significantly.
- Transparency: GitHub CI/CD offers many ways to know the causes of code errors when the code build fails in testing. Here, the ways can be visual workflow builders, logs, and integrated tooling. This is how troubleshooting is simplified in GitHub CI/CD. Besides, GitHub CI/CD helps you understand the complex workflows as well as the statutes shared with teams.
- Speed: Without a doubt, GitHub CI/CD increases the speed of code development and deployment significantly. Here, the speed is measured with ‘lead time for changes and deployment frequency.
- Resilience: Using various methods such as test coverage, feature flags, and observability tooling. GitHub CI/CD reduces errors in codes considerably. As a result, stability will be enhanced, and it is usually measured by tracking ‘meantime to resolution’ and ‘change failure rate’.
- Security: GitHub CI/CD ensures the security of codes in the repositories. That is done by running many checks for codes and permissions. GitHub also tracks auditing failures, security breaches, and non-compliance events. Working with these data helps developers improve the security of GitHub repositories.
[ Also check GitLab Tutorial ]
Conclusion
In a nutshell, GitHub CI/CD allows developers to make frequent changes to the codes in the repositories. Whenever code changes are committed, GitHub automatically tests to identify errors before merging the changes in the main code. It remarkably saves developers' testing and debugging time and allows them to focus on code building. Especially collaboration is simplified in the GitHub CI/CD. In this tutorial, you should have learned about GitHub CI/CD nuances, its features, GitHub actions, etc. Also, you must have learned how to get started with GitHub and create workflows with GitHub Actions.
 On-Job Support Service
Online Work Support for your on-job roles.

Our work-support plans provide precise options as per your project tasks. Whether you are a newbie or an experienced professional seeking assistance in completing project tasks, we are here with the following plans to meet your custom needs:
- Pay Per Hour
- Pay Per Week
- Monthly
| Name | Dates | |
|---|---|---|
| GitHub Training | Jul 28 to Aug 12 | View Details |
| GitHub Training | Aug 01 to Aug 16 | View Details |
| GitHub Training | Aug 04 to Aug 19 | View Details |
| GitHub Training | Aug 08 to Aug 23 | View Details |

Viswanath is a passionate content writer of Mindmajix. He has expertise in Trending Domains like Data Science, Artificial Intelligence, Machine Learning, Blockchain, etc. His articles help the learners to get insights about the Domain. You can reach him on Linkedin


