- Home
- Blog
- Kubernetes
- Install Kubernetes on Windows

- Kubernetes Architecture
- Kubernetes Deployment Vs Kubernetes Services
- Kubernetes Ingress
- Kubernetes Interview Questions
- Kubernetes Load Balancer Services
- Kubernetes Tutorial
- Kubernetes Vs Docker swarm
- Kubernetes Vs Openshift
- Kubernetes Overview
- Detailed Study On Kubernetes Dashboard
- What is Kubernetes?
- Cloud Deployment Models
- Fluentd Kubernetes
- Kubernetes Tools
- Kubernetes Projects and Use Cases
- How To Install Kubernetes on Ubuntu?
- Installing Kubeadm
- Kubernetes Secrets
- Kubernetes Storage Class
- Kubernetes Deployment YAML
- Kubernetes VS Openstack
- Kubectl Connect to Cluster
- Kubernetes Vs Terraform
- ECS Vs Kubernetes
- Kubernetes Pod Vs Node
Kubernetes, often called ‘K8s’, automates the scaling, deployment, and management of containerized applications. With Kubernetes, you can automate container management, increase the efficiency of DevOps operations, etc. You can deploy workloads in multi-clouds and monitor service health tightly.
In this article, we’ll walk you through installing Kubernetes with Docker Desktop on a ‘Windows machine. This quick guide will help you install Kubernetes on your Windows machine in a neat way.
Table of Contents
What is Kubernetes?
Kubernetes is essentially a robust platform that you can use to manage containerized workloads. It automates application deployment and scaling operations. It makes resource management much more straightforward.
Assume you have an online store. You’ve different containers for your website, such as a payment system, inventory database, etc. When there is a tremendous amount of traffic, these containers may crash or require more power than they used to. You simply tell Kubernetes the number of containers you want to run for a particular instance. Kubernetes detects if any container fails and automatically starts a new one in place of that. For example, if your online store faces sudden traffic, then Kubernetes creates extra copies of containers to balance the sudden load. Kubernetes allows containers to interact with each other, though they are located on multiple systems. It keeps everything organized and guarantees that your online store functions correctly, regardless of size and variance.
| If you want to Enrich your career with a Kubernetes-certified professional, then visit Mindmajix - A Global online training platform: “Kubernetes Certification Course”. This course will help you to achieve excellence in this domain. |
Key features of Kubernetes
Here are the key features of Kubernetes
- Containerization: Because of Kubernetes, developers can write once and execute anywhere. It encapsulates application code, dependencies, and runtime into portable units so that they can be used anywhere.
- Batch processing: Batch processing, supported by Kubernetes, allows you to run jobs and tasks at predefined intervals or as per the demand. This is important for data processing, backups, and scheduled jobs.
- Automated Deployment and Scaling: Using configuration files, Kubernetes defines applications. Balancing of the container and auto-scaling is based on the matrices defined earlier.
- Secrets Management: Kubernetes provides a secure way to manage sensitive information like passwords, API keys, and certificates using Secrets. This information can be securely added into containers at runtime.
- Resource Management and Optimization: It prevents containers from consuming excessive resources and allows you to allocate and manage compute resources and optimize the whole resource management as per the needs.
Prerequisites
- Make sure you have Windows 10 and above Operating System.
- Your computer’s processor must support hardware virtualization to run virtual machines and containers.
- Make sure that Hyper-V is enabled in your system.
- A user account with administrative access to perform the installation procedure.
Kubernetes step-by-step installation procedure
Let’s jump into the step-by-step guide
Step 1: Enable Hyper-V
Before installing Kubernetes, You should make sure that Hyper-V is installed on your machine. It is essential to create virtual machines. The great thing is that hyper-V allows running multiple operating systems at a time.
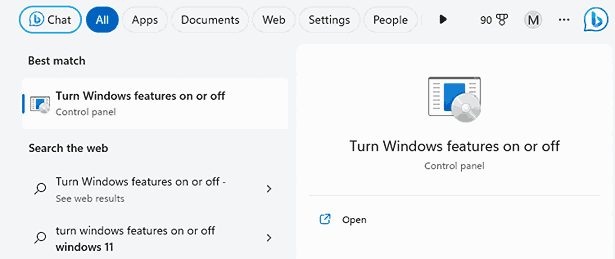
- Hit the ‘Windows Key’ and Search for “Turn Windows features on or off”. Click the first result to open Windows features, as shown below.
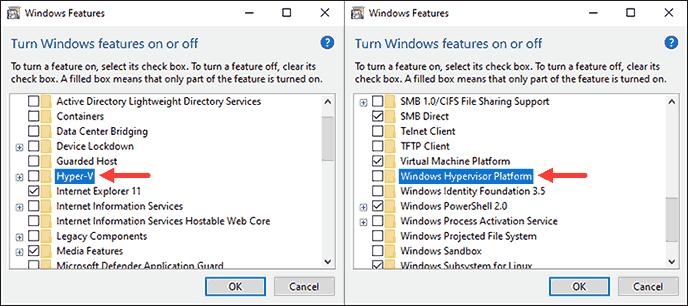
- Check the boxes for Hyper-V and Windows Hypervisor Platform from the given options.
- Wait for the feature installation by clicking OK.
- Now restart your machine
- Then, complete the Hyper-V installation process.
Command - Get-WindowsOptionalFeature -Online -FeatureName Microsoft-Hyper-V
Output - State : Enabled (If Hyper-V is installed correctly)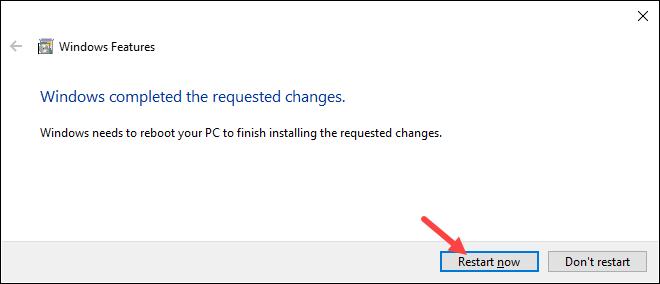
- Once your system restarts, then open the Windows Powershell tool. You can run the below command to examine whether hyper-V is properly installed.

Step 2: Install Docker Desktop
Know that if you install docker desktop, it will simplify the installation of Kubernetes on your machine. Also, it simplifies managing Kubernetes. So you don't need to manage Kubernetes components separately.
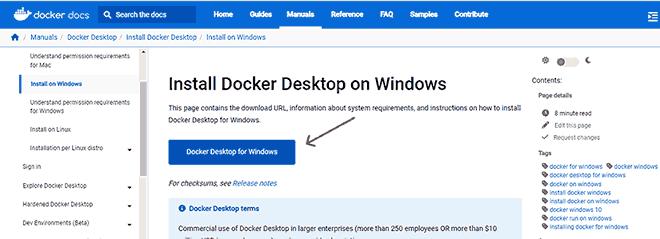
- Open the given link and click on ‘Docker Desktop for Windows’ to start with the installation.
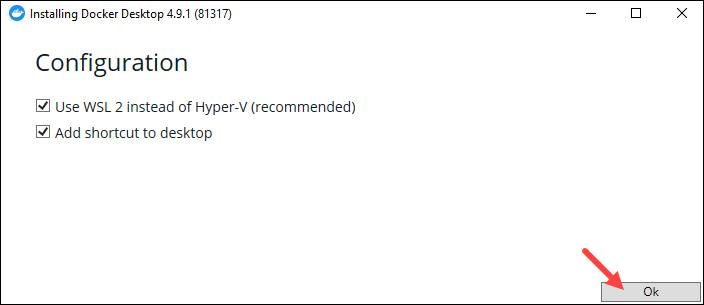
- The Docker installation wizard will ask you to select whether to use Hyper-V or WSL 2 and if you also want to add a Desktop shortcut. Select both the checkboxes if you have WSL 2 installed, and click ‘OK.’
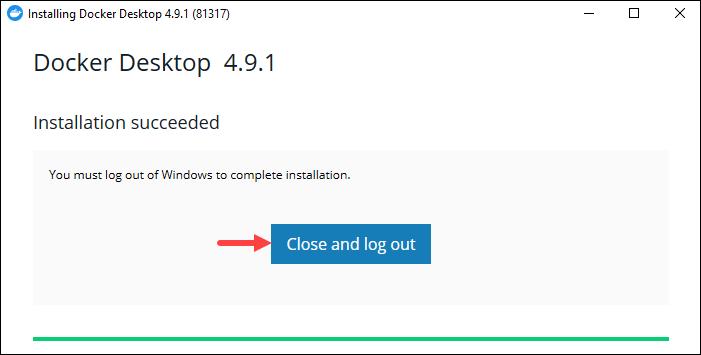
- Click the ‘Close and log out’ button to complete the Docker installation.
Step 3: Kubernetes Installation
We can install Kubernetes in many ways. Based on the specifications of your computer, Install Kubectl before installing Kubernetes. So you can run commands efficiently on Kubernetes clusters.
- Open the kubectl download page.
- Install the kubectl binaries.

- Click “kubectl 1.28.0” to download the latest version and save the file to a directory.
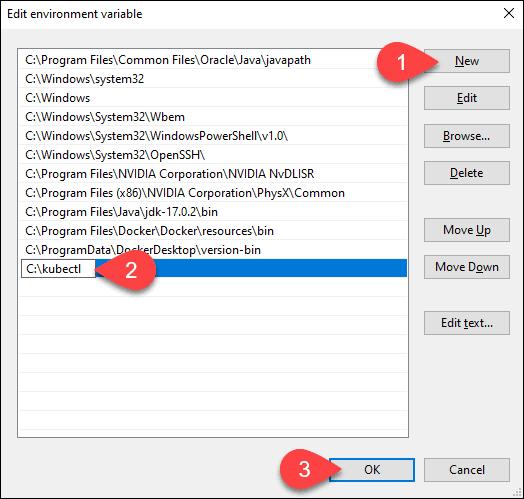
- Now Press ‘Windows Key’ and search for ‘Edit System Environment’ as shown in the figure.
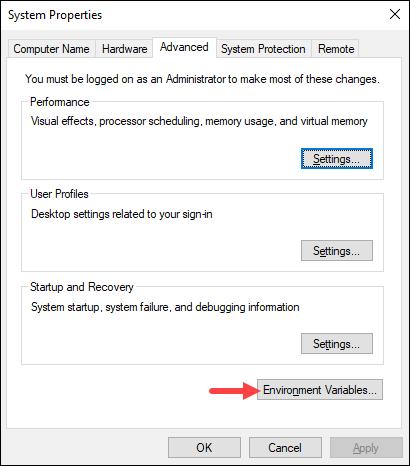
- In order To add the kubectl system variable, click on the ‘Path’ environment variable. Next, you can click on the ‘Edit’ button.
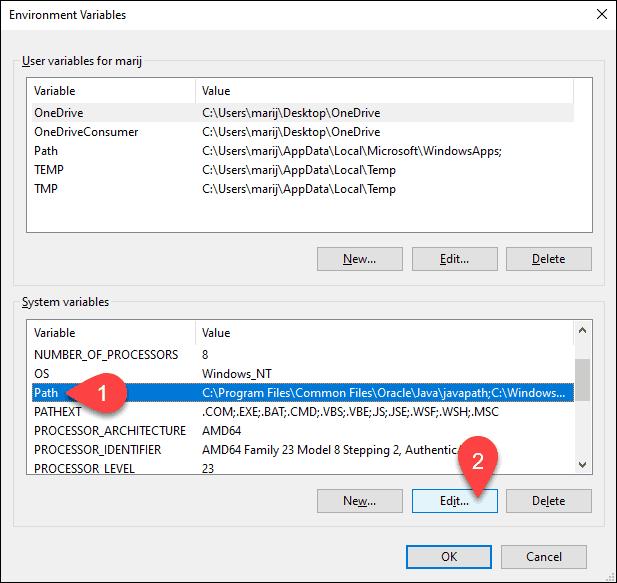
- Click ‘New’ and enter the path to the kubectl binary file. Click ‘OK’ in all windows to confirm the changes.
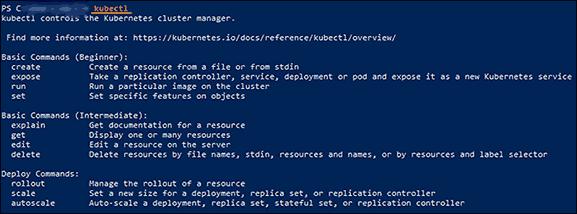
- Run the command ‘kubectl’ in Windows PowerShell to ensure that everything is in order:
Step 4: Enabling Kubernetes
We can enable Kubernetes using docker settings. After that, go through the below steps.
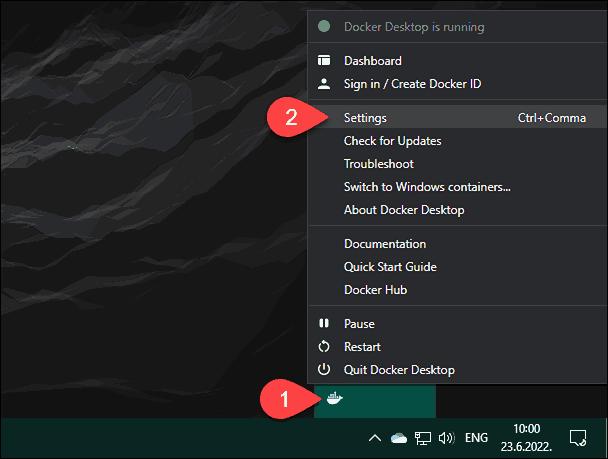
- Find the Docker icon and right-click on it.
- Click the settings from the dropdown menu.
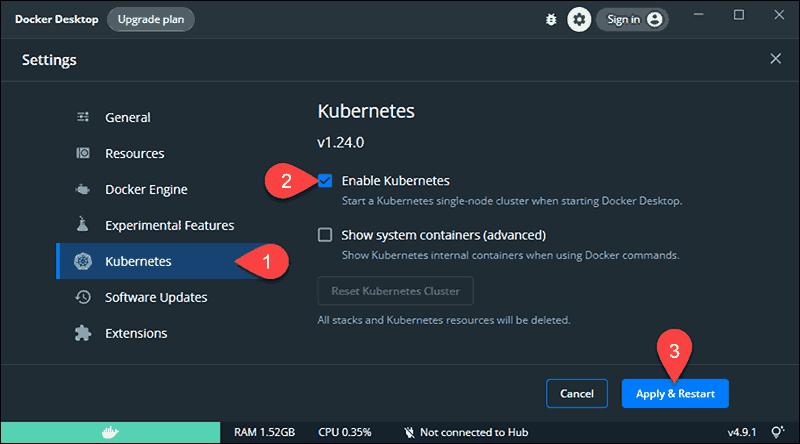
- You should tick the check-box near the ‘enable Kubernetes’ option in the Kubernetes tab,
- Click on the ‘apply & restart’ item.
- To proceed, click ‘Install’ when prompted.
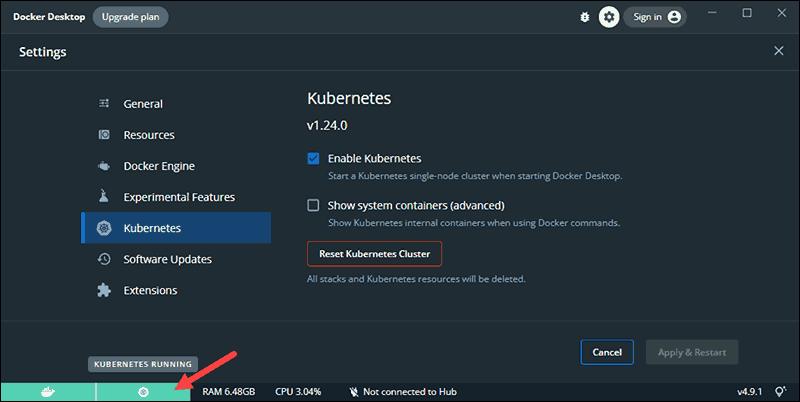
- The tools download the necessary cluster components and build another VM in the background. Both the Docker and Kubernetes icons become green after installation, indicating that they are operational. As shown below
Related Article: Kubernetes Tutorial
Kubernetes FAQ’s
1. How can you choose the type of Kubernetes installation?
You need to consider the below factors to choose the installation type.
- Good Control
- Easy Maintenance
- Robust Resources
- Cluster management system
2. Can you run Kubernetes on Linux machines?
Yes, you can run Kubernetes on Linux machines. You can manage applications installed in Linux machines with Kubernetes.
3. How shall you use the Kubernetes CLI tool?
By using commands, you can run the Kubernetes CLI tool. It helps to manage cluster resources and deploy applications.
4. How to configure kubectl to access Kubernetes clusters?
By using the kubeconfig file, you can access Kubernetes clusters. This file is automatically created while Kubernetes clusters are created. Ensure that kubectl is correctly configured by checking the state of the cluster.
Conclusion
Kubernetes helps to develop, test, and deploy applications. We hope that this quick guide might have helped you install Kubernetes on your machine. If you wish to learn Kubernetes better, you can take the Kubernetes training in mindmajix. You will get certification and stay ahead in the job market.
 On-Job Support Service
Online Work Support for your on-job roles.

Our work-support plans provide precise options as per your project tasks. Whether you are a newbie or an experienced professional seeking assistance in completing project tasks, we are here with the following plans to meet your custom needs:
- Pay Per Hour
- Pay Per Week
- Monthly
| Name | Dates | |
|---|---|---|
| Kubernetes Training | Feb 21 to Mar 08 | View Details |
| Kubernetes Training | Feb 24 to Mar 11 | View Details |
| Kubernetes Training | Feb 28 to Mar 15 | View Details |
| Kubernetes Training | Mar 03 to Mar 18 | View Details |

As a Senior Writer for Mindmajix, Saikumar has a great understanding of today’s data-driven environment, which includes key aspects such as Business Intelligence and data management. He manages the task of creating great content in the areas of Programming, Microsoft Power BI, Tableau, Oracle BI, Cognos, and Alteryx. Connect with him on LinkedIn and Twitter.


