
- Dataflow Programming and Data Types in LabVIEW
- LabVIEW Interview Questions
- LabVIEW Programming
- LabVIEW Tutorial
- Block Diagram in LabVIEW
- LabVIEW Graphs and Charts
- Initializing Arrays In Labview
- Introduction of Repetition And Loops in LabVIEW
- Local and Global Variables in LabVIEW Tutorial
- Overview Of Clusters In Labview
- Shift Registers in LabVIEW
- Labview Structures
- LabVIEW Projects and Use Cases
- How to install LabVIEW on Windows
Array Functions
Array functions are used to create and manipulate arrays. You can perform common ARRAY operations such as extracting individual data elements from an array, INSERTING, DELETING, OR REPLACING data elements in an array, or splitting arrays using array functions.
If you would like to Enrich your career with an Android certified professional, then visit Mindmajix - A Global online training platform: “LabVIEW training” Course.This course will help you to achieve excellence in this domain.
Array functions including Index Array, Replace Array Subset, Insert Into Array, Delete From Array, and Array Subset automatically resize to match the dimensions of the input array you wire. For example, if you wire a ONE-DIMENSIONAL ARRAY to one of these functions, the function shows a single index input. If you wire a TWO-DIMENSIONAL ARRAY to the same function, it shows two index inputs—one for the row index and one for the column index.
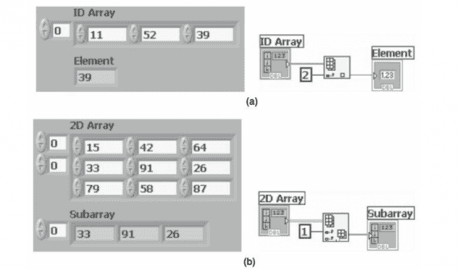
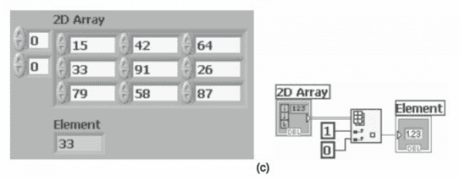
In the above example shown in Figure, the Index Array function is used. In the above Figure (a), input to the Index Array function is a one-dimensional array. By providing the index value in the output, you get the array element corresponding to the index value. When connecting a two-dimensional array as input, the Index Array function automatically resizes to get two index inputs, one for row index and other for column index. In the above Figure (b), input to the Index Array function is a two-dimensional array. The row index is provided. At the output, you get a one-dimensional array which is a row of the two dimensional input array. The row output is based on the index input provided. In the above Figure (c), input to the Index Array function is again a two-dimensional array. Here both row index and column index are given. The output is an element which is based on the row and column indices provided.

You can access more than one element, or subarray (row, column, or page) with these functions by using the Positioning tool to manually resize the function. When you expand one of these functions, the functions expand in increments determined by the dimensions of the array wired to the function. If you wire a one-dimensional array to one of these functions, the function expands by a single index input. If you wire a two-dimensional array to the same function, the function expands by two index inputs—one for the row and one for the column. The index inputs you wire determine the shape of the subarray you want to access or modify. For example, if the input to an Index Array function is a two-dimensional array and you wire only the row input, you extract a complete row (one-dimensional) of the array. If you wire only the column input, you extract a complete column (one-dimensional) of the array. If you wire the row input and the column input, you extract a single element of the array. Each input group is independent and can access any portion of any dimension of the array.
Frequently Asked LabVIEW Interview Questions & Answers
Auto Indexing:
For Loops and While Loops can index and accumulate arrays at their boundaries. This is known as auto-indexing. If you wire an array to a For Loop or While Loop input tunnel, you can read and process every element in that array by enabling auto-indexing. When you auto-index an array output tunnel, the output array receives a new element from every iteration of the loop. The wire from the output tunnel to the array indicator becomes thicker as it changes to an array at the loop border, and the output tunnel contains square brackets representing an array as shown below Figure.

Disable auto-indexing by right-clicking the tunnel and selecting Disable Indexing from the shortcut menu. Disable auto-indexing if you need only the last value passed to the tunnel. Because you can use FOR LOOPS to process arrays by one element at a time, LABVIEW enables auto-indexing by default for every array you wire to a For Loop and for each output tunnel that is created. Auto-indexing for While Loops is disabled by default. To enable auto-indexing, right-click a tunnel and select Enable Indexing from the shortcut menu.
Auto-Indexing To Set The For Loop Count:
If you enable auto-indexing on an array wired to a For Loop input terminal, LabVIEW sets the count terminal to the array size so you do not need to wire the count terminal. In the below Figure (a), the For Loop executes a number of times equal to the number of elements in the array.

Normally, if the count terminal of the For Loop is not wired, the run arrow is broken. However, in this case the run arrow is not broken. If you enable auto-indexing for more than one tunnel (as shown in above Figure (b)) or if you wire the count terminal (as shown in above Figure (c)), the count changes to the smaller of the two. For example, if you wire an array with 10 elements to a For Loop input tunnel and you set the count terminal to 15, the loop executes only 10 times.
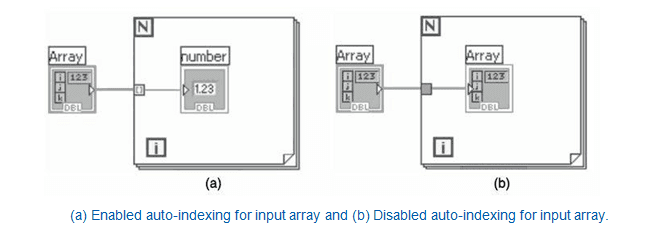
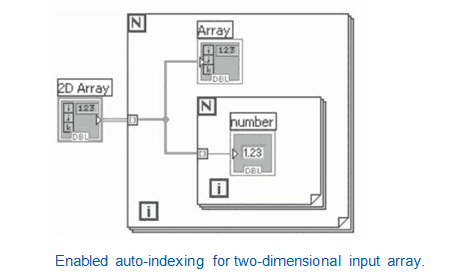
Auto-indexing can be used on input arrays. For calculations to be performed on each element of array, use auto-indexing as shown in below Figure (a). To pass the entire array into a loop, disable auto-indexing as shown in below Figure (b). If auto-indexing is enabled for a two-dimensional array as shown in below Figure, the output from the tunnel will be a one-dimensional array. For example, if you wire a two-dimensional array of three rows, the For Loop executes for three times and the tunnel output will be three one-dimensional arrays with one row per iteration. To get a particular element from the one-dimensional array, another For Loop has to be placed inside the previous loop as shown in below Figure
 On-Job Support Service
Online Work Support for your on-job roles.

Our work-support plans provide precise options as per your project tasks. Whether you are a newbie or an experienced professional seeking assistance in completing project tasks, we are here with the following plans to meet your custom needs:
- Pay Per Hour
- Pay Per Week
- Monthly
| Name | Dates | |
|---|---|---|
| LabVIEW Training | Jul 14 to Jul 29 | View Details |
| LabVIEW Training | Jul 18 to Aug 02 | View Details |
| LabVIEW Training | Jul 21 to Aug 05 | View Details |
| LabVIEW Training | Jul 25 to Aug 09 | View Details |

I am Ruchitha, working as a content writer for MindMajix technologies. My writings focus on the latest technical software, tutorials, and innovations. I am also into research about AI and Neuromarketing. I am a media post-graduate from BCU – Birmingham, UK. Before, my writings focused on business articles on digital marketing and social media. You can connect with me on LinkedIn.


