
- A Deep Dive Into Talend ETL
- Talend Interview Questions
- Talend Tutorial
- Talend vs Informatica - What's The Difference?
- Adding and Reading Talend Headers and Trailers - TALEND
- Checking a Column against a list and lookup in Talend
- Common Mistakes And Other Useful Hints And Tips - Talend
- Creating and Adding a Context Group to Your Job - TALEND
- Pseudo Components and Custom Routines in Talend
- Creating Simple, Complex and Random Test in Talend
- Creating Validation Rules and Binary Error Codes in Talend
- Talend Database Tutorial
- Filtering and Splitting Input Rows in Talend
- How to Manage Metadata using Talend Schema - TALEND
- Joining Data Using tMap, Hierarchical Joins | Talend
- Locating Compilation and Executing Errors - TALEND
- Managing Talend Context Variables
- Talend Data Validation
- Organizing Talend Files
- Printing out Context and Dumping the Output in Talend
- Processing Multiple and Validation Files – Talend
- Reading from and Writing to a Database Table – Talend
- Returning Codes and Passing Parameters to a Child Job - TALEND
- logical Testing the most used pattern in Talend
- Using Java In Talend
- Java debugger and tJavaRow in Talend
- Using tContextLoad and Implicit Context Loading in Talend
- Using the Ternary Operator, Intermediate Variables and Reload – Talend
- Talend – Working with Databases
- Working with Web Services and Queues - TALEND
- Working with XML - Talend
- Various Talend Products and their Features
The tMap component
Function tMap is an advanced component, which integrates itself as a plugin to Talend Studio.
Purpose tMap transforms and routes data from single or multiple sources to single or multiple destinations.
The TMAP COMPONENT has extensive transformation capabilities and has thus become the data integration developer’s tool of choice. The tMap component’s capabilities are the ability to:
- Add and remove columns
- Apply transformation rules to one or more columns
- Filter input and output data
- Join data from multiple sources into one or many outputs
- Split source data into multiple outputs
The tMap component provides much more functionality beyond this, including Joins and Filtering.
If you would like to Enrich your career with a Talend certified professional, then visit Mindmajix - A Global online training platform: “Talend Course”. This course will help you to achieve excellence in this domain.
Flexibility
The tMap component is multipurpose and very flexible and because of this, there is often the temptation to do as much as possible in a single tMap component. This isn’t recommended since this can raise the complexity to a level where the code becomes difficult to understand and to maintain. It is recommended that multiple tMap components be used to manage complex transformations so that the code is more easily understood.
A single line of code
One of the main limitations of tMap is that the output expressions for transformation are limited to just a single line. This can be overcome using code routines that perform complex logic or utilizing tMap variables and the Java ternary operation can be used to perform conditional logic.
Batch versus real-time
The operation of lookups (for joining) can be manipulated in tMap to enable efficient joining in both batch and real-time mode.

Simple mapping and tMap time savers
This recipe will illustrate the most basic mapping options within the tMap component and some of the column level tricks that can be used to speed up the mapping by removing large amounts of repetitive actions.
-------- Related Page: Joining Data Using tMap, Hierarchical Joins --------
Getting started tMap time savers
Open the job jo_cook_ch04_0010_basicMapping.
How to accomplish tMap time savers
- Drag a tMap component from the right-hand panel.
- Connect the tFileInputDelimited component to tMap.
- Connect the output, name it as outputCustomer and accept the schema of the target component.
- Open tMap and you will notice that the inputs and outputs are named the same as the flows.
Rename the flows
- Close tMap and left-click the input flow so that row1 is highlighted. Take a short pause; click again on the row1 text and the text will be editable. Rename the flow to the customer.
- Open tMap and you will see that the names of the tMap input table have now changed to match the row name of the input flow.
Manually dragging columns
- Click the left mouse button on dateOfBirth and drag to dateOfBirth expression in the output. This is the most basic method of copying data from input to output.
Create new columns by dragging
- Press Ctrl and left mouse click the annualTotal and prevYearTotal
- Release Ctrl and left mouse click annualTotal.
- Holding down the left mouse button, drag the columns to the very bottom of the output table.
- Do not release the left mouse button until you see a blue line at the end of the table and an information box that states Insert all selected entries.
.png&w=1920&q=75)
- You will see that the new columns have been added to the output, and their values are automatically mapped from the input.
Reposition a column
You can move a row or column by dragging-and-dropping it to a new location.
- Use the up and down arrows in the Schema tab to move the new columns to the positions below dateOfBirth.
Deleting a column
If you want to remove a column you do not need, you can delete a column.
- Highlight totalTwoYears in the output table and then click the X button to delete it.
Adding a column manually
- In the Schema editor for the output, left mouse click the name field, then click the + button to create a new column.
- Change the name of newColumn to postcode.
Automapping same-named columns
- Click the output table and then click Automap! as shown in the following screenshot:
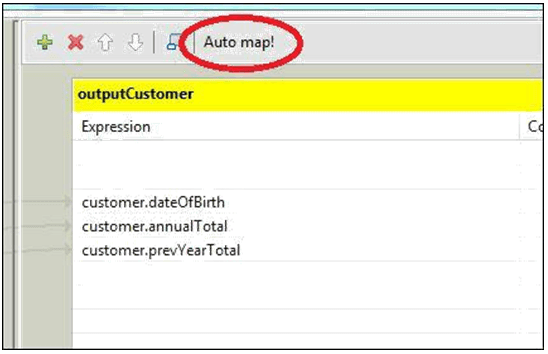
- You should notice that all the columns that share the same input and output name have been mapped automatically.
Concatenating input columns
- Highlight the firstName, middleName, and lastName input columns by holding down Ctrl and left mouse clicking each one individually.
- Drag them across to the output name column, but do not release the left mouse button yet. While hovering over the name column, notice the floating information box. This tells us that the mode is append.
- Release the left mouse button and notice that the three columns have been copied to the same expression.
- Repeat steps 10 to 12, and you will see that the columns have been appended yet again. Append is the default mode when dragging and dropping.
Overwriting columns
- Repeat steps 10 to 12, however, before releasing the left mouse button, hold down Ctrl. You will see that the information box changes to Overwrite mode.
- Release the left mouse button, and you will see that the expression containing six fields has been overwritten by three.
- Add +” “+ between each of the columns to complete the expression.
Copy columns by position
- Highlight the payment1
- Hold the Shift key and click payment4.
- Release the left mouse button, select the payment1 column and drag the group across to the lastFourPayments1 column in the output.
- Drag the four columns to the output, but do not release the mouse button. Notice that the floating box says that this is the append.
- Press Ctrl and you will see that the mode changes to overwrite mode
- Press Shift and the mode changes to each source entry to each target expression.
- This is the mode we want, so release the left mouse button. You will see that the columns have been mapped individually. Note that the copy of multiple columns by position can also be performed with non-sequential columns selected using Ctrl and left mouse click.
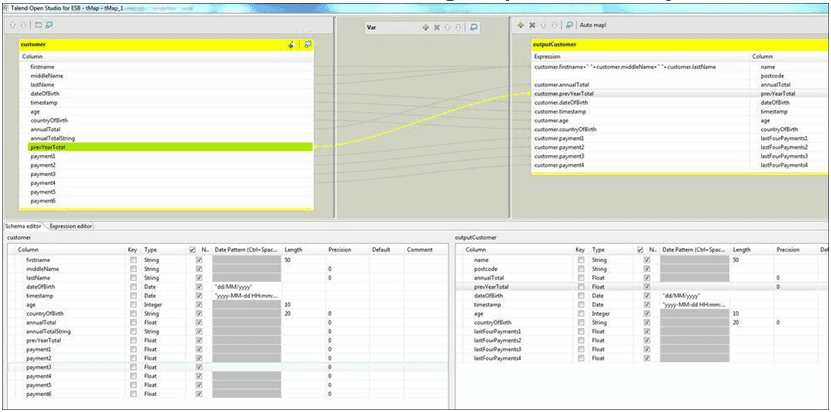
- Your tMap should now look like the following and you can run the job.
How tMap time savers work…
tMap enables columns to be mapped, ignored, and added to the output very easily to ensure that the correct results are produced.
Shortcuts such as Automap! and the group copies, enable many rows to be copied at once, saving time and effort.
New columns can be created by dragging and dropping from the input, as well as via the schema editor.
Tip
Always name the inputs to tMap. Often, tMaps have multiple inputs and outputs. Ensuring that the flow names are consistent help in identifying from where a data element has been sourced, which will make debugging easier.
Frequently Asked TALEND Interview Questions & Answers
Creating tMap Expressions
This recipe will show how to add much more complex rules to tMap and how to use the Talend supplied functions.
Expressions are limited to a single line of Java code, but can contain any of the following:
- Constants
- Input variables
- The globalMap and context variables
- The tMap variables (see next recipe)
- Talend supplied functions
- User-supplied code routines
- Standard Custom Java functions
- Included methods from JAR files
Getting ready
Open the job jo_cook_ch04_0020_usingExpressions
How to achieve tMap expressions
- Open tMap.
- Click the left mouse button on the output transactionDateTime
- You will notice that the expression button looks like the following:

- Click on the … button to open the Expression Builder
Adding a Talend function
- The bottom-left panel lists the Categories of Talend functions. Scroll down to the TalendDate category and click the left mouse button.
- You should now see a list of available functions. Scroll down to the getCurrentDate function, and double-click the left mouse button.
- The function has now been added to the Expression panel, as shown in the following screenshot:
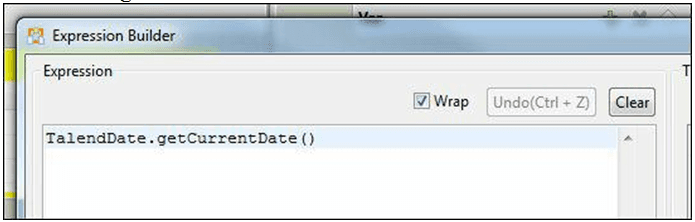
- Exit Expression builder by clicking on OK, and you will now see the function present in the expression column for transactionDateTime.
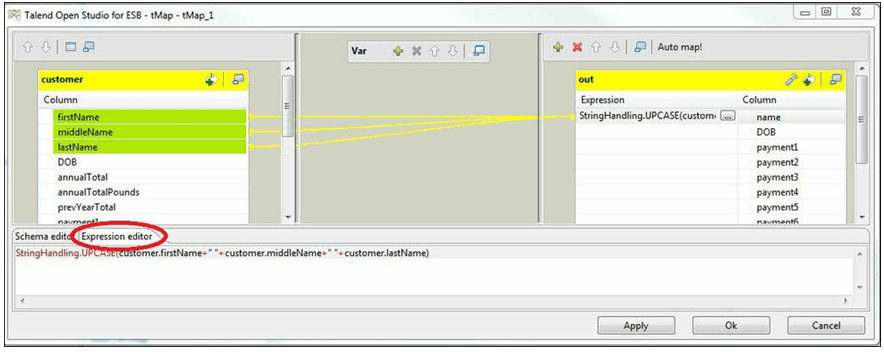
Transforming input columns
- Select the output cleanName column and open Expression builder.
- Select Category of StringHandling and the Function of UPCASE and double-click it to add it to the expression. Delete the text “Hello”.
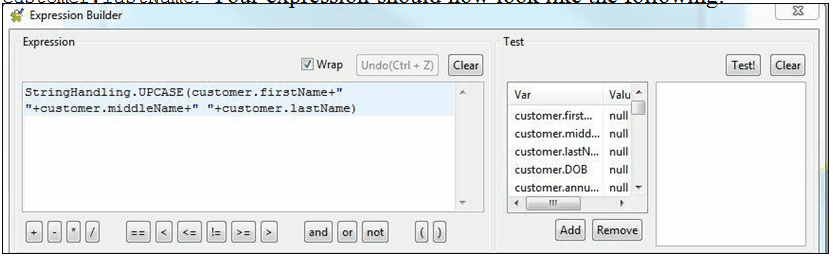
- In the middle-top panel, you will see the input columns available to add to the expression. From this panel, drag first name into the brackets and add +” “+.
- Double-click middleName, add +” “+, then double-click customer.lastName. Your expression should now look like the following:
- Exit Expression builder and run the job.
How tMap expressions work
The expression editor allows drag-and-drop creation of complex transformation rules. It also includes panels for accessing Talend supplied and user-created functions to make building rules much easier.
There’s more…
The expression builder also has test functionality, making it a powerful Talend feature, but it isn’t the only way to create expressions.
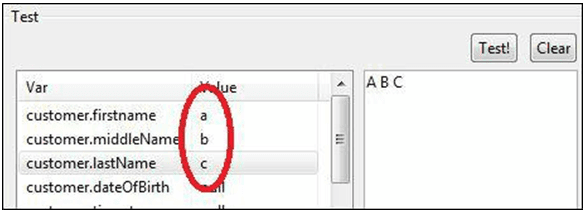
Testing expressions
The expression builder will also allow the Value column and clicking the Test! an expression to be tested by filling in values in button, as shown:
Expression Editor
Although the expression builder is useful, it can also be time-consuming to open and close the editor continuously. More seasoned Talend developers will often not use the expression builder, preferring instead to edit the line directly in the main tMap window expression column or in the expanded expression window, which is an alternative tab of the schema panel, shown in the following screenshot:
Getting around the ‘one line’ limitation
Although tMap expressions are limited to a single line of code, the use of the tMap variables, ternary expressions, and code routines do allow very complex mappings to be handled within a single expression.
 On-Job Support Service
Online Work Support for your on-job roles.

Our work-support plans provide precise options as per your project tasks. Whether you are a newbie or an experienced professional seeking assistance in completing project tasks, we are here with the following plans to meet your custom needs:
- Pay Per Hour
- Pay Per Week
- Monthly
| Name | Dates | |
|---|---|---|
| Talend Training | Jul 28 to Aug 12 | View Details |
| Talend Training | Aug 01 to Aug 16 | View Details |
| Talend Training | Aug 04 to Aug 19 | View Details |
| Talend Training | Aug 08 to Aug 23 | View Details |

Ravindra Savaram is a Technical Lead at Mindmajix.com. His passion lies in writing articles on the most popular IT platforms including Machine learning, DevOps, Data Science, Artificial Intelligence, RPA, Deep Learning, and so on. You can stay up to date on all these technologies by following him on LinkedIn and Twitter.


