
- Guide for Installing JIRA Applications on Windows
- Top 5 JIRA Dashboard Gadgets
- JIRA Interview Questions
- Jira Kanban Boards
- JIRA Tutorial - Complete Guide
- JIRA Version History
- JIRA Vs TFS
- Jira vs Trello: Agile Project Management Tools Comparison
- SDLC Interview Questions and Answers
- Tosca Jira Integration
- JIRA vs Bugzilla
- ALM Octane Tutorial - A Complete Beginners Guide
- JIRA Projects
When the Software Projects grow larger and become more complex, the distribution of Tasks among increasing team members becomes crucial. Therefore, for Managing the Software Project, Developers need an efficient tool that simplifies the Project workflow and Collaboration with the Team members. JIRA is a powerful project management and issue-tracking tool that helps us to overcome these challenges.
It simplifies project workflow by providing an intuitive interface suitable for both beginners and seasoned project managers. JIRA is available in two variations JIRA Software and JIRA Core. The difference between the two is that JIRA Software allows us to create business as well as Agile software projects. But, in JIRA Core, we can create and manage only the business projects
This guide will help you install JIRA Software on your Windows platform so that you can efficiently manage and track your projects.
Table of Contents
- What is JIRA
- Features of JIRA
- System Requirements
- Steps for Installation of JIRA on Windows
- Frequently Asked Questions
What is JIRA?
JIRA is a popular Project Management Tool developed and maintained by Atlassian. It is used to monitor agile issues and bugs. It provides a user-friendly web-based interface for teams to create, prioritize, and monitor tasks and issues. It is compatible with a variety of project management methodologies like Scrum and Kanban. It also has customized processes, role-based permissions, and connections with other development tools.
JIRA also includes reporting and analytics tools to assist teams in streamlining their project management procedures. As a result, it is a flexible Project Management Tool that is popular among Project Managers. But, before we install JIRA on our system, let us look at its important features.
| If you want to enrich your career and become a professional in JIRA, then enroll in "JIRA Training". This course will help you to achieve excellence in this domain. |
Features of JIRA
- With JIRA, you can design and adapt customized workflows to meet the operations of your team.
- JIRA lets you build and configure numerous issue kinds, such as tasks, defects, user stories, and so on, to help you accurately describe the work items in your project.
- It supports Scrum and Kanban boards, which give visual tools to assist in organizing and tracking work in an agile development environment.
- Advanced Search and Query Language (JQL): This enables you to simply filter and locate particular issues based on a variety of parameters.
- It provides precise permission controls to govern who may see, update, and execute certain actions on problems. This guarantees effective data security and access management.
- It also supports several add-ons for connecting with various solutions for effective tracking and management activities.
- It is accessible as a mobile application for both Android and iOS devices. This makes all project management tasks available from any location.

System Requirements for JIRA Installation
- Operating System: you must have a Windows Operating System
- Memory: 2 GB of Heap Memory is required for evaluation purposes.
- Java Runtime Environment (JRE) and Tomcat: The JIRA installer includes JRE and Tomcat. So these do not need to be installed separately. Both these are required because JIRA is a pure Java-based Application. It can be installed on the supported Operating System if the corresponding JDK or JRE requirements are satisfied
- Web Browser: Web Browser is needed to access the web interface of JIRA. It supports various browsers such as Chrome, Mozilla, and Internet Explorer.
Steps for Installation of JIRA on Windows
Step 1: Go to the official website https://www.atlassian.com/software/jira/update. Click on the Get Started button.

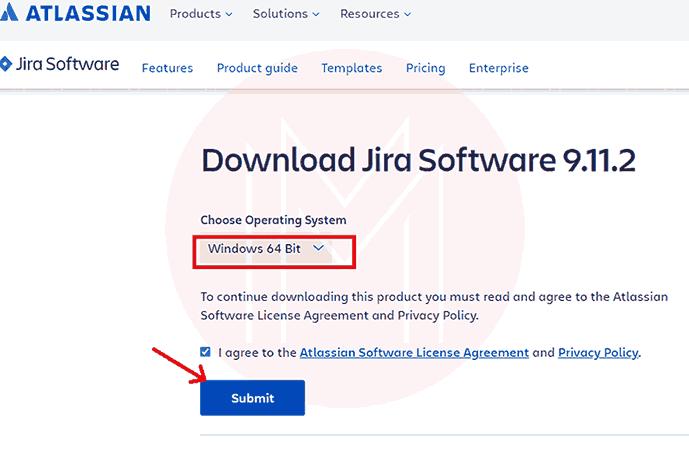
Step 2: Select Windows 64-bit from the dropdown menu. Then, Click on the checkbox to accept the Licence Agreement and Privacy Policy, and then, click on the submit button. The Installer file is downloaded.
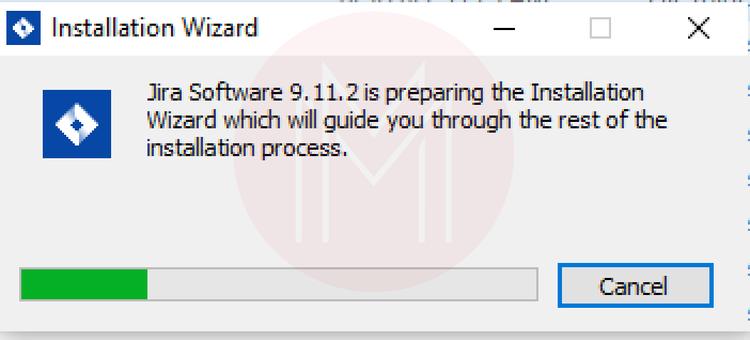
Step 3: Locate the setup file and double-click to start the Installation of JIRA Software. A pop-up appears as outlined below:
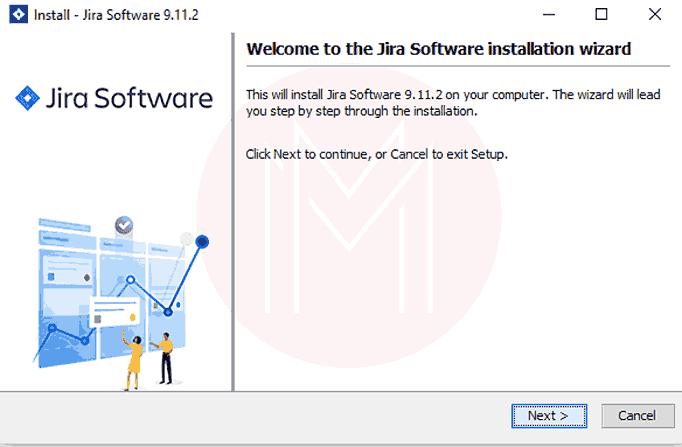
Step 4: After this, the installation wizard pops up as shown below. Click on the ‘Next’ option to continue.
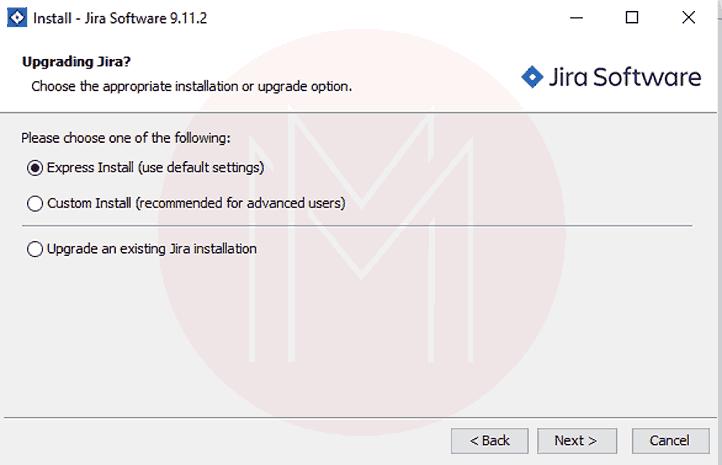
Step 5: Choose the ‘Express Install’ Option and then continue to the ‘Next’ option.
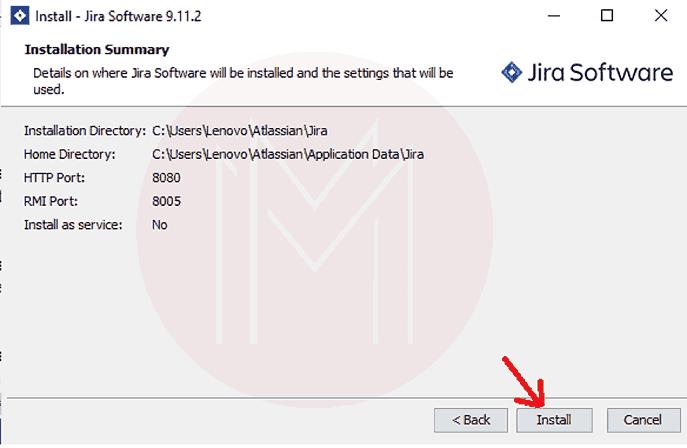
Step 6: The installer chooses the default HTTP and RMI ports. Then, click on the Install button to start the installation.
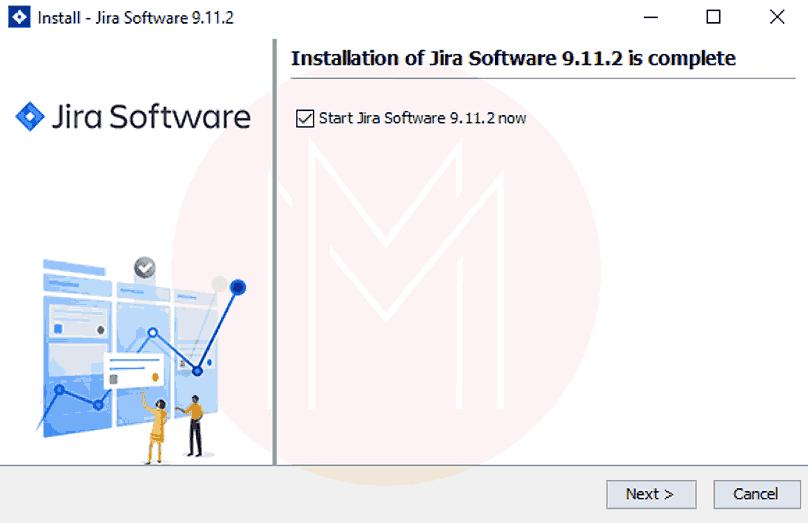
Step 7: After the installation is complete, the setup appears as depicted below. Click on the Next button.
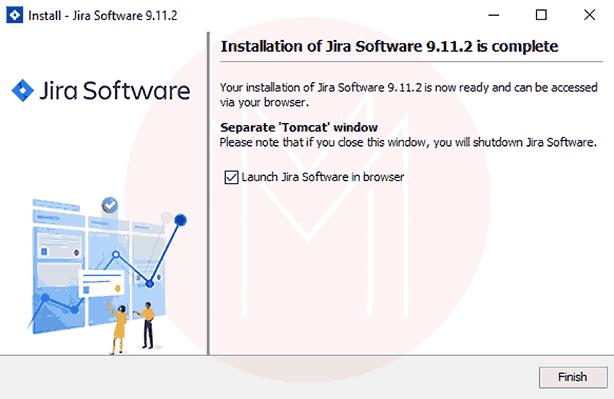
Step 8: Click on the ‘Finish’ button as shown below:
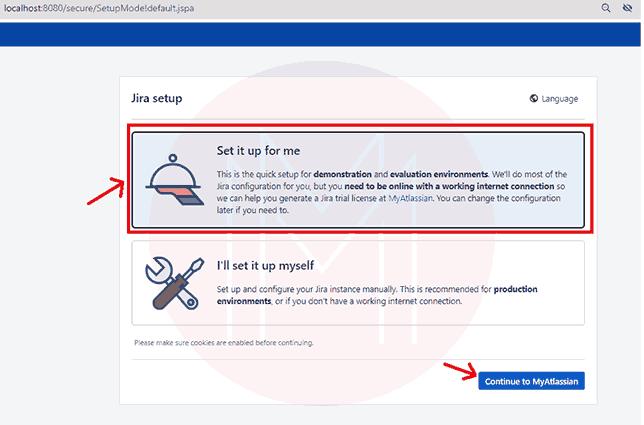
Step 9: The launching of the JIRA as a web application opens up in the browser.
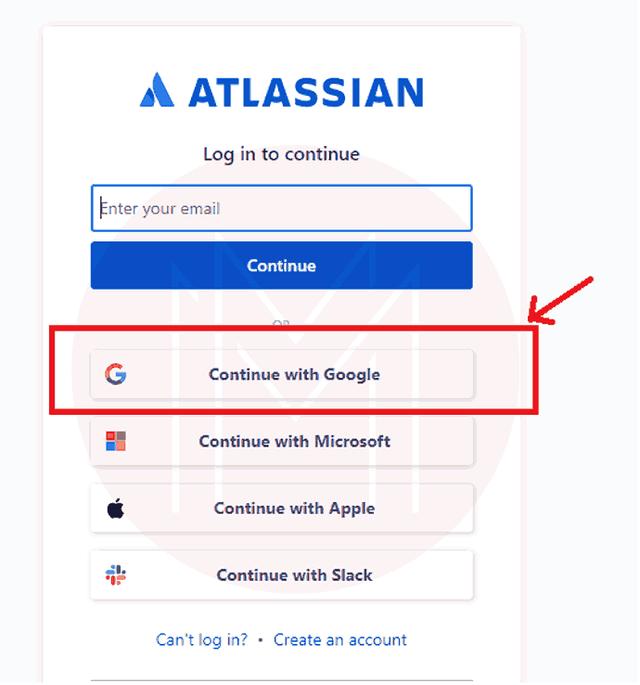
Step 10: Now, you have to create an account on the Atlassian website. You can easily do this by signing up using a Google account as mentioned below:
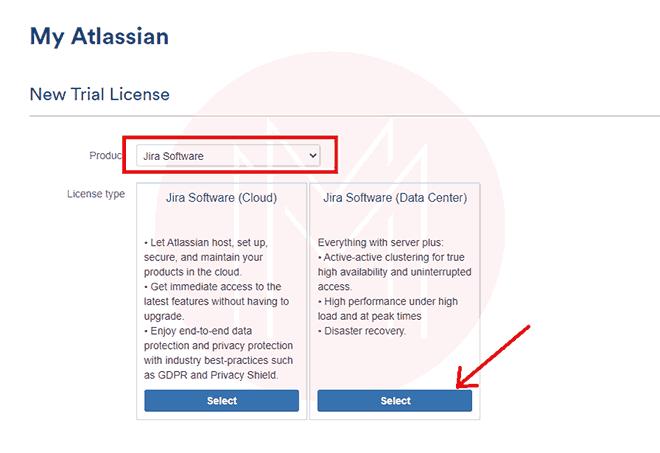
Step 11: Now, you have to create a license. Select the product JIRA Software and then click on the Data Center version as shown below:
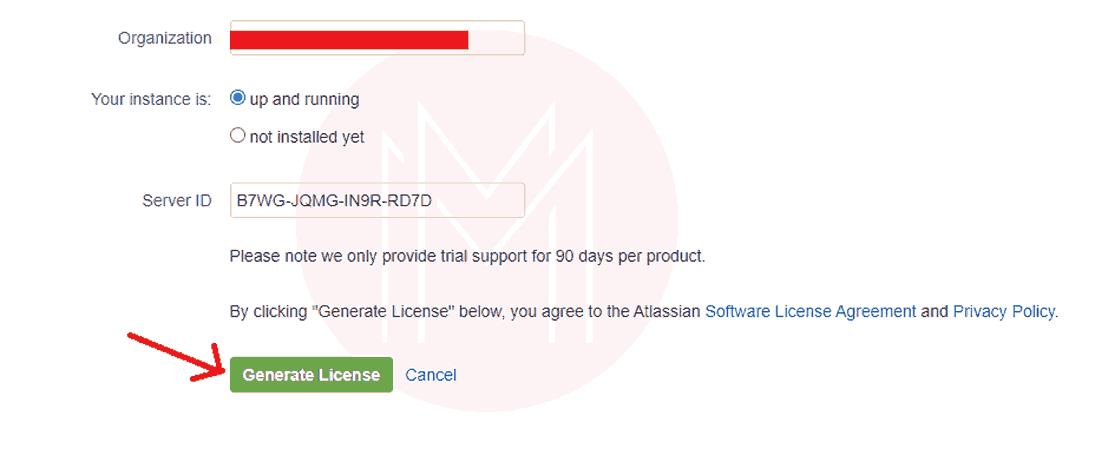
Step 12: After this, enter the email and generate a license as demonstrated below:
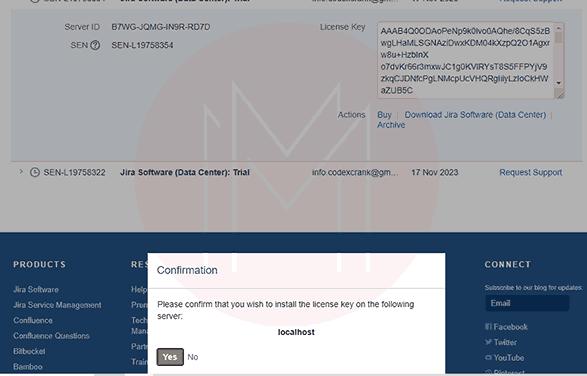
Step 13: A confirmation pop-up appears as shown below. Click on ‘Yes’ to continue.
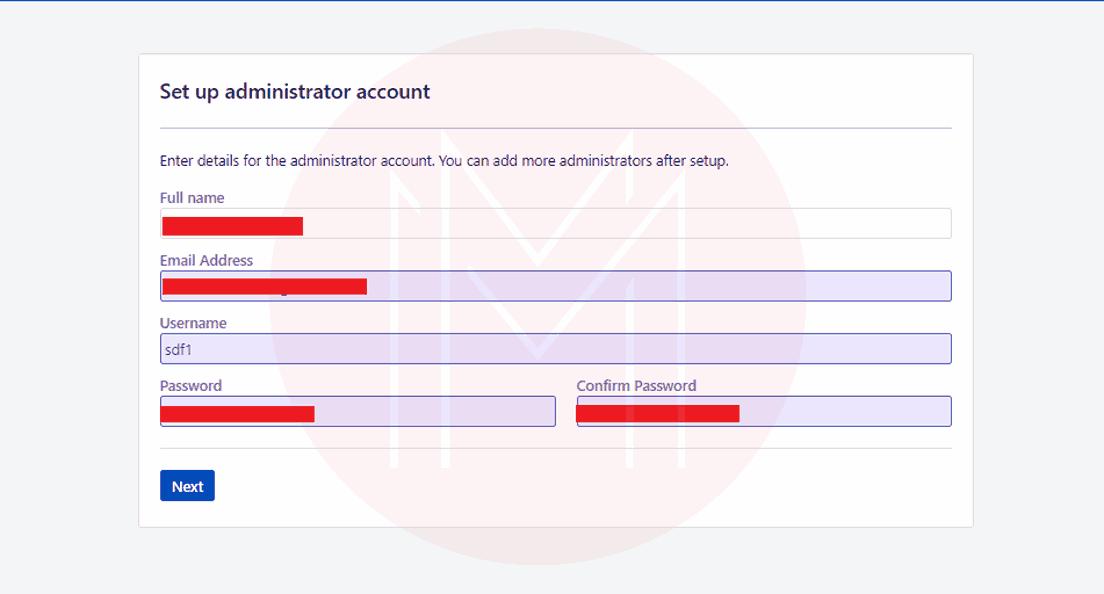
Step 14: Now, you have to set up the administrator account by entering your details like name, email, password, and username as outlined below:
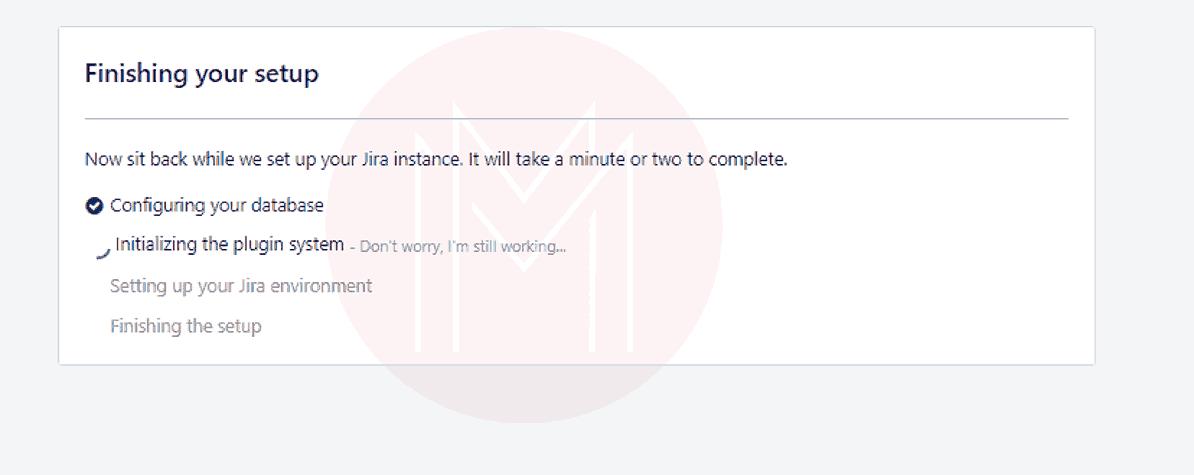
Step 15: After this the JIRA Software Configuration appears as shown below:
Step 16: After the configuration is done, the home screen of the JIRA Web Interface appears as depicted below:

Frequently Asked Questions
1. Are JIRA Core and JIRA Software the same?
No, they are different. JIRA Software offers managing projects with Agile Development Environment. While JIRA Core comes up without the Agile Features
2. Is JIRA available for other Operating Systems?
Yes, JIRA is available for macOS as well as Linux. It is recommended to visit the official documentation of JIRA to know about the supported platforms for JIRA.
3. Can I change the port on which JIRA runs after installation?
Yes, you can change the port on which JIRA runs by editing the server.xml file in the JIRA installation directory.
4. Can I install JIRA in a cloud environment on Windows?
Yes, Atlassian offers a cloud-based version of JIRA known as Jira Cloud. This option doesn't require installation on your local Windows system.
5. Is it possible to integrate JIRA with a Version Control System like Git?
Yes, JIRA can integrate with Git and other version control systems, enhancing software development workflows.
Conclusion
JIRA is a robust platform for efficient issue tracking and project management. With its versatile features and user-friendly interface, JIRA simplifies project workflow and helps teams to streamline their tasks effectively. It also provides custom workflows and a wide range of issue types, which enable teams to adjust according to the project's needs.
Moreover, Its integration capabilities and reporting tools make it a first choice for software development and project management. The installation of JIRA is successfully done on your Windows system. Now, you are ready for issue tracking, project management, and software development with this versatile tool.
 On-Job Support Service
Online Work Support for your on-job roles.

Our work-support plans provide precise options as per your project tasks. Whether you are a newbie or an experienced professional seeking assistance in completing project tasks, we are here with the following plans to meet your custom needs:
- Pay Per Hour
- Pay Per Week
- Monthly
| Name | Dates | |
|---|---|---|
| JIRA Training | Jul 28 to Aug 12 | View Details |
| JIRA Training | Aug 01 to Aug 16 | View Details |
| JIRA Training | Aug 04 to Aug 19 | View Details |
| JIRA Training | Aug 08 to Aug 23 | View Details |

Madhuri is a Senior Content Creator at MindMajix. She has written about a range of different topics on various technologies, which include, Splunk, Tensorflow, Selenium, and CEH. She spends most of her time researching on technology, and startups. Connect with her via LinkedIn and Twitter .


