- Snowflake Interview Questions and Answers
- Snowflake Tutorial
- Snowflake Architecture
- What is Snowflake Data Warehouse
- Star schema and Snowflake schema in QlikView
- Snowflake vs Redshift - Which is the Best Data Warehousing Tool
- Snowflake vs BigQuery
- Snowflake Time Travel - A Detailed Guide
- What is a Snowflake Table & Types of Tables
- Snowflake vs Databricks
- Snowflake vs Azure
- Snowflake Vs Hadoop: What's the Difference?
- How to Insert Data in Snowflake
- Snowflake Connectors
- Snowflake Documentation - A Complete Guide
- How to Update Data in Snowflake?
- How to Delete Data in Snowflake
- How to Add a Default Value to a Column in Snowflake
- How to Add a Column in Snowflake
- How to Add a NOT NULL Constraint in Snowflake
- How to Alter a Sequence in Snowflake
- How to Create a Table in Snowflake
- How to Create a View in Snowflake
- How to create an Index in Snowflake
- How to Drop a Column in Snowflake
- How to Drop a Table in Snowflake
- How to Drop a View in Snowflake?
- How to Drop the Index in Snowflake
- How to Duplicate a Table in Snowflake
- How to Remove a NOT NULL Constraint in Snowflake
- How to Remove a Default Value to a Column in Snowflake
- How to Rename a Table in Snowflake
- How to Rename a Column in Snowflake
- How to write a Common Table Expression(CTE) in Snowflake
- How to Write a Case Statement in Snowflake
- How to Use Coalesce in Snowflake
- How to Query a JSON Object in Snowflake
- How to Truncate a Table in Snowflake
- How to Group by Time in Snowflake
- How to Import a CSV in Snowflake
- How to Query Date and Time in Snowflake
- How to Convert UTC to Local Time Zone in Snowflake
- How to Avoid Gaps in Data in Snowflake
- How to Have Multiple Counts in Snowflake
- How do we Calculate the Running Total or Cumulative Sum in Snowflake
- How to Round Timestamps in Snowflake
- How to Calculate Percentiles in Snowflake
- How to Compare Two Values When One Value is Null in Snowflake
- How to do Type Casting in Snowflake
- How to Get First Row Per Group in Snowflake
- Snowflake Cloning - Zero Copy Clone
- Snowflake Competitors and Comparisons
- Snowflake Integrations
- Snowflake Tables and View Management
- Snowflake Advanced Querying & Analytics
- Snowflake SQL Functions & Conditionals
- Snowflake DML and Constraint Operations
- Snowflake SQL Functions & Querying
- Snowflake DDL Commands, Tables, and Views
- Snowflake DML Commands and Examples
- Snowflake vs Other Data Warehouses
- Snowflake Architecture and Schema Guide with Examples
Snowflake is a cloud-native, modern data warehousing platform that enables organizations to store and analyze large volumes of data more efficiently than traditional systems. In addition to its core capabilities, Snowflake offers robust support for business intelligence, security, systems integration, and more.
The platform offers a wide range of excellent features that help organizations meet their data warehousing and engineering needs. Among these, Time Travel and Cloning stand out by providing data recovery, reliability, and flexibility.
This blog delves into key Snowflake features and highlights how they empower organizations to build scalable, AI-powered data warehousing solutions.
Table of Contents
- Snowflake Warehousing – Overview
- Snowflake Key Features
- Snowflake AI Features
- Snowflake Time Travel
- Snowflake Cloning
- Snowflake Connectors
- Snowflake Integrations
- Tables in Snowflake
- How to Import a CSV in Snowflake
- Key Benefits of Snowflake
- Conclusion
Snowflake Warehousing Overview
Snowflake is a cloud data platform with AI capabilities that prioritizes simplicity over functionality. It can automatically scale up and down based on varying workloads.
For instance, if you require heavy data loads for complex transformations but only have a few significant queries, you can create a large Snowflake warehouse. It helps load data in real-time and scale it back down once loading is complete.
Let’s navigate through some more essential aspects of Snowflake data warehouse.
- Snowflake offers greater flexibility and efficiency than traditional data warehouses.
- You can perform seamless data engineering operations with Snowflake.
- It can securely share data with external applications in real-time.
- You can pay for storage and computing separately, thanks to Snowflake's cloud-native architecture.
| Want to enhance your skills to become a master in Snowflake Certification, Enroll in our Snowflake Training Certification Course |
Snowflake Key Features - Introduction
Snowflake offers a range of features to its users to ensure efficient data warehousing and enable real-time, high-performance data analytics.
The following are the key features of Snowflake, though it offers many. They are listed as:
- Snowflake AI Features
- Snowflake Time Travel
- Snowflake Zero-copy Cloning
These features play a pivotal role in ensuring the security, data protection, and governance of organizations' valuable and sensitive data.
Let’s explore them in detail!
1. Snowflake AI Features
Snowflake provides powerful, intelligent data warehousing solutions to its customers with AI and ML capabilities. It enables Snowflake to excel in data engineering operations.
Let’s explore the AI features of Snowflake.
Snowflake Cortex
It is a suite of tools that uses LLMs to analyze unstructured data, answer questions, and assist customers. Below are some of Cortex’s tools.
- Cortex Agents
- Cortex Analyst
- Cortex Search
- Cortex Code CLI.
Snowflake ML
This AI tool helps users simplify the use of ML models to detect patterns in their structured data. So you can easily understand, predict, and classify data.
The key aspect of this Snowflake ML is that it allows you to develop custom ML models while keeping data inside Snowflake. It also comes with key ML OPs capabilities, including a feature store, a model registry, framework connectors, and immutable data snapshots.
Overall, Snowflake AI features ensure complete data security, privacy, and significant control.

2. Snowflake Time Travel
Time Travel is a feature in Snowflake that allows you to access data from any point in the past. In this context, Time Travel refers to the ability to view or restore previous versions of your data, such as tables or databases, at any time within a set retention period.
Let’s see how Snowflake Time Travel works in this section.
You may sometimes want to run a single piece of code and revert to the snapshot before the last test SQL execution. That's the scenario where Snowflake Time Travel comes in.
Example 1
If you accidentally delete an employee table, you can use the Time Travel feature to revert to a previous version and retrieve the data.
With Snowflake’s Time Travel feature, you can:
- Restore data-related objects, such as tables, schemas, and databases that may have been accidentally removed.
- Duplicate and back up data from previous periods
- Analyze data management and usage over a specified period.
Example 2
Let’s look at this real-time scenario. You're working on a bug patch and are connected to the production database. That’s where you execute an update statement on a table with a large volume of records.
You also conducted additional delete and update operations on the same table. You later realize that when using update and delete statements in your SQL query, you forgot to use the necessary ‘WHERE’ clause.
You may need to retrieve the most recent database backup. Alternatively, you can truncate the table and load new data from the source.
As you're working in a production environment, you don’t have sufficient time to back up your data and load new data. When restoring a backup copy, data may be lost between the last backup and the current data.
If you want to load new data, it will take hours to days, depending on the amount of data you have.
As a solution, you can use the Snowflake warehouse to query historical data. You can retrieve data as it was loaded with your initial update or delete statement.
Next, we will walk through some of the Snowflake Time Travel features.
-
Time Travel SQL Extensions
You can use the Time Travel SQL Extensions, such as the AT/BEFORE clause in SELECT queries, and CREATE... CLONE commands in Snowflake Time Travel to retrieve or clone historical data.
SQL extensions use the following arguments to locate specific historical data that you want to access:
- TIMESTAMP
- STATEMENT (Query ID for statement)
- OFFSET (Time difference from the current time in seconds)
-
Snowflake Data Retention Period
When a user changes a table, Snowflake first saves the current data. This past data remains available for a set period, called the Time Travel data retention period.
- All Snowflake accounts have a default retention duration of 1 day.
- The retention times for databases, schemas, and tables in Snowflake vary by edition.
-
Specifying the Data Retention Period for Time Travel
Here are the steps to specify the data retention duration.
- You can use the DATA_RETENTION_TIME_IN_DAYS object parameter, available with the ACCOUNT ADMIN role, to set the data retention time for your account.
- You can use the UNDROP command to restore a dropped schema, table, or database that has not yet been placed in the Snowflake Fail-safe system.
- Users can change the data retention term for a schema, database, or table at any time.
-
Snowflake Fail-safe Mechanism
The Fail-safe mechanism provides a non-configurable seven-day timeframe during which Snowflake can retrieve prior data. This time begins when the Time Travel retention period expires.
- The Fail-safe mechanism is a historical data recovery service to use when all other options have failed.
- This method helps recover data that has been lost or destroyed due to extreme operational failures.
- The Fail-safe method may take several hours to several days to recover data.
In summary, Snowflake's Time Travel feature is an excellent way to recover data that was either deleted or accidentally lost in the past.
3. Snowflake Cloning
Snowflake cloning makes a copy of data from a database, schema, or table without additional storage. Many organizations use it to replicate production data for development or staging environments.
The image shows the cloning process in detail.
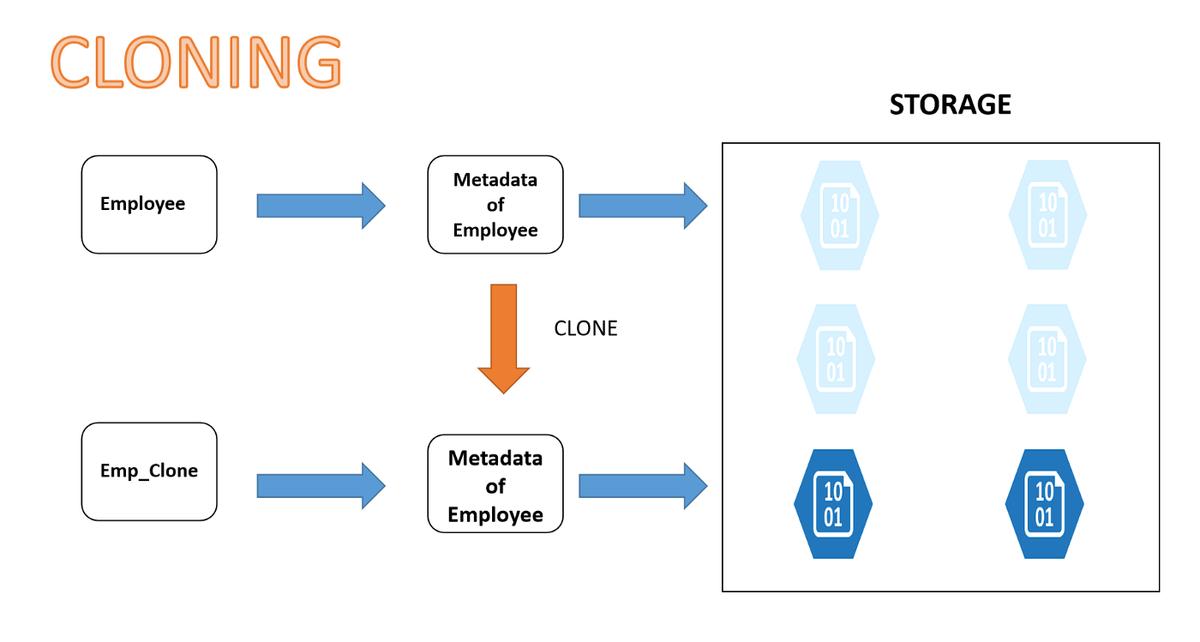
You can use the CLONE command to create duplicates of a database or table without manually copying all associated primary keys, metadata, or schema.
You can replicate the entire database with a single operation, including its metadata and structure.
Let’s understand the benefits of Snowflake Zero Copy Cloning.
- Snowflake Cloning generally replicates data faster. It takes only a few minutes, depending on the source objects.
- When you clone a database, all its schemas and tables are also cloned.
- The changes that you make to the cloned object do not affect its source.
- When you clone a schema, all its tables are copied.
| The Top Snowflake Interview Questions and Answers article can help you understand key concepts and prepare for interviews. |
Example 1
You must run the following script entirely if you copy and paste it into the Snowflake worksheet.
-- Cloning Tables

-- Create a sample table

CREATE OR REPLACE TABLE demo_db.public.employees

 (emp_id number,

 first_name varchar,

 last_name varchar

 );

-- Populate the table with some seed records.

Insert into demo_db.public.employees

values(100,'John','Smith'),

 (200,'Sam','White'),

 (300,'Bob','Jones'),

 (400,'Linda','Carter');

-- Show the content of the table employees in the demo_db database and the public schema

select * from demo_db.public.employees;
Next, we will discuss some of the important aspects of Snowflake cloning.
1. Snowflake Time Travel Cloning
Below is the syntax to use Time Travel to clone a table:
CREATE [ OR REPLACE ] { DATABASE | SCHEMA | TABLE | STREAM } [ IF NOT EXISTS ] <object_name>
CLONE <source_object_name>
[ { AT | BEFORE } ( { TIMESTAMP => <timestamp> | OFFSET => <time_difference> | STATEMENT => <id> } ) ]
This feature allows you to clone a table as it existed at a specific time or a short while ago.
Here are a few examples of how to use Time Travel to duplicate tables in Snowflake.
CREATE TABLE EMPLOYEE_CLONE CLONE EMPLOYEE
AT(OFFSET => -60*5);
CREATE TABLE EMPLOYEE_CLONE CLONE EMPLOYEE
AT(TIMESTAMP => 'SUN, 06 MAR 2022 13:45:00 +0530'::TIMESTAMP_TZ);
Here are the four things you must keep in mind while cloning with time travel in Snowflake.
- If the source object didn’t exist at the time or location indicated in the AT or BEFORE clause, then an error will be returned.
- There will be no errors if an object’s children did not exist at the time/point indicated in the AT or BEFORE clause, and are not cloned.
- An error will be returned if any object that requires cloning lacks historical data.
A clone gets its data from its history, but its metadata comes from the source object in its current state.
2. Snowflake Zero-Copy Cloning
The cloning process can produce a database copy called ‘Zero-Copy Cloning.’
In Zero-Copy Cloning, you can create backups of any data without increasing your storage requirements or incurring extended waits. You can make multiple copies of objects without creating a new physical copy or requiring additional storage space.
Moreover, it enables the copying of all metadata, enhancing storage management.
Example
You can use the command below to clone a database or table.
CREATE TABLE <table_name>
CLONE <source_table_name>- Why Snowflake Zero-Copy Cloning
Here are the reasons why we clone objects in Snowflake.
- Providing support to software development, testing, and data recovery and backup environments
- Performing modifications or development without the need to set up a new environment or risk damaging the source object.
- How does Snowflake's Zero Copy Cloning work?
A Snowflake table's data is automatically partitioned into micro-partitions. All micro-partitions have uncompressed data ranging from 50 MB to 500 MB.
- All Snowflake tables undergo automatic micro-partitioning.
- Snowflake assigns a Unique Identifier (ID) to each table in the database.
- Each copy will have access to both shared and dedicated storage.
- A similar CLONE GROUP ID that reflects cloning status is assigned to each table. The table is a clone if the IDs in both columns are unique.
- The account admin role is required to access the TABLE STORAGE METRICS view.
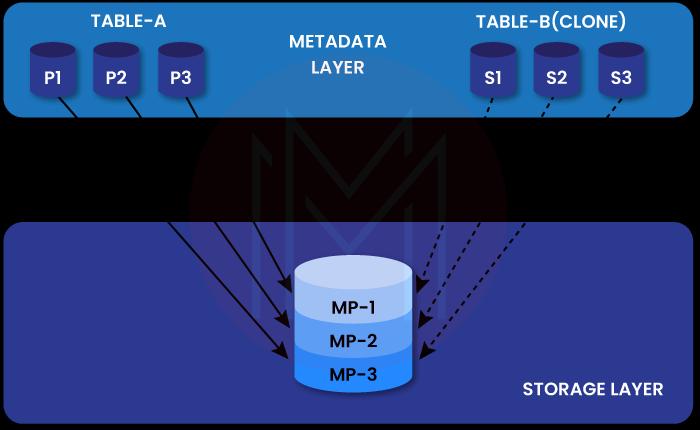
When duplicating micro-partitions, Snowflake creates new metadata that points to the original object's micro-partitions.
- How to clone objects in Snowflake?
You can clone objects in Snowflake with the help of the simple SQL statement shown below.
CREATE <object_type> <object_name>
CLONE <source_object_name>
Example
Below shows the full syntax required to clone a Snowflake object.
CREATE [ OR REPLACE ] { DATABASE | SCHEMA | TABLE | STREAM | STAGE | FILE FORMAT | SEQUENCE | TASK } [ IF NOT EXISTS ] <object_name>
CLONE <source_object_name>- Objects you can clone in Snowflake Zero Copy Clone
Before cloning an object, you must determine which objects you clone and their limitations.
Below are some of the cloneable objects.
- Data Configuration Objects, including File Formats, Stages, and Sequences
- Data Storage Objects, including Schemas, Tables, Streams, and Databases.
- Child Objects in a Clone
Some Snowflake objects have child objects, such as a database with schemas containing tables, which in turn contain table stages.
A pipe is an example of a child that an object could produce. When a pipe is cloned, the operation pauses the pipe by default. It is done to prevent unnecessary data loading, as a clone may not require additional data.
Children of a cloned item will typically be clones themselves. This regulation has the following exceptions:
- External Tables
- Internal Named Stages
In short, Snowflake cloning simplifies copying entire databases for testing, eliminating the need to duplicate storage. Snowflake cloning helps companies save valuable time and costs.
4. Snowflake Connectors
You can integrate real-time data from multiple data sources using Snowflake connectors.
Let’s learn about the three key Snowflake connectors explained with examples. We’ll discuss the Snowflake connectors, such as Python Connector, Spark Connector, and Kafka Connector.
You can use these Snowflake connectors to connect platforms such as Python, Kafka, and Apache Spark with Snowflake. You can load data into Snowflake tables using these Snowflake connectors.
1. Snowflake Connector for Python
This connector serves as the interface between Python applications and Snowflake. It is a native Python package and doesn’t require JDBC and ODBC drivers.
You can use Snowflake Python connectors to perform different operations, including:
- Creating databases, schemas, tables, and warehouses
- Loading data, which includes copying data from internal and external locations
- Binding data, retrieving column metadata, and handling errors
- Querying data, retrieving the query ID, and cancelling a query by query ID.
Pandas DataFrames and Python Connector
At its core, Pandas is a data analysis library. A DataFrame is a data structure that allows you to analyze and manipulate two-dimensional data. API methods facilitate data transfer between Snowflake databases and Pandas DataFrames.
Python Connectors APIs
The Python connector uses the Python database API V2.0 specification, standard APIs, and Snowflake-specific extensions. Also, the Python connector depends on several third-party libraries for communicating with Snowflake databases. Any change to these libraries causes the Python connector to behave unexpectedly.
2. Snowflake Connector for Spark
In general, Spark can read and write data to and from Snowflake. In other words, the Spark connector achieves bi-directional data transfer between Snowflake tables and Spark DataFrames.
Furthermore, the Spark connector runs as a Spark plug-in and is provided as a Spark package.
The interaction between Snowflake and Spark occurs in a bidirectional way as follows:
- Populating Spark DataFrames from Snowflake tables
- Writing the contents of Spark DataFrames into Snowflake tables
The image below depicts the same.
Moreover, data transfer between the Spark Connector and Snowflake can occur in internal or external mode.
| Internal Mode | External Mode |
| It allows Snowflake to create and manage temporary storage | It allows storing data in an Amazon S3 bucket or Microsoft |
| Temporary storage exists until the session ends. Once the session is over, you can delete the data in the storage. | You can specify a storage location, and data is stored there. Data is stored until users manually delete it. |
3. Snowflake Connector for Kafka
Apache Kafka is a software platform for processing, storing, and delivering streaming data. It works on a publish-subscribe model. An application can push data into a Kafka topic. Similarly, an application can subscribe to a topic to receive data.
Here, the topic is Kafka's storage, which stores a specific category of data.
The Kafka Connector is the framework that enables Kafka to connect to external systems. It supports reading data from Kafka topics and writing data into Snowflake tables. Kafka Connect Cluster helps run and scale Kafka connectors.
How does Kafka Connector work?
The Kafka connector enables subscribing to one or more Kafka topics based on its configuration. You can configure it using a configuration file or the command line.
Let’s see how to move data into Snowflake tables from Kafka topics using Kafka connectors. The internal stage, pipes, and tables act as the Snowflake objects.
The workflow process is performed as follows:
- Creating an internal stage for every topic in Kafka
- Ingesting data from the partitions of Kafka topics through pipes
- Assigning one table for one Kafka topic
In a nutshell, Snowflake connectors load data from various sources into Snowflake tables.
5. Snowflake Integrations
Importance of Snowflake Integrations
These are compelling reasons why Snowflake integration is crucial for detailed data analytics and informed decision-making.
- Eliminating Data Silos: Snowflake integration unifies disparate data sources in one place. It helps businesses to process and analyse with a comprehensive and consistent data set.
- Enhancing Data Quality: Snowflake integration helps improve data quality by cleaning and transforming data.
- Streamlining Operations: The automated Snowflake integrations help reduce manual data management efforts. It helps reduce potential human errors, thus improving efficiency.
- Enabling real-time insights: Snowflake integration processes real-time data precisely to provide actionable insights to users.
Hence, Snowflake is vital for unifying data sources, improving data quality, and enabling real-time insights for data-driven decision-making.
Snowflake Integration Methods
Snowflake supports different methods to integrate data sources with Snowflake.
- ETL (Extract, Transform, and Load): ETL is a traditional method for extracting data from sources and loading it into Snowflake databases. It is a good choice when data transformation is required before loading data into Snowflake.
- ELT (Extract, Load, and Transform): This method loads raw data into Snowflake and then transforms it. It is a better choice when you need more flexible data transformation.
- Batch Processing: This method is used when you load data in batches at different schedules in Snowflake.
- API-based integration: You can use APIs for seamless data integration between different systems.
These methods ensure reliable data flow between diverse platforms, enabling scalable data operations.
6. Tables in Snowflake
Snowflake stores data in database tables, which are logically built into collections of rows and columns. Especially for large tables, you need to understand the physical structure behind the logical structure. It helps you work with the tables efficiently.
Snowflake consists of schemas, which are logical groupings of database objects such as views and tables. Interestingly, there’s no limit on the number of databases, schemas, or objects in Snowflake.
Next, we will explore Snowflake tables.
Types of Tables in Snowflake
Snowflake offers three types of tables: Temporary, Transient, and Permanent. To clarify, each type has specific features regarding data retention, accessibility, and recovery.
- Temporary Tables
Snowflake supports creating temporary tables to store non-permanent data.
Temporary tables exist only within the session in which they are created. They are not visible to other sessions or users and do not support standard features like cloning.
Therefore, the data stored in the system is completely removed and cannot be recovered by either the user-created tables or Snowflake.
To create a temporary table, specify the TEMPORARY keyword in CREATE TABLE.
- Transient Tables
Snowflake supports creating transient tables that persist until explicitly dropped and are available to all users with the relevant privileges.
Transient tables are designed to maintain data across sessions for temporary needs.
To create a transient table:
After creation, transient tables cannot be converted to another table type.
- Permanent Tables
Permanent tables, which are the default in Snowflake, include a Fail-safe period for additional data recovery security. They are intended for long-term data storage and retention, unlike temporary and transient tables.
You cannot change permanent tables into transient tables using the ALTER TABLE command, nor can you convert a transient table into a permanent table. To switch types, create a new table of the desired type, use the COPY GRANTS clause, and copy the data.
If you want to convert an existing transient table to a permanent table (or vice versa), you can create a new table, use the COPY GRANTS clause to copy the grants, then copy the data.
Let’s understand with a few examples.
Example
Create a transient database to acquire all create schema/tables as transient by default.
Example
Create a permanent database with a transient schema, so all newly created tables are transient by default.
Comparison of Table Types
The following table directly compares Temporary, Transient, and Permanent tables, focusing on time travel and fail-safes to highlight their key differences.
| Table Type | Time Travel Retention Period (Days) | Fail-safe Period (Days) | Cloning(Source Type ⇒ Target Type | Cloning (Source Type ⇒ Target Type) |
| Temporary | 0 or 1(Default is 1) | 0 | Temporary ⇒ Temporary Temporary ⇒ Transient | Reminder of the session |
| Transient | 0 or 1(Default is 1) | 0 | Transient ⇒ Temporary Transient ⇒ Transient | Until explicitly dropped |
| Permanent | 0 or 1(Default is 1) | 7 | Permanent ⇒ Temporary Permanent ⇒ Transient Permanent ⇒ permanent | Until explicitly dropped |
How to Import a CSV in Snowflake?
In Snowflake, you can upload CSV (Comma-Separated Values) files from local machines running macOS, Windows, and Linux operating systems.
Snowflake allows you to upload CSV files from your local Linux, macOS, or Windows machines.
In the following example, the file to be imported is named ‘Organizations’. It will have three columns (O.id, O.location, and O.name), is located in the ‘test1’ folder of the local machine, and contains the following structure:
- Twitter, Canada
- Amazon, Washington
- Flipkart, California
Let’s go through the steps below.
Step 1
- Create the Snowflake stage
- Create or replace stage organizations_stage1
Step 2
- Create the file format through the “FILE FORMAT” command to explain the format of the file we import
- Create or replace file format organizations_format type = ‘CSV’ field delimiter = ‘,’
Step 3
Upload our CSV file from the local folder to the Snowflake stage through the “PUT” command:
Linux/Mac:
put file:///tmp1/data1/Oragnizations.csv @organizations_stage1;Windows:
put file://D: \test1\Organizations.CSV @organizations_stage1;Step 4
Check whether the Snowflake stage is populated with data from a file.
Select
b.$1,
b.$2,
b.$3
from @_stage1 (file_format => organizations_format1) c;
Step 5
You must create a Snowflake table with a structure similar to the CSV file we need to import before running the “COPY INTO” command.
Create or replace table organizations (
O.Id integer,
O.name varchar(100),
O.location varchar(100)
)
Step 6
You can load the data from the Snowflake stage into the Snowflake database table through the “COPY INTO” command.
copy into test.organizations from @organizations_stage1;
copy into test.organizations from (select c.$1, c.$2, from @organizations_stage1 (file_format1 => organizations_format1) c);
Step 7
Check whether the Snowflake database table contains data.
select * from organizations;| O.id | O.name | O.location |
| 101 | Canada | |
| 102 | Amazon | Washington |
| 103 | Flipkart | California |
Key Benefits of Snowflake
Snowflake is a cloud data platform with robust AI capabilities. Here, we outline the key benefits of the platform.
- Snowflake is a cloud-agnostic solution, so it runs on all three major cloud providers: Google Cloud Platform, AWS, and Azure.
- It enables you to optimize resources when you need to load or unload large volumes of data without affecting service. You can use Snowflake’s auto-scaling and auto-suspend capabilities for minimal management.
- You may encounter concurrency issues when managing data. Snowflake's multi-cluster design resolves synchronization issues. So queries executed in a cloud warehouse will not affect queries run on another warehouse.
- You can control network policies by allowing IP addresses that you want to prevent from logging in to your account. Snowflake supports two-factor authentication and federated single sign-on.
- Snowflake uses a subscription-based model with storage and computing running independently.
- It uses elastic storage to automatically switch between hot and cold storage, reducing costs.
- It saves both structured and semi-structured data and converts it to a SQL-compatible format.
- Its scalable computing feature eliminates the usual concurrency limits.
- It can query data quickly without altering the underlying data set.
- It decentralizes data storage, allowing each stakeholder or group within an organization to access specific datasets without time-consuming data transfers.
- Customers can utilise the on-demand feature, allowing them to choose the amount of computation and storage they require before paying for it on a per-use or monthly fixed-rate basis.
Conclusion
It’s a wrap! Snowflake helps businesses store and manage large volumes of data effectively. Snowflake’s time travel and cloning features empower businesses with greater flexibility, enhanced data protection, and seamless integration.
We hope this complete guide to Snowflake features has shed enough light on its capabilities.
If you are interested in learning more about Snowflake, you can register for a Snowflake course with MindMajix. By the end of the blog, you will gain a comprehensive understanding of the Snowflake platform and will be able to implement data warehousing solutions in real-time scenarios.
 On-Job Support Service
Online Work Support for your on-job roles.

Our work-support plans provide precise options as per your project tasks. Whether you are a newbie or an experienced professional seeking assistance in completing project tasks, we are here with the following plans to meet your custom needs:
- Pay Per Hour
- Pay Per Week
- Monthly
| Name | Dates | |
|---|---|---|
| Snowflake Training | Aug 01 to Aug 16 | View Details |
| Snowflake Training | Aug 04 to Aug 19 | View Details |
| Snowflake Training | Aug 08 to Aug 23 | View Details |
| Snowflake Training | Aug 11 to Aug 26 | View Details |