
- SSIS SQL Server Editions
- SSIS Data Flow Destinations
- SSIS Interview Questions
- SSIS Tutorial
- 64-Bit Issues In SSIS
- Guide for Accessing a Heterogeneous Data In SSIS
- Administering SSIS Using The SSIS Catalog
- Advanced Data Cleansing in SSIS
- Fuzzy Lookup and Fuzzy Grouping in SSIS
- SSIS – Analysis Services Processing Task, Execute DDL Task
- BreakPoints In SSIS
- Building the User Interface - SSIS
- Bulk Insert Task in SSIS Package - SSIS
- Learn Cache Connection Manager and Cache Transform in SSIS
- Clustering SSIS
- Command-Line Utilities In SSIS
- Creating the Basic Package in SSIS
- Data Extraction In SSIS
- Data Flow Task in SSIS
- Data Loading In SSIS
- Data Preparation Tasks in SSIS
- Data Profiling Task in SSIS with Example
- Introduction to Data Quality Services (DQS) Cleansing Transformation
- Developing a Custom SSIS Source Component
- Developing a Custom Transformation Component - SSIS
- Dimension Table Loading In SSIS
- Error Outputs in SSIS
- Error Rows in SSIS
- Essential Coding, Debugging, and Troubleshooting Techniques - SSIS
- Event Handling - SSIS
- Excel and Access In SSIS
- SSIS Architecture
- External Management of SSIS
- Fact Table Loading
- Flat Files In SSIS
- Create SSIS Package in SQL Server
- How to Execute Stored Procedure in SSIS Execute SQL Task in SSIS
- How to get Solution Explorer in Visual Studio 2013 - SSIS
- How to Use Derived Column Transformation in SSIS with Example - SSIS
- Importing From Oracle In SSIS
- How to do Incremental Load Data using Control Table Pattern in SSIS
- Software Development Life Cycle in SSIS
- Introduction to SSIS
- Literal SQL - SSIS
- Logging in SSIS
- Lookup Transformation in SSIS
- Overview of Master Data Services SQL Server in SSIS
- Using the Merge Join Transformation in SSIS
- Monitoring Package Executions - SSIS
- Import and Export Wizard in SSIS with SQL Server Data
- Null in SQL Server - SSIS
- What is Open Database Connectivity (ODBC) in SSIS
- Package Configuration Part II - SSIS
- Package Configurations Part I - SSIS
- Package Log Providers - SSIS
- Package Transactions - SSIS
- Performance Counters In SSIS
- Pipeline Performance Monitoring In SSIS
- Restarting Packages In SSIS
- Scaling Out in SSIS
- Scheduling Packages in SSIS
- SSIS Script Task Assign Value to Variable
- Scripting in SSIS
- Security Of SSIS Packages
- SQL Server Boolean Expression In SSIS
- SQL Server Concatenate In SSIS
- SQL Server Data Tools for Visual Studio 2013
- SQL Server Date Time - SSIS
- SQL Server Management Objects Administration Tasks In SSIS
- SQL Server The Data Flow Sources in SSIS 2014
- SQL string functions
- Conditional Expression In SSIS
- SSIS Container
- SSIS Data Flow Design and Tuning
- SSIS Data Flow Examples in SSIS
- SSIS Expressions
- SSIS Script Task
- SSIS Software Development Life Cycle
- SSIS Pipeline Component Methods
- The SSIS Engine
- Typical Mainframe ETL With Data Scrubbing In SSIS
- Understanding Data Types Using Variables, Parameters and Expressions - SSIS
- Understanding The DATA FLOW in SSIS
- Using Precedence Constraints In SSIS
- Using the Script Component in SSIS
- Using T-SQL With SSIS
- Using XML and Web Services In SSIS
- Various Types of Transformations In SSIS - 2014
- Versioning and Source Code Control - SSIS
- Windows Management Instrumentation Tasks In SSIS
- SSIS Workflow Tasks – Integration Services
- Working with SQL Server 2014 Change Data Capture In SSIS
- SSIS Projects and Use Cases
You can deploy packages using the project deployment model or the package deployment model. The project deployment model, enables you to use the parameters and deploy to the Integration Services catalog.
There are several differences between the project deployment model and the package deployment model, as shown in below screenshot.
Deployment Models

Project Deployment Model
In previous versions of SSIS, you deployed packages to either a server or a file system. Those options are still available but are not the recommended practice since SQL Server 2012. The project deployment model is the standard and makes deployment much easier, as you will see in Administering SSIS Topic. Parameters and environments are great features also and will be the standard for your SSIS development replacing configuration files and tables. The old configuration methods are still available though not recommended. This project deployment method along with the parameters and environments is a big change in the way you think about SSIS package deployments. You will now consider deploying projects as a group of work not individual packages. Think of a project as a body of work that needs to be completed together. This may include just one package or several. This section will cover the project deployment model.
When choosing a deployment model, you should consider the administration options and the deployment options. The project deployment model provides some development features, such as parameters and environments.

The Integration Services catalog is the location where packages and all SSIS objects are stored in SQL Server 2014 if the project deployment model is selected. An instance of SQL Server can have one catalog, and a catalog can contain folders for organizing your instance. Folders hold the SSIS projects and environments. As mentioned earlier, the folders in the catalog can also be used for security.
Parameters are covered briefly in The SSIS Tools Topic. In Administering SSIS Topic you will learn how they work from the administration side. When you create a parameter, you can scope it to either the package level or the project level. Parameters work much like variables. They can be used in expressions and tasks. You can assign parameters at runtime with T-SQL or let the package use the default value set during development.
Once you have a package deployed with numerous parameters, you may want to control them with different sets of values. Environments give you this capability. Environments store a set of variable values that can be referenced during package execution. You can store values for different runtimes. For example, you might have different values for weekend runtimes versus weekday runtimes. By storing all the parameter values in an environment, you can execute your package and point it to the correct set of parameter values, rather than set each value individually.
After you have completed your package development, you are ready to deploy the project to the SSIS catalog. In this example, you have a package that contains an Execute SQL Task. You will have one parameter on the package, and deploy the package to the SSIS catalog and set up an environment. This sample package is available with the code download for this Tutorial.
In this example package you will simply use the Execute SQL Task to write a row to a table in AdventureWorks. Use the following code to create this example table:
USE [AdventureWorks]
GO
CREATE TABLE [dbo].[InsertTest](
[StringCol] [varchar](50) NULL
) ON [PRIMARY]
GO
The SQL statement in the Execute SQL Task in the package is as follows:
INSERT INTO [dbo].[InsertTest]
([StringCol])
VALUES
(?)
The project will contain one package with an Execute SQL Task that will write a value to the InsertTest table. The value that is inserted into this table is the parameter value. This parameter value will be changed using the environments. This first example uses a package level parameter. The example package has a package level parameter on it named strInput with a data type of String and a value of PackageParam, as shown in below screenshot.

Now that you are familiar with the package, you are going to deploy it to the SSIS catalog.
1. To start the deployment, right-click on the project name in Solution Explorer in SQL Server Data Tools, and select Deploy (see Below screenshot). In the middle of this menu, you should see the option Convert to Package Deployment Model. If you instead see Convert to Project Deployment Model, then your project is in the package deployment model, and you will need to click this option to convert it to the project deployment model.

2. The first window of the SSIS Deployment Wizard is the basic information screen. Read this and then click the checkbox at the bottom to hide the screen in the future, and then click Next.
3. The next window asks for the server name and the path. Enter your server name. This example uses LocalHost as the server name.
4. Now click the Browse button next to Path and select a folder into which the package should be deployed. You can create a new folder by clicking the New Folder button at the bottom of the window. You must deploy the project into a folder; you cannot put it in the SSISDB root. For this example, use the folder named AdminDemo, as shown in below screenshot, and click Next.

5. This next window is the Review window. Check the source and destination here to ensure everything is correct, and then click Deploy.
6. The last window is the Results window. You should see a passed result for every step, as shown in below screenshot.

Congratulations. You have successfully deployed your first project to your SSIS catalog. The next section describes the package deployment model. Then we will return to this project in the T-SQL section of Administering SSIS Topic, where you will learn how to execute the package and set the parameter values and environments.
Package Deployment Model
The package deployment model is the older version of deployment, and you should be changing your methods to take full advantage of the newer method.
Because of the fact that some users will still want to use the old model, either because of large frameworks, they have in place or just because changing can be difficult, this model is covered in this section.
In the package deployment model, you can create a deployment utility that helps users install your project of packages and any dependencies. This deployment utility is similar to creating a program like InstallShield, and it is for times when you want to pass a set of packages to a customer or a production DBA who may not know how to install SSIS packages manually. When you create a deployment utility, all the files necessary to install the project are copied into a centralized directory, and an.SSISDeploymentManifest file is created for the installer to run, which opens the Package Installation Wizard.
Creating the Deployment Manifest
To create a deployment utility, simply right-click the SSIS project in SQL Server Data Tools and select Properties. In the Property Pages dialog, go to the Deployment Utility page and change the CreateDeploymentUtility property to True, as shown in below screenshot. This is set to False by default. The AllowConfigurationChanges property is a key setting as well, and when set to True, it asks installers whether they would like to change any settings that may be exposed via a configuration file at installation time. The DeploymentOutputPath property specifies where the deployment utility will be outputted to underneath the project folder.

Next, under the Build menu, select Build, where represents your project’s name. You should see “(package deployment model)” next to the package name, as shown in below screen shot. If you don’t see this, then you are in the project deployment model. If so, right-click on the project in Solution Explorer to convert to the package deployment model.

NOTE After building the deployment utility, you should change the CreateDeploymentUtility option to False again. Otherwise, each time you click the Play button to execute the package, each package will be validated and executed, which could take an enormous amount of time for a large project. Instead of using the green debug arrow at the top of SQL Server Data Tools, the best practice is to right-click on the package in Solution Explorer and then click Execute package. This ensures that only the package is executed.
The Package Deployment Wizard
After the introduction screen, you are asked where you want to deploy the packages, as shown in below screenshot. You can choose either a file system deployment or a SQL Server deployment. A file system deployment just copies the packages, which are the .dtsx files, to a directory on the server. A SQL Server deployment stores the packages in the MSDB database on the target server. Select the SQL Server deployment option if you are following this example, and then click Next. You can also have the wizard validate each package after you install it. This ensures that the package delivered to you is valid on your machine, including the Data Sources.

The following table lists the pros and cons of the MSDB versus File System Deployment. Security is usually the defining factor here.

If you selected SQL Server deployment, the next screen prompts you for the SQL Server 2014 instance to which you wish to deploy the packages. Additionally, type “/” (without the quotes) for the Package Path property. This specifies that the packages will be installed into the root path. If you had selected a file system deployment, the next screen prompts you for the file path to which you wish to deploy the packages. The last option in the SQL Server deployment screen enables you to specify whether you want to rely on the SQL Server to protect the package by encrypting it. This is the recommended option, and it will change the ProtectionLevel package property to ServerStorage as it installs each package. You’ll learn more about the ProtectionLevel property later in Administering SSIS Topic.
After you click Next, the packages will be installed in the package store on the server. After the packages are installed, if the developer selected True for the AllowConfigurationChanges option in SQL Server Data Tools, then an additional screen appears, giving you, as an installer, a chance to edit the values in the configuration file at deployment time. This is shown in below screenshot, and you can click the dropdown menu to see multiple configuration files. Unfortunately, it does not show the packages to which these files are associated.

The only other additional screen you might see is a pop-up if there were a user password on any package.
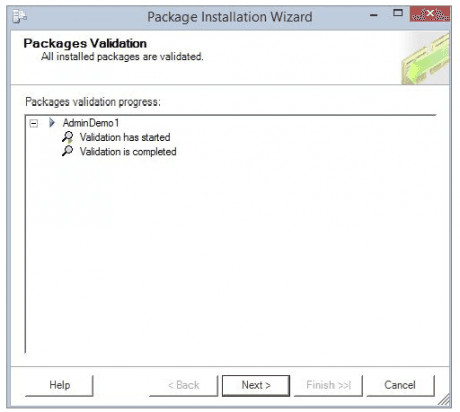
After the packages have been deployed, they are validated, as shown in below screenshot. Any problems will appear in this Packages Validation screen, and you can redeploy after correcting the problem. The last screen is a summary screen to complete the wizard.
If you wish to deploy a package in Management Studio, as shown later in Administering SSIS Topic, you have to do it one package at a time. The file system, however, is much easier. With this method of storage, you can just copy the .dtsx and supporting files manually into a directory that is monitored by the SSIS service, and the packages can be seen immediately from Management Studio.
The main point to remember about using the deployment utility is that every package and all project dependencies are deployed. If you don’t want to deploy that many packages, you can edit the.SSISDeploymentManifest file in a text editor to remove any extra files you don’t want to migrate. Some find it useful to create a project in the same solution that contains a subset of the packages that they wish to deploy if deploying all packages and dependencies is too aggressive for them.
If you did want to edit the.SSISDeploymentManifest XML file before sending the folder to a client, you could just remove one of the «Package» lines, as shown in the following XML example. The header of the XML file indicates who created the deployment tool and when. This information is useful if the project doesn’t install correctly. If you don’t wish to deploy a configuration file with the wizard, you can remove the «ConfigurationFile» line in order to prevent the configuration file from overwriting the older configuration files that may already be on the server file.
GeneratedFromProjectName=”Pro SSIS”
GeneratedDate=”2011-10-15T23:39:54.7343750-05:00″
AllowConfigurationChanges=”true”>
EventHandler.dtsx
Package1.dtsx
Restartability.dtsx
ConfigFiles.dtsx
Chapter1.dtsx
RawFile.dtsx
DBSnapshots.dtsx
Logging.dtsx
FileWatcher.dtsx
ConfigRepository.dtsx
configuration.xml
Using the SSIS Package Store
The other option for deploying your packages is the SSIS Package Store. This is the older option now, and you should be moving your packages to the SSIS catalog to take advantage of features like parameters and environments. In some cases, the Package Store will actually physically store the package, such as the MSDB database option. If you’re using file system storage, the Package Store just keeps a pointer to the top-level directory and enumerates through the packages stored underneath that directory. In order to connect to the Package Store, the SSIS service must be running. This service is called SQL Server Integration Services, or MSDTSServer120. There is only one instance of the service per machine or per set of clustered machines.
Frequently Asked SSIS Interview Questions & Answers
You can configure the SSIS service in the Services applet (select Control Panel ⇒ Administrative Tools ⇒ Services). Double-click SQL Server Integration Services. The service is set to automatically start by default, under the NT AUTHORITYNetworkService account. In the Recovery tab, you can specify that the service should automatically start up again in the event of a failure, as shown in below screen shot. You can specify what action should be taken if the service fails the first, second, and subsequent times. In this case, the service has been changed to restart if a failure occurs two times. The failure count is also reset after two days.

Although you can run and stop packages programmatically without the service, the service makes running packages more manageable. For example, if you have the service run the package, it tracks package execution, and users with the proper permission can interrogate the service to find out which packages are running. Those who are in the Windows Administrators group can stop all running packages. Otherwise, you can stop only packages that you have started. It can also aid in importing and exporting packages into the Package Store. We cover other uses for the service throughout Administering SSIS Topic, but another benefit is that it enables you to create a centralized ETL server to handle the execution of your packages throughout your enterprise.
There isn’t much to really configure in this file, but it does have some interesting uses. The first configuration line tells the packages how to react if the service is stopped. By default, packages that the service is running will stop if the service stops or fails over. You could also configure the packages to continue to run until they complete after the service is stopped by changing the StopExecutingPackagesOnShutdown property to False, as shown here:
Everything in the Packages folder, and below that folder, will be enumerated. You can create subdirectories under this folder, and they will immediately show up in Management Studio; you don’t have to modify the service configuration file. Each time you make a change to the MsDtsSrvr.ini.xml file, you must stop and start the MSDTSServer120 service.
In this section, you learned how to use the SSIS Package store. Again keep in mind that this is an older method that you should move away from. Using the SSIS catalog and SSISDB gives you the ability to take advantage of the features like versioning, parameters, and environments.
List of Related Microsoft Certification Courses:
| SSRS | Power BI |
| SSAS | SQL Server |
| SCCM | SQL Server DBA |
| SharePoint | BizTalk Server |
| Team Foundation Server | BizTalk Server Administrator |
 On-Job Support Service
Online Work Support for your on-job roles.

Our work-support plans provide precise options as per your project tasks. Whether you are a newbie or an experienced professional seeking assistance in completing project tasks, we are here with the following plans to meet your custom needs:
- Pay Per Hour
- Pay Per Week
- Monthly
| Name | Dates | |
|---|---|---|
| SSIS Training | Jul 21 to Aug 05 | View Details |
| SSIS Training | Jul 25 to Aug 09 | View Details |
| SSIS Training | Jul 28 to Aug 12 | View Details |
| SSIS Training | Aug 01 to Aug 16 | View Details |

Ravindra Savaram is a Technical Lead at Mindmajix.com. His passion lies in writing articles on the most popular IT platforms including Machine learning, DevOps, Data Science, Artificial Intelligence, RPA, Deep Learning, and so on. You can stay up to date on all these technologies by following him on LinkedIn and Twitter.


