
- Power Automate Interview Questions
- What is Microsoft Intune?
- what is Microsoft Access - A Complete Tutorial Guide
- What is FSMO Roles?
- Powerapps Lookup
- PowerApps Components
- PowerApps Variables
- ClearCollect PowerApps
- Patch Function in PowerApps
- Power Apps Patch – Functions and Syntax with Examples
- Logic Apps vs Power Automate
What is Microsoft Dynamics 365 CRM?
Products or services offered by Microsoft Dynamics 365 CRM
Benefits of Microsoft Dynamics 365 CRM
Setting up Microsoft Dynamics CRM online Account
Functional modules of Dynamics 365 CRM
Microsoft Dynamics 365 CRM Records and Entities
Different types of activities in Microsoft Dynamics 365 CRM
Web resources of Dynamics 365 CRM
Difference between Microsoft Dynamics and SalesForce
Managing an organization is not at all an easy task. It involves a lot of complex scenarios like managing marketing, sales, staff, etc. All of these activities are carried out simultaneously while executing the day-to-day operations. To streamline the activities, organizations definitely need a well-organized tool. To meet this demand, Microsoft has come up with Dynamics 365 which gives provision for the organizations to execute their operations and streamline the entire process. In this article, we will go through different topics, which will provide more in-depth information about setting up an account to configure the system according to the needs.
Microsoft Dynamics 365 Tutorial
- What is CRM?
- What is Microsoft Dynamics 365 CRM?
- Products or services offered by Microsoft Dynamics 365 CRM
- Benefits of Microsoft Dynamics 365 CRM
- Setting up Microsoft Dynamics CRM online Account
- Downloading CRM SDK
- Functional modules of Dynamics 365 CRM
- Microsoft Dynamics 365 CRM Records and Entities
- Different types of activities in Microsoft Dynamics 365 CRM
- Web resources of Dynamics 365 CRM
- Difference between Microsoft Dynamics and SalesForce
- Future of Microsoft Dynamics 365 CRM
- Microsoft Dynamics 365 CRM certification
| If you want to enrich your career and become a professional in Microsoft Dynamics 365, then enroll in "Microsoft Dynamics 365 Training" - This course will help you to achieve excellence in this domain. |
What Is CRM?
CRM stands for Customer Relationship Management system.
With the use of CRM systems, organizations can leverage the technology and can streamline their sales channel, and marketing channel, and automate their customer service/ support to a maximum effort.
With the use of CRM systems, organizations can definitely reduce operating costs and increase profitability for organizations where the existing business processes can be automated. Automating the business processes will improve customer service and helps to gain trust, satisfaction, and loyalty.
What is Microsoft Dynamics 365 CRM
Microsoft Dynamics 365 CRM is nothing but a customer relationship management system that is used to manage communication between existing customers and future/potential customers.
Few important points to notice about Microsoft Dynamics 365 CRM:
- It is one of the most popular CRM software systems that are available in the market.
- The software was developed by Microsoft
- The software mainly focuses on the core departments of any organization, i.e. Sales, Marketing, and Customer service department.
- As it is built by Microsoft, they have predominantly used a. NET-based framework where they are customizing the CRM software periodically to support the market demands.
Products or Services offered by Microsoft Dynamics 365 CRM
In this section of the article, we will discuss the various products/services that are offered by Microsoft Dynamics 365 platform.
The Microsoft Dynamics CRM system is offered in two variations, i.e.
- CRM online
- CRM on-premises
CRM online:
CRM online is nothing but a cloud-based version of Microsoft Dynamics CRM. With this type of product offering, businesses don’t have to worry about managing servers, hosting, etc. All of the infrastructures and backend processes (application servers, setups, deployments, databases, etc) are managed by Microsoft itself. The service is available on subscription plans.
CRM on-Premise:
The same product, i.e. Microsoft Dynamics CRM is offered to businesses and the installation is done on your servers. This kind of installation actually involves a lot of maintenance activities. I.e. database maintenance, customizations, backups, licensing, network, and hardware setup activity.
This type of installation is only offered by companies that opt for a customized version of the CRM solutions.
The differences between CRM online implementation and CRM On-Premise implementation are listed below in the tabular format.
| CRM Online | CRM ON-premise |
| It is a cloud-based solution provided by Microsoft. All the hardware and software set up is actually managed by Microsoft itself. | It is an on-premise implementation service provided by Microsoft. The entire setup, including hardware and infrastructure-related items, is managed by the customer. |
| The entire setup can be completed in a few days. The payment mode for this is Pay as you go. So, you end up paying only for the services that you have used. | It takes a considerable amount of time, definitely needs individuals who have sound technical knowledge. |
| Doesn’t offer support for customizations and extensions. | Offers greater flexibility of customization and extensions. |
| Based on the data storage, customers can opt for the relevant plan (i.e. 5GB, 20 GB data storage plans) | No restrictions in terms of data storage. |
| CRM online provides inbuilt features like insights, analytics, etc. | For on-premise implementation, it takes the additional cost to use these features. |
| Supports automatic updates and it is all done via the cloud. No human interaction is needed. | For on-premise implementation, an administrator is necessary to install the updates. |
| It offers automatic backup functionality | Requires manual intervention of backups. |
| It is a comparatively cheaper option. | It has a high maintenance cost because the servers and the databases are managed by the organizations themselves. |

Benefits of Using Microsoft Dynamics 365
In this section of the article, we will discuss the benefits of using Microsoft Dynamics 365. With the use of its core features and functionalities of a standard CRM system and an ERP tool, Microsoft Dynamics 365 is a deadly combination.
With the use of this tool, the following areas can be managed effectively.
- Sales
- Customer service
- Marketing
- Financials
- Operations
- Project service automation
The entire system is integrated with communication tools like Outlook and Excel. With this tight integration, the use of Microsoft Dynamics 365 has been widely accepted and it is now one of the popular tools in the market.
Flexible to configure apps: Microsoft Dynamics 365 has come up with a simple user interface where the users will be able to configure apps based on the need and the use.
Meaningful customer data: All the customer data can be utilized and meaningful data can be generated within Dynamics 365. Also, there are pre-built KPIs that are available within the system which will help you to understand that customer journey.
Flexibility: The users can pay for the service once a month or can take up a subscription model where they can manage their payments. Also, it gives flexibility for the users to pay for the apps that they are going to use.
It is a cloud-based solution, so managing your own servers and data centers is not necessary. This leads to significant savings.
- Permission-based access: Microsoft Dynamics 365 offers flexibility for the users and provides access only to the specific modules, and the subscription cost will be based on the modules used. Unlike other software tools, it offers a standard license fee.
- Accessible Apps: A dedicated App store is available for Microsoft Dynamics 365 where the users will be able to pick and choose from the app market. Based on the requirement, the users can find out whether there are any existing apps that can fulfill the need.
- Scalability: Microsoft Dynamics 365 offers a lot of flexibility for the users while utilizing the system. Based on the usage, the system can be scaled up or down. For example, especially in the Christmas season, users have to pay only for what they have used for.
- Agility: All of your information or data is saved in the cloud and thanks to its Common data model, it is a shared business database. I.e. it connects the data and the business together so that you can always find the correlation between data and the business. This helps to make value-added decisions based on the data analysis.
- Productive: Employees using Microsoft Dynamic 365 are more productive compared to others because they have all the information readily available. This helps businesses to make data-driven decisions right on time.
- Intelligent system: The CRM system is actually available on the Microsoft platform and tools like Power BI, Cortana Intelligence, and Azure Machine Learning make the entire system intelligent. Using all these features, the users will be able to take the benefit of predictive insights, data-driven actionable steps, prescriptive advice, etc.
- Safe & Secure: As already discussed, Microsoft Dynamics 365 is a cloud-based solution that comes up with high-level security and access controls for all the applications. The data is completely protected and most of the applications are accessed via two-step factor authentication.
Setting up Microsoft Dynamics CRM online Account
In this section of the article, we will go through different steps that are involved in the creation of a new Microsoft Dynamics CRM account.
Step 1: Please navigate to Signup for Dynamics CRM online Account
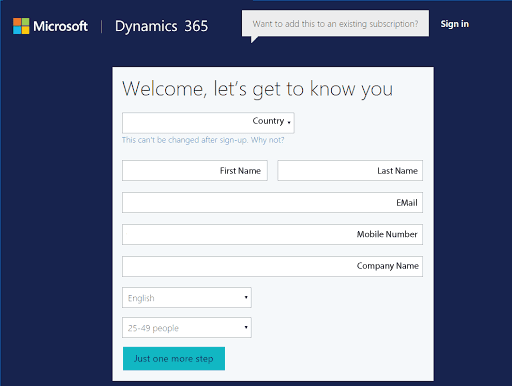
Step 2: You will be redirected to the Dynamics CRM trial sign-up page. A popup will appear asking for specific details, and by providing the necessary information, you will be able to create a free account.
- Click on the “Just one more Step” button to proceed further.
Please navigate to the below URL
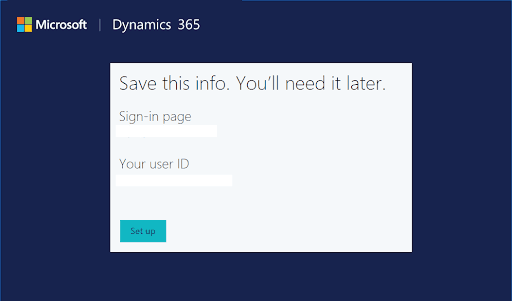
Step 3: At this point, the user has to create a username and password. After providing the necessary information the user has to click on the “Create My Account” button. It is advisable for you to make a note of the login details so that they can be handy.

Step 4: The next step is to verify your account.
- Please provide a valid contact number so that your contact details are validated.
- The user has to provide an active mobile phone number, and based on the number, either an OTP will be sent or an auto-generated call will be received on the registered mobile number.

Step 5: If text is selected, a text message will be sent to the designated mobile number. The user has to key in the verification code and click on the “Next” button.
Step 6: After the verification process, the user has to complete the setup process.
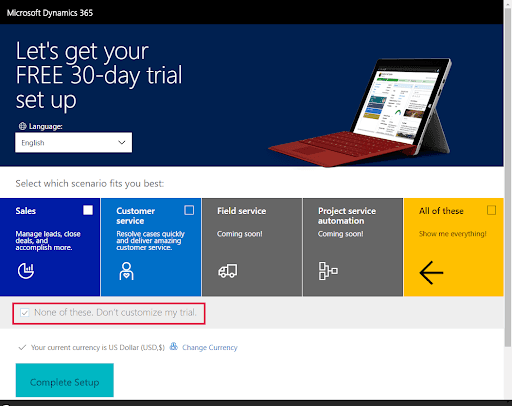
Step 7: At this point, please make sure to select the “ None of these. Don’t customize my trial” option and then click on the “Complete Setup” button.
Step 8: At this point, the user will be redirected to the CRM online trial account where a set of sample data is already available for the user to play around with. The user will be able to see all the navigation options where they can access information like Sales, Marketing, Service, Settings, Help area, etc.

Downloading CRM SDK
SDK stands for Software Development Kit. Every version of Microsoft Dynamics CRM comes with its own SDK version. It contains vital code samples which include client-side code, server-side code, necessary plugins, web services, relevant workflows, security model, and extensions. In a nutshell, the developer will have access to all the relevant elements/ resources for them to start utilizing the CRM.
The SDK provides basic architecture and relevant examples that will help the user to get started. Let’s understand the steps that are involved in terms of downloading and installing the SDK.
Step 1: It is really important to use the relevant SDK version according to your Microsoft Dynamics 365 version. This is because every version of Microsoft Dynamics 365 comes with its own SDK components.
Step 2: After downloading the SDK, click on the .exe setup file and then click on “CONTINUE”.
Step 3: Please specify the location where the SDK should be extracted.
Step 4: Once the SDK is extracted, the user will be able to access all of the content.
Functional Modules of Dynamic 365 CRM
In this section of the article, we will discuss the functional modules of Dynamic 365 CRM and get along with minute details about the features that are available within these modules.
The entire Microsoft Dynamics CRM is laid out by the following functional modules:
- Sales
- Marketing
- Service Management
The functional modules are often referred to as “Work Areas”.
The CRM software is divided into three core modules, the classification is done based on the functionalities that are carried out by individual teams. All the users from the Sales team will be working on the sales module completely. It is the same case with marketing and customer service teams as well.
The life cycle of customer engagement:
In order to manage existing customers and onboard new customers perfectly is nothing but the life cycle of customer engagement. To understand the life cycle of a customer engagement process, let us go through an example.
Let’s consider a bank that is primarily known for selling credit cards and loans to its customers. The general life cycle of the selling process is as follows:
- The sales team engages with the customers
- The marketing team gets the required information for the customers
- The service team fulfills customer requirements.
Sales Module:
The sales module is one of the prominent modules within the CRM system. The sales module provides different options for the users to track all the information related to the sales activity and provides a life cycle of the new customer.
The following submodules are available within the sales module:
- Leads
- Opportunities
- Accounts
- Contacts
- Competitors
- Products
- Quotes
- Orders
- Invoices
Now let us understand each and every submodule in detail:
- Leads: In CRM terminology, a lead is nothing but a potential customer who is interested in the service provided by the organization but has not taken any action. This is an important aspect of the business because, if they are not able to convert leads into actual customers, the organization won't be getting into the profitable zone.
- Opportunities: Opportunities are nothing but a potential sale to a customer. If the customer or lead is interested in the service, the opportunity is converted into a real sale.
- Accounts: In CRM terminology, the account is nothing but an individual or an organization that is constantly utilizing your services.
- Contacts: Contacts are nothing but an individual or an organization that is constantly utilizing your services. For example ( all the customers using credit cards of a bank- in this case, the customers are called as contacts for the bank).
- Competitors: Provides a list of other organizations that are providing the same service as your organization.
- Products: Has a list of products that are offered by your organization. ( As per the earlier example, all the credit card plans will be the products associated with the credit card service).
- Quotes: It is nothing but a formal letter where the price associated with the services will be provided to the customers according to their needs.
- Orders: A quote that is accepted by the customers is nothing but Orders.
- Invoices: Once the order is billed, then it generates invoices.
Marketing module:
The marketing module is another prominent module within the Microsoft Dynamics 365 system. It is designed to manage the end-to-end marketing campaigns so that the existing customers and new customers are aware of the latest services offered by your company.
In order to engage the customers, there are a lot of submodules that are available within the marketing module, and they are listed as follows:
- Marketing lists
- Campaigns
- Quick campaigns
Let us understand the submodules in detail below:
Marketing list: Marketing lists provide a unique way to segregate your contacts lists based on different categories (i.e. contacts, accounts, leads). Based on the different groups, promotional emails, or event emails, newsletters are sent across. This helps the businesses to send appropriate and customized emails according to the user base.
The list can also be segregated based on the age factor. The lists can be completely configured based on the need and marketing activities can be executed.
Campaigns: Campaigns are also part of marketing activity or promoting a particular product or service. But a constant monitoring activity is carried out after unleashing the promotional content. This way, the activity can be tracked.
Quick Campaigns: A quick campaign also follows the same process as that of the campaign process but the purpose of the campaign might be different. This format can be used to quickly provide any relevant information about the product in a short span of time to a larger audience.
Service Management Role:
The service management role is a very important aspect of the business and within Microsoft Dynamics 365, there are a lot of submodules that are available to make sure the customers are satisfied with the services.
Below are a few sub-modules that are available within the Service Management module:
- Cases also called Incidents
- Knowledgebase
- Contacts
- Resources/ Resource Groups
- Services
- Service Calendar
Cases/ Incidents:
If any of your customers are not happy with the service or need some extra information from you, then they can get in touch with the support team. All of the requests are tracked under cases or incidents. This allows the flexibility for the customer support to answer or address the issue without any ambiguity.
Also, if you have employed multiple customer support executives, this feature works perfectly. Because, when a case is created, a unique ID is generated where it will be sent across to the customer. The customer can get in touch with the customer support team and whoever is available for that particular moment, will be able to understand the customer problem in real-time by using the case id number.
Once the problem is resolved, the case can be closed by updating the status. So, if your business has no cases open, that means all of your customers are happy with the service you are providing.
Knowledge Base:
This is a helpful section for customer support executives. This section has all the details about frequently asked questions, if the customer support executive is not sure about a specific question, they will have an option to look into the probable answer within the knowledge base.
Using this feature, the customer support executives can provide real-time information to the customers while they are on the call and resolve their concerns.
Contracts:
This section contains all the active contracts that the customer has with the business. So, whenever a customer gets in touch with the customer service executives, they can look into their existing contracts and answer any specific questions if they have any.
Resources:
Resources are nothing but a piece of information, tools that are used to deliver a service. Using these resources, the customer support executives can resolve any specific customer concerns.
Services:
This section contains all the information about the different services that your business is offering.
Service Calendar:
This is another module that can be used to schedule the work timings for the users who work within the business.
Activity Management:
All the modules that are explained above represent activities. Any kind of interaction with the customer can be defined as an activity. The activities can be related to accounts, contacts, leads, etc.
The following is a list of all activities that can be carried out within a CRM system:
- Phone call
- Task
- Appointment
- Letter
- Fax
- Campaign Response
- Campaign activities
- Service Activity
[Related Article: SAP CPI Interview Questions]
Microsoft Dynamics 365 CRM - Records and Entities
In this section of the article, we will discuss the process of creating an entity and also go through the process of updating and deleting the records.
What is an entity?
- An entity is nothing but a model that has the capacity to store business data within the CRM system.
- By default, entities are available within Microsoft Dynamics, i.e. Accounts, cases, and contacts. In this scenario, contact is an entity that has all the contact information of the customers of your business.
- As an admin, you can create customized entities according to the business needs.
Create a new Entity:
In this section of the article, we will go through the steps that are needed to create an Entity.
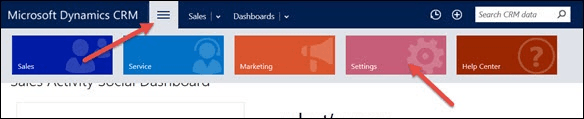
Step 1: Log in to your Microsoft Dynamics 365 account.
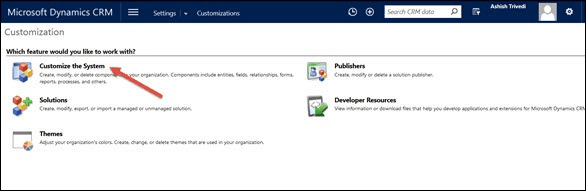
Click on the Menu button and then select the “Settings” option as displayed in the below screenshot.
Step 2: Now, click on the “Customize the system” option.
By clicking on the option, it will open up a default solution window.
Step 3: Now, click on “Entities” and this will open more options from the left panel.
Step 4: Now click on the “New Entity” option.
Step 5: Within the entity form, please enter the information like :
- Display name
- Plural Name
Also, under “Areas that display this entity”, please select the options, Sales, Service, Marketing.
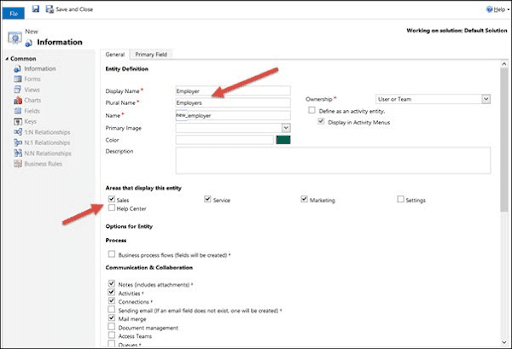
Step 6: After selecting the necessary information, now click on Save and close icon.
Following this process will create a new entity in the CRM database.
Step 7: The newly created entity will be displayed in the default solution parent window.
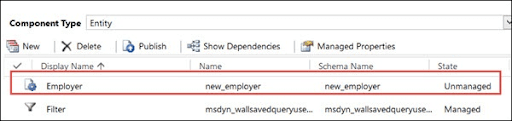
Step 8: Click on the “Publish All Customization” options from the top ribbon bar. Doing this will publish all the changes that have been done so far. Later on, close the window by clicking on Save and close.

Creating Records:
In this section of the article, we will go through the process of creating/ update/ open/read/delete a record. Within a CRM system, it is all about managing previous data within the system.
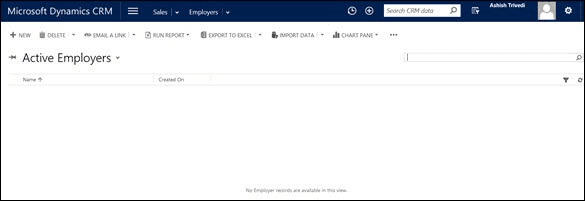
Step 1: To create a record, it needs an entity, to begin with. So, as per the above process, you have already created an Entity called Employers by this time. So let’s create a record for the same entity.
Navigate to Employer entity
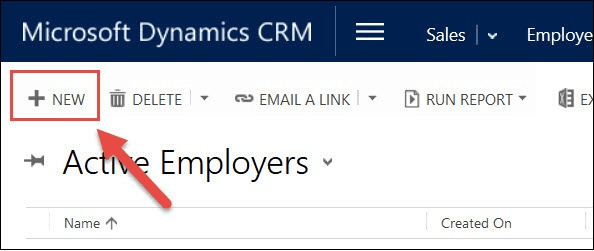
Step 2: Click on the New icon
This will open up a default new record form.
In this case, you can get to see only one default field information to be filled in. i.e. “ Name”.
Provide valid information and click on the “Save and Close” button.
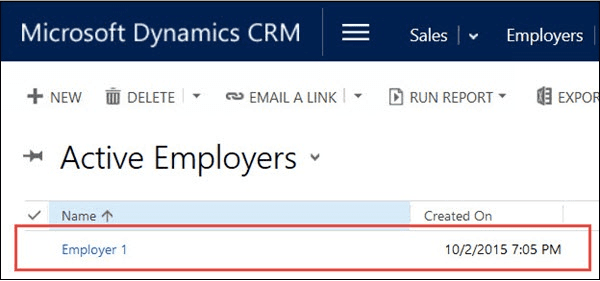
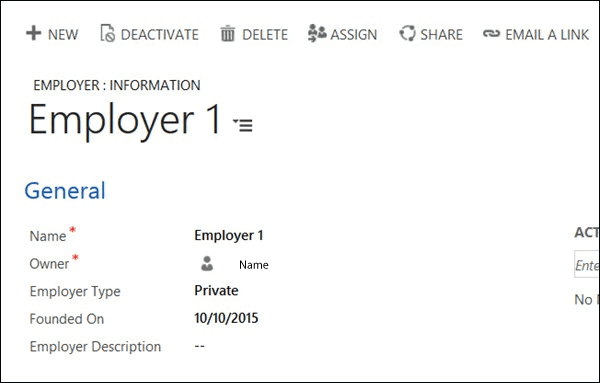
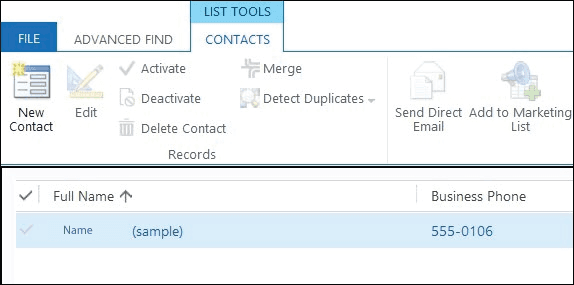
Step 3: By completing the above step, an active record is created within the entity called “Employers”.
See the screenshot below:
Accessing Records:
In order to access the existing records, please go to the entity page.
In this particular case, go to Show work areas> Sales> Extensions> Employers.
All the records that were created in the “Employers” entity will be displayed here.
Click on any specific record to view the information.
Updating Records:
Follow the above process “Accessing Records”.
Click on any particular record to view the information. In this page, you can modify the data accordingly. By default, all the information will be saved automatically, and this is because of the “AutoSave” feature that Microsoft Dynamics 365 has in place.
Deleting Records:
For you to delete the records, please go to the specific entity where you want to delete the information.
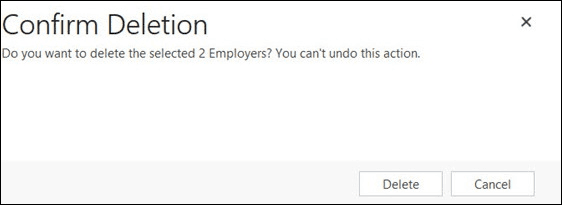
Step 1: Now, select all the records that you want to delete from the entity.
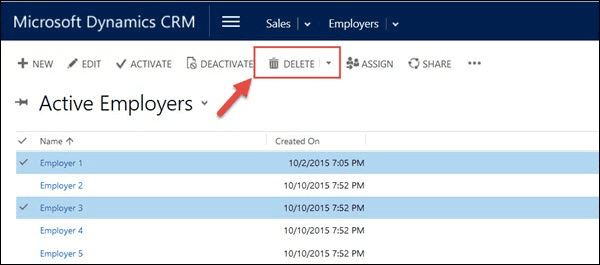
Step 2: Confirm the deletion of records by clicking on the “Delete” option.
Different types of activities in Microsoft Dynamics 365 Edition.
Before adding new fields to the forms, let us understand the different types of fields that are available:
The following list of fields are available to add within a form:
- Single Line of Text
- Image
- Whole number
- Options set ( Dropdown)
- Two options ( Radio button)
- Floating-point nUmber
- Decimal number
- Currency
- Multiple lines of text
- Date and Time
- Lookup
A brief explanation about each and every field is provided in this section:
| Field name | Field description |
| Single Line of Text | It is a text field. The maximum character limit is 4000 characters. The format of the field can also be set to email, text, URL, etc |
| Option set ( Dropdown) | This field has an option to store a group of options where every option has a value and a label associated. The values can be set to Global as well, i.e. the same set of values will be displayed within multiple forms. |
| Two options ( Radio button) | This field has an option to store two values. I.e. Yes or No/ True or False etc. It is also called a radio button field. |
| Image | The form can be configured in such a way that the user will be able to load an image to the field. |
| Whole Number | This field stores integer values. The minimum and maximum values can also be configured. |
| Floating Point Number | This field can store numbers that can have up to 5 decimal points. |
| Decimal number | This field is used for storing decimal values. |
| Currency | This field is used for storing currency information. |
| Multiple lines of Text | This field is used for capturing lengthy text. |
| Date and Time | This field is used for capturing date and time. There are only two formats that are supported: i.e. date only or date and time. |
| Lookup | A lookup field can be created by using an entity-relationship. |
Adding Fields on Form:
In this section of the article, we will go through the process of adding new fields to a form:
Step 1:Make sure you are logged into Microsoft Dynamics 365.
Now click on the top ribbon button, it will open up a few options.
Within the available options, click on “Settings”.
Step 2: Now click on the “customize the system” option.
This will open up the default window option.
Step 3: From the left panel, select the “Entities” option.
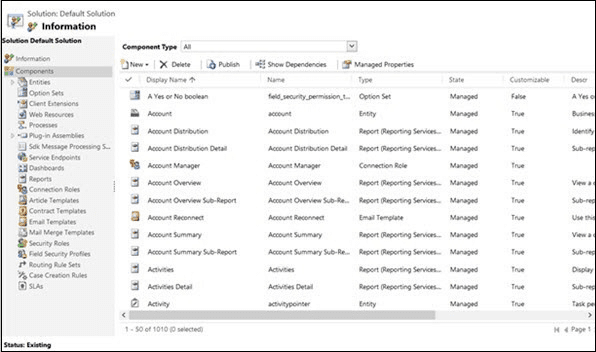
Step 4: From the list of available entities, please select the “ Employer” entity that we have created above (I.e. create a new entity section).
Clicking on the employer entity will show you all the sub-options that are available. ( you can see Forms, View, Charts, Fields, etc)
Step 5: Click on “Fields”. It will open up a grid where you can see all the fields that can be used. All of these fields are available by default. The user will have an option to create new fields as per the requirement.
Step 6: Click on the “New” button.
A new window will appear. In this window, please enter the following details:
- Display Name: Employer Type
- Name: This field will be auto-populated based on the display name.
- Data Type: Select Option set from the drop-down.
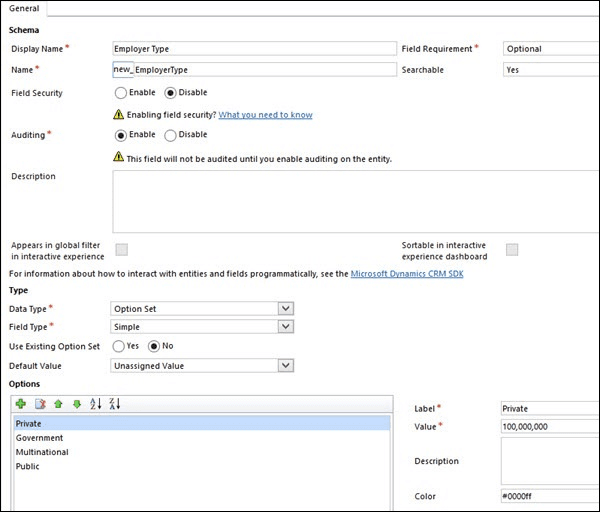
Step7: Click on the “Save and Close” button. This action will create a new Employer type field within the form.
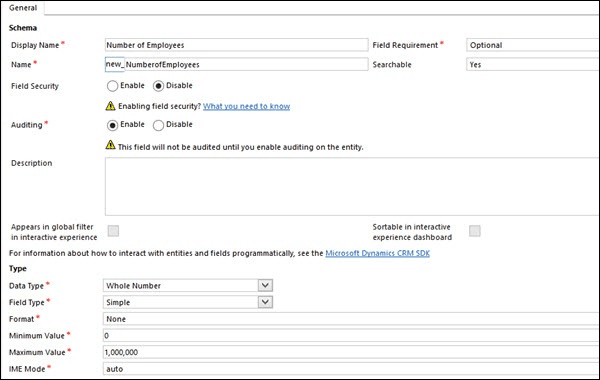
Step 8: Add a few more fields that you have done in Step 7.
- The number of employees: This will be a whole number field.
- Founded on: This will be a date and time field.
- Employer Description: This will be multiple lines of the text field
The below screenshots display the data after adding the three fields.
The below Screenshot is for the “The number of employees” field:
The below screenshot is for “Founded on the field”
Screenshot for the Employer Description field
Step 9: So far, we have created different fields.
Now, let's add these fields to the employer form.
To do this, click on “Forms” from the left navigation under the “Employer” entity.
For every form, Microsoft Dynamics creates two versions of it. I.e. Main and Mobile Express
Step 10: The newly added fields can be seen in the below screenshot.
The fields are available within the Field Explorer panel, which is available on the right of the screen.
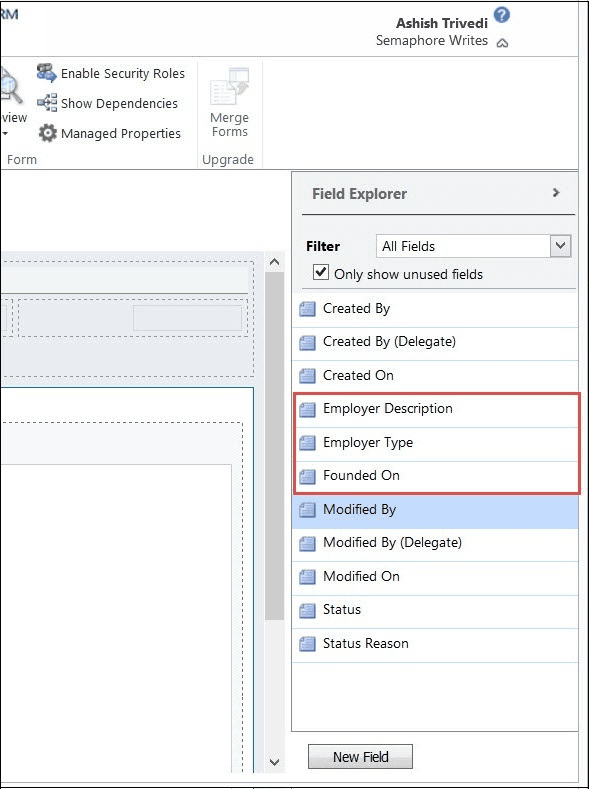
Step 11: Drag and drop the fields into the “General” tab.
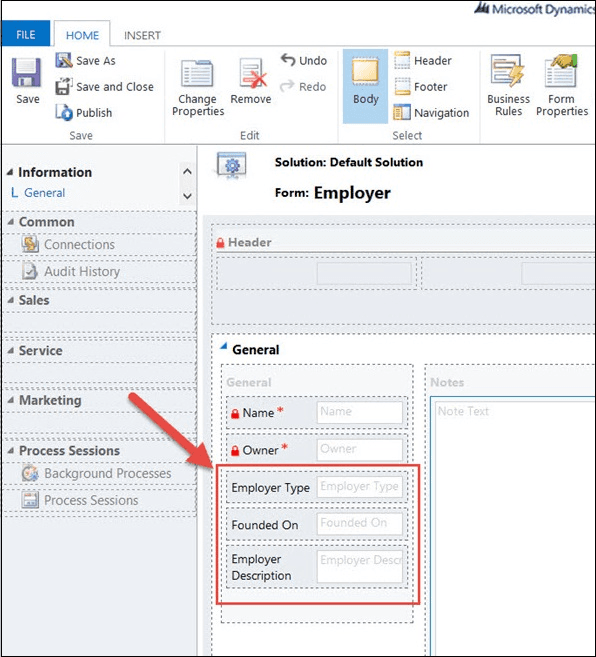
Step 12: Click on “Save” and then click on “ Publish”.
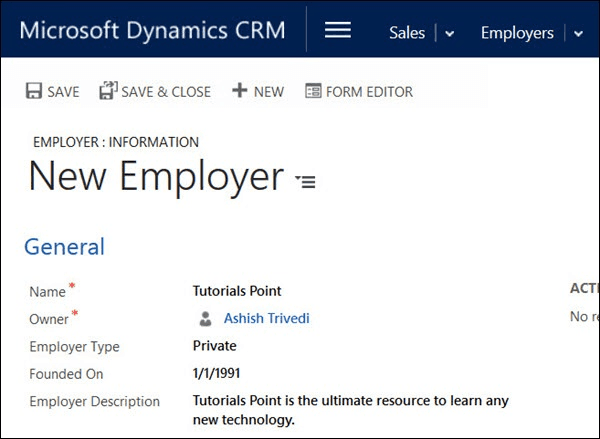
All the fields that we have added in the form can be displayed below in the screenshot.
Quick Search:
The quick search option is available on the top right-hand corner once you log into your Microsoft Dynamics account.
Type in with any specific name, and results associated with that key parameter will be displayed.
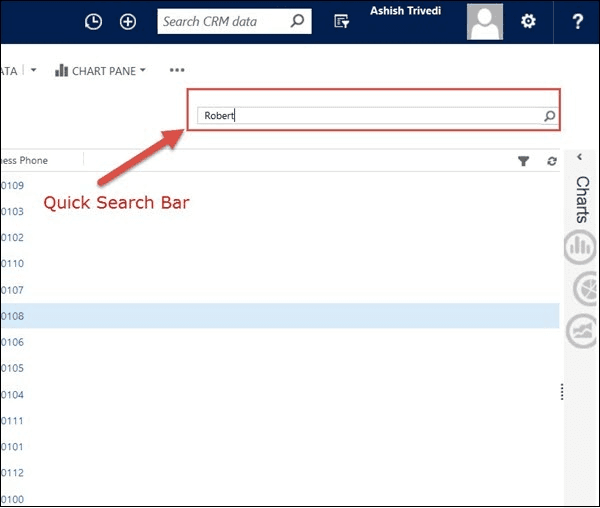
Check out the below screenshot:
Advanced Search:
It is one of the important features within the Microsoft Dynamics environment. To access this feature, click on the Advanced search icon available on the top right-hand side corner.

After selecting the Advanced search option, the screen will look like the one below:
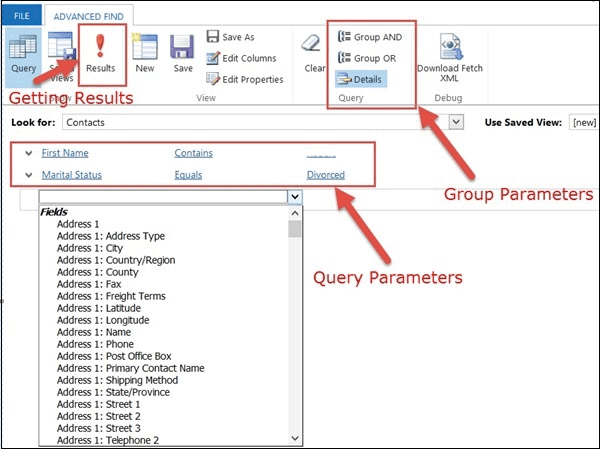
To explain in detail the functionality of the Advanced search concept, let us go through a simple example.
Find out all the results with the name Robert and whose Marital status is Divorced.
To do this, follow the below steps:
Step 1: Select Contacts from the Lookups section.
Step 2: It is time to enter the search criteria.
You can enter as many query parameters as you want, there is no restriction.
Step 3: After providing all the necessary query parameters, now click on the “Results” button.
All the matched records will be displayed below.
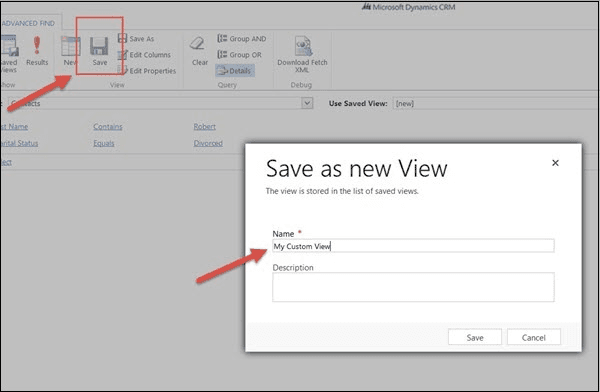
Saving a Custom View:
The above search results ( i.e. See all the names which started with Robert and whose marital status is set as Divorced) can be saved as a custom view and you can come and view the result at any point of the time. The query parameters will be saved as it is and when you want to view the data, the search condition will be executed again and the data will be displayed.
Click on the “Save” button to save this as a new custom view.
Web Resources of Dynamics 365 CRM
Web Resources are nothing but virtual web files that are stored in the CRM database and are used to implement web page functionalities. The files can be HTML, JScript, Silverlight, or any other supported types.
As Microsoft Dynamics 365 is a product, it has a lot of features and functionalities. But most of the time, these functionalities should be customized according to the need. So to customize, it can be done in two ways:
- Extending on the client-side: Using web resources and form scripting, can be achieved.
- Extending on the Server side: With the help of plugins, workflows, and web services, this can be achieved.
Uses of Web Resources:
- Validations: Microsoft Dynamics 365 provides a basic level of validations, but if you are looking for complex validations then it can be possible with the use of web resources.
- UI Customizations: UI customizations are completely possible. The user will be able to create a completely new page where they can show the customer information accordingly.
- Upload own buttons: Provides an option to add your own ribbon button.
- Iframes: Provides an option to open CRM screens within the ERP system
- Easy to migrate: As all the web services are available within the CRM system, it is easy to migrate from one environment to another environment.
Types of Web Resources:
There are two types of web resources:
- Webpage (HTML): With HTML webpages, you can create pages like maps, custom application pages, and integrate them within the CRM application.
- Script (JScript): Any client-side logic, i.e. validations, data manipulation can be achieved with the help of JScript web resources.
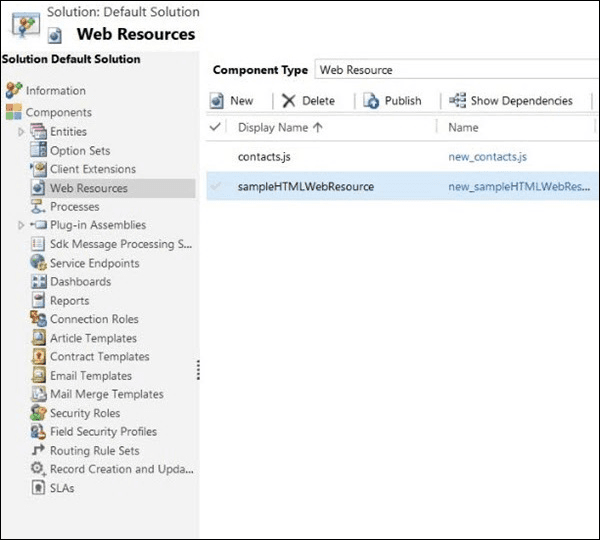
Web Resources accessing for the required entity:
The web resources are available within the database and can be accessed in the CRM. The following are the steps involved:
Step 1: Go to settings > Customizations> Customize the system.
Step 2: From the left-hand side menu, select “Web Resources”.
Microsoft Dynamics CRM Plugins:
In this section of the article, we will discuss the available plugins and exception handling of the plugins.
Plugin:
A plugin is nothing but a custom business logic that is implemented and it can be easily integrated into Microsoft Dynamics CRM. Using the plugins, the user will be able to extend the functionalities of a particular feature or it can be a new add-on to the system itself.
A plugin acts as an event handler and it is meant to execute a particular event within the CRM system. Most of the time, the plugins are written in C# or VB. These plugins can be executed in synchronous mode or asynchronous mode.
Exception Handling in the plugin:
Most of the time, the plugin itself needs to handle the run-time exceptions. For synchronous plugins, a return exception can be sent across, InvalidPluginExecutionException. This error will be displayed in the dialog box. Also, you can configure the messages in the message object, and in return, the same text will be displayed in the exception object.
Signing the Plugin Assembly:
The below section or the process is applicable only if you are registering the plugin assembly for the first time. To deploy the plugin, you need to sign into the assembly with the key.
Right-click on the solution, click on “properties”.
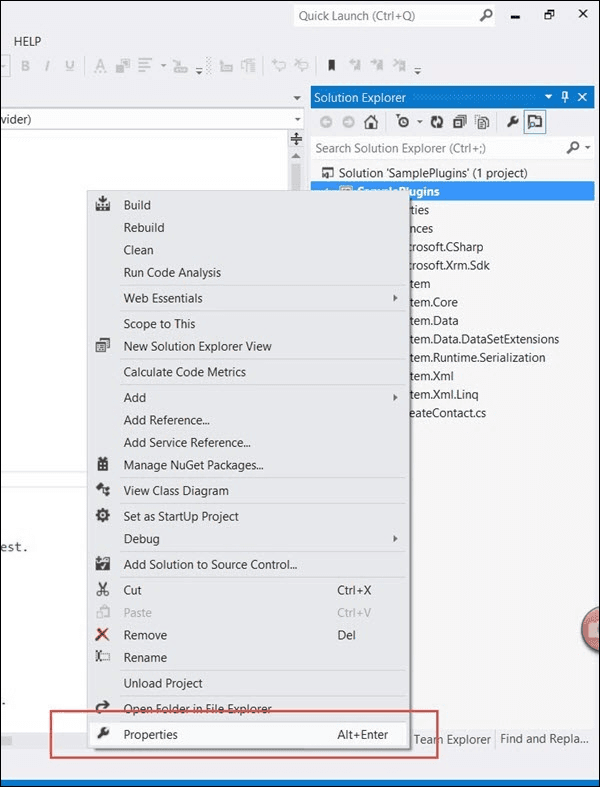
A popup will appear where you need to select the “Signing” option ( available on the left-hand side of the screen) and then check the “Sign the assembly” option. Further, select “New” from the “Choose a strong name key file” field.
Now, enter the file name as per your naming convention.
Make sure to uncheck the option “Protect my key file with a password”.
Click on the “OK” button to save the changes
Writing Plugin:
Within this section, we will create a plugin that will actually create a task activity to follow up with the customers when a new customer is added to the system. In other words, whenever a new contact record is created within the CRM system, the plugin should send out a follow-up activity with the customer.
Firstly, make sure that you have included the references to Microsoft.Xrm.SDK namespace. Also, before going forward, we assume that you have already downloaded the relevant Microsoft Dynamics SDK.
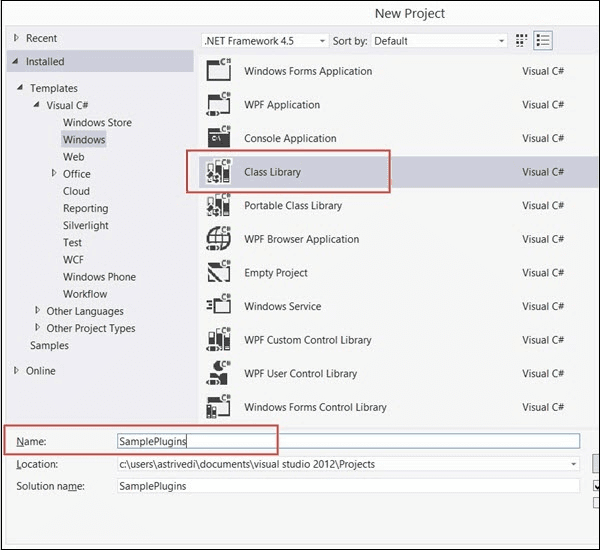
Now, open Visual Studio and create a new project of type “Class Library”.
Provide a name to the project and click on the “OK” button to save the changes.
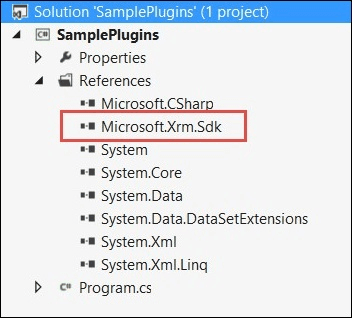
Now, add the reference to Microsoft.Xrm.SDK assembly to the project that we have created previously.
The assembly is present within SDK/Bin
At this point, the next step is to create a class with the name “PostCreateContact.cs”.
Further, extending the class from I plugin.
So far, the code will look like below:
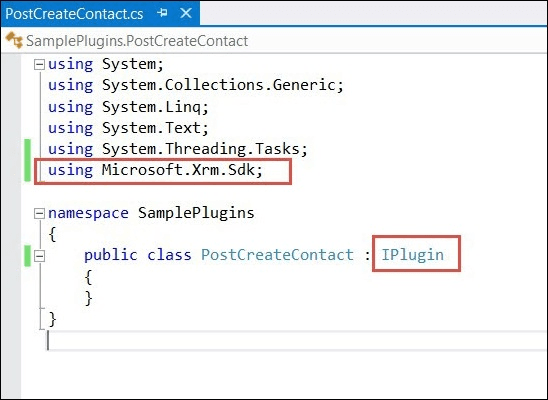
Also, don’t forget to add a reference to System.Runtime.Serialization.
After finishing up the required references, it is time to copy the code to PostCreateContact class.
Use the below code, that is available. ( In-detailed explanation of the code is followed by the screenshot)
using System;
using System.Collections.Generic;
using System.Linq;
using System.Text;
using System.Threading.Tasks;
using Microsoft.Xrm.Sdk;

namespace SamplePlugins {
   public class PostCreateContact:IPlugin {
      /// A plug-in that creates a follow-up task activity when a new account is created.
      /// Register this plug-in on the Create message, account entity,
      /// and asynchronous mode.

      public void Execute(IServiceProviderserviceProvider) {
         // Obtain the execution context from the service provider.
         IPluginExecutionContext context =(IPluginExecutionContext)
            serviceProvider.GetService(typeof(IPluginExecutionContext));

         // The InputParameters collection contains all the data
            passed in the message request.

         if(context.InputParameters.Contains("Target")&&
            context.InputParameters["Target"]isEntity) {

            // Obtain the target entity from the input parameters.
            Entity entity = (Entity)context.InputParameters["Target"];
            try {

               // Create a task activity to follow up with the account customer in 7 days
               Entity followup = new Entity("task");
               followup["subject"] = "Send e-mail to the new customer.";
               followup["description"] =
                  "Follow up with the customer. Check if there are any new issues
                  that need resolution.";

               followup["scheduledstart"] = DateTime.Now;
               followup["scheduledend"] = DateTime.Now.AddDays(2);
               followup["category"] = context.PrimaryEntityName;

               // Refer to the contact in the task activity.
               if(context.OutputParameters.Contains("id")) {
                  Guid regardingobjectid = new Guid(context.OutputParameter
                     s["id"].ToString());
                  string regardingobjectidType = "contact";
                  followup["regardingobjectid"] =
                     new EntityReference(rega rdingobjectidType,regardingobjectid);
               }

               // Obtain the organization service reference.
               IOrganizationServiceFactory serviceFactory =
                  (IOrganizationSer viceFactory)serviceProvider.GetService
                  (typeof(IOrganizationServiceFactory));
               IOrganizationService service =
                  serviceFactory.CreateOrganizationService(context.UserId);

               // Create the followup activity
               service.Create(followup);
            } catch(Exception ex) {
               throw new InvalidPluginExecutionException(ex.Message);
            }
         }
      }
   }
}
The above code is explained in step by step process:
Step 1: During implementation, consider the IServiceProvider object as a parameter. This service provider has references to a lot of other objects that are going to be used within the plugin.
Step 2: Obtains the context,i.e. IPluginExecutionContext object with the use of the GetService method of Iserviceprovider.
Step 3: At this point in time, the target entities' objects are obtained.
Step 4: After getting the necessary objects, it internally creates a Task entity within which a subset of information like subject, description, dates, category, and regarding objectid. With the use of regarding objectid the system would actually understand whose records are being saved /created.
If you closely observe the code, the parent id of the contact is obtained by using context.OutputParameters.
Step 5: With the use of the IServiceProvider object, a new object of IOrganizationServiceFactory is created.
Step 6: The creation method is created by using the service object. The follow-up- activity is created and saved within the CRM system.
Event Framework Plugin: The event Framework plugin is nothing but an event execution pipeline service system where it processes all the synchronous and asynchronous plugin requests by passing through the execution pipeline service system.
Plugin Pipeline Stages: The plugin pipeline is actually divided into four events and every stage has certain activities to be carried out internally. The below table describes the activities that are carried out in these stages.
| Event Name | Stage Name | Description of the Event |
| Pre-Event | Pre-validation | Plugins are registered within this stage. Also, they may be executed outside the database transactions. |
| Pre-Event | Pre-operation | Plugins are registered within this stage. They are executed within the database transactions. |
| Platform Core operation | Main operation | This is purely for internal use only. No external plugins can be registered at this point. All the transactions are executed in the main system only. |
| Post Event | Post-operation | A series of actions need to happen after the main operation. |
Plugin Messages:
Messages are nothing but events on which the plugins are registered. For example, let’s say the user has integrated a new plugin, i.e. Contacts. So whenever a new contact record is added, a confirmation message will be sent across.
| Preparing for Microsoft Dynamics 365 Interview? Here’s Top Microsoft Dynamics 365 Interview Questions and Answers |
Microsoft Dynamics CRM vs Salesforce:
In this section of the article, we will go through the key differences between Microsoft Dynamics and SalesForce.
| Overview | SalesForce | Microsoft Dynamics CRM |
| Implementation models | It is completely online. It is a cloud-based solution. | It provides two types of implementations: cloud-based and CRM on-premise. |
| On-Demand service | It can provide on-demand service | Yes, it can provide on-demand service. |
| Custom Reporting | Users will be able to generate custom reports. | The interface provides custom reporting options for the users. |
| Configuration | Not easy when it comes to configuration | It is very easy when it comes to configurations. |
| Plugins | Few plugins are available. | A lot of plugins are available in the market. |
| Analytics | Had inbuilt Analytics | It has built analytics and has its own analytical tool which can give more precise information. |
| Native Outlook interface | It doesn’t have a native outlook interface | It has a native outlook interface. |
| Dedicated database | It doesn’t have a dedicated database. | It has a dedicated database. |
| Pricing | Comparatively high | Comparatively low in pricing |
Future of Microsoft Dynamics 365 :
The future of Microsoft Dynamics is all about adopting new technologies and provide more value-added services to their customers. With the combination of Artificial Intelligence and powerful mobile applications, Microsoft Dynamics can offer a lot of value to their existing and potential customers.
Every release of Microsoft Dynamics has offered a lot of new features and excited their customers with competitive pricing on all of their services. Microsoft Dynamics is giving out tough competition to its competitors like SalesForce and other industry giants.
With the integration of CRM and ERP solutions approach, Microsoft Dynamics has an edge compared to the Salesforce platform.
The following qualities of Microsoft Dynamics will definitely make it better compared to other tools that are available in the market.
- Tight integration to all other Microsoft products.
- User-friendliness
- Has different deployment/implementation methods
- Provides high-quality services at a lesser price.
- More personalization towards serving a customer.
- Multi-channel support
Microsoft Dynamics CRM Certification:
Getting a Microsoft Dynamics CRM certification will be a stepping stone for getting into a Dynamics 365 developer position. The certification provides a value add to your career progression. Once the certification is complete, you can get into the roles like implementation consultant, technical support engineer, system administrator, etc, and slowly can move on to bigger positions like Business Application Microsoft Certified Solutions Expert (MCSE).
Anyone can take this exam as there are no prerequisites. The individual has to go through the available materials. Once the preparation is completed, the individual has to take the exam.
To clear the certification, it is really important to have good functional knowledge about all the services that Microsoft Dynamics 365 provides. For this, it is really important that the individual should have practical exposure to using the tool. We, at MindMajix, provide training with practical exposure where our students get in touch with industry experts and understand the practical implementations of Microsoft Dynamics 365.
Our tutors come along with vast experience in terms of implementing Microsoft Dynamics CRM and they provide training in such a way that real-life examples and problems are taken into consideration while training.
Conclusion:
Like any other CRM solution, Microsoft Dynamics 365 provides a lot of features and functionalities that businesses can utilize and streamline their process. Using an effective CRM solution will definitely help businesses to automate a few of their processes and achieve more productivity and profitability. Microsoft Dynamics 365 has a lot of other options (i.e. Outlook, Power BI) where it can be tightly integrated with the CRM solution.
We have gone through the different areas of Microsoft Dynamics where most of the activities related to Sales, Marketing, Customer service aspects are taken care of. Using the CRM system, all the processes around these modules can be automated to a certain extent.
As technology is ever-changing, more and more functionalities and features are made available. If you are looking for a career change or want to build up your career on the Microsoft platform, then Microsoft Dynamics 365 is a great platform to start with.
List of Other Microsoft Dynamics Courses:
| Microsoft Dynamics AX | Microsoft Dynamics CRM |
| Microsoft Dynamics 365 Sales | Microsoft Dynamics SL |
| Microsoft Dynamics NAV | Microsoft Dynamics GP |
 On-Job Support Service
Online Work Support for your on-job roles.

Our work-support plans provide precise options as per your project tasks. Whether you are a newbie or an experienced professional seeking assistance in completing project tasks, we are here with the following plans to meet your custom needs:
- Pay Per Hour
- Pay Per Week
- Monthly
| Name | Dates | |
|---|---|---|
| Microsoft Dynamics 365 Training | Jul 25 to Aug 09 | View Details |
| Microsoft Dynamics 365 Training | Jul 28 to Aug 12 | View Details |
| Microsoft Dynamics 365 Training | Aug 01 to Aug 16 | View Details |
| Microsoft Dynamics 365 Training | Aug 04 to Aug 19 | View Details |

Ravindra Savaram is a Technical Lead at Mindmajix.com. His passion lies in writing articles on the most popular IT platforms including Machine learning, DevOps, Data Science, Artificial Intelligence, RPA, Deep Learning, and so on. You can stay up to date on all these technologies by following him on LinkedIn and Twitter.


