- Abstraction in Java
- Clojure Tutorial
- Control Statements in Java
- Core Java Interview Questions
- Data Types in java
- Top 9 Java EE Frameworks
- Java EE vs Spring Framework
- Java Frameworks List - Top 14 Java Frameworks
- Java Interview Questions
- Java Tutorial
- Java Web Dynpro Interview Questions
- JavaFX Interview Questions
- Method Overloading in Java
- Multithreading in Java
- List of Popular Open Source Java Build tools
- Operators in Java
- Program Logics in Java
- String Handling in Java
- Why You Should Learn Java Programming
- Data Structures Interview Questions
- Exception Handling in Java
- Multithreading Interview Questions
- C++ Interview Questions and Answers
- JSP Interview Questions
- EJB Interview Questions
- SOAP in Web Services
- JPA Interview Questions
- DXC Interview Questions and Answers
- Java Architect Interview Questions
- Java Concurrency Interview Questions
- What is Java Concurrency?
- What is JPA - Complete Tutorial Guide
- What is EJB?
- Java Collections Interview Questions
- Java Swing Tutorial
- Java Stream Tutorial
- Linked List Interview Questions
- Compiler Design Interview Questions
- Java Collection Tutorial
- Java Stream Interview Questions
- Thymeleaf vs JSP
- Thymeleaf Tutorial - What is Thymeleaf
- Socket Programming in Java - What is TCP
- Apache Tomcat Interview Questions
- Capgemini Interview Questions
- Zoho Interview Questions
- PwC Interview Questions
- Hexaware Interview Questions
- Intuit Interview Questions
- Tech Mahindra Interview Questions
- Qualcomm Interview Questions
- Arcesium Interview Questions
- PayTM Interview Questions
- DXC Technology Interview Questions
- Java Developer Job Description
- MAQ Software Interview Questions
- Amdocs Interview Questions
- TCS NQT Interview Questions
- Virtusa Interview Questions
- Siemens Interview Questions
- Tricky Java Interview Questions
When it comes to solving common issues occurring in software development, like redundant functions, reusable patterns, repetitive code, etc., design patterns are used effectively. These are reusable template solutions that are much similar to customizable blueprints.
The concept of design patterns was first mentioned by Christopher Alexander. Later, it was picked up by four authors - Richard Helm, Ralph Johnson, John Vlissides, and Enrich Gamma - known as the Gang of Four.
With design patterns, you get to easily solve commonly recurring issues without investing a lot of time and effort into the same. So, if your job entails this process and you have an interview in tow, this post covers the latest design patterns interview questions that you can refer to for preparation.
We have categorized Design Patterns Interview Questions - 2023 (Updated) into 2 levels they are:
Top 10 Frequently Asked Design Patterns Interview Questions
- Define Design Patterns.
- Define the design patterns in Java.
- What do you mean by SOLID principles?
- What is the difference between design patterns and design principles?
- Define Bridge Design Pattern.
- What do you mean by inversion of control?
- Define a Factory Design Pattern.
- What is the Adapter Design Pattern?
- What do you mean by Decorator Design Pattern?
- What problems does the Builder Pattern solve?
| Do you want to enhance your skills and build your career in this Core Java domain? Then enroll for " Core Java Training " this course will help you to achieve excellence in this domain. |
Design Patterns Interview Questions and Answers For Freshers
If you are just starting out in this domain, these design patterns interview questions for freshers will be helpful in your preparation.

1. Define Design Patterns.
Design patterns are known as reusable solutions that help solve commonly recurring issues of software development. Some of these issues are redundant logic and functions, repetitive code, and more. These patterns help save a significant amount of time and effort needed when developing software. Also, these patterns are used commonly in object-oriented software products.
2. Can you list some benefits of design patterns?
As mentioned above, these design patterns are flexible enough to identify unwanted repetitive code. With this, the software’s architecture can be customized accordingly. Thus, some of the benefits of design patterns include:
- Reusable and can be used in varying projects
- Well-tested and effective methods of developing significant solutions
- Offer template solutions to define system architecture
- Provide utmost transparency to software design
3. How can a design pattern be described?
To describe a design pattern, the below-mentioned things are generally followed:
- Define the name of the pattern and the classification of the design pattern under which it will fall
- Define an issue and the corresponding solution
- Finding the variations and language-dependent alternatives for the issue that has to be addressed
- Defining the real-time use cases along with the software’s efficiency.
4. Define the design patterns in Java.
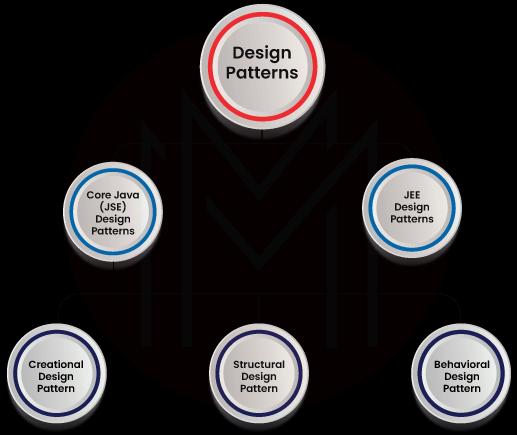
In Java, there are three varying types of design patterns, such as:
- Creational Patterns: They offer freedom of choice between the creation of objects by concealing the logic. The constructed objects are decoupled from the implemented system. Some of the examples of this type include abstract factory design, singleton design, prototype design, builder design, and factory design pattern.
- Behavioral Patterns: These patterns help define how the objects should be communicating and interacting with each other. Strategy pattern, observer patterns, iterator pattern, and command pattern are some examples of behavioral patterns.
- Structural Patterns: These patterns assist in defining how the structures of objects and classes should look like for defining the composition between objects, interfaces, and classes. Some examples are proxy design, decorator design, facade design, adaptor design, and more.
| Check out Core Java Interview Questions and Answers that help you grab high-paying jobs. |
5. What do you mean by Gang of Four (GOF) in design patterns?
Gang of Four (GOF) is used for four authors who invented the concept of design patterns. They are John Vlissides, Richard Hel, Ralph Johnson, and Erich Gamma. They documented the design patterns in the book named “Design Patterns: Elements of Reusable Object-Oriented Software”, which was published in 1995.
6. What do you mean by SOLID principles?
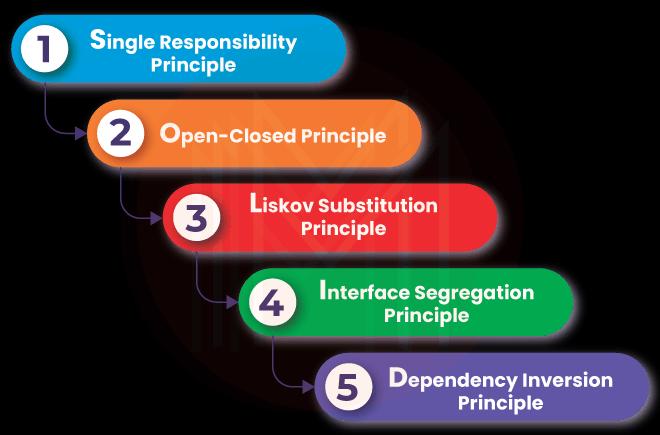
Introduced by Robert C. Martin in 2000 in his paperwork called “Design Principles and Design Patterns”, SOLID principles are the object-oriented principles. The SOLID acronym goes:
- S stands for Single Responsibility Principle (SRP): This principle makes sure that every module or class should be responsible for one functionality. And, there should be only one reason to change any class.
- O stands for Open-Closed Principle (OCP): It says that every class is open for extension and closed for modification. Here, you can extend the behavior of entities by not altering anything available in the existing source code.
- L stands for Liskov Substitution Principle (LSP): The LSP principle talks about objects that can be replaced by subtype instances without impacting the program’s correctness.
- I stands for Interface Segregation Principle (ISP): This one concentrates on the use of as many interfaces specific to the requirements of the client as possible rather than creating a general interface. Herein, clients should not be compelled to integrate the functionalities that they don’t need.
- D stands for Dependency Inversion Principle: Under this principle, the high-level modules shouldn’t be dependent on the concrete implementations or the lower level modules. Rather, they should stay dependent on the abstractions.
7. Define some design patterns used in the JDK library of Java.
Some of the design patterns used in the JDK library of Java are:
- Decorator pattern used by the Wrapper classes
- Observer pattern used to handle event frameworks, like swing, AWT, etc.
- Singleton pattern used in classes, like runtime and calendar
- Factory pattern used for methods, like Integer.valueOf methods, etc.
8. What is the difference between design patterns and design principles?
Design patterns are known as the reusable template solutions used for common issues that can be customized as per the requirements. These can be implemented efficiently, are safe to use and can be tested properly.
On the other hand, design principles are followed when designing software systems for any sort of platform by using a programming language. The SOLID principles are the design principles that are followed as guidelines to develop extensive, scalable, and robust software systems. These principles can be applied to every aspect of programming.
| Related Article: Low level Design Interview Questions |
9. What is the difference between design patterns and algorithms?
Design patterns and algorithms are used to describe typical solutions to a problem. However, the primary difference between these two is that a design pattern offers a high-level description of solutions, and algorithms outline a set of actions to achieve a goal.
10. Define Bridge Design Pattern.
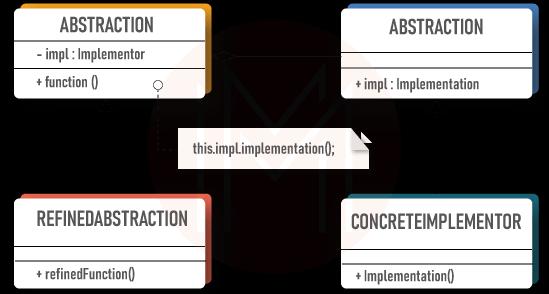
The bridge pattern is a structural design pattern type that allows you to split closely related classes or large classes into two hierarchies - implementation and abstraction. These two are independent of one another and can be used whenever you wish to decouple an abstraction from implementation.
This is known as a bridge pattern as it acts as a bridge between the implementation class and an abstract class. In this pattern, these classes can be modified or altered independently without impacting one another.
There are four primary elements of bridge pattern, such as:
- Abstraction: This is the code and defines the crux of the pattern. It comprises a reference to the implementer.
- Refined Abstraction: This is an extension to the abstraction and takes details of the requirements while hiding them from the implementers.
- Implementer: This is referred to as the implementation classes’ interface.
- Concrete Implementation: This one is the concrete implementation class that integrates the interface of the implementer.
Design Patterns Interview Questions and Answers For Experienced
If you are a professional and have spent years working in this domain, these design patterns interview questions for professionals will help you prepare thoroughly.
11. What do you mean by inversion of control?

Inversion of Control (IoC) is one such pattern that is used to decouple the dependencies between the system’s components and layers. The Dependency-Injection (DI) pattern is one such example of this IoC pattern that assists in eradicating the dependencies in the entire code.
Let’s dive deeper with an example. Suppose we have a class Y that uses class Z as:
public class Y{
       private Z z;
       public Y ( ) {
               this.z = new Z ( ) ;
        }
}
Here, we get a dependency between the Y and Z classes. If the IoC pattern was implemented, the new operator wouldn’t have been used to assign value to the dependent variable. And then, it would have been:
public class Y {
       private IocZ z;
       public Y (IocZ z) {
               this.z = z;
       }
}
The control of managing the dependency of instantiating the object of class Z to the IoC class IocZ has been inverted.
12. Define a Factory Design Pattern.
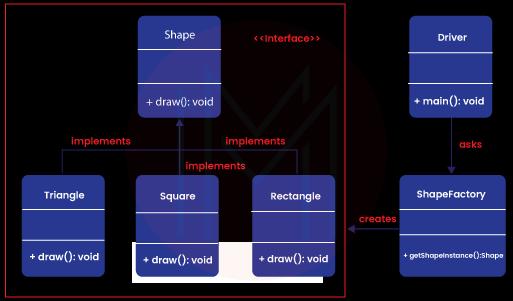
Factory design pattern comes under the Creational Design Patterns category. Herein, the objects get created without exposing the creation logic to the client. The objects are referred to the common interface.
To understand better, let’s consider an example:
Suppose there are three classes - Square, Rectangle, and Triangle. Let’s use factory patterns to create objects of these classes without bringing forth the creation logic by using the ShapeFactory class. Now, the Driver class will be used to pass the information to get the required object.
To integrate the factory design pattern, let’s follow these steps:
- Step 1: Creating "Shape" Interface
//Shape.java
   public interface Shape {
      void draw();
   }
- Step 2: Creating Concrete Classes Rectangle, Square, Triangle to Implement the Shape Interface
//Rectangle.java
  public class Rectangle implements Shape {
         @Override
          public void draw ( ) {
                 System.out.printIn (“Rectangle Drawn”);
           }
    }
//Square.java
  public class Square implements Shape {
         @Override
          public void draw ( ) {
                 System.out.printIn (“Square Drawn”);
           }
    }
//Triangle.java
  public class Triangle implements Shape {
         @Override
          public void draw ( ) {
                 System.out.printIn (“Triangle Drawn”);
           }
    }
- Step 3: Creating ''ShapeFactory" Class and a getShapeInstance() Method to Generate Objects of the Concrete Classes
//ShapeFactory.java
  public class ShapeFactory {
         //the method will be used to get object of required shape
           public shape getShapeInstance (String type) {
                  if (type == null) {
                        return null;
                   }
                   if (type.equalsIgnoreCase (“TRIANGLE”) ) {
                       return new Triangle ( ) ;
                    } else if (type.equalsIgnoreCase (“SQUARE”) ) {
                         return new Square ( ) ;
                    } else if (type.equalsIgnoreCase (“RECTANGLE”) ) {
                          return new Rectangle ( ) ;
                    }
                    return null;
               }
}
- Step 4: Implementation of the Drive Class and Using the Factory Class to Get the Required Object
//Driver.java
  public class Driver {
         public static void main (String [ ] args) {
                ShapeFactory shapeFactory = new ShapeFactory ( ) ;
                //get Triangle object and call draw ( )
                Shape triangle = shapeFactory.getShape (“Triangle”) ;
                triangle.draw ( ) ;
                //get Rectangle object and call draw ( )
                Shape rectangle = shapeFactory.getShape (“Rectangle”) ;
                rectangle.draw ( ) ;
               //get Square object and call draw ( )
                Shape square = shapeFactory.getShape (“Square”) ;
                square.draw ( ) ;
           }
}
- Step 5: Validating the Output
Now, the output of the implementation will be:
Triangle Drawn
Rectangle Drawn
Square Drawn
13. What is the Adapter Design Pattern?
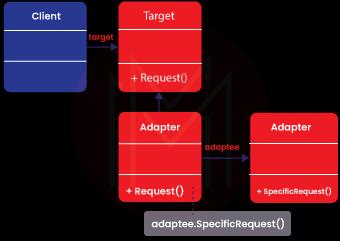
The adapter design pattern comes under the structural design pattern’s category that allows incompatible objects to collaborate. This one acts as a wrapper between two varying objects. The adapter gets a hold on the call for one object and transforms it to be recognized by the second object.
Let’s consider the example of a USB to Ethernet adapter to understand it better. When you have an ethernet interface at one end and the USB interface on the other, you use USB to Ethernet. Since the ethernet and USB are not compatible with each other, you have to use an adapter.
This adapter class comes with a client class and an adaptee class. While the former expects an object type, the latter provides the same feature by exposing a distinct interface. Now, to establish communication between the two, there is an adapter class.
The client uses the target interface to request the adapter. And then, the adapter class translates the request through the adaptee interface. The client, then, receives the results without having any idea of the role of an adapter.
To get deeper into this concept, let’s consider another example. Suppose you have a MediaPlayer Interface that is implemented by the AudioPlayer class. The AudioPlayer can play the format of mp3 by default. Let’s consider another interface, which is AdvancedPlayer, implemented by the MP4Player class that plays the mp4 formats. And then, there is a WAVPlayer that plays wav formats.
If you want the AudioPlayer class to play different formats, you will have to use the MediaAdapter class that implements the MediaPlayer interface and makes use of the AdvancedPlayer objects to play the needed format.
The code implementation of this situation will be:
//MediaPlayer.java
public interface MediaPlayer {
     public void play (String format, String file) ;
}
//AdvancedPlayer.java
public interface AdvancedPlayer {
     public void playMP4 (String file) ;
     public void playWav (String file) ;
}
//MP4Player.java
public class Mp4Player implements AdvancedPlayer{
     @Override
      public void playMp4 (String file) {
             System.out.printIn (“MP4 File “ + file + “ Playing….”) ;
}
    @Override
     public void playWav (String file) {
             //do nothing
      }
}
//WAVPlayer.java
public class WAVPlayer implements AdvancedPlayer{
     @Override
      public void playMP4 (String file) {
             //do nothing
      }
      @Override
        public void playWav (String fille) {
               System.out.printIn (“WAV File “ + file + “ Playing….”) ;
        }
}
//MediaAdapter.java
public class MediaAdapter implements MediaPlayer {
  AdvancedPlayer advancedPlayer;
  public MediaAdapter(String format){
     if(format.equalsIgnoreCase("mp4") ){
        advancedPlayer = new Mp4Player();
     }else if(format.equalsIgnoreCase("wav") ){
        advancedPlayer = new WAVPlayer();
     }
  }
  @Override
  public void play(String format, String file) {

     if(format.equalsIgnoreCase("mp4")){
        advancedPlayer.playMp4(file);
     }
     else if(format.equalsIgnoreCase("wav")){
        advancedPlayer.playWav(file);
     }
  }
}
//AudioPlayer.java
public class AudioPlayer implements MediaPlayer {
  MediaAdapter mediaAdapter;
  @Override
  public void play(String format, String file) {
     //inbuilt support to play mp3 music files
     if(format.equalsIgnoreCase("mp3")){
        System.out.println("MP3 file " + file +" Playing...");
     }
     //Make use of Adapter to support different formats
     else if(format.equalsIgnoreCase("wav") || format.equalsIgnoreCase("mp4")){
        mediaAdapter = new MediaAdapter(format);
        mediaAdapter.play(format, file);
     }
     else{
        System.out.println("Format not supported");
     }
  }
}
//Driver.java
public class Driver {
  public static void main(String[] args) {
     AudioPlayer audioPlayer = new AudioPlayer();
     audioPlayer.play("mp3", "music1.mp3");
     audioPlayer.play("wav", "music2.wav");
     audioPlayer.play("mp4", "music3.mp4");
     audioPlayer.play("avi", "music4.avi");
  }
}
The output of the code will be:
MP3 file music1.mp3 Playing...
WAV File music2.wav Playing...
MP4 File music3.mp4 Playing...
Format not supported
14. What do you mean by Decorator Design Pattern?
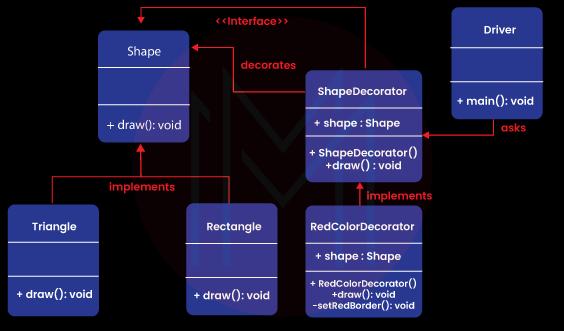
Decorator design patterns come under the structural pattern category that allows you to add new features to existing objects without altering the structure. This pattern creates a decorator class that works as a wrapper to the existing class by retaining the class methods’ signatures intact.
This pattern uses abstract classes as well as interfaces with composition to implement the wrapper. Mostly, they are used to apply the Single Responsibility Principle (SRP) as the functionalities are divided into classes with distinct concerns. In terms of structure, this pattern is similar to the chain of responsibility pattern.
Here are the steps to implement the decorator design pattern:
- Creating an interface and concrete classes to implement the interface
- Creating an abstract decorator class to implement the above interface
- Creating a concrete decorator class to extend the above abstract class
- Using the concrete decorator class to decorate the objects’ interface and verifying the output.
To understand better, let’s take an example. Let’s create a shape interface and concrete classes, Rectangle and Triangle, to implement the shape interface.
- Step 1: Creating Shape Interface
// Shape.java
  public interface Shape {
         void draw ( ) ;
  }
- Step 2: Creating Concrete Classes Rectangle.java and Triangle.java to Implement Shape Interface
// Rectangle.java
  public class Rectangle implements Shape {
          // Overriding the draw method
            @Override public void draw ( )
             {
                       System.out.printIn (“Rectangle Drawn…”) ;
              }
}
// Triangle.java
  public class Triangle implements Shape {
          // Overriding the draw method
            @Override public void draw ( )
             {
                       System.out.printIn (“Triangle Drawn…”) ;
              }
}
- Step 3: Creating ShapeDecorator Abstract Class to Implement the Shape Interface
// ShapeDecorator.java
  public abstract class ShapeDecorator implements Shape {
           protected Shape shapeDecorated;
           public ShapeDecorator (Shape shapeDecorated)
           {
                  this.shapeDecorated = shapeDecorated;
            }
            public void draw ( ) {
                     shapeDecorated.draw ( ) ;
            }
}
- Step 4: Creating the RedColorDecorator.java Class to Extend the ShapeDecorator Class
public class RedColorDecorator extends ShapeDecorator {
        public RedColorDecorator (Shape shapeDecorated)
        {
               super (shapeDecorated) ‘
         }
         @Override
          public void draw ( )
          {
                  shapeDecorated.draw ( ) ;
                  setRedBorder (shapeDecorated) ;
           }
                 private void setRedBorder (Shape shapeDecorated)
                 {
                       System.out.printIn (“Red color border added….”) ;
                  }
}
- Step 5: Implementation Of the Driver Class to Demo the Decorator Class
// Driver.java
  public class Driver {
          // Main driver method
          public static void main (String [ ] argos)
          {
                  Shape triangle = new Triangle ( ) ;
                  Shape redTriangle
                           = new RedColorDecorator (new Triangle ( ) ) ;
                   Shape redRectangle = new RedColorDecorator (new
Rectangle ( ) ) ;
                        // Draw normal triangle
                        triangle.draw ( ) ;
                        System.out.printIn (“.........”) ;
                        // make the triangle red
                        redTriangle.draw ( ) ;
                        System.out.printIn (“.........”) ;
                        // make the rectangle red
                        redRectangle.draw ( ) ;
                        System.out.printIn (“..........”) ;
               }
}
- Step 6: Validating the Output
The output of the above-mentioned code will be:
Triangle Drawn...
   .........
   Triangle Drawn...
   Red color border added...
   .........
   Rectangle Drawn...
   Red color border added...
   .........
| Check out String Handling in Java |
15. Define a Command Pattern.
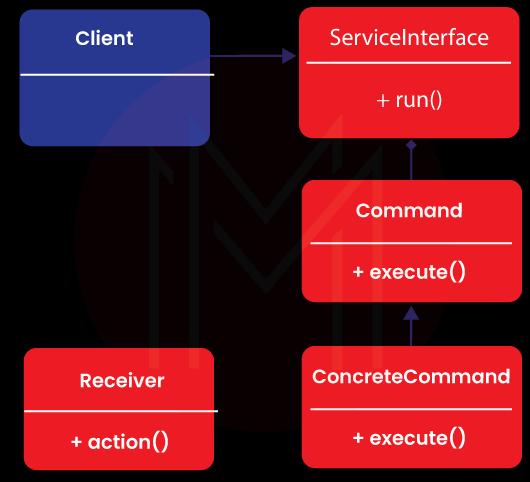
The command pattern is the type of behavioral design pattern that helps transform a request into a stand-alone object that comprises all of the details about that request. This one is a data-driven pattern as we use the information regarding the request by wrapping the same as an object, which is then passed to the invoker object in the form of a command.
The invoker object looks for the object that can manage the command and passes it to the object for the command execution. There is a client that calls the invoker to run the command. There is a command interface that acts as an abstraction to the concrete classes.
Let’s understand it with an example of remote control that only has one button. Through this button, you can control the behavior of two objects - tubelight and a radio. Thus, the command design pattern will be used to command the handling of objects.
- Step 1: Creating Command Interface
// Command Interface
  interface Command
  {
         public void execute ( ) ;
   }
- Step 2: Creating Tubelight Class and the Command Classes to Extend the Above Interface to Control the Tubelight
// Tubelight class
  class TubeLight
  {
        public void lightOn ( ) {
                 System.out.printIn (“TubeLight on…”) ;
        }
        public void lightOff ( ) {
                System.out.printIn (“TubeLight off…”) ;
        }
 }
 // Command class to turn on the tubelight
 class TubeLightOnCommand implements Command
 {
       TubeLight tubeLight ;
       // The constructor is passed the light it
       // is going to control.
       public TubeLightOnCommand (Tubelight tubeLight) {
            this.tubeLight = tubeLight ;
       }
       public void execute ( ) {
             tubeLight.lightOn ( ) ;
       }
  }
  // Command class to turn off the tubelight
  class TubeLightOffCommand implements Command
  {
         TubeLight tubeLight ;
          public TubeLightOffCommand (TubeLight tubeLight) {
                  this.tubeLight = tubeLight ;
          }
          public void execute ( ) {
                   tubeLight.lightOff ( ) ;
           }
  }
- Step 3: Creating a Radio Class and its Command Class to Extend the Above Interface to Control the Radio
// Radio class
  class Radio
   {
        public void radioOn ( )
        {
                System.out.printIn (“Radio on…”) ;
         }
         public void radioOff ( )
         {
                System.out.prinIn (“Radio off…”) ;
          }
           public void setVolume (int volumeLevel)
           {
            // code to set the volume
            System.out.printIn (“Radio volume set to “ +
volumeLevel) ;
                 }
      }
      // Command class to turn on the radio
      class RadioOnCommand implements Command
      {
             Radio radio;
              public RadioOnCommand (Radio radio)
              {
                      this.radio = radio;
               }
               public void execute ( )
               {
                    radio.radioOn ( ) ;
                }
         }
         // Command class to set the volume of the radio
         class RadioVolumeCommand implements Command
         {
                Radio radio;
                int volumeLevel;
                public RadioVolumeCommand (Radio radio, int volumeLevel)
                {
                      this.radio = radio;
                      this.volumeLevel = volumeLevel;
                 }
                 public void execute ( )
                 {
                      radio.setVolume (volumeLevel) ;
                  }
}
- Step 4: Creating a Remote Control Class with One Button that Executes the Command Functionality Upon Clicking
// remote control with one button
  class RemoteControl {
         Command button; // only one button
          public RemoteControl ( ) { }
          public void setCommand (Command command) {
                   // set the command the remote will
                    // execute
                    button = command;
            }
            public void pressButton ( ) {
                 // execute the command on click (call) of the button
                   button.execute ( ) ;
             }
}
- Step 5: Creating a Driver Class to Integrate the Pattern
Here, we will be turning on the tubelight on the button’s first click. And, on the next click, the radio will get turned on. Next, the radio’s volume will be set to 4 and then the tubelight will get turned off.
// Driver class
  public class Driver
  {
         public static void main (String [ ] args)
         {
                      RemoteControl remote = new RemoteControl ( ) ;
                      TubeLight tubeLight = new TubeLight ( ) ;
                       Radio radio = new Radio ( ) ;
                       // Turn on Tubelight
                        remote.setCommand (new
TubeLightOnCommand (tubeLight) ) ;
                                     remote.pressButton ( ) ;
                                     // Turn on Radio
                                      remote.setCommand (new RadioOnCommand (radio) ) ;
                                      remote.pressButton ( ) ;
                                      // Turn off Radio
                                       remote.setCommand (new
RadioVolumeCommand (radio, 4) ) ;
                                      remote.pressButton ( ) ;
                                      // Turn off Tubelight
                                       remorse.setCommand (new
TubeLightOffCommand (tubeLight) ) ;
                                   remote.pressButton ( ) ;
                }
       }
- Step 6: Validating the Result
TubeLight on...
   Radio on ...
   Radio volume set to 4
   TubeLight off…
16. What problems does the Builder Pattern solve?
A builder pattern is a kind of creational design pattern that allows you to step-by-step construct complicated objects. The pattern allows you to produce varying representations of an object through the same logic of construction.
It assists in creating immutable classes with a large set of attributes. In the Factory as well as Abstract Factory Design Patterns, you come across these problems if the object has several attributes:
- When there are too many arguments, the program will get prone to error when passing to the Factory Class from the client in a certain order. It becomes difficult to maintain the order of these arguments when the types are the same.
- When the creation of an object turns complex because of heavy attributes, the complexity of this class will turn confusing.
- There may be optional attributes of the object. And, despite that, you might be compelled to send all of the optional attributes and parameters as Null.
These issues can be solved through constructors of needed parameters. However, this creates a problem when new parameters will be added as parts of new requirements. This will result in inconsistency. That is where Builder is used.
This pattern helps solve the problem of a massive number of optional attributes and the inconsistent situation by offering a method to develop an object in a step-by-step methodology and return the final object through another method.
The following steps can help implement the builder pattern:
- Creating a static nested class, copy all arguments from the outer class: This nested class will be called the builder class. Adequate naming convention must be followed when naming the builder class. For instance, if the class’s name is MindMajix, the builder’s name will be MindMajixBuilder.
- The builder class must have a public constructor with all of the attributes sent as parameters.
- The builder class should also have methods to set optional parameters and return the builder object after setting the values.
- Finally, the build() method should be there inside the builder class to return the object required by the client.
Let’s understand better with an example. Here, we have a user class and will build a UserBuilder class to develop objects of the user class.
class User
{
   //All final attributes
   private final String firstName; // required
   private final String lastName; // required
   private final int age; // required
   private final String phoneNbr; // optional
   private final String address; // optional
   private final String nationality; //optional

   private User(UserBuilder builder) {
       this.firstName = builder.firstName;
       this.lastName = builder.lastName;
       this.age = builder.age;
       this.phoneNbr = builder.phoneNbr;
       this.address = builder.address;
       this.nationality = builder.nationality;
   }

   //Setters are not provided to make it immutable
   public String getFirstName() {
       return firstName;
   }
   public String getLastName() {
       return lastName;
   }
   public int getAge() {
       return age;
   }
   public String getPhoneNbr() {
       return phoneNbr;
   }
   public String getAddress() {
       return address;
   }
   public String getNationality() {
       return nationality;
   }

   @Override
   public String toString() {
       return "User: "+this.firstName+" "+this.lastName+", "+this.age+", "+this.nationality", "+this.phoneNbr+", "+this.address;
   }

   public static class UserBuilder
   {
       private final String firstName;
       private final String lastName;
       private int age;
       private String phoneNbr;
       private String address;
       private String nationality;

       public UserBuilder(String firstName, String lastName) {
           this.firstName = firstName;
           this.lastName = lastName;
       }
       public UserBuilder age(int age) {
           this.age = age;
           return this;
       }
       public UserBuilder phoneNbr(String phoneNbr) {
           this.phoneNbr = phoneNbr;
           return this;
       }
       public UserBuilder address(String address) {
           this.address = address;
           return this;
       }
       public UserBuilder nationality(String nationality) {
           this.nationality = nationality;
           return this;
       }
       // method to return the constructed object
       public User build() {
           User user =  new User(this);
           validateUserObject(user);
           return user;
       }
       private void validateUserObject(User user) {
           //Validate of the object does not break anything
       }
   }
}
public class Driver{
   public static void main(String[] args) {
       User firstUser = new User.UserBuilder("Harry", "Potter")
       .age(30)
       .phoneNbr("1234567")
       .address("221B Baker Street - London")
       .build();

       System.out.println(firstUser);

       User secondUser = new User.UserBuilder("Ron", "Weasley")
       .age(32)
       .phoneNbr("5655")
       //no address
       .build();

       System.out.println(secondUser);

       User thirdUser = new User.UserBuilder("Hermoine", "Granger").age(20).nationality("English")
       //No age
       //No phone
       //no address
       .build();

       System.out.println(thirdUser);
   }
}
The output of this code will be:
User: Harry Potter, 30, null, 1234567, 221B Baker Street - London
User: Ron Weasley, 32, null, 5655, null
User: Hermoine Granger, 20, English, null, null
17. What is the method to accomplish thread-safe Singleton Patterns in Java?
A thread-safe singleton class is created to help object initialization in the presence of several threads. It can be done in several ways:
- Method 1: Using Enums
Enums are the easiest ways to create a thread-safe singleton class in Java as the synchronization support is internally done by Java. By default, Enums are finalized and help in averting several initializations during serialization.
public enum ThreadSafeSingleton{
      SINGLETON_INSTANCE;
      public void display(){
          System.out.println("Thread-safe singleton Display");
      }
   }
   // The Singleton class methods can be invoked as below
   ThreadSafeSingleton.SINGLETON_INSTANCE.show();
- Method 2: Using Static Field Initialization
They can also be created by developing the instance at the time of class loading. This can be achieved by using static fields as the Classloader guarantees the initialization of instances during class loading. Also, the instance is not visible until it has been created completely.
 public class ThreadSafeSingleton{
      private static final ThreadSafeSingleton INSTANCE = new ThreadSafeSingleton();
      private ThreadSafeSingleton(){ }
      public static ThreadSafeSingleton getInstance(){
          return INSTANCE;
      }
      public void display(){
          System.out.println("Thread-safe Singleon");
      }
   }
   ThreadSafeSingleton.getInstance().display();
- Method 3: Using Synchronized Keyword
We can use the synchronized keyword upon the getInstance method as:
In this method, you can achieve lazy initialization and the object initialization is thread-safe because of the use of synchronized keywords.
The only issue is that the performance gets affected in the presence of multiple threads because the entire method is synchronized.
 public class ThreadSafeSingleton
   {
    // Creating private instance to make it accessible only by getInstance() method
    private static ThreadSafeSingleton instance;
    private ThreadSafeSingleton()
    {
      // Making constructor private so that objects cant be initialized outside the class
    }
    //synchronized getInstance method
    synchronized public static ThreadSafeSingleton getInstance(){
      if (this.instance == null)
      {
        // if instance is null, initialize
        this.instance = new ThreadSafeSingleton();
      }
      return this.instance;
    }
   }
- Method 4: Double-Check Locking
Here, a synchronized block of codes will be used within the getInstance method rather than making the entire method synchronized. This makes sure that just a handful of threads will have to wait for the first time; thus, it doesn’t affect the performance.
 public class ThreadSafeSingleton {
    // Creating private instance to make it accessible only by getInstance() method
    private static ThreadSafeSingleton instance;
    private ThreadSafeSingleton(){
      // Making constructor private so that objects cant be initialized outside the class
    }
    public static ThreadSafeSingleton getInstance(){
      if (instance == null){
        //synchronized block of code
        synchronized (ThreadSafeSingleton.class){
          if(instance==null)
          {
            // initialize only if instance is null
            instance = new ThreadSafeSingleton();
          }
        }
      }
      return instance;
    }
   }
18. Can you write a Java program to showcase the following pyramid design?
       *
      * *
     * * *
    * * * *
   * * * * *
This design can be achieved through nested loops and calculatingly adding stars and spaces as shown below:
public class MindMajixPyramid{
   public static void printPyramid(int n) {
       for (int i=0; i<n; i++){  // for number of rows
           for (int j=n-i; j>1; j--) {
               System.out.print(" "); //print space
           }
           //for number of columns
           for (int j=0; j<=i; j++ ) {
               System.out.print("* "); // print star
           }
           //end-line after every row
           System.out.println();
       }
   }

   public static void main(String args[]){
       printPyramid(5); //Print Pyramid stars of 5 rows
   }
}
The output of this code will be:
       *
      * *
     * * *
    * * * *
   * * * * *
19. Can you write a Java program to showcase the left triangle star pattern on the system console?
This can be accomplished through nested loops and calculatingly adding spaces and stars as shown below:
public class MindMajixPyramid{
   public static void printLeftTriangleStars(int n) {
       int j;
       for(int i=0; i<n; i++){  // outer loop for number of rows(n)
           for(j=2*(n-i); j>=0; j--){   // for spaces
               System.out.print(" "); // to print space
           }
           for(j=0; j<=i; j++){ // for columns
               System.out.print("* "); // Print star and give space
           }
           System.out.println(); // Go to next line after every row
       }
   }
   public static void main(String args[]){
       printLeftTriangleStars(5); //print stars of 5 rows in left triangle fashion
   }
}
The output will be:
          *
        * *
      * * *
    * * * *
  * * * * *
20. Can you write a Java program that can print diamond number patterns?
public class MindMajixDiamondNumber{
   public static void diamondNumberDisplay(int maxNum){
     for (int i = 1; i <= maxNum; i++){
           int n = maxNum;
           for (int j = 1; j<= n - i; j++) {
               System.out.print(" ");
           }
           for (int k = i; k >= 1; k--) {
               System.out.print(k);
           }
           for (int l = 2; l <= i; l++) {
               System.out.print(l);
           }
           System.out.println();
       }
       for (int i = maxNum-1; i >= 1; i--){
           int n = maxNum-1;
           for (int j = 0; j<= n - i; j++) {
               System.out.print(" ");
           }
           for (int k = i; k >= 1; k--){
               System.out.print(k);
           }
           for (int l = 2; l <= i; l++){
               System.out.print(l);
           }
           System.out.println();
       }
   }
   public static void main(String[] args) {
     int n = 5;
     diamondNumberDisplay(n);

   }
}
The output will be:
   1
  212
 32123
4321234
543212345
4321234
 32123
  212
   1
Conclusion
Design patterns make sure that the reusable solutions are tested adequately and implemented in a right manner to enhance the code flexibility and make a way to develop extendible and smart solutions that solve issues with ease. Now that you are finally preparing to appear for the interview, refer to these design patterns interview questions and get that well-deserving job.
 On-Job Support Service
Online Work Support for your on-job roles.

Our work-support plans provide precise options as per your project tasks. Whether you are a newbie or an experienced professional seeking assistance in completing project tasks, we are here with the following plans to meet your custom needs:
- Pay Per Hour
- Pay Per Week
- Monthly
| Name | Dates | |
|---|---|---|
| Core Java Training | Feb 17 to Mar 04 | View Details |
| Core Java Training | Feb 21 to Mar 08 | View Details |
| Core Java Training | Feb 24 to Mar 11 | View Details |
| Core Java Training | Feb 28 to Mar 15 | View Details |

Although from a small-town, Himanshika dreams big to accomplish varying goals. Working in the content writing industry for more than 5 years now, she has acquired enough experience while catering to several niches and domains. Currently working on her technical writing skills with Mindmajix, Himanshika is looking forward to explore the diversity of the IT industry. You can reach out to her on LinkedIn.


