
- SAP Interview Questions
- SAP MDG Interview Questions
- SAP PS Interview Questions
- SAP C4C Interview Questions
- SAP ISU Interview Questions
- SAP Analytics Cloud Interview Questions
- SAP CO Interview Questions
- SAP CPI Interview Questions
- SAP VIM Interview Questions
- SAP SCM Interview Questions
- SAP IBP Interview Questions
- SAP RAR Interview Questions
- SAP TM Interview Questions
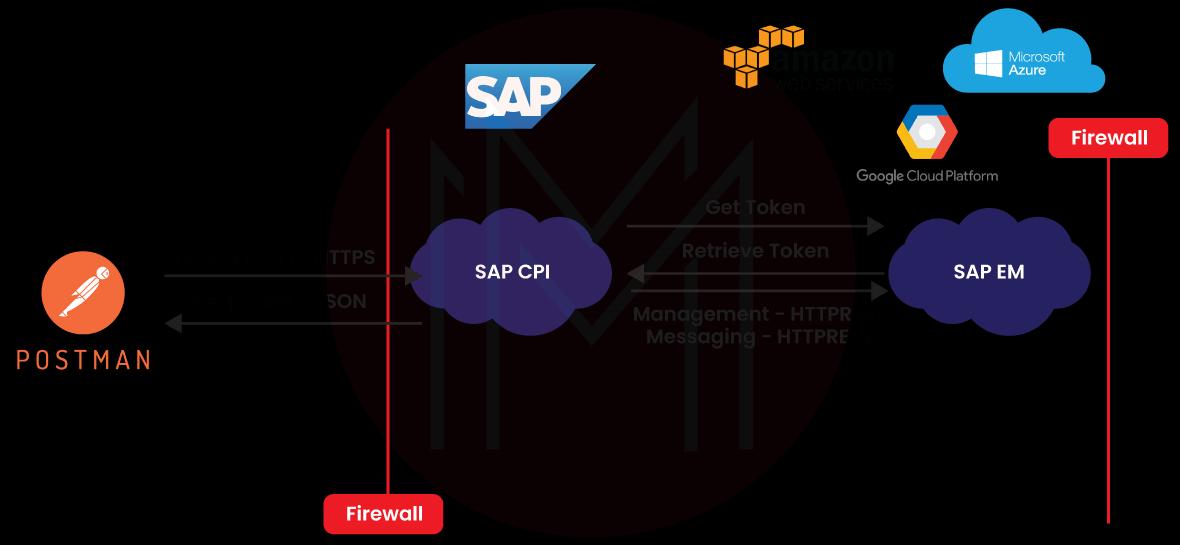
- SAP CPI Architecture
- What is SAP Transportation Management ?
- What is SAP SCM?
- What is SAP PO - SAP Process Orchestration Architecture
- SAP PO Interview Questions
- What is SAP EDI?
- What is SAP Vistex?
- What is SAP Cloud Platform?
- What is SAP MRP - SAP MRP Tutorial
- What is SAP BTP?
- What is SAP Fieldglass?
- What is SAP C4C?
- What is SAP ISU
- What is SAP Solution Manager?
- SAP Analytics Cloud Tutorial
- SAP HCM Interview Questions
- What is SAP APO?
- What is SAP CAR?
- What is SAP PS - SAP PS Tutorial
- What is SAP IBP?
- What is SAP CPQ
- What Is Sap Netweaver
- What Is SAP BRIM
- What is SAP Master Data Governance (MDG)?
- What is SAP VIM?
- SAP MDG Architecture
- What is SAP MDG
- SAP HCM Tutorial
- SAP MDG Tutorial
- SAP TRM Interview Questions
Why is SAP cloud platform different?
SAP Cloud Platform Checklist for Site Planning
SAP Cloud Platform New Site Creation
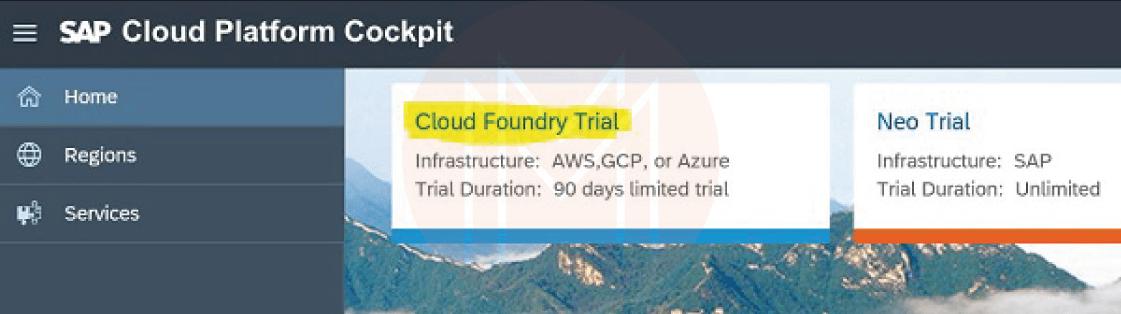
SAP Cloud Platform Cloud Foundry Environment
SAP Cloud Platform Creating New Instance
SAP Cloud Platform Creating Service Key
SAP Cloud Platform Publishing Site
SAP Cloud Platform Cloud Repositories
If you are intrigued towards SAP CPI and would like to use it to create custom applications and software, this SAP CPI tutorial by MindMajix provides a comprehensive scope. Let’s get started to know more.
What is SAP CPI?
SAP CPI is the cloud-based middleware of SAP that helps connect SAP ERP systems of users with third-party products. Such products can be non-SAP, SAP, on-premise, or cloud-based. The service offers real-time exchange of data between the systems.
SAP CPI comprises the below-mentioned integration services:
- API Management: It helps manage the API and track its usage while restricting access.
- SAP API Business Hub: It assists in finding other APIs and publishing custom APIs in the business hub.
- Connectivity: This one helps connect the on-premise apps with CPI interfaces.
- Process Integration: It helps develop the integration that connects and exchanges data through varying connectivity adapters.
- OData Provisioning: It helps access OData services from SAP Netweaver Gateway or Business Suite.
| If you want to enrich your career and become an SAP CPI professional, enroll in "SAP CPI Training".This course will help you to achieve excellence in this domain. |
Why is the SAP cloud platform different?
There is no denying the fact that in the coming future, smart business processes and models will be driving successful businesses. In such a scenario, the SAP cloud platform simplifies and accelerates the entire digital transformation while delivering key benefits.
Here are some of the reasons that make the SAP cloud platform different from others:
#1.Easy Integration of Hybrid System Landscapes and Existing Solutions
SAP cloud platform ensures seamless interaction between the Software-as-a-Service (SaaS) offerings of SAP and the SAP systems. Along with that, you can also integrate SAP Data Hub solutions and SAP HANA Data Management Suite tools conveniently, allowing users to call the data from different solutions and systems almost instantly. Moreover, this platform presents hybrid system landscapes and heterogenous solutions under one platform.
#2.Quick Deployment of Preconfigured Services and Applications
SAP cloud platform offers access to a huge range of pre-configured services for businesses. By using pre-made app components and integrated functions for provisioning and authentication, you can develop and integrate unique apps almost instantly. What’s more, you can also use partner-built apps and solutions just with the click of a button.
#3.Straightforward Development of Native Apps
Since this platform is based on open standards, it provides several development capabilities and tools. For instance, programmers can leverage existing ABAP know-how along with DevOps principles and agile methods to develop new apps and services.
#4.Comprehensive Management of Interface Lifecycles
With the SAP cloud platform, you can effortlessly manage Application Interfaces (API), regardless of whether for new solutions or legacy systems. Keeping in mind that API management is one of the primary pillars of intelligent enterprises, this becomes a crucial advantage.
#5.Continuous User Experience
User acceptance leads to an intelligent success of a business app. This makes it even more essential to provide user-friendly application interfaces across all devices. With the SAP cloud platform, you can rest assured of it. The Platform-as-a-Service (PaaS) provides all the Software Development Kits (SDKs) required to create end-to-end, need-based, and customized interfaces.

SAP Cloud Platform - Checklist for Site Planning
Before you begin creating a site with a cloud platform, you must stay clear of the site’s goals, content, navigation, and evolution. Having said that, you can use the below-mentioned checklist to figure out the crucial aspects
- Objective of creating the site
- Target audience
- Objectives of the business
- Objectives of the end-users
For a site, the target audience could be
- Employees
- New customers
- Suppliers
- Existing customers
Once you have identified the goals, the next step will be to draw the site’s navigation clearly. This comprises how your users will be navigating between the pages of the site. And then, define the content of the site wherein you zero down upon the images, graphics, videos, and text. With the SAP cloud portal, you can also add custom URLs, videos, and widgets or can create widgets on your own. The content further comprises:
- Content type
- Testimonials
- Branding
- Links to be used
- Theme
You can also define the theme type that you wish to use for the site. You can either go with a customized theme or a default one.
To develop a new site, your starting point should be the Site Directory. It takes up every site as a card and comprises details of the site along with other important information regarding its creation.
Check Out: SAP CPI Architecture
SAP Cloud Platform New Site Creation
To create a new site and manage access to sites, you use the site directory in the SAP cloud platform. This is the first point of creating new websites. With the site directory, you can even see sites from extra sources, like:
Transferred Sites: These are the ones that were earlier exported in the ZIP format from other landscapes or accounts and imported to the site directory.
Transported Sites: These are the ones that originated from some other account and are automatically deployed to this account through the SAP cloud platform.
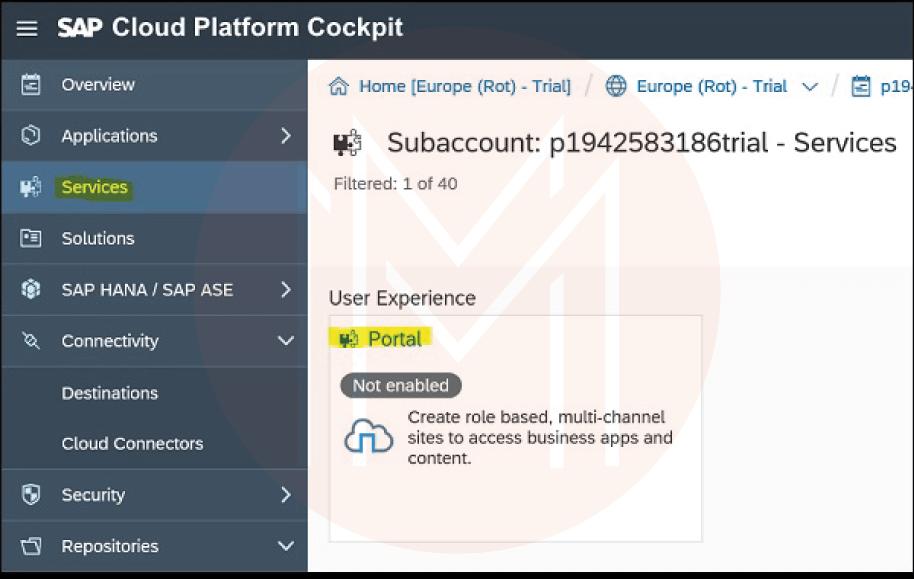
To visit the site directory:
- Go to Services
- Choose Portal
Once there, check the Overview tab, and you will see a brief description of services along with some actions to perform. Go to Services to access customization tools and Launchpad.
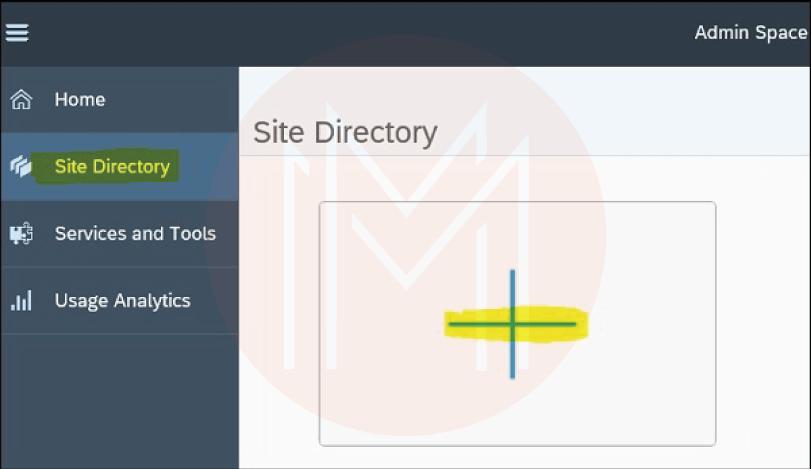
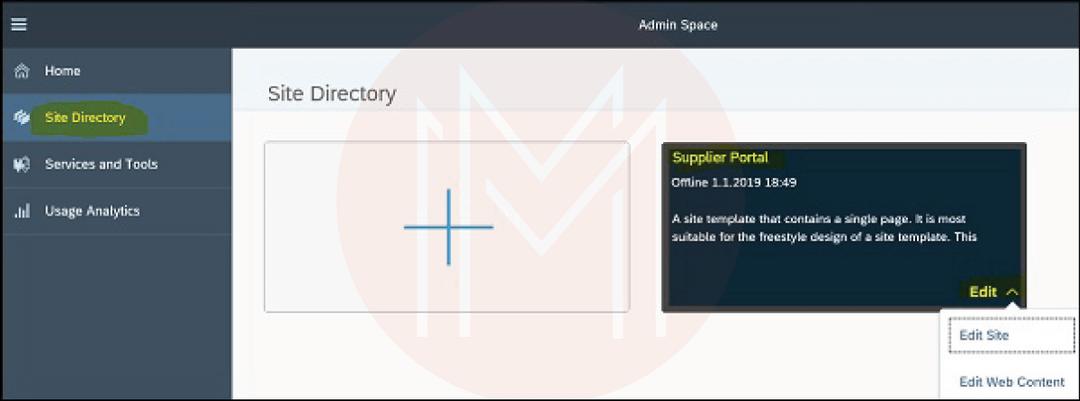
If your site is already defined, you can easily find a list of all the sites under the page Site Directory. However, if not, you can create a new site by clicking on the card that has a (+) cross option.
Next, give a name and description and click “Create and Open.”
Keep in mind that to create the site, you must have TENANT_ADMINrole (Administrator) in the Portal cockpit of the SAP cloud platform.
#1.Site Design
Once you’ve created a new site, you will have to design it adequately. You will have to add sub-pages and define the hierarchy. If you want, you can define varying access levels.
On the side panel, click “Page Management: to define the site’s structure. You will now have the page management menu. To add a new page to the site, use the “Add Page” option.
Choose “Add Title” from the dropdown menu to add an empty placeholder to the menu of the site. If you want, through “AddLink”, you can add a link to the external or internal site or page.
You can create a new page through content from some other site page. For this, from the dropdown menu, click “Import Page.” You will have to choose the site and the page you wish to import.
On the left side, you will have varying tools, services, and editors offered by the configuration cockpit.
#2.Site Themes
Through site themes, you can easily define the appearance of the site. There are predefined site themes, and you can even add more to the theme repository.
To apply a site theme, go to “Design Settings” and choose “Services and Tools.”
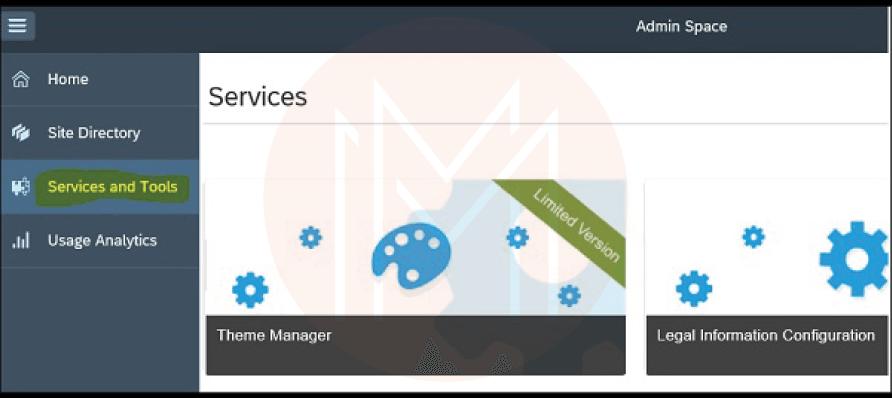
If you want to use a custom theme on the site, choose “Theme Manager.”
In the “Bottom toolbar,” you can find varying options to manage your theme. Here, you can choose the “Assign to Site” option to get a theme for the site.
Once you have applied changes, choose the “Publish” option.
SAP Cloud Platform Cloud Foundry Environment
When using the Cloud Foundry environment, services get enabled by creating a service instance and binding that instance to the application. You can easily create a Service instance on the basis of certain service plans that are defined as a service’s configuration variant. You will have to give service credentials to the application so as to integrate the service of a service instance. By accomplishing this, you can bind the service instances with an app to deliver credentials automatically.
SAP Cloud Platform Creating New Instance
To create a new instance, you will have to use a command line or cockpit cloud foundry interface. Here, the first step will be to:
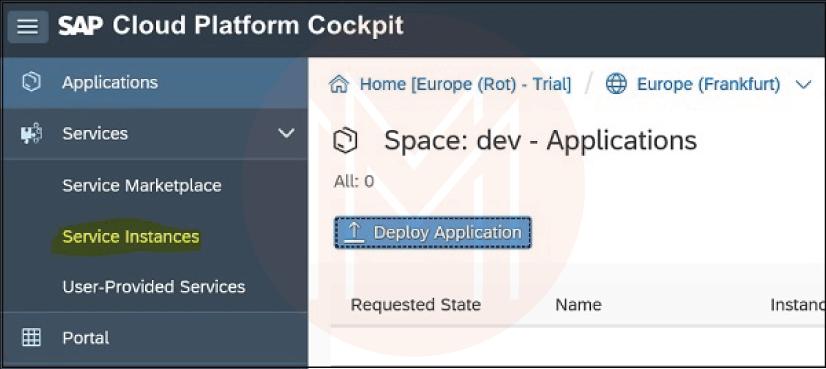
- Go to the space where you wish to create a service instance
- Go to “Services” and choose “Service Marketplace”
- Choose the service for which you would want to create the instance
- Go to the “Navigation Area” and select “Instances” from the left side
- Here, you can see an option to create “New Instance”
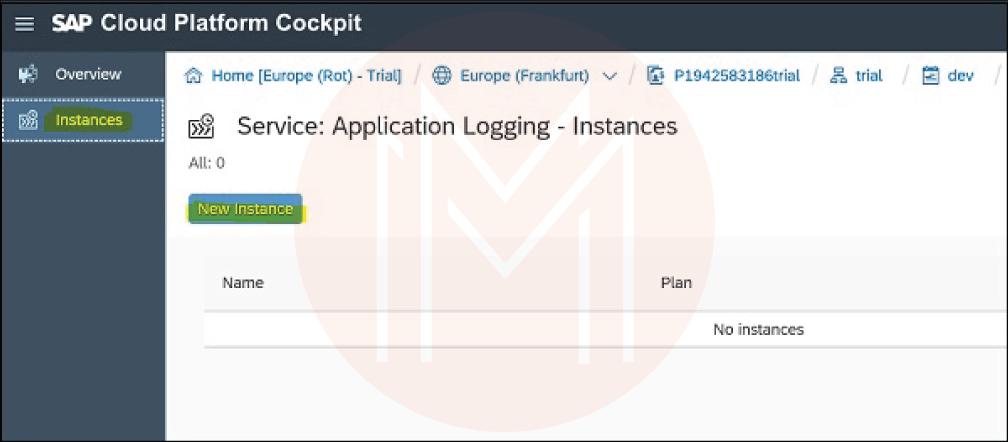
- From the dropdown list, choose the service plan and click “Next”
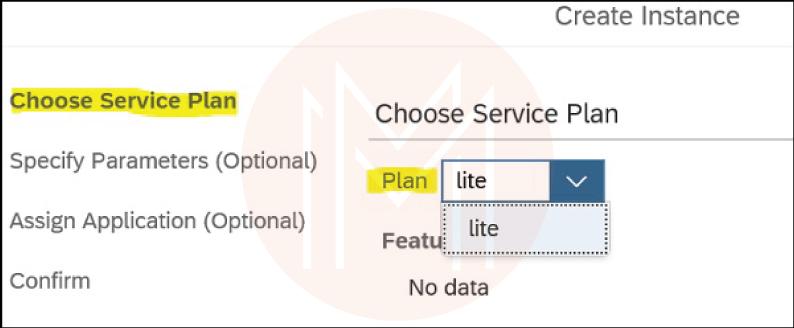
- Then, either specify a JSON file or the parameters in the JSON format
- Click “Next”
- The next field will be an option, so click “Next”
- Click “Next” once again
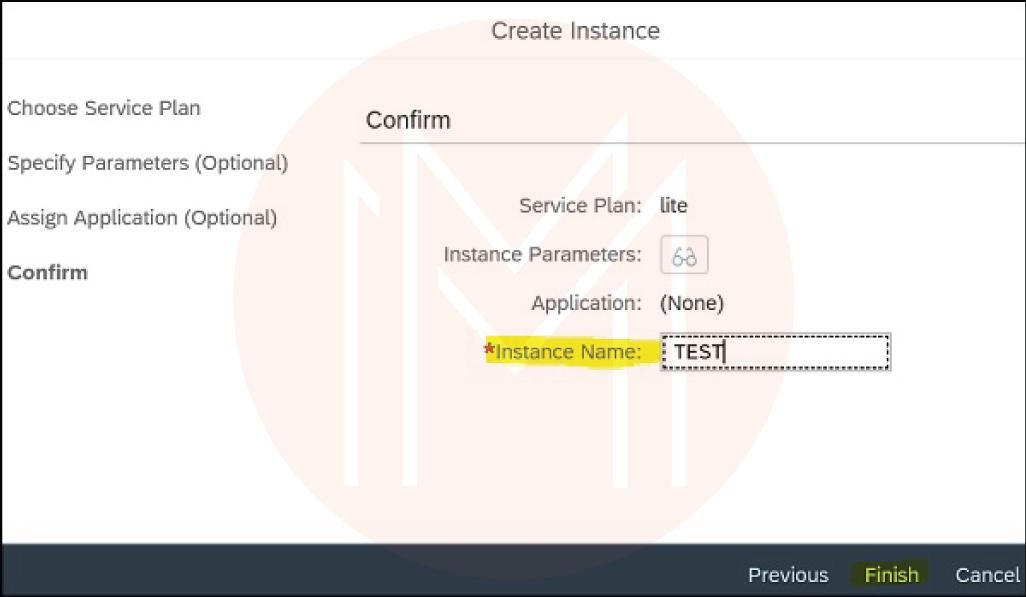
- Give the name to the instance and validate parameters as passed when creating the instance. Keep in mind that you can edit parameters whenever required
- Click “Finish” to complete the creation
If you wish to create a service through the Cloud Foundry Command Line interface, you will have to run the below-mentioned command:
cf create-service SERVICE PLAN SERVICE_INSTANCE
In the above command, make sure that you are defining the following parameters:
SERVICE: This displays the name of the service to create an instance.
PLAN: This is the name of the service plan that you wish to use in the instance.
SERVICE_INSTANCE: This is referred to as the name of the service instance. Here, you must use underscores, hyphens, and alphanumeric characters.
Binding an Instance to an Application
You can use the command line interface or cockpit to bind a service instance to an app. The instance binding can be performed at the service-instance view in the Cloud cockpit or application view. To create one, follow these steps
- Go to “Services” and click “Service Instances”
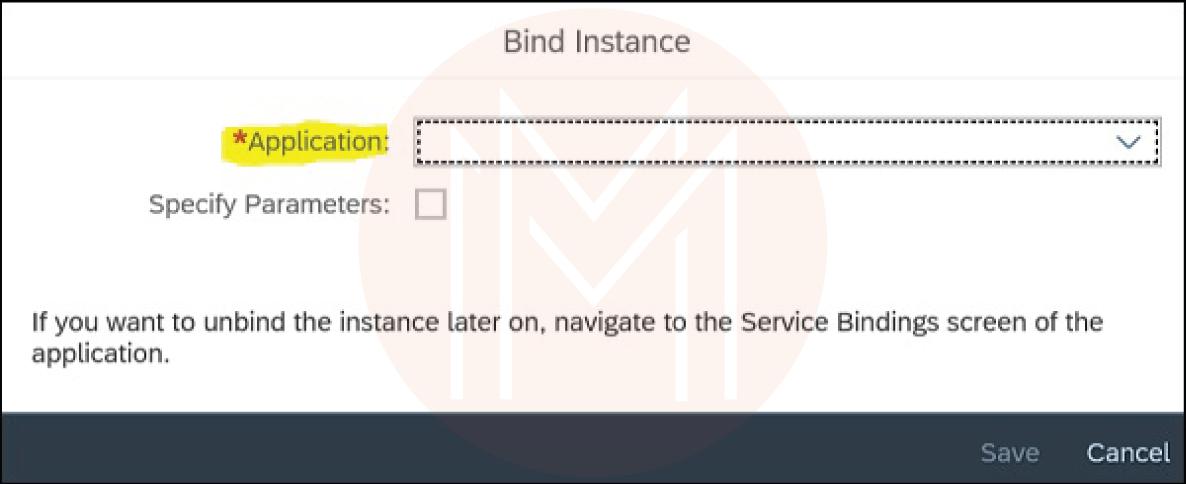
- From the “Actions” column, choose “Bind Instance”
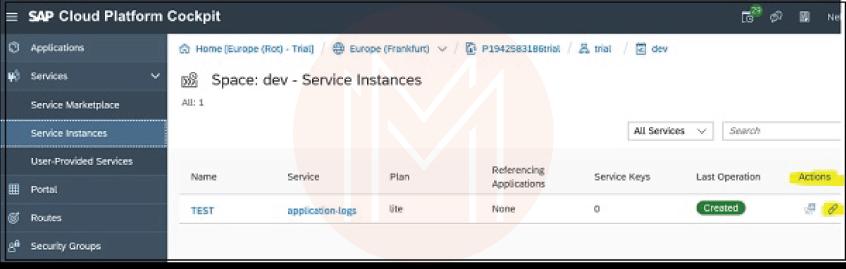
- From the dropdown, choose your application and click “Save”
If you are using Cloud Foundry command line to bind a service instance to an app, you will have to use this command
cf bind-service APP-NAME SERVICE_INSTANCE {-c PARAMETERS_AS_JSON}
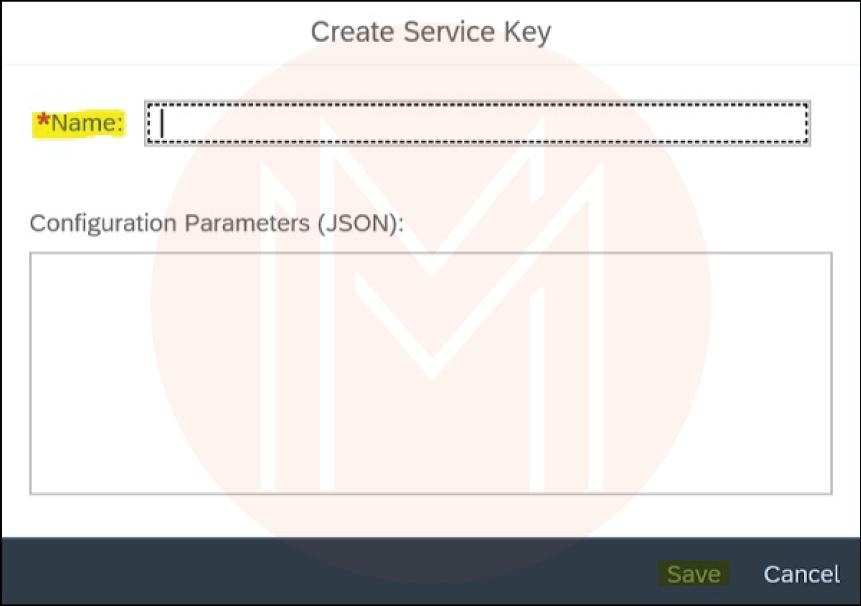
SAP Cloud Platform - Creating Service Key
In an application, service keys are generally used to communicate with a service instance directly. When you configure these keys for service, external entities and apps from some other space get to access the service you are providing through service keys. You can create service keys through the Cloud Foundry command line interface or SAP Cloud cockpit.
If you are using SAP Cloud Cockpit to create service keys, follow these steps
- Go to the space where the service instance was created and visit “Services”, and click on “Service Marketplace”

- Choose the service you wish to create the service key and choose the instance for which the key will be created
- Click “Create Service Key” option and give a name to the key

- You can even configure parameters if you want
- Click “Save”
If you are using Cloud Foundry command line interface to create a service key, you will have to run this command:
cf create-service-key SERVICE_INSTANCE SERVICE_KEY {-c PARAMETERS_AS_JSON}
SAP Cloud Platform Publishing Site
Once you have finalized the site, you can go ahead with publishing it. However, before that, you must make sure your website is looking as you anticipated. Here, you will have to keep an eye on these points:
| Site previewing | Ensure that your site is displaying as you expected on every device that your target audience is using. |
| Editing the URL of the site | Modify the suffix of the URL of the site to make it look more meaningful to the audience. You can select a string that comprises the name of the company or indicates its purpose. But ensure to keep it as short as possible. |
| Publishing the site | Once you have reviewed the site and have ensured everything is adequate, you can go ahead with publishing it. |
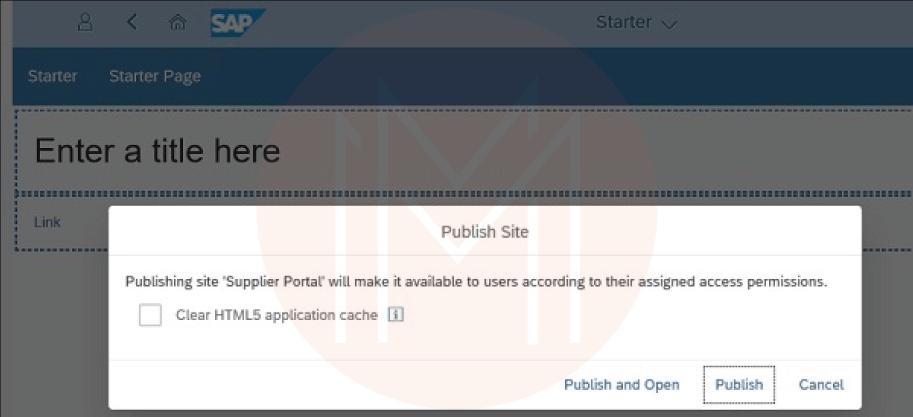
Other Site Activities: Once at this stage, you can find other activities and options as well, such as:
Publishing Options: In the side panel, you can see two publishing options as per the site status, such as Offline and Published. The former says that your site has not been published yet and is offline, while the latter says that your site is published. Apart from this, there is an option that says Modified, meaning that the site is published but has been modified after being published.
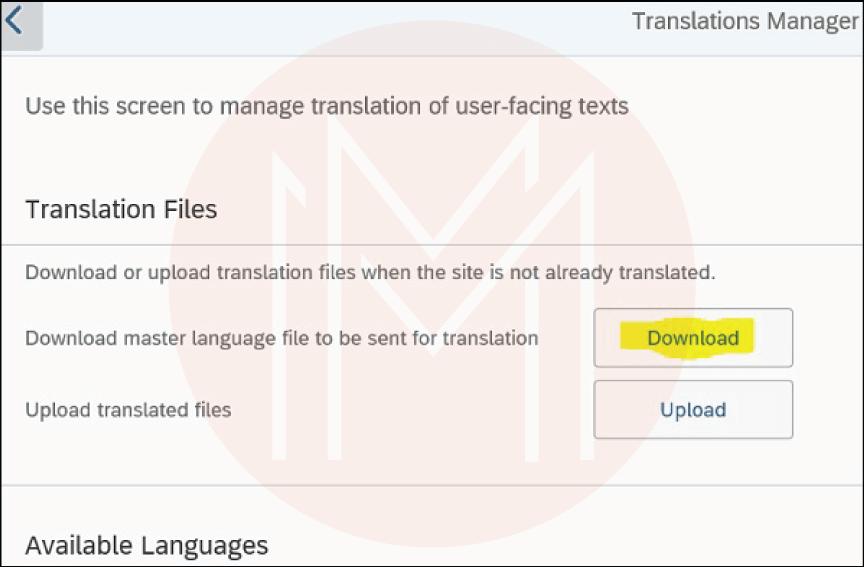
Translating Site and Transferring Sites
If you want, you can translate your site and download its content in HTML, PDF, and other formats. Once you have translated the files, you can load them to the website, where your audience can see the same in a browser language. But keep in mind that the site will be maintained in the master language itself. When a site is translated to some other account, the translations get automatically available in the website content. But, whenever you duplicate the website through the same account, translations will not be available, and you will have to export the files and import the site to that specific account.
To define the master language of the site:
- Go to “Site Settings” menu
- And you can choose there
To download the site content:
- Go to “Services and Tools”
- Choose “Translation Tiles”
- Click “Configure” option
Now, coming to the transferring of the site, you can perform this action through SAP Cloud platform or can create a site from some other account or create a prototype. In the site directory, you can perform basic site transfer through the export/import option.
For exporting:
- Go to “Site Directory”
- Choose the site that you wish to export and click “Site Actions:
- Now, export the site and save the ZIP file to the system
For importing:
- Go to “Site Directory”
- Add your site and import the site

With this, a site will be created in the Site Directory, and you will be able to see a transfer date in the Created field. If you want, you can even create a duplicate site by:
- Clicking on “Site Actions”
- Choosing “Duplicate Site”
The next step will be entering the following details:
- Name of the new site
- Description of the new site
Once done, choose “Duplicate” option and a copy of your existing site will be created with the given description and name. If you wish to include invited users in your duplicated site, you can choose the “Include site users” checkbox.
SAP Cloud Platform Cloud Repositories
From SAP cloud administrators, you can have varying cloud repositories for developing a site. These repositories are easy to modify and edit. They also come with administrator privileges. The content of these repositories is available in the authoring space.
There are three types of repositories found in the SAP cloud, such as:
Theme Repository: This one can be found in the “Theme” tab of the “Portal Service.” Herein, you can find themes in a table form with varying details, such as the theme’s name, description and the name of the creator. The default theme for this account is available in a star symbol. To create a theme in this repository
- Go to the “Themes tab” and click “Add Theme” available in the right corner, and this will open a dialogue box.
- Enter the details of the theme, like its name, description, and location
- Click the “Add” option
Document Repository: It is available in the “Portal Service” and under the “Document” tab. It comprises all those documents that you can share and reuse on varying sites. It has documents for a certain account. To access this repository
- Visit “Portal service tab”
- Click “SAP Cloud Platform cockpit”
- Click “Repositories” and choose “Document Repositories”
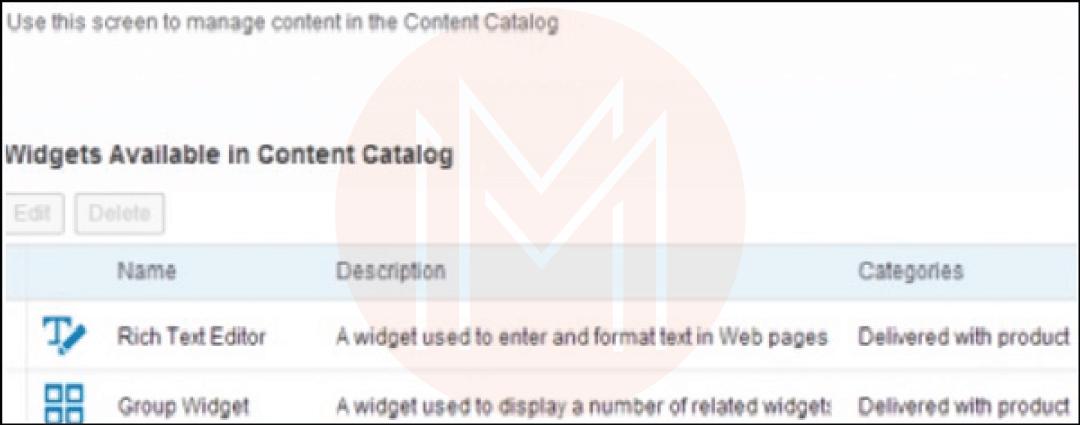
Widget Repository: It is in the “Content” tab in the “Portal Service.” It comprises all the widgets for a specific account. The widgets here are available in a table format and display basic information regarding widgets. You can also add a variety of widgets to this repository, such as a social widget, URL widget, and SAP Jam Feed widget.
Check Out: SAP ERP Interview Questions
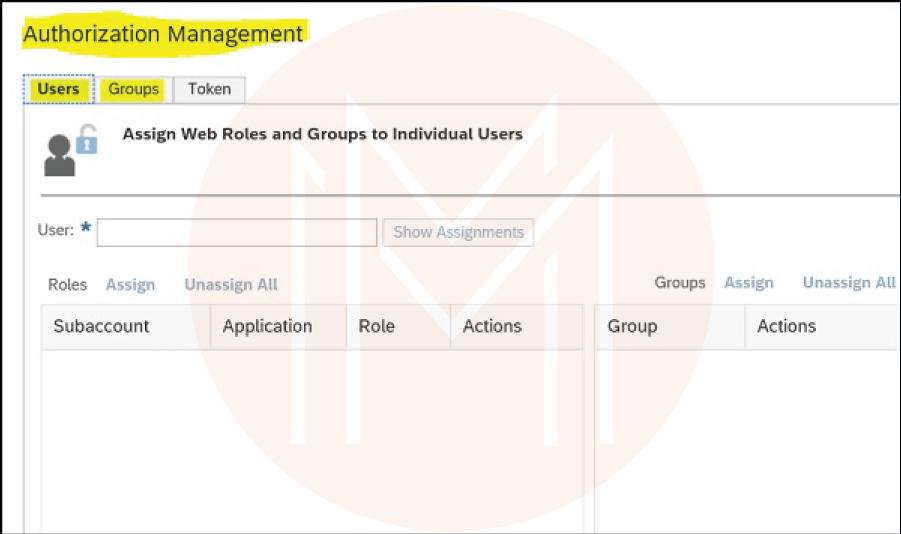
SAP Cloud Platform Access Management
To administrate and regulate the site, the SAP Cloud Platform offers different access and permissions. Administrators get the responsibility for handling content and themes, while user-level access is used to handle access relevant to the site and pages that are published.
1. Roles
In the cloud platform, the following roles are used commonly:
- Administrator: It is predefined as Tenant_Admin and is used to add and manage themes and content.
- User Roles: This one is used to manage access to published pages and sites.
- Guest Role: This one is used to give access to individuals who are outside the organization.
2. Managing Site and Page Access for Users
Whenever you publish a site, you get the liberty to allow varying levels of site access to users, such as:
- Public: Whenever you give the public access, anyone on the internet can access the site.
- Authenticated: this comprises site users who are a part of the company and can access the site through the mechanism of predefined authentication.
- Role Based: This comprises some users who are assigned a certain role to access the site.
3. Managing Site Settings
You can easily navigate to the settings options of the site and edit diverse properties associated with the site, such as custom, user, and system settings. On the left side, go to the “Settings” tab, and you will see a “Site Setting” menu on the screen. To make edits and changes, click the “Edit” option available at the bottom right corner.
SAP CPI FAQs
1. What is SAP CPI used for?
SAP Cloud Platform Integration (CPI) is the cloud-based middleware of SAP that helps connect the SAP ERP systems with third-party products. They can be cloud-based products, on-premises products, SAP products, and non-SAP products. This service lets real-time data exchange between different systems.
2. How do I start learning SAP CPI?
First and foremost, you must have access to SAP CPI. Once done, you can enroll yourself in a detailed, high-level course, such as SAP CPI Training Course by MindMajix. The course comprises up to 30 hours of sessions, 25 hours of lab, a flexible schedule, free demo, 24/7 lifetime support, one-on-one doubt clearing, a certification-oriented curriculum, and real-time use cases.
3. Is SAP CPI difficult?
It is easy to develop an interface but it could be relatively difficult to understand the architecture and design of SAP CPI.
4. What are 4 uses of CPI?
There are several uses of SAP CPI, such as Business-to-Business (B2B) and Application-to-Application (A2A) integration, integration between non-SAP and SAP systems, integration between on-premise and cloud applications, and synchronous and asynchronous data integration.
5. Is SAP CPI an ETL tool?
Yes, SAP CPI is an Extract Transform Load (ETL) tool.
6. What is the salary of SAP CPI jobs?
On average, the salary of an SAP CPI consultant ranges anywhere between Rs. 4.8 lakhs to Rs. 14 lakhs a year.
7. Is SAP CPI a SaaS or PaaS?
SAP CPI is a Platform-as-a-Service (PaaS).
8. Is SAP CPI a middleware?
Yes, SAP CPI is a cloud-based middleware.
Conclusion
Whether you are a novice or an experienced professional, you must know one thing creating an interface with SAP CPI is an extremely easy thing. However, you might have to face a bit of difficulty in understanding its design and architecture. Having said that, with this SAP CPI tutorial, you can now easily develop and build a site for your business. In case you would like to learn more about this technology, take part in this SAP CPI Course by MindMajix.
 On-Job Support Service
Online Work Support for your on-job roles.

Our work-support plans provide precise options as per your project tasks. Whether you are a newbie or an experienced professional seeking assistance in completing project tasks, we are here with the following plans to meet your custom needs:
- Pay Per Hour
- Pay Per Week
- Monthly
| Name | Dates | |
|---|---|---|
| SAP CPI Training | Aug 01 to Aug 16 | View Details |
| SAP CPI Training | Aug 04 to Aug 19 | View Details |
| SAP CPI Training | Aug 08 to Aug 23 | View Details |
| SAP CPI Training | Aug 11 to Aug 26 | View Details |

Although from a small-town, Himanshika dreams big to accomplish varying goals. Working in the content writing industry for more than 5 years now, she has acquired enough experience while catering to several niches and domains. Currently working on her technical writing skills with Mindmajix, Himanshika is looking forward to explore the diversity of the IT industry. You can reach out to her on LinkedIn.


