- Alteryx vs Tableau
- The Assistance of Tableau Rest API, You Can Now Automate Server Administration Tasks
- How to Blend Different Data sources in a Single Worksheet in Tableau
- Tableau Essentials
- Components Of Data Warehouse - Tableau
- How to Connect to Your Data and Generated Values of Tableau
- Create Visual Analytics Using Tableau Desktop
- Generate a new data with forecasts in an ad hoc analysis environment
- Future and Career Growth as a Tableau developer
- Import Custom Geocode Data / Map in Tableau
- Tableau Essentials: Chart Types
- How to Enhance Views with Filters, Sets, Groups and Hierarchies in Tableau?
- How to become a Tableau Developer -A Perfect Guide
- How to edit views in tableau server?
- Detailed Guide to Get Certified in Tableau
- Building Interactive Tableau Dashboards
- Introducing the Tableau Desktop Workspace - Tableau
- How to Join Database Tables with Tableau
- Introduction to Joins In Tableau
- Lumira Vs Tableau
- Top Reasons To Learn Tableau
- Authoring and editing reports via server in tableau
- Tableau 10.2.1 – New Capabilities and Corrected Issues in TABLEAU
- Tableau Advanced Interview Questions
- Introduction to Tableau API
- Why Tableau is Considered the Best BI Tool ?
- Growth of Tableau BI (Business Intelligence) Among Trending Technologies
- Tableau Calculated fields
- Table calculation in Tableau
- Tableau Careers and Salaries
- Tableau Case Statements
- Tableau Certification
- Create Pie charts, Scatter Plot, Area Fill charts & Circular View in Tableau
- Tableau Competitors
- Tableau Data Blending
- Tableau Desktop Tutorial
- Tableau Drivers
- Tableau Ecosystem Contains Of Different Components
- Tableau Interview Questions And Answers
- Tableau Latest Version
- What are the web mapping service pros and cons in tableau?
- Tableau Maps Tutorial
- Tableau Parameters
- Tableau Reporting
- Tableau Reporting Tool
- Tableau Reshaper Tool
- Tableau Server
- Tableau Server interview Questions
- Tableau Server Tutorial
- Tableau Show Me feature
- Tableau Tutorial
- Tableau Version History
- Tableau Visualization Course and its advantages in the current job market
- Tableau vs Cognos
- Tableau vs Domo
- Tableau vs Looker
- Tableau Vs Microstrategy
- Tableau vs Power BI
- Tableau vs QlikView
- Tableau Vs Spotfire
- Animating maps using the pages shelf or slider filters in Tableau
- Succession Planning analytics and Hr Dashboard in Tableau
- How to publish dashboards in tableau server?
- How Tableau geocodes your data?
- How to use Date Field in Tableau?
- How the Table Calculations Use Building Formulas in Tableau
- How to Add Flexibility to Calculations with Parameters in Tableau
- How to Build your first Advanced Dashboard in Tableau?
- How to Change the Scope of Trend Lines Tableau
- How to configure tableau server for the first time?
- How to consume information in tableau server?
- How to create a Standard Map View in Tableau?
- How to Create Calculated Values using Dialog Box in Tableau
- How to Customize Shapes, Colors, Fonts and Images in Tableau?
- How to deploy tableau server in high availability environments?
- How to deploy tableau server in multi-national entities?
- How to Determine your Hardware and Software needs in Tableau server?
- How to embed tableau reports securely on the web?
- How to improve appearance to convey meaning more precisely in tableau?
- Install Tableau Server and Reasons to Deploy it
- How to Install the Command Line Tools in Tableau?
- How to monitor activity on tableau server?
- How to organize reports for consumption in tableau server?
- How To Sort Data In Tableau
- Use Custom Background Images to Plot Spatial Data
- How to use maps to improve insight in Tableau?
- How to use performance recorder to improve performance in tableau server?
- Tableau Subscription and Report Scheduling
- How to use tabadmin for administrative task automation in tableau?
- How to Use Table Calculation Functions in Tableau
- Learning to leverage tabcmd in tableau
- Leverage existing security with trusted authentication in tableau server
- Managing tableau server in the cloud
- Planning for a successful tableau deployment at ACT
- How to Plot Your Own Locations on a Map in Tableau
- Tableau Self-Service Ad Hoc Analysis with Parameters
- Quality metrics in a hospital in tableau
- Trend Lines and Reference Lines In Tableau
- What Are Calculated Values and Table Calculations in Tableau?
- What are the advanced chart types in tableau?
- Tableau Dashboard Best Practices
- What are the common use cases for tabcmd in tableau?
- What are the licensing options for tableau server and tableau online?
- What are the Options for Securing Reports in Tableau?
- Sharing Connections, Data Models, Data Extracts in Tableau
- What are the tips, tricks and timesavers in tableau?
- What are the typical map errors and how to deal with them in tableau?
- What do tabcmd and tabadmin do in tableau’s command line tools?
- Tableau Aggregate Functions
- What is the right way to build a dashboard in tableau?
- What is the wrong way to build a dashboard in tableau?
- What kinds of tasks can be done with tabcmd commands
- When and how to deploy server on multiple physical machines in tableau?
- Tableau Extracts or Direct Connection - When to Use
- The Practicality of Using Tableau Mobile to Create Visualization
- Web Data Connector in Tableau Server
- Data Visualization and its influence on Businesses
- Tableau Charts Types
- How to Use Date Functions in Tableau
- Tableau Architecture & Server Components
- Looker vs Power BI
- Tableau Projects and Use Cases
- Tableau Integration with Salesforce
- Excel vs Tableau
- rohit blog title test
Before jumping into Tableau sets and creating sets, we will briefly go through what Tableau is and why it is.
Tableau is one of the popular data visualization tools widely used by data scientists and analysts. It is an easy-to-use tool with which we can convert raw data into valuable visuals. Using this tool, we can analyze the raw data and create charts, diagrams, and maps. As a result, you can closely track your business processes and identify patterns in customer behavior.
Tableau provides an interactive dashboard where we can view the visuals of data analyses. Besides, we can get the analyses in the report format as workbooks.
No programming knowledge or any specific expertise is required to use this tool. The important thing is that we can easily install Tableau on any device in no time. Not only that, Tableau is one of the highly secure applications.
Moreover, we can create sets in Tableau. A set is nothing but a selected list of members. A set is made based on the conditions defined by users.
In this article, we will look into what is set in Tableau, how to create sets in Tableau, what set actions are, combining sets, and much more in detail.
| How to Create Sets in Tableau - Table of Contents |
What is a set in Tableau?
In its basic form, sets in Tableau are nothing but data subsets created based on conditions. In other words, sets are custom fields, and we use conditions to select the members of a set. The main thing about a set is that users can decide the members of a set by defining conditions. Apart from using conditions, we can use filters to include members in a set.
Generally, sets are dynamic as well as interactive. We can compare two sets and form a new set. ‘Set Actions’ is one of the critical features of Tableau that support users to interact effectively with the dashboard. ‘Set Control’ is another vital feature of Tableau that we can use to change the members of a set.
There are two types of sets in Tableau
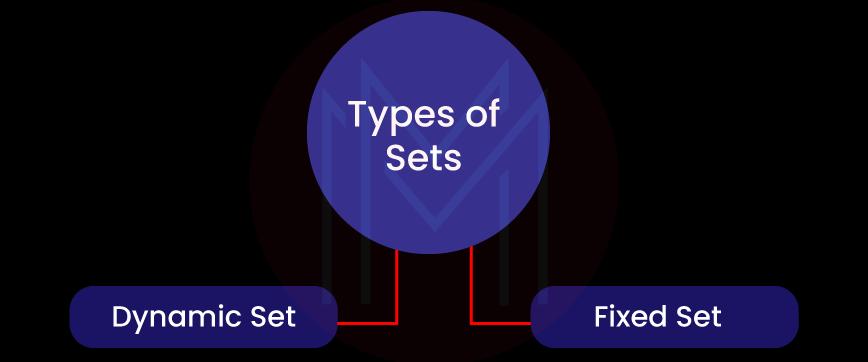
1. Dynamic Set
In this type, changes in the underlying data change the members of a set. Dynamic sets are usually created based on a single dimension of the data.
2. Fixed Set
In this type, changes in the underlying data don’t change the members of a set. Besides, it is based on both a single dimension as well as many dimensions of the data.
| If you want to enrich your career and become a professional in Tableau, then enroll in "Tableau Training" - This course will help you to achieve excellence in this domain. |
How to Create Sets in Tableau?
Tableau allows you to add or delete data points from a set. As you know, Tableau enables users to create sets based on their requirements. We can create either a dynamic set or a fixed set.
Now, let’s go through the procedure on how to create sets in Tableau step by step and how to add/delete data points in the following.
1. Creating a Dynamic Set
You must follow the following steps to create a dynamic set in Tableau.
1. First, right-click a dimension in the data pane, and then choose ‘create’ and ‘set’.
2. Now, you will see the opening of the ‘create set’ dialog box. In this box, you will configure the set.
3. This dialog box contains three tabs: General, Top, and Condition.
4. Now, click the ‘General’ tab and click ‘Select from list’ to select specific members from a list.
5. To select all members of a list, click the ‘Use all’ button under the ‘General’ tab.
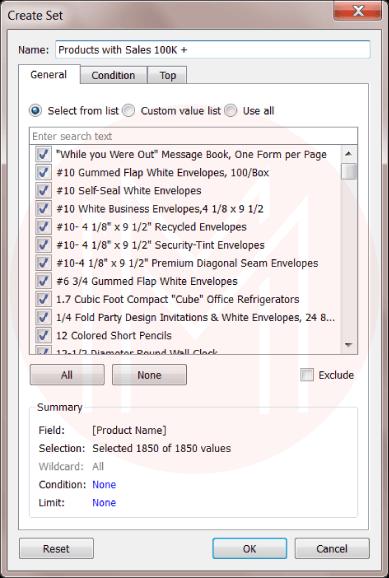
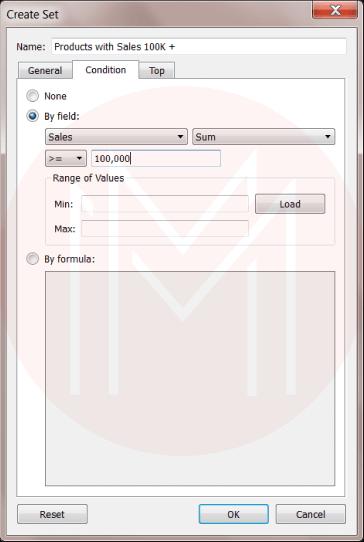
6. To select members of a set based on conditions, use the ‘Condition’ tab to select members from a list.
7. You can use the ‘Top’ tab to fix limits to the set. For example, if you want to add just five members to the set, then you can enter as 5 using the ‘Top’ tab.
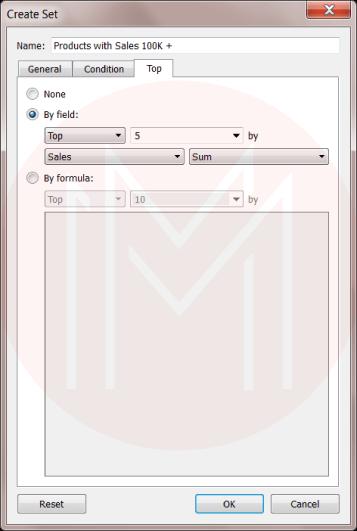
8. Finally, click the ‘OK’ button to complete creating a dynamic set.
2. Creating a Fixed Set
You must follow the following steps to create a Fixed Set in Tableau.
1. First, select more than one mark in the Tableau visualization.
2. Then, right-click on any one of the chosen marks and then select the ‘Create Set’ option.
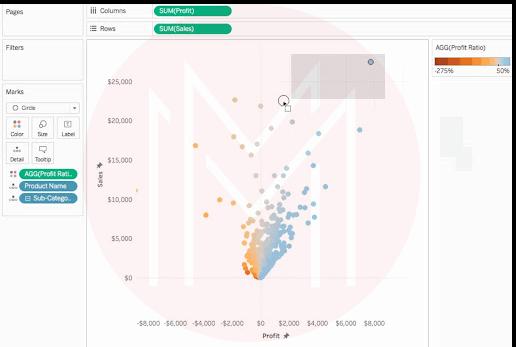
3. A dialog box will open where you can enter a name for the fixed set
4. After that, use the ‘exclude’ option to add the non-selected members to the set and then remove the selected members,
5. You need to click the ‘x‘ icon to remove any dimension.
6. If you don’t want to add rows to the set, you can remove the rows.
7. Suppose there is more than one dimension, you can separate members by entering characters of choice.
8. Now, select ‘Add to filters shelf’ to move the set to the ‘filters shelf automatically'.
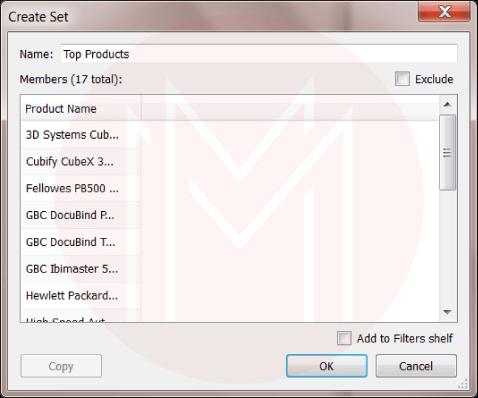
9. Finally, click the ‘OK’ button to complete creating a fixed set.
So far, we have gone through how to create sets in Tableau. Next, we will see how to add or remove data points from sets.
3. Adding or Removing Data Points to/from Sets
If a set is made using data points, then you can add more data to the set. Similarly, you can subtract data from the set.
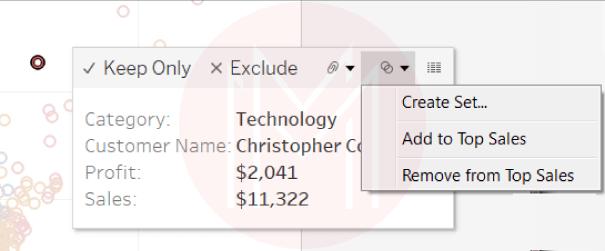
1. In the Tableau visualization, find the data that you want to add or remove
2. Now, you can see that the ‘tooltip’ opens. Once it is opened, click the drop-down menu.
3. Finally, choose ‘Add to’ if you want to add the data to a set. Or else, choose ‘Remove from’ to remove the data from a set.
How to use Sets in Tableau or Data Visualization?
Once the set is created, you can see the set in the ‘sets section’ at the bottom of the data pane. Tableau allows dragging sets into the visualization. So you can view the members of the set. Or, you can aggregate the members based on the ‘In’ and ‘Out’ categories.
It is essential to note that ‘In’ is the list of members of a set, and ‘Out’ is the list of members that are not part of the set. Tableau aggregates only the members of a set into ‘In’ and ‘Out’ categories.
[ Related Article: What is Data Visualization?]
How to show ‘In’ and ‘Out’ members of a Tableau set
When you drag a set into the visualization on the Tableau Desktop, it shows the set members in the ‘In’ and ‘Out’ modes. This mode supports comparing members in a set with others.
If you want to show the ‘In’ and ‘Out’ members of a set in the visualization, we can perform the following steps.
- Right-click the set in the visualization workspace of the Tableau desktop. Then, you can choose ‘Show In/Out of set’.
- Soon after you complete the above step, you will notice IN/Out prefix in the set name on the shelf.
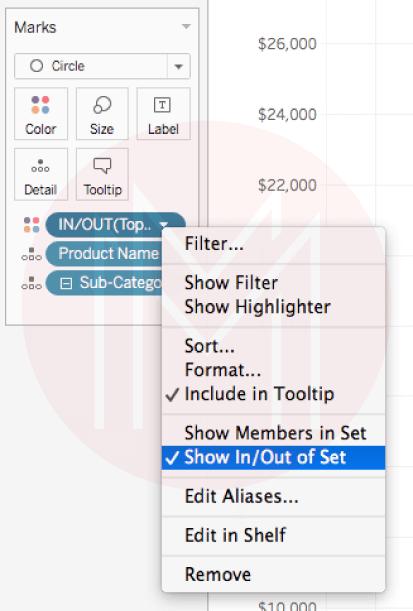
Alternatively, you have another option available on the Tableau desktop to list the members of a set. To do so, you must right-click the set and then choose ‘show members in set’.
What are Set Actions in Tableau
Tableau Desktop offers an excellent feature, 'Set actions', to its users. ‘Set actions’ allow users to control the Tableau visualization. By doing this, users can perform analyses as per their demands. Also, you can update the values in a set using set actions. Note that you can create ‘Set actions’ in any platform, whether it is Tableau Desktop, Tableau Cloud, or Tableau Server.

1. Preliminary Steps for Set Actions
- First, select a data source and then create one or more sets associated with the data source.
- You will create a set action for a set. Also, you will make many set actions.
- Then, you need to create a calculated field that will use the set.
- Next, you will construct a visualization based on the set connected with the set action.
- Finally, you can test the set actions. Based on the results, you can adjust the settings of the set action.
2. Creating a Set Action
1. In Tableau Desktop, choose the dashboard and then open ‘Actions’
2. Similarly, find the ‘Workbook’ and then open ‘Actions’
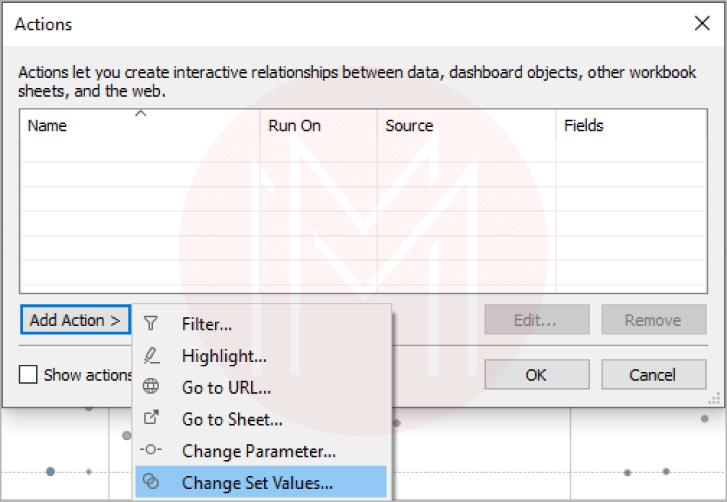
3. After that, click the ‘Add Action’ button in the ‘Actions’ dialog box. Then, you can select the ‘Change set values’.
4. The ‘Add set action’ dialog box will open. Now you can provide a name for the ‘Action’.
5. After that, you can select a data source. Note that when you select a data source, you need to choose an individual sheet from the dialog box.
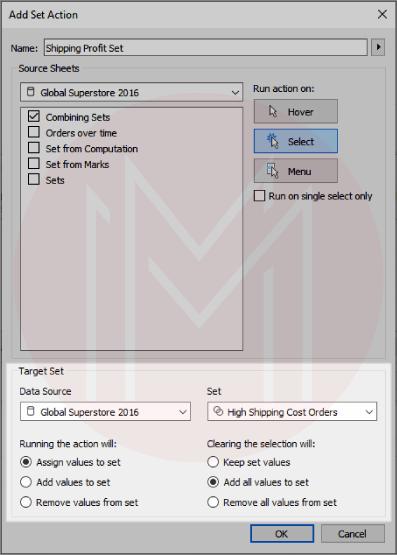
6. Next, you need to select how users need to run the ‘Actions’ whether to ‘hover’ or ‘use the menu’ or ‘select’.
7. Now, you can select the data set from the data source
8. And specify the ‘Actions’ that need to be done when they are running
9. You can perform the actions such as ‘Assign values to set’, ‘Remove values from the set’ or ‘Add values to set’
10. You also need to specify what needs to be done when the selected data set is cleared.
11. You can perform the actions such as 'Keep set values', 'Add all values to set', or 'Remove all values from the set'.
12. Save the changes by clicking the ‘OK’ button. So you can return to the view section.
13. Finally, interact with the Tableau Desktop visualization. So, you can test the performance of ‘Set Actions’.
3. Examples of Set Actions
Following are the areas where you can use ‘Set actions’ widely.
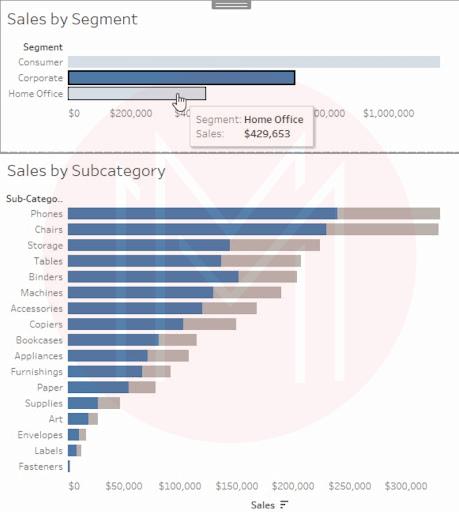
1. Proportional Brushing
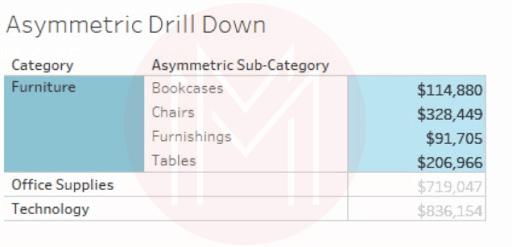
2. Asymmetric drill down
3. Color Scaling
How to Combine Sets in Tableau?
Tableau allows combining two sets. It means that we can combine the members of two sets.
Know that we can combine sets in many ways. For example, we can combine two sets by creating a new set where you can list all the members of the two sets. Similarly, we can combine two sets by creating a new set where we can list all the members that are common to the two sets.
The question is, why do we must combine sets?
The answer is simple. By combining two sets, we can quickly solve complex problems in data analysis. For instance, consider two sets of customers who purchased products in the current and last years. If we want to list only the customers who bought products in both years, then we can combine the two sets with the condition. As a result, the new set will contain the list of customers who purchased products in the two years.
It is essential to note that we can only combine sets based on the exact dimensions. For example, we can combine a product set only with another. Similarly, we can combine a customer set only with another customer set. Note that we cannot combine a customer set with a product set.
To combine two sets, we can follow the procedures below.
- First, choose the two sets you want to combine under sets in the data pane of the Tableau desktop.
- Then, right-click the sets and then choose ‘create combined set’.
- Name the new combined set in the create set dialog box.
- Make sure the selected sets are in the drop-down menu
- Next, select the right option to combine sets as you wish
- The options are ‘All members in both sets’, ‘Except shared members’, and also ‘Shared members in both sets’.
- Select ‘All members in both sets’, if you want to get a new combined set that includes all the two members of two sets.
- Select ‘shared members in both sets’ if you want to get a new combined set that includes common members of the two sets.
- Select the ‘except shared members’ if you want to make a new combined set that will only have the members, not in the second set. In other words, the combined set is the result of the first set subtracted by the second set.
- Finally, click ‘OK’ to return the results.
Applications of Tableau Sets
Let’s list out the applications of Tableau sets in the following.
- By using Tableau sets, we can find the overall total of members, such as how many sales were received from repeat customers.
- We can list the customers who purchased in the last year as well as in the current year.
- We can list the products a specific customer purchased.
- We can set filters to group a particular type of members
FAQs
1. Why do you Create Sets in Tableau?
We usually create sets to build the subsets of data. We can achieve this with the help of conditions or filters. Once it is created, you can use the sets to analyze the data in multiple ways.
2. How do you establish ‘Set Actions’ in Tableau?
If we use the Tableau Dashboard, we establish set actions on the dashboard. If we use the Tableau Workbook, we select set actions in the worksheet. After that, we will configure values to complete creating set actions.
3. What do you mean by ‘Sets’ and ‘Groups’ in Tableau?
Sets in Tableau is the data subset built based on the conditions. The conditions are usually defined by users. Another one, groups, only include members of a single dimension.
4. What do you mean by Parameters and Sets in Tableau?
Parameters in Tableau are nothing but variables such as date, number, etc. Sets are the data subsets created based on conditions.
5. Where can you Identify Sets in Tableau?
We can identify sets in the ‘Sets Section’ in the Tableau Desktop. Particularly, we can identify them in the bottom portion of the data pane.
| Related Article: Tableau Interview Questions |
Conclusion
It’s a wrap! This blog might have helped you to set in Tableau the types of sets and their applications in greater detail. You might have understood how to create sets in Tableau as well as how to use sets in a step-by-step procedure. Moreover, this blog has taught you about combining sets in different ways. If you wish to learn more about Tableau, sets, and other concepts, you may enroll in MindMajix Tableau Course and achieve certification.
 On-Job Support Service
Online Work Support for your on-job roles.

Our work-support plans provide precise options as per your project tasks. Whether you are a newbie or an experienced professional seeking assistance in completing project tasks, we are here with the following plans to meet your custom needs:
- Pay Per Hour
- Pay Per Week
- Monthly
| Name | Dates | |
|---|---|---|
| Tableau Training | Feb 21 to Mar 08 | View Details |
| Tableau Training | Feb 24 to Mar 11 | View Details |
| Tableau Training | Feb 28 to Mar 15 | View Details |
| Tableau Training | Mar 03 to Mar 18 | View Details |

Madhuri is a Senior Content Creator at MindMajix. She has written about a range of different topics on various technologies, which include, Splunk, Tensorflow, Selenium, and CEH. She spends most of her time researching on technology, and startups. Connect with her via LinkedIn and Twitter .


