- Introduction to Amazon Elastic File System
- Amazon On-Demand Instance Pricing
- AWS Kinesis
- Amazon Redshift Tutorial
- Amazon SageMaker - AIs Next Game Changer
- AWS Console - Amazon Web Services
- AWS Architect Interview Questions
- AWS Architecture
- Amazon Athena
- Top 11 AWS Certifications List and Exam Learning Path
- How to Create Alarms in Amazon CloudWatch
- AWS CloudWatch Tutorial
- Introduction To AWS CLI
- AWS Configuration
- AWS Data Pipeline Documentation
- AWS EC2 Instance Types
- AWS Elastic Beanstalk
- AWS Elastic Beanstalk Available in AWS GovCloud (US)
- AWS Free Tier Limits and Faq
- AWS EC2 Instance Pricing
- Choosing The Right EC2 Instance Type For Your Application
- AWS Interview Questions and Answers
- AWS Key Management Service
- AWS Lambda Interview Questions
- AWS Lambda Tutorial
- What Is AWS Management Console?
- Complete AWS Marketplace User Guide
- AWS Outage
- AWS Reserved Instances
- AWS SDK
- What is AWS SNS?
- AWS Simple Queue Service
- AWS SysOps Interview Questions
- AWS vs Azure
- AWS Vs Azure Vs Google Cloud Free Tier
- Introduction to AWS Pricing
- Brief Introduction to Amazon Web Services (AWS)
- Clean Up Process in AWS
- Creating a Custom AMI in AWS
- Creating an Elastic Load Balancer in AWS
- How to Deploy Your Web Application into AWS
- How to Launch Amazon EC2 Instance Using AMI?
- How to Launch Amazon EC2 Instances Using Auto Scaling
- How to Sign Up for the AWS Service?
- How to Update Your Amazon EC2 Security Group
- Process of Installing the Command Line Tools in AWS
- Big Data in AWS
- Earning Big Money With AWS Certification
- AWS Certification Without IT Experience. Is It Possible?
- How to deploy a Java enterprise application to AWS cloud
- What is AWS Lambda?
- Top 10 Reasons To Learn AWS
- Run a Controlled Deploy With AWS Elastic Beanstalk
- Apache Spark Clusters on Amazon EC2
- Top 35 AWS Services List
- What is Amazon S3? A Complete AWS S3 Tutorial
- What is AMI in AWS
- What is AWS? Amazon Web Services Introduction
- What is AWS Elasticsearch?
- What is AWS ELB? – A Complete AWS Load Balancer Tutorial
- What is AWS Glue?
- AWS IAM (Identity and Access Management)
- AWS IoT Core Tutorial - What is AWS IoT?
- What is Cloud Computing - Introduction to Cloud Computing
- Why AWS Has Gained Popularity?
- Top 10 Cloud Computing Tools
- AWS Glue Tutorial
- AWS Glue Interview Questions
- AWS S3 Interview Questions
- AWS Projects and Use Cases
- AWS VPC Interview Questions and Answers
- AWS VPC Tutorial
- AWS EC2 Interview Questions
- AWS DynamoDB Interview Questions
- AWS API Gateway Interview Questions
- How to Become a Big Data Engineer
- What is AWS Fargate?
- What is AWS CloudFront
- AWS CloudWatch Interview Questions
- What is AWS CloudFormation?
- What is AWS Cloudformation
- Cloud Computing Interview Questions
- What is AWS Batch
- What is AWS Amplify? - AWS Amplify Alternatives
- Types of Cloud Computing - Cloud Services
- AWS DevOps Tutorial - A Complete Guide
- What is AWS SageMaker - AWS SageMaker Tutorial
- Amazon Interview Questions
- AWS DevOps Interview Questions
- Cognizant Interview Questions
- Cognizant Genc Interview Questions
- Nutanix Interview Questions
- Cloud Computing Projects and Use Cases
- test info
- AWS Server and Administration
- AWS vs Alternatives
Technology transformation in enterprises is being made in different ways. Shifting to virtual mode from on-premises resource management is one of the transformational ways. In simpler terms, users can make computing, storing, and managing resources in the Cloud rather than maintaining them on-premises, making huge investments. Through virtual computing and resource management, enterprises can simplify their tasks and boost their bottom line without a doubt. This way, Amazon EC2 is the platform with excellent features to support users in many ways.
Amazon EC2 is the short form of Amazon Elastic Compute Cloud. It is the AWS cloud platform that offers a virtual computing environment for applications and resources. EC2 Instances are the core of amazon EC2. With Amazon EC2, you can launch virtual servers, manage storage, configure networking, ensure security, and many more. Unlike on-premises servers, you can achieve an easily scalable computing environment through Amazon EC2. Especially, both up and down scaling can be done quickly in Amazon EC2.
In this tutorial, you can learn the various features of Amazon EC2 and what we can do with it. Continue to read this tutorial to have a thorough understanding of Amazon EC2.
AWS EC2 Tutorial - Table of Content
Features of Amazon EC2
With fantastic features, Amazon EC2 offers scalable and secured virtual computing environments for applications.
Let’s discuss them below:
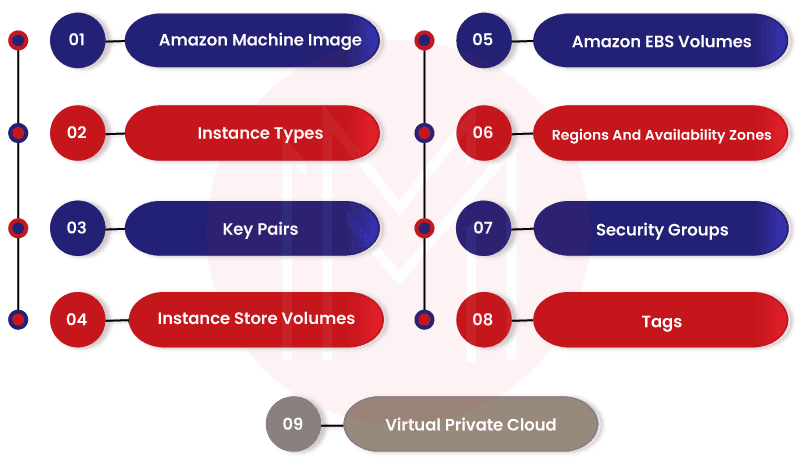
- Amazon Machine Image (AMIs): AMIs are nothing but pre-configured templates used for launching EC2 instances. You need to accurately choose the right AMIs based on the type of computing environment that you plan to create in the AWS Cloud.
- Instance types: Amazon EC2 offers various EC2 instance types based on the following elements – configuration, storage, memory, and networking requirements.
- Key Pairs: It is the security setup provided by Amazon EC2 to protect the login credentials required to access EC2 instances. With this setup, you can store your private key, but AWS stores your public key.
- Instance Store Volumes: Amazon EC2 allows storing temporary data in the instance store volumes. Note that this data will be deleted once you stop, hibernate, or terminate your EC2 instances.
- Amazon EBS Volumes: They are the persistent devices used for storing data with the support of Amazon EBS.
- Regions and Availability Zones: These are the physical locations that consist of the resources such as EC2 instances and Amazon EBS volumes.
- Security Groups: They are firewalls. You can protect EC2 instances with the specified ports, protocols, and source IP addresses using security groups.
- Tags: Tags are a sort of metadata that you can create and assign to your EC2 instances.
- VPCs: VPC refers to the Virtual Private Cloud. Generally, EC2 instances in a VPC are logically isolated from other resources of AWS.
What is AMI?
AMI in Amazon EC2 stands for Amazon Machine Image. It is a basic configuration that works as the template for EC2 instances. It will consist of Amazon EBS snapshots, root volume of the instances, block device mapping, and permissions. With AMIs, you can launch EC2 instances quickly. It allows you to start building as well as deploying applications quickly. Know that a single AMI is enough for launching EC2 instances that have the same configuration. On the contrary, you need to use multiple AMIs for launching EC2 instances that have multiple configurations.
| Looking forward to becoming a master in "Cloud Computing Courses"? Check out the "AWS Training" and get certified today. |
Amazon EC2 offers many types of AMIs. Here is what you can do with the different types of AMIs.
- AWS Windows AMI: This type of AMI will have a configuration specific to the Windows platform. You need to identify the best-fitting AMI based on your requirements and then launch EC2 instances from that AMI. Know that Amazon EBS volume is the root device for the devices that work on the Windows platform. Moreover, it is launched through AWS windows AMI.
- Shared AMI: These are the AMIs usually created by developers. Shared AMIs can be made public, which allows others to use them. Mainly, it is the easiest way of using AMIs. Also, you can customize AMIs as per your needs and share them with others. However, the integrity of the shared AMIs is very crucial. You need only to use the shared AMIs that come from trusted sources.
- Paid AMI: These AMIs can be purchased from the developers who created them. Along with that, paid AMIs can be found in the AWS marketplace, where you can purchase the paid AMIs with other AWS products.

What are Amazon EC2 Windows Instances?
Basically, an instance is a virtual server located in the AWS Cloud. In many ways, Amazon EC2 Windows instances are similar to Windows on-premises servers. In other words, both Windows server and EC2 instances are used to run web applications, manage applications for performing large-scale computations, conduct batch processing, and many more.
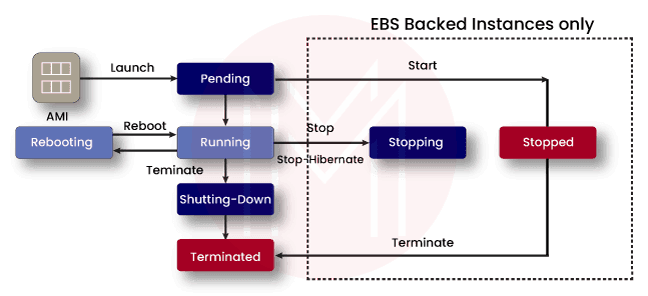
Generally, Amazon EC2 Instances keep running until you stop or hibernate or terminate them. Suppose an instance fails to work, you can launch a new instance from an AMI. Once you launch an instance, it goes to the pending state until the registration is completed. After that, it goes to the running state. Note that you cannot restart an instance after terminating it. Although windows EC2 instances and Windows servers are identical in many ways, they have differences among them, undeniably.
What are the types of Amazon EC2 instances?
Know that users choose an instance type based on the requirements of applications. And the corresponding infrastructure is also built based on the instance type. Amazon EC2 instances are classified into the following categories – general purpose, compute optimized, and storage optimized.
Let’s learn more about them below.
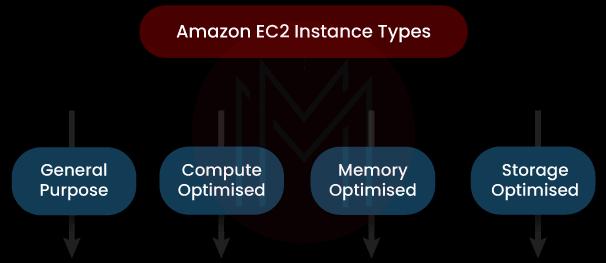
General Purpose: Instances in this category offer a balance between computing, network, and memory resources. Therefore, you can use them for many applications and workloads.
- M5 and M5a Instances: These instances provide an ideal cloud infrastructure that balances networks, memory, and computing resources. And they serve as the right resources for the small and midsize databases, backend servers for SAP, data processing tasks, Cluster computing, SharePoint, and so on.
- m5zn instances: These instances can support applications that require low latency networking and high single-thread performance and throughput. Additionally, they can be used for High-Performance Computing (HPC), gaming, and simulation modeling.
- M6i and M6id Instances: These instances can be suitable for general-purpose workloads such as application servers, microservices, web servers, App development, HPC, and small and midsize databases.
- T2, T3, and T3a Instances: These instances can provide base-level and high-level performance based on the demands. Moreover, they can be used across websites, code repositories, web applications, and microservices.
Compute Optimised: Instances in this category are ideal for compute-bound applications. Moreover, these instances use high-performance processors.
- c5 and c5n Instances: These instances can be used for batch processing workloads, high-performance web servers, media transcoding, high-performance computing, dedicated gaming servers, scientific modeling, and ad serving engines.
- c6i and c6id Instances: They can run compute-intensive workloads such as HPC, video encoding, batch processing, highly scalable multiplayer gaming, and ad serving.
Memory Optimised: Instances under this category are ideal for workloads with large memory datasets. Besides, they achieve fast performance.
- R5, R5a, R5b, R5n Instances: These instances can be used when working with My SQL and NoSQL databases. They will be suitable for applications that process big real-time data. Because of this, these instances are widely used in HPC and Electronic Design Automation (EDA) applications.
- R6i and R6id Instances: These instances are ideal for memory-intensive workloads. Also, they can be used in high-performance databases such as RDBMS and NoSQL and in-memory databases such as SAP HANA.
Storage Optimised: The instances that fall into this category are ideal for workloads that require high and sequential access to manage the vast datasets on data storage. Moreover, they can be used for delivering random IOPS (Input/output Operations Per Second) and low latency to applications.
- d2 Instances: These instances can be used for MapReduce, Hadoop distributed computing, massively parallel processing warehouses, and log and data processing applications.
- d3 and d3en Instances: These instances can be used for Hadoop workloads, distributed file systems, and large data lakes for HPC workloads.
| Checkout AWS EC2 Instance Types and learn more about them |
What are the Monitoring Tools used in Amazon EC2?
Essentially, monitoring is required to ensure the reliability, performance, and availability of EC2 instances in Amazon EC2. Monitoring includes measuring CPU utilization, disk I/O, and network utilization of the instances. Amazon EC2 allows monitoring instances at various workloads and periods. Also, you can compare the current performance of instances with the history of the monitoring data. As a result, you can analyze the performance patterns as well as anomalies in the functioning of instances and address them in the best manner possible.
There are two types of monitoring tools used in Amazon EC2. They are given below:
- Automated monitoring tools
- Manual monitoring tools
Let’s learn these tools one by one.
Automated Monitoring Tools:
- System Status Checks: These checks are performed on the AWS resources needed to run Amazon EC2 instances. As a result, they identify issues in the AWS resources. When there is a failure while making these checks, the issues for the failure can be resolved either by AWS or by external sources. The causes for the failures may be loss of network connectivity, software and hardware issues in the host devices, and loss of system power.
- Instance Status Checks: These checks help to monitor the software and network configurations of the EC2 instances. And they identify the issues when there is a failure in the checks. Here, the issues can be usually resolved by users. Know that the causes for the failure may be misconfigured networking, exhausted memory, corrupted file system, misconfigured start-up configuration, incompatible kernel, etc.
- Amazon Cloud Watch Alarms: This tool monitors a single metric over a period. This alarm invokes actions when there is a state change in an instance.
- Amazon Event Bridge: Generally, events in the AWS resources are delivered to Amazon Event Bridge. Here, you can specify the actions that should be made when an event matches with a rule defined in the tool.
- Amazon Cloud watch Logs: This tool supports monitoring, storing, and accessing the log files of EC2 instances.
- Cloud Watch Agent: This tool helps to collect the logs and system-level metrics of both hosts and guests of the EC2 instances.
Manual Monitoring Tools:
- Amazon EC2 Dashboard: This dashboard displays various kinds of data to users, such as – service health, scheduled events, status checks, alarm status, instance state, and instance and volume metric details.
- Amazon Cloud watch Dashboard: This dashboard displays various kinds of data to users, such as – current alarms and status, service health and status, and graphs of alarms and resources.
| Checkout: Choosing The Right EC2 Instance Type For Your Application |
How is Networking Managed in Amazon EC2?
Let’s find out how networking is managed in Amazon EC2 below.
- Regions and Zones: Amazon EC2 instances and resources are placed across various regions and zones for effective networking and management. Generally, regions represent the geographical area, whereas zones are located inside the regions. Besides, there are many zones such as regions, availability zones, local zones, AWS outposts, and wavelength zones. If you like to know more about the zones in detail, you can find them below.
- Availability Zones - They are located inside the regions and are usually isolated from other zones. A region will have multiple availability zones.
- Local Zones - They will have resources such as instances and storage near the end-users.
- AWS Outposts – They will have the native AWS services, operating models, and infrastructure for the data centers located anywhere and on-premises.
- Wavelength Zones – The instances and resources located in these zones allow developers to build applications that will provide low latency to 5G devices.
- Instance IP Addressing: Know that Amazon EC2 and AWS VPC support IP addressing protocols. Amazon EC2 uses IPv4 addressing protocol while launching EC2 instances. Similarly, AWS VPC also uses IPv4 addressing protocols.
- With the Amazon EC2 console, you can view the private IPv4 addresses, elastic IPv4 addresses, and public IPv4 addresses of your EC2 instances. Similar to IPv4, you can assign IPv6 addresses to EC2 instances and view them in the console through the instance page or network interface.
- Elastic Network Interfaces: Basically, the elastic network interface is a logical networking component. It has the attributes such as a primary private IPV4 address, one elastic address, one or more secondary private IPv4 addresses, one public iPv4 address, one or more security groups, one or more IPv6 addresses, a source, and destination check flag, a MAC address, and a description.
Amazon EC2 allows for creating and configuring network interfaces. This interface allows you to connect with the EC2 instances in an availability zone. On the other hand, the requester-managed network interface supports connecting with other AWS resources and services. Note that AWS only manages this interface.
How is Security Managed in Amazon EC2?
Security is the highest priority in AWS Clouds and is usually a shared responsibility between a client and AWS. There are two aspects present in the security of AWS Clouds – one is the security of the Cloud itself, and the other is the security of the resources inside the Cloud. This way, AWS takes responsibility for the infrastructure that runs in the Cloud. The client is responsible for managing access control to instances, managing the credentials used to access instances, configuring IAM roles and permissions, and so on.
Below are the security arrangements followed to secure resources in Amazon EC2.
- Infrastructure Security: You need only to use the AWS published API calls to access EC2 instances. And you need to use the transport layer security 1.0 or later for data transfer. Moreover, it would help if we used the cypher suites with perfect forward secrecy (PFS), such as DHE and ECDHE. Note that VPC Clouds separate AWS resources into separate groups logically.
- Identity and Access Management (IAM): Without sharing your login credentials, you can allow users, applications, and other services to access your AWS resources. With IAM, you can orchestrate how a user can access the resources. For example, you can assign whether a user can fully access the resources or limitedly. You can create the user and user groups and create credentials accordingly. Also, you can create roles for the users and control their permissions. Not only this, you can manage the rules of security groups by which you can control the traffic to the EC2 instances.
- Amazon Key Pairs: Generally, a key pair consists of private and public keys. They are used to authenticate identities when they try to access Amazon EC2 instances. Know that a public key is usually stored in AWS, and users save the private key. Before accessing EC2 instances, you need to decrypt the admin password using your private key. Note that private keys must be kept safe and careful. If it is lost, you can no longer access your instances.
- NitroTPM: NitroTPM refers to Nitro Trusted Platform Module, a virtual device offered by the AWS Nitro System. With NitroTPM, you can securely store your passwords, encryption keys, and certificates, which will be used to authenticate EC2 instances. NitroTPM is used to generate keys and use them for cryptographic functions such as hashing, encryption, signing, and decryption.
How to set up an AWS Account for launching Amazon EC2 instances?
Setting up an Amazon EC2 consists of three steps as follows:
- Signing up for AWS
- Creating a key pair
- Creating a security group
Let us look at how to accomplish the above tasks step by step as below:
Step 1: Signing up for AWS:
Signing up for AWS allows you to access all the services offered by AWS. Since it is the pay for use only service, you can only use the services needed for your applications.
To open a new account in AWS, you need to follow the below steps:
- Open the following link: https://portal.aws.amazon.com/billing/signup
- Complete the instructions mentioned in the link. The signing-up process includes receiving a phone call from AWS and filling in a verification code on the required text box.
Step 2: Creating a Key Pair
Generally, AWS follows the public key cryptography in security. First, you have to enter the private key information to get the admin password from the AWS. Then, you can log into your instances.
With the Amazon EC2 console, you can create the key pair. The following steps will help you to create the key pair.
- Use the following link to open the Amazon EC2 console – https://console.aws.amazon.com/ec2/
- Select the key pairs in the navigation pane
- Then, select ‘Create key pair’
- Enter a descriptive name for your key pair in the ‘Name’ field. Note that the key name can include 255 ASCII characters.
- Select RSA or ED25519 for the key pair type. Here, RDA supports Windows instances
- You can format to save the private key in ‘Private key format’. You can choose either ‘pem’ or ‘ppk’ formats in this regard.
- Now, select ‘Create key pair’
At last, the private key is automatically downloaded. You need to save it in a safe place.
Step 3: Creating a Security Group:
As we know, security groups act as firewalls for their associated instances. They control the inbound and outbound traffic at the instance level. Connecting the instances relies on the rules set in the security groups. You will need the IPv4 addresses of your computer regarding this setup. Note that key pairs and security groups need to be created for every region in AWS.
You can use the below instructions to create security groups at least privilege.
- Use the following link to open the Amazon EC2 console - https://console.aws.amazon.com/ec2/
- Now, select the region for the specific group from the navigation bar
- Select ‘Security groups’ in the left navigation pane
- Enter a name for the security group and a brief description.
- Then, choose the default VPC for the region from the VPC list
- Now, you can create rules allowing specific traffic to reach your instances for inbound rules. For example, you can create rules allowing HTTP, HTTPS, and RDP traffic.
- For outbound rules, you can keep the default rule that will allow all the outbound traffic
- Finally, select ‘create security group’.
Good! You have set up the AWS prerequisites to launch the Amazon EC2 instances.
How to get started with AWS EC2 Windows Instances?
This tutorial will teach how to launch a Windows instance, connect with resources, and use the instances in detail. Once the AWS setup is over, you must follow the steps below to launch Amazon EC2 instances.
Step 1: Launching an Amazon EC2 instance:
- You can open the Amazon EC2 console using the following link - https://console.aws.amazon.com/ec2/
- Now, select ‘Launch instance’ in the launch instance box from the EC2 console dashboard
- Enter a descriptive name under the ‘Name and tags’ tab
- Select ‘Quick start’ and select ‘Windows’ under the applications and OS images. It means that you are opening Windows Operating System.
- Now, you can choose the AMI for your Windows server
- Choose the hardware configuration from the ‘Instance type’ list under the ‘Instance type’ tab. You can select either t2.micro or t3.micro instance type according to the availability, where t2.micro is the default instance type.
- In the key pair tab under the key pair name, select the key pair that you have created already.
- Click 'edit' in the network settings. In the 'security group name', you will see a wizard and a 'selected security group' for you. So, you can use this security group or the one you created during setup.
- You can keep the default selections for the other configuration settings.
- In the summary panel, we can view the summary of your configuration, and you can launch an instance.
- A confirmation page will pop up now. Then, you can select ‘view all instances’ to close the page.
- Now, we can check the status of your instances on the instances screen. Once the instance starts, you have to click 'confirm'.
- Make sure that the instances have passed all the status checks. This information can be found in the status check column.
Step 2: Connecting to your Instances:
- First, you need to get the administrator password and enter the password to access the windows instances from a remote desktop.
- Let’s see the steps to how to connect to the Amazon EC2 instances using an RDP client.
- You can open the Amazon EC2 console using the following link - https://console.aws.amazon.com/ec2/
- Choose ‘instances’ in the navigation pane. Then, select the instance and select ‘connect’.
- Select the 'RDP client' tab, and select 'Get password' on the 'Connect to instance' page.
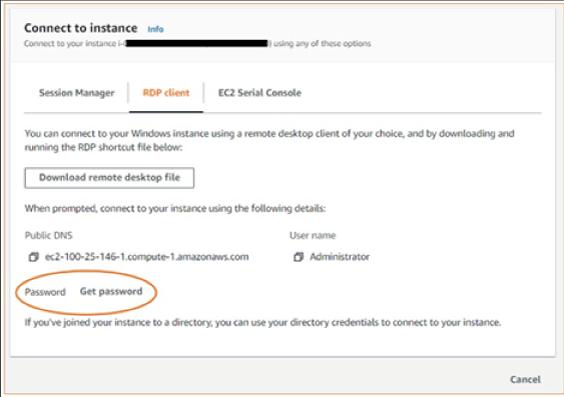
- Now, select 'browse' and select the private key file you have already created. Copy the entire content of the file.
- Select 'Decrypt Password'. Then, under password, you will find the admin password. Now, save the password in a safe place.
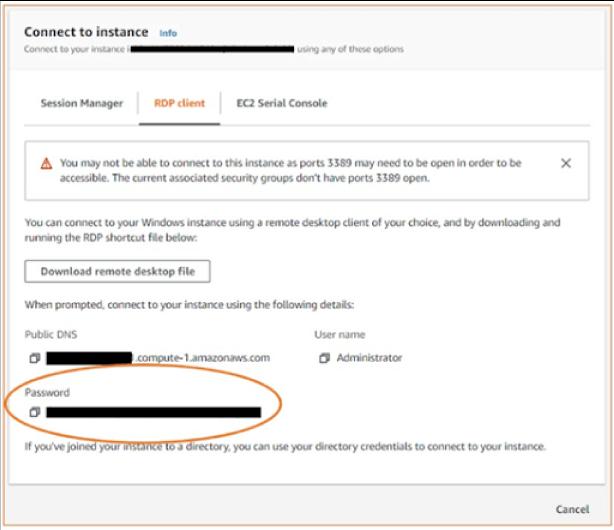
- Select ‘Download remote desktop file’. Once the downloading is over, click ‘Cancel’ to return to the instances page.
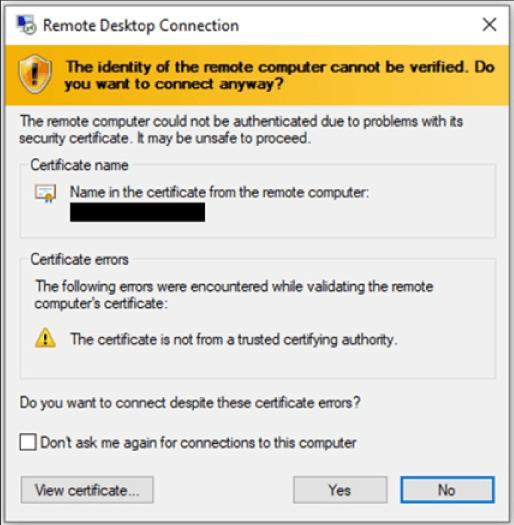
- Open the RDP file, you will get the ‘remote desktop connection’ dialog box
- Select ‘connect’ to continue to your instance if you get a warning dialog box
- Here, the admin account is selected by default. Now, you can paste the password you copied in the earlier steps.
- You may get a warning dialog box for the self-signed certificates at the final step. You can either select yes or follow the steps to verify the identity of the remote desktop.
Step 3: Cleaning up your Instances:
You will need to terminate your Amazon EC2 instances once the purpose for launching instances gets completed. If you need to stop your instances temporarily and intend to use them later, you can do that too.
Follow the below instructions to terminate your instances.
- Select ‘instance’ from the ‘instances list’ on the navigation pane
- Then, select ‘instance state’ and ‘terminate instance’
- At last, select ‘terminate’ when asked for confirmation.
Congrats! You have completed the tutorial on how to get started with y instances.
Conclusion:
Well! You have gone through the features of Amazon EC2, instances, its types, monitoring tools, security mechanisms, etc. we hope that you might have gone through a cakewalk on the blog topics if we are on the same page. You must have hands-on experience in the tutorials – setting up Amazon EC2 in AWS and getting started with Amazon EC2 instances. Repeat reading this tutorial to gain substantial knowledge on Amazon EC2 and shine as the best among the best.
 On-Job Support Service
Online Work Support for your on-job roles.

Our work-support plans provide precise options as per your project tasks. Whether you are a newbie or an experienced professional seeking assistance in completing project tasks, we are here with the following plans to meet your custom needs:
- Pay Per Hour
- Pay Per Week
- Monthly
| Name | Dates | |
|---|---|---|
| AWS Training | Aug 01 to Aug 16 | View Details |
| AWS Training | Aug 04 to Aug 19 | View Details |
| AWS Training | Aug 08 to Aug 23 | View Details |
| AWS Training | Aug 11 to Aug 26 | View Details |