
- Introduction to Amazon Elastic File System
- Amazon On-Demand Instance Pricing
- AWS Kinesis
- Amazon Redshift Tutorial
- Amazon SageMaker - AIs Next Game Changer
- AWS Console - Amazon Web Services
- AWS Architect Interview Questions
- AWS Architecture
- Amazon Athena
- Top 11 AWS Certifications List and Exam Learning Path
- How to Create Alarms in Amazon CloudWatch
- AWS CloudWatch Tutorial
- Introduction To AWS CLI
- AWS Configuration
- AWS Data Pipeline Documentation
- AWS EC2 Instance Types
- AWS Elastic Beanstalk
- AWS Elastic Beanstalk Available in AWS GovCloud (US)
- AWS Free Tier Limits and Faq
- AWS EC2 Instance Pricing
- Choosing The Right EC2 Instance Type For Your Application
- AWS Interview Questions and Answers
- AWS Key Management Service
- AWS Lambda Interview Questions
- AWS Lambda Tutorial
- What Is AWS Management Console?
- Complete AWS Marketplace User Guide
- AWS Outage
- AWS Reserved Instances
- AWS SDK
- What is AWS SNS?
- AWS Simple Queue Service
- AWS SysOps Interview Questions
- AWS vs Azure
- AWS Vs Azure Vs Google Cloud Free Tier
- Introduction to AWS Pricing
- Brief Introduction to Amazon Web Services (AWS)
- Clean Up Process in AWS
- Creating a Custom AMI in AWS
- Creating an Elastic Load Balancer in AWS
- How to Deploy Your Web Application into AWS
- How to Launch Amazon EC2 Instance Using AMI?
- How to Launch Amazon EC2 Instances Using Auto Scaling
- How to Sign Up for the AWS Service?
- How to Update Your Amazon EC2 Security Group
- Process of Installing the Command Line Tools in AWS
- Big Data in AWS
- Earning Big Money With AWS Certification
- AWS Certification Without IT Experience. Is It Possible?
- How to deploy a Java enterprise application to AWS cloud
- What is AWS Lambda?
- Top 10 Reasons To Learn AWS
- Run a Controlled Deploy With AWS Elastic Beanstalk
- Apache Spark Clusters on Amazon EC2
- Top 35 AWS Services List
- What is Amazon S3? A Complete AWS S3 Tutorial
- What is AMI in AWS
- What is AWS? Amazon Web Services Introduction
- What is AWS Elasticsearch?
- What is AWS Glue?
- AWS IAM (Identity and Access Management)
- AWS IoT Core Tutorial - What is AWS IoT?
- What is Cloud Computing - Introduction to Cloud Computing
- Why AWS Has Gained Popularity?
- Top 10 Cloud Computing Tools
- AWS Glue Tutorial
- AWS Glue Interview Questions
- AWS S3 Interview Questions
- AWS Projects and Use Cases
- AWS VPC Interview Questions and Answers
- AWS EC2 Tutorial
- AWS VPC Tutorial
- AWS EC2 Interview Questions
- AWS DynamoDB Interview Questions
- AWS API Gateway Interview Questions
- How to Become a Big Data Engineer
- What is AWS Fargate?
- What is AWS CloudFront
- AWS CloudWatch Interview Questions
- What is AWS CloudFormation?
- What is AWS Cloudformation
- Cloud Computing Interview Questions
- What is AWS Batch
- What is AWS Amplify? - AWS Amplify Alternatives
- Types of Cloud Computing - Cloud Services
- AWS DevOps Tutorial - A Complete Guide
- What is AWS SageMaker - AWS SageMaker Tutorial
- Amazon Interview Questions
- AWS DevOps Interview Questions
- Cognizant Interview Questions
- Cognizant Genc Interview Questions
- Nutanix Interview Questions
- Cloud Computing Projects and Use Cases
- test info
- AWS Server and Administration
- AWS vs Alternatives
Do you want to implement the automatic distribution of your incoming web traffic across Amazon EC2 instances on the Amazon AWS cloud? If yes, then the Amazon Elastic Load Balancing (ELB) service is your answer. Be it incoming website or application traffic, ELB can automatically distribute this traffic across many targets. These targets include Amazon EC2 instances along with containers and IP addresses.
Additionally, AWS ELB can handle your varying traffic across single – or multiple – availability zones. So, even as your application traffic scales or changes over time, ELB can automatically scale its capability according to the workloads.
| In this Amazon ELB Blog, you will learn the below topics: |
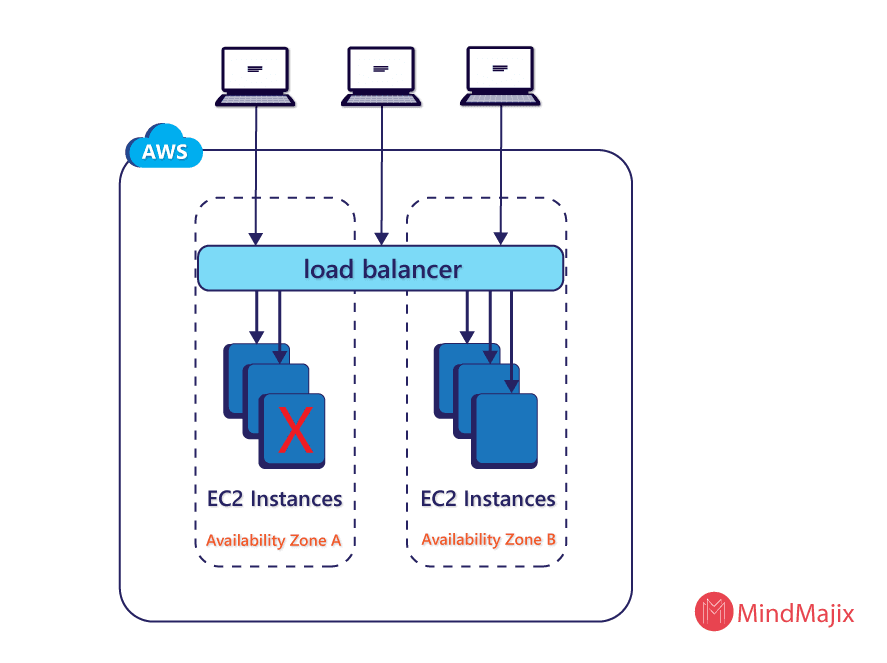
How does Amazon ELB Work
Traditionally, load balancing worked by dividing the incoming traffic or users equally among multiple computers so that every user request is processed faster. In the case of ELB, the load balancer first checks the health of the targeted instances and routes the traffic only to healthy targets. Additionally, it stops directing traffic towards an unhealthy instance.
You can also configure your elastic load balancer to accept incoming traffic by selecting one or more listeners. Configured with a port number and network protocol, a listener checks for connection requests from clients to the load balancer.
| Want to become a Certified AWS Solution Architect? Click here to learn AWS Online Training |
Types of AWS Elastic Load Balancers
Application load balancer
This load balancer is best designed for load balancing of HTTP/ HTTPS traffic and can route the incoming traffic towards the latest application architectures that include IP addresses, containers, EC2 servers, and Lambda functions.

The application load balancer is optimized to work with traffic that is routed to targets within the Amazon Virtual Private Cloud (or Amazon VPC).
Network load balancer
This load balancer is best designed for load balancing of traffic that uses protocols like TCP, User Datagram Protocol (or UDP), and Transport Security Layer (or TSL), which require good performance.
This load balancer can handle millions of user requests each second between the client device and the target instance.
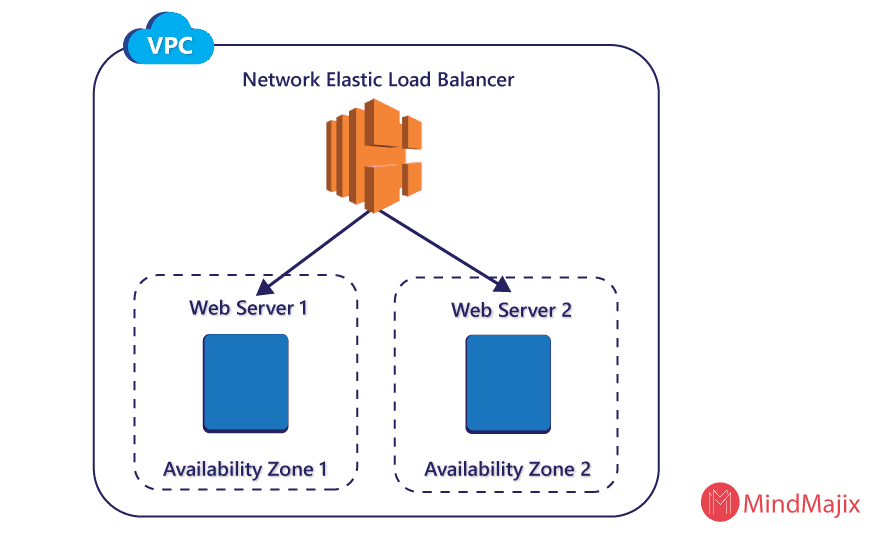
The network load balancer is optimized to work with volatile and dynamic workloads and for handling a sudden increase in incoming traffic.
Classic load balancer
This load balancer is best designed for basic load balancing that operates across multiple EC2 instances at both request and the connection level. The classic load balancer retrieves information – such as the network protocol and port number – from the incoming request and routes the traffic to the appropriate EC2 instance that is hosting the web application.
The classic load balancer is similar to traditional forms of load balancing using physical devices, except that this load balancer automatically performs balancing in a virtual environment. This load balancer is optimized to work with applications that were built in the classic EC2 network.
We shall learn about how to create these load balancers in later sections. For now, let’s discuss the various features and benefits of using ELB.

What are the Features of ELB?
How does ELB differ from traditional load balancing? Here are 6 features that set it apart:
Checking of Healthy and Unhealthy Targets
ELB service distributes all its AWS instances across only healthy channels. It can also detect unhealthy targets of EC2 instances and stop sending any traffic to them. During this process, it can identify and spread the workload across only healthy and working targets.
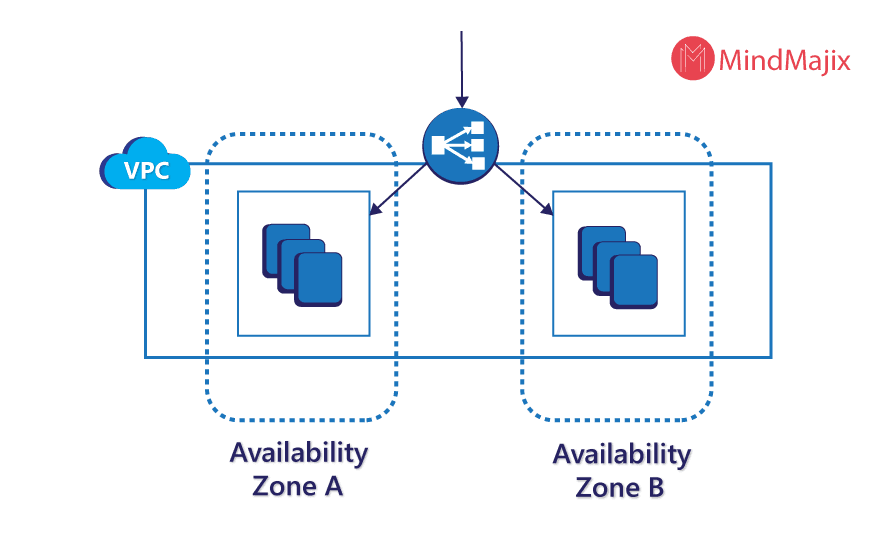
Cross Zone Load Balancing
Prior to the implementation of this feature, ELB distributed its traffic evenly across all AWS availability zones. This usually resulted in service disruption or sometimes in performance degradation. It also used DNS information to distribute the traffic from the client device to the availability zones.
With cross-zone load balancing, ELB does not depend on implementing an equal number of AWS instances in each availability zone. Additionally, there is no issue regarding caching of DNS information.
Security Features
With ELB, you can use the Amazon VPC tool to create and manage security groups that are associated with the ELB load balancers. This ensures better networking and security options. Additionally, you can create an internal (or off the cloud) load balancer.
Additionally, ELB has security enhancements like SSL termination and a security policy. Other enhancements include the Perfect Forward Secrecy along with Server Order Preference that boosts ELB security for application traffic.
Connection Draining
Connection draining is a feature that is designed to prevent abrupt behavior of deregistered AWS instances when existing connections to that instance are lost. The connection draining process continues to serve these existing connections to deregistered instances for a configured timeout duration. As a result, users do not experience abrupt instance behavior during the deregistration process.
Integration with Amazon Route 53 DNS Failover
Amazon Route 53 now supports integration with ELB endpoints. With its DNS Failover feature, Route 53 can detect website outages and redirect users to another website or backup site.
With this integration, website users can configure multiple records for the same website domain from multiple regions using different ELBs. This enables high availability for applications using ELB.
Application Monitoring
With its integration with Amazon CloudWatch, ELB can now use its metrics to monitor your application performance on a real-time basis.
These are six of the best features that ELB has to offer. Next, we shall discuss how ELB can be beneficial to your applications.
| Related Article: AWS Interview Questions and Answers for Freshers |
What are the Benefits of ELB?
The ELB service offers the following benefits:
High Availability
ELB performs a complete health check of the AWS instance before sending any incoming traffic to it. This ensures that even if a particular instance fails or is unhealthy, ELB will route the traffic to the remaining healthy instances in the same availability zone – or to a different availability zone.
Elastic load balancing can also balance the workload across a region and to different availability zones. This ensures the benefit of high availability for your applications.
Security
By supporting applications that are within the Amazon VPC, ELB provides robust network security with built-in features like user authentication, security certificate management, and SSL/ TLS decryption. As the IT maintenance team, you can specify if you want an internal – or an Internet-accessed - load balancer.
With an internal load balancer, ELB allows you to configure your traffic through private IP addresses. Alternatively, you could also route traffic between multiple application tiers using a combination of internal and Internet-facing load balancers.
Automatic Scaling
ELB is designed to handle a rapid surge in incoming traffic. With its automatic scaling feature, ELB allows the automatic handling of varying application workloads without any human intervention.
By configuring “Auto Scaling” conditions for an ELB with running EC2 instances, it can automatically create additional EC2 instances when these conditions are fulfilled. You can set up conditions to create new instances in order to reduce latency. With automatic scaling, you can benefit from the adequate capacity for any application.
Flexibility
With Elastic load balancing, you can use different IP addresses to route your traffic requests to your target instance, thus making it more flexible. Besides, you can even virtualize your targets, thus enabling you to host many more applications in a single instance.
Thanks to its flexibility, you can now simplify the communication between applications by configuring them within the same security group and network port.
Application Monitoring
Thanks to its real-time integration with the Amazon CloudWatch tool, ELB allows you to perform real-time monitoring of all your web applications and their performance. This enables better visibility into how your applications are performing. Additionally, application monitoring enables you to detect performance bottlenecks or any other issues.
Hybrid Load Balancing
ELB enables you to balance your load across the AWS platform and your in-premise resources at the same time using the same load balancer. This makes it easier for you to handle any failover as well as to migrate on-premise applications to the cloud platform.
How do you create an Application Load Balancer?
You can create your Application load balancer using either of the following methods:
- AWS Management console
- AWS Command Line Interface (or CLI)
Here’s how you can create your application load balancer using the web-based interface of the AWS management console:
#Step 1: Select the type of load balancer as “Application load balancer.”
- Open your Amazon EC2 console.
- From the navigation pane, select the region for your load balancer – the same as the region you used for your EC2 instances.
- From the navigation pane, select LOAD BALANCING > Load Balancers.
- Click the “Create Load Balancer” button, followed by clicking “Create” for the Application load balancer.
#Step 2: Configure your application load balancer along with its listener from the “Configure Load Balancer” page as follows:
- Configure a unique name for your load balancer (maximum of 32 characters).
- Maintain the default values for the Scheme and IP address type.
- Keep the default value for the listeners with port number 80.
- From Availability Zones, select the VPC that you used for your EC2 instances. If you are using multiple availability zones, select the availability zone and public subnet for each availability zone.
- Click “Configure Security Settings.”
#Step 3: Configure the security group of your load balancer.
- Create a new security group for your load balancer.
- Type a new name and description for your security group.
- Click “Configure Routing.”
#Step 4: Configure the target group for your load balancer.
- From the “Configure Routing” page, create a new target group and enter its name.
- Maintain the default values for target type as Instance, protocol as HTTP, and port as 80.
- Maintain the default settings for Health checks.
- Click “Register Targets”.
#Step 5: Register your target instance with your target group.
- From the “Register Target” page, select one (or more) instances.
- Maintain the default port setting (that is, 80) and then select “Add to registered.”
- Click Review after selecting all your instances.
#Step 6: Create and then test your application load balancer.
- From the Review page, click Create to create your load balancer.
- Click Close once your load balancer has been created.
- From your navigation pane, click “Target Groups” from LOAD BALANCING and select your target group. Additionally, verify if your instances are ready from the Targets tab.
- From your navigation pane, click “Load Balancers” from LOAD BALANCING and select your load balancer. On the Description tab, copy the DNS details of your load balancer.
Here’s how you can create your application load balancer using the AWS CLI:
1. Create your application load balancer using the “create-load-balancer” command. You need to specify two subnets that belong to different availability zones. Here is a sample command:
aws elbv2 create-load-balancer --name my-load-balancer

--subnets subnet-12345789 subnet-23556790 --security-groups sg-12346789
The output of this command must include the Amazon Resource Name or ARN of the load balancer.
2. Create your target group for your load balancer using the “create-target-group” command. Specify the same VPC that you used for your EC2 instances. Here is a sample command:
aws elbv2 create-load-balancer --name my-load-balancer

--subnets subnet-12345789 subnet-23556790 --security-groups sg-12346789
Again, the output must include the ARN of the target group.
3. Next, register your instances with your target group using the “register-targets” command. Here is a sample command:
aws elbv2 create-load-balancer --name my-load-balancer

--subnets subnet-12345789 subnet-23556790 --security-groups sg-12346789
4. Next. create a listener for your load balancer using the “create-listener” command that includes a default rule. Here is a sample command:
aws elbv2 create-load-balancer --name my-load-balancer

--subnets subnet-12345789 subnet-23556790 --security-groups sg-12346789

--default-actions Type=forward,TargetGroupArn=targetgroup-arn
Again, the output must include the ARN of the listener.
How do you create a Network Load Balancer?
You can create your Network load balancer using either of the following methods:
- AWS Management console
- AWS Command Line Interface (or CLI)
Here’s how you can create your network load balancer using the web-based interface of the AWS management console:
#Step 1: Select the type of load balancer as “Network load balancer.”
- Open your Amazon EC2 console.
- From the navigation pane, select the region for your load balancer – the same as the region you used for your EC2 instances.
- From the navigation pane, select LOAD BALANCING > Load Balancers.
- Click the “Create Load Balancer” button, followed by clicking “Create” for the Network load balancer.
#Step 2: Configure your network load balancer along with its listener from the “Configure Load Balancer” page as follows:
- Configure a unique name for your load balancer (maximum of 32 characters).
- Maintain the default values for Scheme as “Internet-facing.”
- Keep the default value for the listeners with port number 80.
- From Availability Zones, select the VPC that you used for your EC2 instances. If you are using multiple availability zones, select the availability zone and public subnet for each availability zone.
- Click “Configure Security Settings.”
#Step 3: Configure the target group for your load balancer.
- From the “Configure Routing” page, create a new target group and enter its name.
- Maintain the default values for target type as Instance, protocol as TCP, and port as 80.
- Maintain the default settings for Health checks.
- Click “Register Targets.”
#Step 4: Register your target instance with your target group.
- From the “Register Target” page, select one (or more) instances.
- Maintain the default port setting (that is, 80) and then select “Add to registered.”
- Click Review after selecting all your instances.
#Step 5: Create and then test your application load balancer.
- From the Review page, click Create to create your load balancer.
- Click Close once your load balancer has been created.
- From your navigation pane, click “Target Groups” from LOAD BALANCING and select your target group. Additionally, verify if your instances are ready from the Targets tab.
- From your navigation pane, click “Load Balancers” from LOAD BALANCING and select your load balancer. On the Description tab, copy the DNS details of your load balancer.
Here’s how you can create your network load balancer using the AWS CLI:
1. Create your network load balancer using the “create-load-balancer” command. You must specify one public subnet for each availability zone. Here is a sample command:
aws elbv2 create-load-balancer --name my-load-balancer --type network --subnets subnet-12345688The output of this command must include the Amazon Resource Name or ARN of the load balancer.
2. Create your target group for your load balancer using the “create-target-group” command. Specify the same VPC that you used for your EC2 instances. Here is a sample command:
aws elbv2 create-load-balancer --name my-load-balancer --type network --subnets subnet-12345688Again, the output must include the ARN of the target group.
3. Next, register your instances with your target group using the “register-targets” command. Here is a sample command:
aws elbv2 register-targets --target-group-arn targetgroup-arn --targets Id=i-12345789 Id=i-235567904. Next. create a listener for your load balancer using the “create-listener” command that includes a default rule. Here is a sample command:
aws elbv2 register-targets --target-group-arn targetgroup-arn --targets Id=i-12345789 Id=i-23556790Again, the output must include the ARN of the listener.
5. Finally, for a network load balancer, you need to specify one elastic IP address for each subnet using subnet mapping. Here is a sample command:
aws elbv2 register-targets --target-group-arn targetgroup-arn --targets Id=i-12345789 Id=i-23556790How do you create a Classic Load Balancer?
You can create your Classic load balancer by only using the AWS Management console.
Here’s how you can create your classic load balancer:
#Step 1: Select the type of load balancer as “Classic load balancer.”
- Open your Amazon EC2 console.
- From the navigation pane, select the region for your load balancer – the same as the region you used for your EC2 instances.
- From the navigation pane, select LOAD BALANCING > Load Balancers.
- Click the “Create Load Balancer” button, followed by clicking “Create” for Classic load balancer.
#Step 2: Define your classic load balancer along with its listener from the “Configure Load Balancer” page as follows:
- Configure a unique name for your load balancer (maximum of 32 characters).
- For the “Create LB Inside” field, select the same EC2 network that you chose for your instances.
- Select the “Enable advanced VPC configuration” checkbox if you have selected the default VPC and want to configure subnets for your load balancer.
- Keep the default settings for the Listener.
- From the available subnets, add at least one subnet. You can only add one subnet for each availability zone.
#Step 3: Assign the security group to your load balancer using VPC.
- From the “Assign Security Groups” page, create a new security group for your load balancer.
- Type a new name and description for your security group.
- Click “Configure Security Settings,” followed by “Configure Health Check.”
#Step 4: Configure the health checks for your instances.
- From the “Configure Health Check” page, set the “Ping Protocol” to HTTP and “Ping Port” to 80.
- In the “Ping Path” field, replace the default value with “/”
- Maintain the default values for the advanced details.
- Click “Add EC2 instances.”
#Step 5: Register your EC2 instances with your load balancer.
- From the “Add EC2 Instances” page, select the instance to be registered with your load balancer.
- Keep the options for cross-zone load balancing and connection draining enabled.
- Click “Add Tags.”
#Step 6: Create and then verify your classic load balancer.
- From the Review page, click Create to create your load balancer.
- Click Close once your load balancer has been created.
- From your navigation pane, click “Load Balancers” from LOAD BALANCING and select your load balancer. On the Description tab, check the Status field to see if any of your instances are not in service.
- Test your load balancer by copying and pasting the DNS name of your load balancer into any web browser tool connected to the Internet.
| Explore AWS Sample Resumes! Download & Edit, Get Noticed by Top Employers! |
Conclusion
As seen in this article, Elastic Load Balancing is a proven mechanism for distributing application and web traffic requests across multiple targets or instances. ELB allows you to scale your varying workloads automatically. We have also seen the three types of load balancers used in ELB and how to create each one of them.
Hope you have found this article detailed and helpful for your learning. Feel free to leave behind your queries in the section below.
 On-Job Support Service
Online Work Support for your on-job roles.

Our work-support plans provide precise options as per your project tasks. Whether you are a newbie or an experienced professional seeking assistance in completing project tasks, we are here with the following plans to meet your custom needs:
- Pay Per Hour
- Pay Per Week
- Monthly
| Name | Dates | |
|---|---|---|
| AWS Training | Jul 14 to Jul 29 | View Details |
| AWS Training | Jul 18 to Aug 02 | View Details |
| AWS Training | Jul 21 to Aug 05 | View Details |
| AWS Training | Jul 25 to Aug 09 | View Details |

Prasanthi is an expert writer in MongoDB, and has written for various reputable online and print publications. At present, she is working for MindMajix, and writes content not only on MongoDB, but also on Sharepoint, Uipath, and AWS.


