- Introduction to Amazon Elastic File System
- Amazon On-Demand Instance Pricing
- AWS Kinesis
- Amazon Redshift Tutorial
- Amazon SageMaker - AIs Next Game Changer
- AWS Console - Amazon Web Services
- AWS Architect Interview Questions
- AWS Architecture
- Amazon Athena
- Top 11 AWS Certifications List and Exam Learning Path
- How to Create Alarms in Amazon CloudWatch
- AWS CloudWatch Tutorial
- Introduction To AWS CLI
- AWS Configuration
- AWS Data Pipeline Documentation
- AWS EC2 Instance Types
- AWS Elastic Beanstalk
- AWS Elastic Beanstalk Available in AWS GovCloud (US)
- AWS Free Tier Limits and Faq
- AWS EC2 Instance Pricing
- Choosing The Right EC2 Instance Type For Your Application
- AWS Interview Questions And Answers
- AWS Key Management Service
- AWS Lambda Interview Questions
- AWS Lambda Tutorial
- What Is AWS Management Console?
- Complete AWS Marketplace User Guide
- AWS Outage
- AWS Reserved Instances
- AWS SDK
- What is AWS SNS?
- AWS Simple Queue Service
- AWS SysOps Interview Questions
- AWS vs Azure
- AWS Vs Azure Vs Google Cloud Free Tier
- Introduction to AWS Pricing
- Brief Introduction to Amazon Web Services (AWS)
- Clean Up Process in AWS
- Creating a Custom AMI in AWS
- Creating an Elastic Load Balancer in AWS
- How to Deploy Your Web Application into AWS
- How to Launch Amazon EC2 Instance Using AMI?
- How to Launch Amazon EC2 Instances Using Auto Scaling
- How to Sign Up for the AWS Service?
- How to Update Your Amazon EC2 Security Group
- Process of Installing the Command Line Tools in AWS
- Big Data in AWS
- Earning Big Money With AWS Certification
- AWS Certification Without IT Experience. Is It Possible?
- How to deploy a Java enterprise application to AWS cloud
- What is AWS Lambda?
- Top 10 Reasons To Learn AWS
- Run a Controlled Deploy With AWS Elastic Beanstalk
- Apache Spark Clusters on Amazon EC2
- Top 30 AWS Services List in 2024
- What is Amazon S3? A Complete AWS S3 Tutorial
- What is AWS? Amazon Web Services Introduction
- What is AWS Elasticsearch?
- What is AWS ELB? – A Complete AWS Load Balancer Tutorial
- What is AWS Glue?
- AWS IAM (Identity and Access Management)
- AWS IoT Core Tutorial - What is AWS IoT?
- What is Cloud Computing - Introduction to Cloud Computing
- Why AWS Has Gained Popularity?
- Top 10 Cloud Computing Tools
- AWS Glue Tutorial
- AWS Glue Interview Questions
- AWS S3 Interview Questions
- AWS Projects and Use Cases
- AWS VPC Interview Questions and Answers
- AWS EC2 Tutorial
- AWS VPC Tutorial
- AWS EC2 Interview Questions
- AWS DynamoDB Interview Questions
- AWS API Gateway Interview Questions
- How to Become a Big Data Engineer
- What is AWS Fargate?
- What is AWS CloudFront
- AWS CloudWatch Interview Questions
- What is AWS CloudFormation?
- What is AWS Cloudformation
- Cloud Computing Interview Questions
- What is AWS Batch
- What is AWS Amplify? - AWS Amplify Alternatives
- Types of Cloud Computing - Cloud Services
- AWS DevOps Tutorial - A Complete Guide
- What is AWS SageMaker - AWS SageMaker Tutorial
- Amazon Interview Questions
- AWS DevOps Interview Questions
- Cognizant Interview Questions
- Cognizant Genc Interview Questions
- Nutanix Interview Questions
- Cloud Computing Projects and Use Cases
- test info
Are you working on the Amazon Web Services (or AWS) cloud platform? Amazon Machine Image (or AMI) offers an easy and visual mode of launching instances of your virtual machine on the cloud platform.
For example, you may want to launch multiple and identical instances of the same virtual machine for your applications. AMI allows you to do that by creating an unlimited number of instances having the same configuration in a short period of time.
Additionally, you can use AMI to create multiple instances of different virtual machines when you require instances of different configurations.
How does the AMI technology work and what are the different types of AMI that are available for your use? Let’s discuss all this and more in the following below-given sections.
| In this article, we will go through the below topics: |
What is AWS AMI
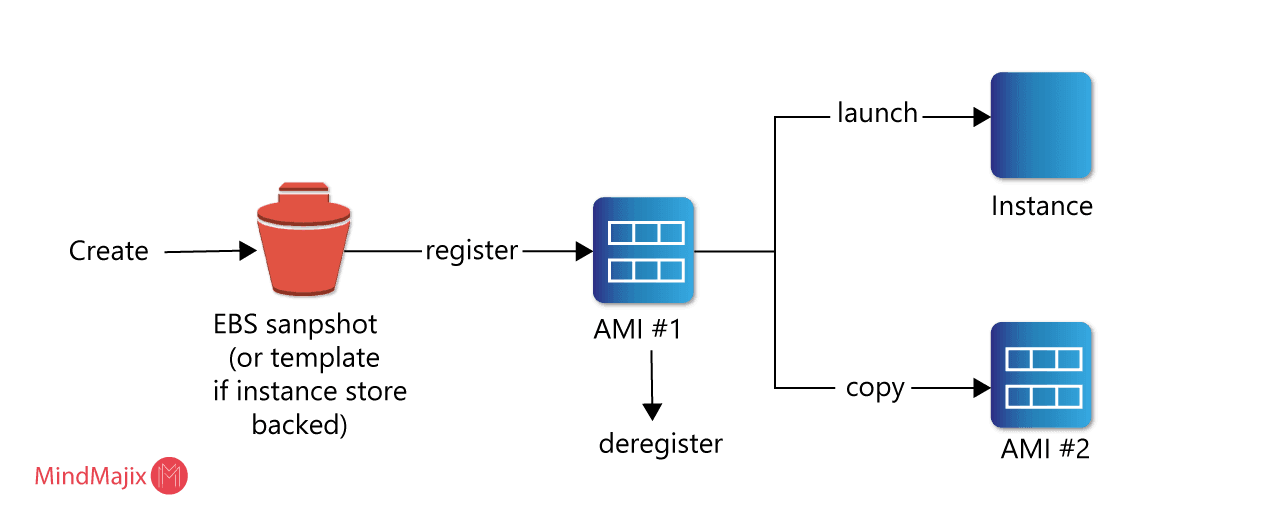
In simple words, an AWS AMI is a virtual image that can be used to create an instance of a virtual machine. How does it operate? Here’s an illustration that summarizes the AMI lifecycle:
| Related Article: What is Amazon AWS |

The first step is to create and register the AMI, which is then used to launch or set up AWS instances. Alternatively, you can launch instances from another AMI provided the AMI creator grants you the necessary launch permissions. You can also copy an existing AMI within the same or different AWS region. Finally, you need to deregister an AMI once you no longer require it.
An AMI typically consists of the following three components:
- The template is the root volume for the AWS instances (for example, application server, operating system, or web application).
- Launch permissions that determine which AWS account can use this AMI to set up an instance.
- Block device mapping that specifies the root device volumes that are attached to the AWS instance after launch.
| Want to become a Certified AWS Solution Architect? Learn AWS Certification Training |
What are the types of AWS AMI?
As an AWS user, you can choose your AMI on the basis of the following parameters:
Operating System
You can choose an AMI on the basis of the supported operating system (or OS) like Windows or Linux.
32-bit or 64-bit Architecture
This parameter is based on the architecture of your selected OS.
Region
This parameter is based on the selected region of the Amazon machine image that comprises regions, availability zones, and local zones. Each region operates in different geographical regions and is independent of each other.
Storage (EBS or Instance store)
This AMI parameter is based on the storage of the root device. Based on storage, AMIs are categorized as either of the following two types namely:
- EBS-backed instances: In this case, the root device for an AWS instance – launched using AMI – is an Amazon EBS volume that has been created from Amazon EBS.
- Instance store-backed instances: In this case, the root device for an AWS instance – launched using Ami – is an Amazon instance store volume that has been created from an Amazon S3 template.
The table below highlights the main differences between these two storage types:
| EBS-backed AMI | Instance store-backed AMI | |
| Instance boot time | < 1 minute | < 5 minutes |
| Size limit for root device | 16TiB | 10GiB |
| Data persistence | The root volume is deleted on the termination of the instance. | Data persists only during the overall life of the instance. |
| Cost | Less expensive | More expensive |
Launch permissions
An AMI owner can determine their instance availability through the following three launch permissions:
- Public, that grants instance launch permission to all AWS account holders.
- Explicit, that grants launch permission only to specific AWS accounts.
- Implicit, where only the AMI owner has permission to launch an instance.
| Related Article: AWS Interview Questions for Experienced Professionals |
What are Shared AMIs?
In simple language, a shared AMI is one that an AWS developer creates and shares with other users for use. Shared AMIs enable any new AWS user to easily get started using the AWS platform. On the flip side, Shared AMIs are not guaranteed any security or integrity and must be treated as any other foreign code.
You can locate the following shared AMIs from the Amazon EC2 console by selecting the “AMIs” option from the navigation pane:
- Private images: that contain all the shared AMIs that are private and only for your use.
- Public images: that contain all the shared AMIs that have been created for public use.
Additionally, you can also create your own AMI and share it for public use or with specific AWS accounts.
Here’s how you can share your AMI with all AWS account holders:
- Open the Amazon EC2 console and choose AMIs from the navigation pane.
- Select your AMI to be shared, then click Actions > Modify Image Permissions.
- Select the “Public” option before saving your changes.
Alternatively, you can share your AMI for public use by modifying the “launchPermission” property of your AMI. To do this, run the “modify-image-attribute” command for the specific AMI as follows:
aws ec2 modify-image-attribute
--image-id ami-<ID>
--launch-permission "Add=[{Group=all}]"
Here’s how you can share your AMI with specific AWS account holders:
- Open the Amazon EC2 console and choose AMIs from the navigation pane.
- Select your AMI to be shared, then click Actions > Modify Image Permissions.
- Specify the AWS account holder by entering their AWS account number in the respective field and then clicking “Add Permission.”
Alternatively, you can share your AMI for public use by modifying the “launchPermission” property of your AMI. To do this, run the “modify-image-attribute” command for the specific AMI as follows:
aws ec2 modify-image-attribute
--image-id ami-<ID>
--launch-permission "Add=[{ UserId=<UserID>}]"
What are Paid AMIs?
As the name suggests, a paid AMI is when you purchase an AMI from another developer. As an AMI developer, you can create an AMI and then sell the same on the AWS Marketplace that is an online store for paid AMIs. For paid AMIs, the AWS user is charged for the instance based on the rates set by the AMI owner.
You can find a paid AMI either from the Amazon EC2 console or from the AWS Marketplace. Here’s how to find one from the Amazon EC2 console:
- Open the Amazon EC2 console and choose AMIs from the navigation pane.
- Choose the “Public images” option from the available filter, followed by “Owner” and “AWS Marketplace.”
- Search for available paid AMIs from this owner, or enter the specific product code (if you happen to know it).
To find a paid AMI from the AWS Marketplace:
- Open the AWS Marketplace.
- Specify your operating system.
- Search for your paid AMI by using the available search filters.
Alternatively, you can find a paid AMI by running the “describe-images” command as follows:
aws ec2 describe-images
    --owners aws-marketplace
On running this command, you are provided with a list of paid AMIs along with its product code. You can filter the list of paid AMIs by searching for the product code.
You need to first sign up or purchase a paid AMI before launching an AWS instance using the AMI. To purchase a paid AMI, you can use the Amazon EC2 launch wizard.
What are the types of Linux AMI Virtualization?
For the Linux OS, AMIs uses either of the following virtualization methods, which are primarily different in their booting processes:
Paravirtual or PV
In this case, the AVM instance boots with the help of a special boot loader, PV-GRUB that starts the boot cycle and then loads the menu.1st file kernel on the image. AVM users deploying this method run their instances on host hardware that do not explicitly support virtualization, hence cannot exploit hardware extensions like GPU processing for better performance.
Hardware virtual machine (HVM)
AMIs that are based on the HVM method has the ability to directly run an OS on the virtual machine without any underlying modification. HVM allows complete access of the virtualized hardware and booting through the execution of the master boot record of your image’s root block device. HVM users can also exploit the hardware extensions on the host system for better performance.
On the whole, the PV method works better for applications with storage and network operations as compared to HVM. However, for the best overall performance, HVM AMIs work better when launching your instances.
How do you find a Linux AMI?
As discussed before, you can only launch an instance after selecting a Linux AMI. Here are the two best ways to locate and select an AMI from the Amazon EC2 console:
Choosing an AMI during the EC2 launch
1) Sign in to the Amazon EC2 console and then select from the available AWS regions in which you wish to launch your instance.
2) Next, from the dashboard, click the “Launch Instance” button.

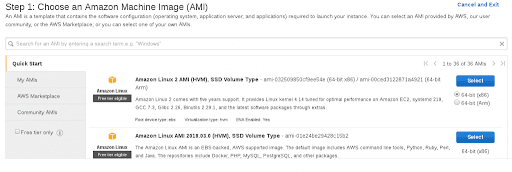
3) This will open the section where you can now choose an Amazon Machine Image (AMI). You can choose the AMIs from any of the following four sections:
- Quick Start: lists the commonly used AMIs.
- My AMI: contains all the AMIs created by you.
- AWS Marketplace contains all the paid AMIs created by other AWS users. You can also create and sell your AMIs on this marketplace.
- Community AMIs: that contain AMIs that have been created for public use.
4) Review the existing AMIs and check the Root device and virtualization type of each AMI. Finally, choose the AMI that satisfies your instance requirements.
Choosing an AMI using the Images page
1) Sign in to the Amazon EC2 console and then select from the available AWS regions in which you wish to launch your instance.
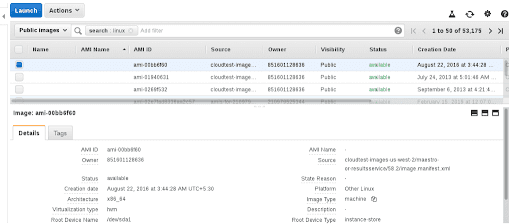
2) From the Images menu on the left navigation pane, choose the “AMIs” option.
3) From the Filter section, select the “Public Images” option from the drop-down list to view all the machine images that are safe for public use. Alternatively, you can select “Private Images" to view all the shared AMIs that have been shared with you.

You can also choose to filter the AMIs on the basis of other parameters like AMI name, owner, architecture, and image type.
4) Select the AMI of your choice, then click “Launch” to launch the AWS instance on the next page.
How do you create your own AMI?
You can also create your own AMI from a running AWS instance. You can use this AMI later to launch additional instances in the near future.
Here are the steps you need to follow to create your own AMI:
1) Sign into the Amazon EC2 console.
2) Next, from the dashboard, select the running instance (as illustrated in the figure), then click the Actions > Image > Create Image option.

3) The “Click Image” dialog box is displayed with the following instance-related fields:
- Instance ID: that shows the ID of the current EC2 instance.
- Image name: where you can specify the name of your AMI.
- Image description: an optional field where you can enter the AMI description.
- Instance volume: that shows the default settings for the instance volume. If required, you can modify the volume size and type in the respective fields. You can also add more instance volumes if required.
4) Click “Create Image” to start the creation of your AMI.
5) After creating the AMI, you can view your AMI in the “Owned by me” section along with its details.
How to deregister your AMI?
You can deregister your AMI once you have finished using it to launch new instances. This does not impact any of the running instances that you have launched using the same AMI.
Additionally, deregistering an EBS-backed AMI does not impact the snapshots taken for the instance volumes created when creating the AMI. You need to delete those snapshots separately.
For instance, for store-backed AMIs, deregistering does not impact the files uploaded to the Amazon S3 location when creating the AMI. You need to delete uploaded files separately.
Here’s how you can deregister your AMI:
1) Sign in to the Amazon EC2 console.
2) Next, from the dashboard, click the “AMIs” option in the left navigation pane.
3) Select the “Owned by me” filter option, and then select the AMI that you want to deregister.
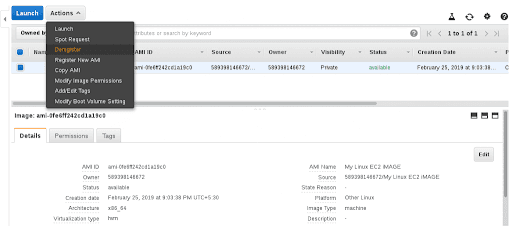
4) Click Actions > Deregister

5) Click Continue on the Deregister dialog box to complete the deregistration process.
Alternatively, you can deregister your owned AMI by running the “deregister-image” command as follows:
aws ec2 deregister-image --image-id ami_id
Conclusion
As an AWS user, you can use Amazon Machine Image or AMI to create a new image or customize an existing image to launch new instances. You can also copy the AMI to other AWS regions for wider use. Through this guide, we have learned about shared and paid AMIs, as well as how to create and find an AMI for your use. Additionally, we have learned how to deregister an AMI which is no longer in use.
Hope you have found the article helpful and knowledgeable. You can leave a message if you have any doubts regarding AWS AMI.
 On-Job Support Service
Online Work Support for your on-job roles.

Our work-support plans provide precise options as per your project tasks. Whether you are a newbie or an experienced professional seeking assistance in completing project tasks, we are here with the following plans to meet your custom needs:
- Pay Per Hour
- Pay Per Week
- Monthly
| Name | Dates | |
|---|---|---|
| AWS Training | Feb 10 to Feb 25 | View Details |
| AWS Training | Feb 14 to Mar 01 | View Details |
| AWS Training | Feb 17 to Mar 04 | View Details |
| AWS Training | Feb 21 to Mar 08 | View Details |

Prasanthi is an expert writer in MongoDB, and has written for various reputable online and print publications. At present, she is working for MindMajix, and writes content not only on MongoDB, but also on Sharepoint, Uipath, and AWS.


