- Introduction to Amazon Elastic File System
- Amazon On-Demand Instance Pricing
- AWS Kinesis
- Amazon Redshift Tutorial
- Amazon SageMaker - AIs Next Game Changer
- AWS Console - Amazon Web Services
- AWS Architect Interview Questions
- AWS Architecture
- Amazon Athena
- Top 11 AWS Certifications List and Exam Learning Path
- How to Create Alarms in Amazon CloudWatch
- AWS CloudWatch Tutorial
- Introduction To AWS CLI
- AWS Configuration
- AWS Data Pipeline Documentation
- AWS EC2 Instance Types
- AWS Elastic Beanstalk
- AWS Elastic Beanstalk Available in AWS GovCloud (US)
- AWS Free Tier Limits and Faq
- AWS EC2 Instance Pricing
- Choosing The Right EC2 Instance Type For Your Application
- AWS Interview Questions and Answers
- AWS Key Management Service
- AWS Lambda Interview Questions
- AWS Lambda Tutorial
- What Is AWS Management Console?
- Complete AWS Marketplace User Guide
- AWS Outage
- AWS Reserved Instances
- AWS SDK
- What is AWS SNS?
- AWS Simple Queue Service
- AWS SysOps Interview Questions
- AWS vs Azure
- AWS Vs Azure Vs Google Cloud Free Tier
- Introduction to AWS Pricing
- Brief Introduction to Amazon Web Services (AWS)
- Clean Up Process in AWS
- Creating a Custom AMI in AWS
- Creating an Elastic Load Balancer in AWS
- How to Deploy Your Web Application into AWS
- How to Launch Amazon EC2 Instance Using AMI?
- How to Launch Amazon EC2 Instances Using Auto Scaling
- How to Sign Up for the AWS Service?
- How to Update Your Amazon EC2 Security Group
- Process of Installing the Command Line Tools in AWS
- Big Data in AWS
- Earning Big Money With AWS Certification
- AWS Certification Without IT Experience. Is It Possible?
- How to deploy a Java enterprise application to AWS cloud
- What is AWS Lambda?
- Top 10 Reasons To Learn AWS
- Run a Controlled Deploy With AWS Elastic Beanstalk
- Apache Spark Clusters on Amazon EC2
- Top 35 AWS Services List
- What is Amazon S3? A Complete AWS S3 Tutorial
- What is AMI in AWS
- What is AWS? Amazon Web Services Introduction
- What is AWS Elasticsearch?
- What is AWS ELB? – A Complete AWS Load Balancer Tutorial
- What is AWS Glue?
- AWS IAM (Identity and Access Management)
- AWS IoT Core Tutorial - What is AWS IoT?
- What is Cloud Computing - Introduction to Cloud Computing
- Why AWS Has Gained Popularity?
- Top 10 Cloud Computing Tools
- AWS Glue Tutorial
- AWS Glue Interview Questions
- AWS S3 Interview Questions
- AWS Projects and Use Cases
- AWS VPC Interview Questions and Answers
- AWS EC2 Tutorial
- AWS EC2 Interview Questions
- AWS DynamoDB Interview Questions
- AWS API Gateway Interview Questions
- How to Become a Big Data Engineer
- What is AWS Fargate?
- What is AWS CloudFront
- AWS CloudWatch Interview Questions
- What is AWS CloudFormation?
- What is AWS Cloudformation
- Cloud Computing Interview Questions
- What is AWS Batch
- What is AWS Amplify? - AWS Amplify Alternatives
- Types of Cloud Computing - Cloud Services
- AWS DevOps Tutorial - A Complete Guide
- What is AWS SageMaker - AWS SageMaker Tutorial
- Amazon Interview Questions
- AWS DevOps Interview Questions
- Cognizant Interview Questions
- Cognizant Genc Interview Questions
- Nutanix Interview Questions
- Cloud Computing Projects and Use Cases
- test info
- AWS Server and Administration
- AWS vs Alternatives
AWS VPC stands for Amazon Virtual Private Cloud. AWS VPC enables you to launch AWS resources in your virtual network and take complete control over your virtual networking environment. Know that this network will function as the actual network in your own data center. With AWS VPC, you can create subnets, add gateways, add subnets, and associate security groups. Besides, AWS VPC supports both IPV4 and IPv6 addressing protocols.
In this tutorial, you will have insightful content on AWS VPC in terms of AWS VPC peering, the stages of implementing AWS VPC, DHCP options sets, and much more.
AWS Virtual Private Cloud - Table Of content
Why AWS VPC?
You know that AWS VPC is much-needed to launch AWS resources such as EC2 instances in the AWS Cloud and protect them safely.
Are you still wondering why AWS VPC allows users to replace their physical network with this virtual one? Then you need to know the following pointers, which will help you in this regard.
- With AWS VPC, you can launch your AWS resources at an isolated virtual network. Not only that, but you can create subnets, select the IP addresses, and configure network gateways and round tables.
- AWS VPC supports both IPv4 and IPv6 protocols, thereby ensuring easy access and enhanced security to its AWS resources
- Customizing the network configuration is made simple in AWS VPC
- With AWS VPC, you can control access to Amazon EC2 instances in every subnet
- You can create private subnets to place the backend systems, such as application servers, databases, etc. – without an internet connection
- Similarly, you can create public subnets for your web servers – with an internet connection.
- With the support of security groups and network access control lists, AWS VPC offers robust security to its resources.
| Looking forward to becoming a master in "Cloud Computing Courses"? Check out the "AWS Training" and get certified today. |
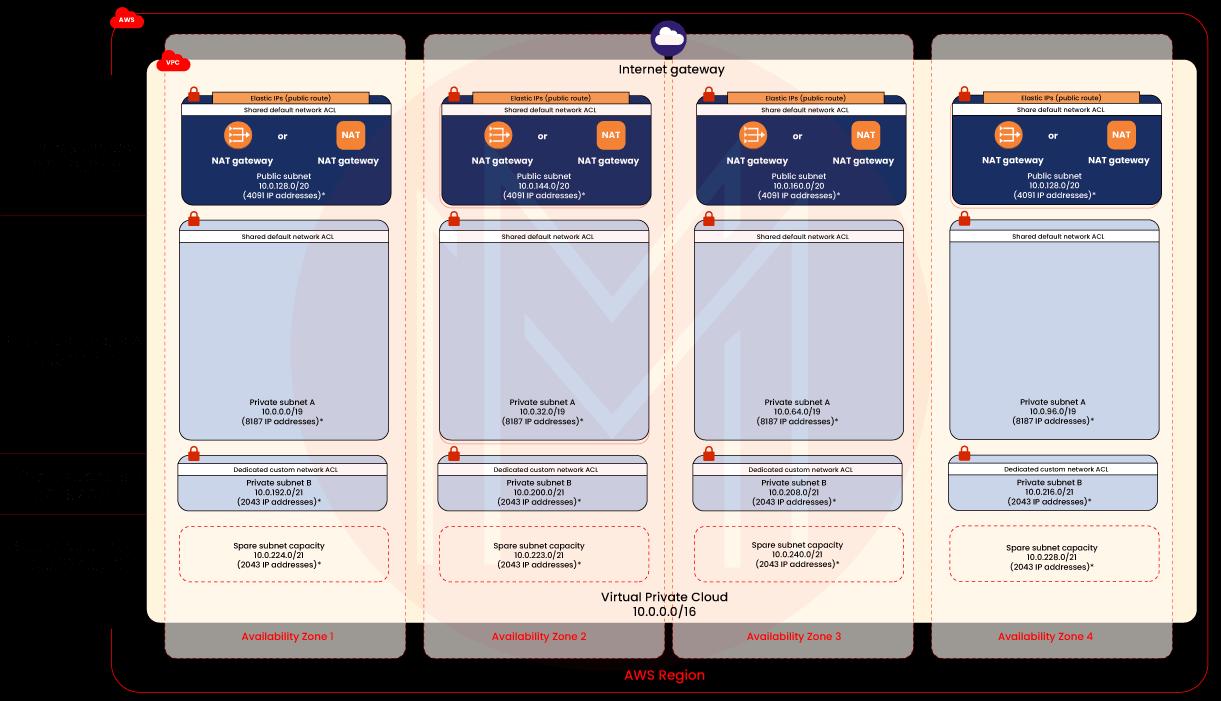
The Architecture of AWS VPC:
Availability Zones: In an AWS VPC, there can be up to four availability zones, usually providing high availability and disaster recovery. The availability zones are distributed over the AWS region, providing the best insulation and stability. So, when there is a disaster, they protect the AWS resources safely.
Subnets: They are used to fulfill the routing requirement of AWS resources. Here, pubic subnets are used for public-facing resources, and private subnets are used for private-facing resources.
Security Layer: security groups effectively control the inbound and outbound traffic at the subnet level. In addition, Network Access Control Layer lists (ACL) act as the firewall and the additional layer of security.
Routing Tables: AWS VPC allows configuring the individual routing tables for every private subnet, which in turn supports controlling traffic in and out of subnets. On the contrary, public subnets use a single routing table because all the public subnets use a shared internet gateway to communicate with the internet.
NAT Gateways: AWS VPC has highly available NAT gateways that simplify AWS resources' availability, deployment, and maintenance.
Spare Subnet Capacity: AWS VPC is provided with additional subnets that will be used during scaling.
What are the features of AWS VPC?
AWS VPC is provided with fantastic features to enhance the security of AWS resources and achieve effective monitoring.
Let’s explore them one by one.
Flow logs: They are usually delivered to Amazon S3 and Amazon Cloud Watch in AWS VPC. Monitoring the flow logs will provide good operational visibility over AWS VPC applications and resources. Not just that, Flow logs allow you to analyze network dependencies and traffic patterns among the AWS VPC resources. Also, you can detect anomalies in the activities of applications and other resources by which you can prevent data leakages. Moreover, you can effectively troubleshoot network connectivity and configuration issues.
With the support of flow logs, you can identify the activities in TCP connections and packet-level traffic flow through NAT gateways. Here, the NAT gateway is nothing but an intermediate layer. Besides, flow logs help to meet the compliance requirements of AWS VPC.
IP Address Manager (IPAM): IPAM is the tool used in AWS VPC to manage the planning, tracking, and monitoring of IP addresses for the workloads. Also, it helps track the usage of IP addresses across many accounts and VPCs, which in turn helps monitor virtual networks closely. What’s more! IPAM automates assigning IP addresses to instances.
IP Addressing: Know that you can assign public IP addresses to the instances of VPC. In this regard, AWS VPC allows using the IP addresses such as elastic IPv4 addresses, Amazon-provided public IPv4 addresses, and Amazon-provided IPv6 CIDRs.
Ingress Routing: This routing technique helps route all the incoming and outgoing traffic from an internal gateway to a specific Amazon EC2 elastic network interface. Not only internal gateway, but ingress routing supports virtual gateway too.
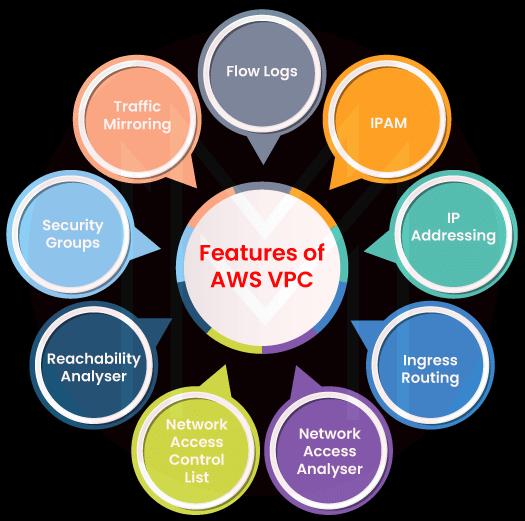
Network Access Analyzer: This is the tool used in AWS VPC to make sure whether the virtual network meets the security and compliance requirements or not. And this analyzer detects the accesses in the network that don’t meet the requirements. Simply put, a network access analyzer helps to improve the security and compliance of AWS VPC significantly.
Network Access Control List (ACL): ACL acts as a firewall and controls the traffic in and out of subnets. Also, it acts as an optional security layer, which supports secure networks in AWS VPC. One important thing to note here is that we can set up ACL with rules as it is done in security groups.
Reachability Analyser: Essentially, it is a static configuration analysis tool. It helps to analyze network reachability between two resources in AWS VPC. With the analysis reports, you can make an effective debugging process. When two resources are reachable, the reachability analyzer produces complete hop-by-hop details. If not, it identifies the components that restrict the reachability, which will support debugging.
Security Groups: They act as the firewalls for the EC2 instances connected with them. With security groups, you can control inbound and outbound traffic at the instance level. An instance can be connected with one or more security groups. Or else it will be connected with the default security group of VPC.
Traffic Mirroring: In this process, the network traffic is copied from an elastic interface of Amazon EC2 instances. Then, it is sent to security and monitoring applications so that deep packet inspection can be carried out. As a result, you can detect anomalies in the network and security, and gather operational insights about the AWS VPC. With this feature, you can efficiently implement compliance and security controls and troubleshoot issues.

What is AWS VPC Peering?
AWS VPC is a network connection that can be made between two VPCs of different AWS regions or two VPCs of different AWS accounts. Creating a relationship between two VPCs of different regions is known as inter-region VPC peering. The purpose of making VPC peering is to enable a VPC to access AWS resources in another VPC. Therefore, AWS resources such as EC2 instances, Lambda functions, and Amazon RDS databases that run across different AWS regions can easily communicate with others.
VPC peering connections can be made through IP addresses without gateways, separate network devices, and VPN connections. Because of VPC peering, there won't be any bottleneck issues and failures in inter-region traffic. In short, VPC peering acts is a cost-effective tool to share AWS resources between AWS regions.
| Want to know more about AWS check out: A Complete Tutorial for AWS |
What are Default and Non-Default AWS VPCs?
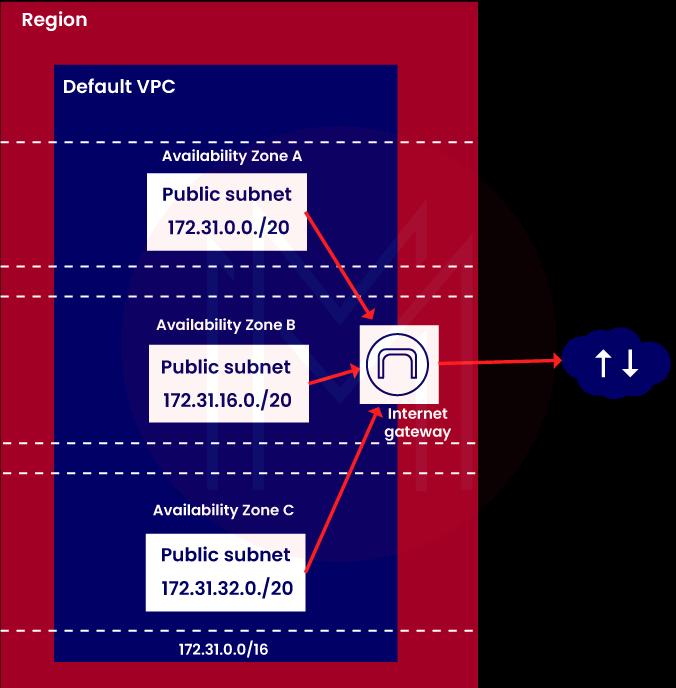
Default VPCs:
With Default VPCs, you can quickly launch public instances and modify components based on your needs. Each availability zone in a default VPC will have a public subnet. Also, default VPCs will have the internet gateway and settings to enable DNS resolution. In addition to launching public instances, Default VPCs also provide other services such as Elastic Load Balancing, Amazon EMR, Amazon RDS, and so on.
Advantages of Default VPCs:
- You can add additional default subnets
- You can change the main route table and add more route tables
- You can associate default VPCs with additional security groups
- You can update the rules of the default security groups
- You can add site-to-site VPN connections
- With a direct connect gateway, you can access default VPCs from a remote region
Non-default VPCs:
Non-default allows creating your own VPC and configuring it the way you need. Also, you can create subnets in non-default VPCs and add more subnets. These subnets are called non-default subnets.
| Would you like to ace AWS VPC job interviews? Top AWS VPC Interview Questions from MindMajix are exclusively for you! |
What are DHCP Options Sets in AWS VPC?
What is DHCP?
Before diving into the concept of DHCP options sets, you need to know about DHCP and its role in AWS VPC. Know that DHCP refers to Dynamic Host Configuration Protocol.
With DHCP protocol, AWS VPC provides the following advantages.
- You can control domain names, DNS Servers, and network time protocol servers in the AWS VPC
- You can disable DNS resolution in the AWS VPC
- This protocol allows DHCP Servers to assign IP addresses dynamically
DHCP Option Sets:
DHCP options sets are the group of network configurations used by EC2 instances in AWS VPC. Also, they support EC2 instances to communicate with each other. You can disassociate all option sets from the AWS VPC if needed.
Know that AWS VPC supports two types of DHCP option sets. They are given as follows:
- Default DHCP option set
- Custom DHCP option set
Default DHCP option set:
In this type, all the VPCs in an AWS region will use the same default options sets. Following are the network configurations that you can get through the default DHCP option set.
Domain Name: It provides hostnames using the domain name system
Domain Name Servers: Network interfaces use domain name servers to achieve domain name resolution. Generally, all the instances in a VPC will interact with the Amazon DNS Server, DHCP server, and VPC Router. Especially, the instances can interact with DHCP servers at any time. As a result, they can get their IP address lease and additional network configurations.
Custom DHCP option set:
You can customise the DHCP option sets based on your needs. You can achieve the following configuration by creating your own DHCP option sets.
Domain Name: It provides hostnames using the domain name system
Domain Name Servers: Network interfaces use domain name servers to achieve domain name resolution.
NTP Servers: These servers generally use Network Time Protocol for devices to synchronise their clocks over the internet. In AWS VPC, NTP servers manage the time of instances.
NetBIOS Name Servers: They maintain a list of mappings between NetBIOS computer names and network addresses of a VPC. In other terms, VPCs use NetBIOS for their naming service. It is applicable for the EC2 instances running on a Windows Operating system.
NetBIOS Node type: It provides NetBIOS names to IP addresses for the instances running on a Windows operating system.
What are Subnets in AWS VPC?
Subnets in a VPC consist of AWS resources like EC2 instances. And they can be connected to the datacenters, internet, and other VPCs. Know that each subnet will have a separate IP address. Managing traffic in and out of subnets is accomplished by using route tables. In general, every subnet is placed inside an availability zone. Because of this, subnets don’t overlap between zones. This setup provides good protection over the AWS resources inside an availability zone. Therefore, if there is a failure in any of the availability zones in an AWS region, it won’t affect the subnets in the other zones. Moreover, you can add subnets in the local zones based on your needs. Here, the local zone is nothing but the AWS deployment infrastructure where you can place devices such as compute, database, storage, and others.
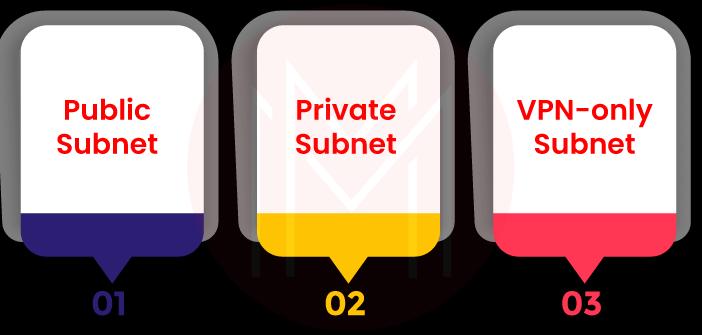
Subnet Types:
There are three types of subnets used in AWS VPC. They are given as follows:
- Public Subnet
- Private Subnet
- VPN-only Subnet
Public Subnet: You can use public subnets to connect AWS resources over the internet. The subnet traffic is usually routed to the internet through an internet gateway or an egress-only internet gateway.
Private Subnet: In a private subset, subnet traffic cannot reach the internet through the internet gateway but with a NAT device.
VPN-only Subnet: The subnet traffic is routed to a site-to-site connection through a virtual private gateway. Like the private subnet, the VPN-only subnet cannot reach the internet through the internal gateway.
While creating subnets, we need to specify IP addresses depending on the configuration of the VPC. Following are the three ways you can specify IP addresses to subnets.
- IPv4 only
- Dual-stack
- IPv6 only
Let’s look at the key features of the methods below:
IPv4 Only: This subnet will have an IPv4 CIDR block but won’t have the IPv6 CIDR block.
Dual-Stack: This subnet will have both IPv4 and IPv6 CIDR blocks. The AWS resources in these CIDR blocks will communicate over IPv4 and IPv6 addresses.
IPv6 Only: This subnet will have the IPv6 CIDR block but won’t have the IPv4 CIDR block.
| Check out: AWS Configuration |
What are the stages of implementing AWS VPC?
Implementation of AWS VPC is performed in three stages. You need to just follow the below:
- In the first stage, set up the VPC in the AWS service console
- Next, you need to add resources such as EC2 and RDS instances in the AWS VPC
- Finally, you must define how VPC should communicate with other AWS regions, availability zones, etc.
How to get started with AWS VPC?
AWS VPC allows creating AWS resources in subnets. Note that you can use default or non-fault subnets based on your needs.
This tutorial will help you start with AWS VPC using default subnets with simple instructions. Right! Get on board to experience the same.
Prerequisites:
- At first, you need to sign up for an AWS account. To do so, you can use the below link:
https://portal.aws.amazon.com/billing/signup
- Then, you have to follow the instructions given in the link. The registration will include a phone call as well as entering a verification code.
Step 1: Understanding the Default VPC:
To begin with, you need to see the configuration of your default VPC with its default subnets, internet gateway, and main route table. Here, the main route table is used to route the internet gateway. The main route table allows all the resources in the default subnets to access the internet.
You can view the configuration of the default VPC by following the below instructions.
- Use the following link to open the AWS VPC console - https://console.aws.amazon.com/vpc/
- Select ‘Your VPCs’ in the navigation pane. In the default VPC, select ‘yes’ if you use the default VPC; otherwise, select 'No'.
- Know that every VPC will have the main route table. Default subnets only use the main route table.
- Select the check box for the default VPC and select the ID under the Route table. Now, you can view the main route table.
- Now, you can find a local route on the Routes tab. This local route allows all the AWS resources in the VPC to share data with each other. Also, another route allows all traffic to reach the public internet via the internet gateway.
- Select ‘subnets’ in the navigation pane. You can find one subnet for one availability zone in the default VPC. The default columns are always ‘yes’ for default subnets.
- By selecting each subnet, you can view information such as the routes, the CIDR block, and the rules for the default network Access Control List.
- Finally, select ‘Internet Gateways’ in the navigation pane. Here, the VPC ID column shows the ID of the default VPC.
Step 2: Launching an instance in your VPC
In this step, you will get to know launching an instance in a default subnet in an AWS VPC. And the Amazon EC2 console offers default values for the instance configuration. This process helps to start with AWS VPC quickly. Once you select the AWS region, AWS will automatically select the default VPC for the region.
Now, execute the following instructions to launch an instance in your VPC.
- First, using the following link, open the Amazon EC2 console - https://console.aws.amazon.com/ec2/
- Select ‘launch instance’ from the dashboard
- Select ‘Region’ from the navigation pane
- Optionally, you can enter a name for the instance in 'name and tags'
- Select ‘Quick Start’ under ‘Application and OS images’ and select an operating system for the instance
- Continue with the default value t2.micro under instance type
- Now, you can select any one of the options under the ‘key pair’ tab. This tab will have the options such as ‘create a new key pair’, ‘existing key pair’, and ‘proceed without a key pair’.
- You will see the default VPC for the selected region,
- Default subnet, and a public IP address under the ‘network settings’ tab
- AWS will also create a default security group with rules that clear SSH traffic for Linux instances and RDP traffic for Windows instances.
- Finally, select the launch instance in the summary panel.
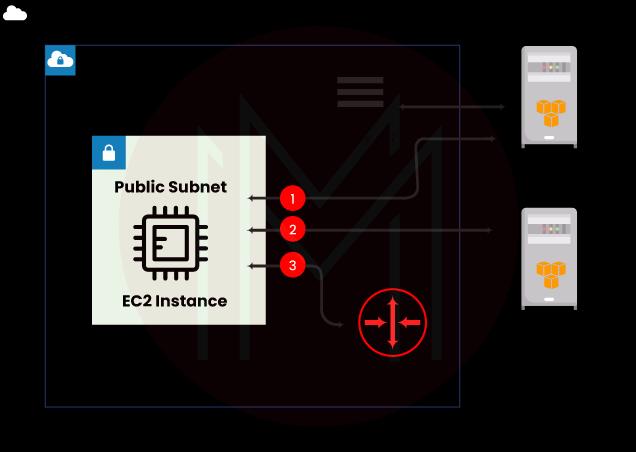
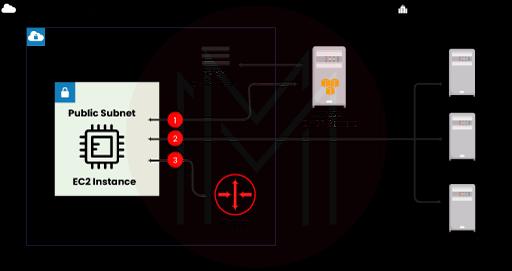
Step 3: Connecting the EC2 instance in the public subnet with the home network
The EC2 instance you created in the public subnet can be accessed through the internet. With SSH or remote desktop, you could connect to the EC2 instance from the home network. Know that you can connect with both Linux and Windows instances from your home network.
Step 4: Cleaning up or terminating an instance.
You could terminate an instance once the job is done. Therefore, you can avoid any further charges for the instance. The instance will be displayed in the console for a while once you terminate the instance. Note that you shouldn't delete the default VPC.
By following the below instructions, you can terminate an instance:
- First, open the Amazon EC2 console at the following link - https://console.aws.amazon.com/ec2/
- Select instances in the navigation pane
- Now, choose the instance and then select the instance state
- After that, terminate the instance and confirm the termination at last.
Congrats! You have learned how to launch an instance from the AWS VPC. And you know how to connect an EC2 instance with the home network and terminate an instance.
| Related Article: AWS EC2 Tutorial |
How to access AWS VPC?
You can create, monitor, access, and manage the AWS VPCs through the following interfaces. Let’s take a look at them now:
AWS Management Console: It offers a web interface to access VPCs
AWS CLI: AWS VPCs and other AWS services are accessed using commands in this interface. It supports all platforms such as macOS, Linux, and Windows.
AWS SDKs: They provide language-specific APIs and manage the key tasks such as calculating signatures, error handling, and request entries.
Query APIs: They allow low-level API actions made using HTTPS requests. Moreover, it is the direct way to access QWS VPC.
Benefits of AWS VPC:
So far, we have seen the features of AWS VPC from a technical point of view. Let’s know the business benefits of AWS VPC as listed below:
- You can easily set up and use AWS VPC
- You can attain complete control over the networking environment
- Security of AWS resources can be improved through security groups, ACL, security policies, etc.
- You can quickly scale AWS resources up and down and choose EC2 instances that best fit your applications.
Conclusion:
Let’s wrap off! You might have learned the basic concepts of AWS VPC, various features of AWS VPC, default and non-default VPCs, and many more. We hope that you might be familiar with getting started with AWS VPC and launching EC2 instances in an AWS VPC. With essential details, we have covered VPC subnets and how security is managed in AWS VPC. We are confident that this tutorial might have enriched your knowledge in AWS VPC a little better than before.
 On-Job Support Service
Online Work Support for your on-job roles.

Our work-support plans provide precise options as per your project tasks. Whether you are a newbie or an experienced professional seeking assistance in completing project tasks, we are here with the following plans to meet your custom needs:
- Pay Per Hour
- Pay Per Week
- Monthly
| Name | Dates | |
|---|---|---|
| AWS Training | Jul 18 to Aug 02 | View Details |
| AWS Training | Jul 21 to Aug 05 | View Details |
| AWS Training | Jul 25 to Aug 09 | View Details |
| AWS Training | Jul 28 to Aug 12 | View Details |