
- 6 Hot And In-Demand Tech Areas In 2024
- How To Forward Your Career With Cloud Skills?
- Top 7 On-Demand IT Certifications
- Most In-demand Technologies To Upskill Your Career
- Top 10 Hottest Tech Skills to Master in 2024
- Top Skills You Need to Become a Data Scientist
- Groovy Interview Questions
- Facets Interview Questions
- Crystal Reports Tutorial
- VAPT Interview Questions
- Saviynt VS Sailpoint
- Flutter vs Xamarin
- PingFederate Interview Questions and Answers
- Dart vs Javascript : What's the Difference?
- Terraform Private Registry
- Cylance Interview Questions and Answers
- Sophos Interview Questions and Answers
- Top Camunda Interview Questions
- NUnit Interview Questions and Answers
- Impala Interview Questions and Answers
- ETL Tutorial
- Ionic Interview Questions
- Grafana Tutorial
- What is VAPT? - A Complete Beginners Tutorial
- SnapLogic Interview Questions
- Saviynt Interview Questions
- What is PingFederate? - A Complete Beginners Tutorial
- SnapLogic Tutorial
- Grafana Interview Questions
- RHCE Interview Questions and Answers
- Web Services Interview Questions
- Domo Interview Questions and Answers
- Terraform Interview Questions
- What is Sophos? | Sophos Turorial for Beginners
- Top Servlet Interview Question And Answers
- NLP Interview Questions and Answers
- Microsoft Intune Interview Questions
- Top XML Interview Questions And Answers
- Tosca Commander
- Katalon vs Cypress
- SQLite Tutorial
- Tosca Tutorial - A Complete Guide for Beginners
- Xamarin Interview Questions and Answers
- UiPath vs Automation Anywhere - The Key Differences
- OpenShift Interview Questions
- What is Katalon Studio - Complete Tutorial Guide
- Kronos Interview Questions
- Tosca Framework
- Burp Suite Tutorial
- Mendix Interview Questions
- Power Platform Interview Questions
- Burp Suite Interview Questions
- What is Mendix
- What is Terraform ?
- Burp Suite Alternatives
- Dart vs Kotlin
- What is Kronos?
- ES6 Interview Questions
- Entity Framework Interview Questions
- COBOL Interview Questions
- Express JS Interview Questions
- OSPF Interview Questions
- LINQ Tutorial
- CSS3 Interview Questions and Answers
- Auth0 Tutorial
- MS Access Interview Questions
- What is SPARQL - A Complete Tutorial Guide
- ExpressJS Tutorial
- UML Tutorial
- HTML vs XML
- Cypress vs Jest
- Impacts of Social Media
- OWASP Interview Questions
- Security Testing Interview Questions
- OpenShift vs Docker
- ES6 Tutorial
- Spark SQL Interview Questions
- Spark SQL Tutorial
- What is OWASP?
- AppDynamics Interview Questions
- Dynatrace Interview Questions
- Rest Assured Tutorial
- New Relic Interview Questions
- REST API Tutorial
- Datadog Interview Questions
- Rest API Interview Questions
- Rest Assured Interview Questions
- PTC Windchill Interview Questions
- Easiest Tech Skills To Learn
- Python SQLite Tutorial - How to Install SQLite
- Datadog Tutorial - Datadog Incident Management
- What is AppDynamics - AppDynamics Architecture
- RabbitMQ Interview Questions And Answers
- What is Dynatrace
- Datadog Vs Splunk
- Web Developer Job Description
- JP Morgan Interview Questions
- Types of Corporate Training
- Benefits of Corporate Training
- What is Corporate Restructuring?
- Blended Learning in Corporate Training
- What is Corporate Level Strategy?
- Flutter Projects and Use Cases
- How to Become a Web Developer
- How To Install Keras?
- How to Install Flutter on Windows?
- How to Install Cypress on Windows?
- How to Become a Computer Scientist?
- How to Install Katalon Studio in Windows
- How to Become a Programmer
- OWASP Projects and Use Cases
- How to Install Sophos?
- Workato Tutorial
- Workato Tutorial - What is Workato?
Generally, building a mobile application is a challenging and difficult task. We have various frameworks to develop mobile applications. Android offers a native framework according to the Java language, and iOS offers a native framework according to Swift-language/ Objective C. But, for developing the application that supports both OSs, we have to code in two different languages through two different frameworks. To overcome this difficulty, we have frameworks that support both OS. But, these frameworks also have certain disadvantages; one of the main disadvantages is their slow performance.
At this stage, Flutter is a high-performance and simple framework on the basis of Dart language, offering high performance by interpreting UI in the canvas of the operating system instead of using the native framework. It offers various ready-for-use widgets for creating modern applications. According to a report from Statista, the popularity of Flutter among developers has risen from 30% in 2019 to 42% in 2021. In May 2021, Google announced that there were more than 2,00,000 flutter apps in the App store. So, Join our Flutter training to have a promising career in mobile app development.
In this Flutter tutorial, you will learn what Flutter is and how to develop mobile applications using the Flutter framework. Before we start, let us have a look at what we will be discussing in this article:
What, How, and Why?
Flutter is the freeware framework for creating high-performance and high-quality mobile applications throughout the mobile operating systems-iOS and Android. It provides a robust, easy-to-understand SDK for writing a mobile application in Google’s programming language, Dart. It’s unique because it utilizes neither OEM nor WebView objects sent with the device. Instead, it utilizes its high-performance rendering engine for drawing the widgets.
It also deploys almost all systems like gestures, widgets, and animation in the Dart programming language that enables readers to change, replace, remove or read things easily. Flutter has the following unique features in comparison to other SDKs and Java:
- Hot Reload: We can immediately see the modifications made in the code without recompiling.
- Fast Development: Flutter utilizes customizable widgets that we can nest together for creating the app interface, the same as how we structure the HTML.
- Light on the system resources: Flutter can be flexibly run on the lower resource system.
- It’s Native in the end: In the hood, we compile the codebase into java, assuring similar performance to that provided by the native apps.
| If you want to enrich your career and become a professional in Flutter, then enroll in "Flutter Training". This course will help you to achieve excellence in this domain. |
Setting up Flutter
Step 1: Configuring the Flutter SDK
- Download the latest SDK through the following link:
https://docs.flutter.dev/development/tools/sdk/releases
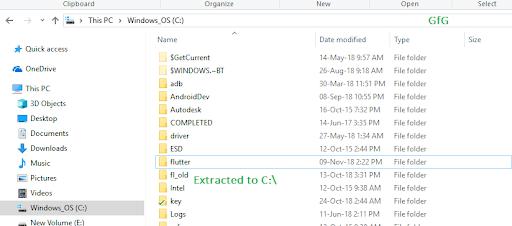
- Extract the zip file and locate the contained “flutter” folder in the required directory.
Step 2: Insert Flutter in the path: However, not necessary. It is suggested to set the “PATH VARIABLE” for making the Flutter simply accessible from anywhere in the system.
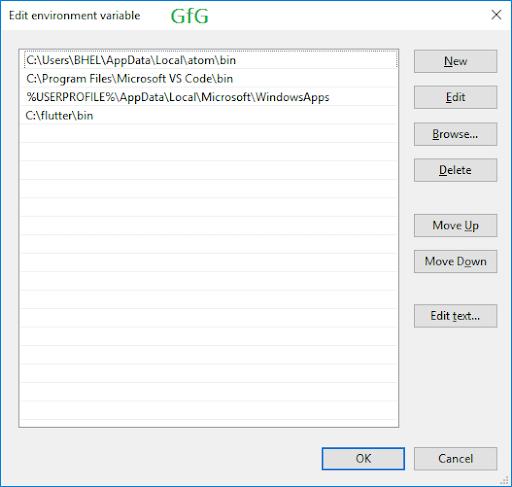
- Open the “Edit environment variables for your account” control panel. We can search this setting in the search bar.
- In the user variables, check whether there is an entry called Path:
-
- If it is available, insert the new path to “flutter\bin.”
- If the entry does not become available, create the new entry called Path, and later insert the whole location in “flutter\bin.”
3. Restart the Windows after configuring the PATH variables to work.
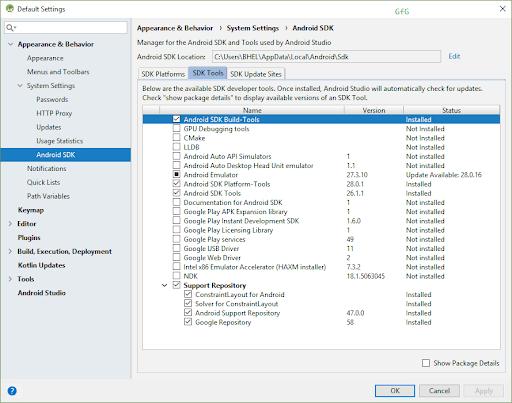
Step 3: Configuring the Android Studio: Android Studio mechanically downloads the development tools necessary for the Flutter to work with the Android.
- Download the Android Studio here: https://developer.android.com/studio
- Start the Android Studio and pursue the SDK manager wizard for downloading all the necessary building tools.
Step 4: Configuring the Visual Studio Code: Visual Studio Code is a light code editor that we can use in the Flutter development.
- Download and Install the VS Code: VS Code Download
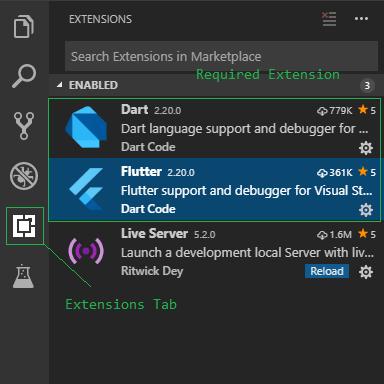
- For help in the development, we suggest two VS Code extensions. Install the “Dart” and “Flutter” plugins from the extension tab of the VS Code.
3. Install Git Bash: It is optional, but it is a suggested command prompt. Git Bash offers several general Unix commands that are helpful for some rapid tasks.
4. Run Flutter Doctor: Flutter doctor is the built-in tool provided by flutter that we use for checking the status of Flutter installation. After configuring the PATH variable, we can open the Command Prompt and run:
![]()
Create the empty template project:
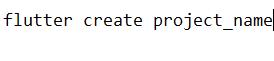
Step 1: Go to the place where you have to create your project. Open the command prompt and type the command for creating the new project:
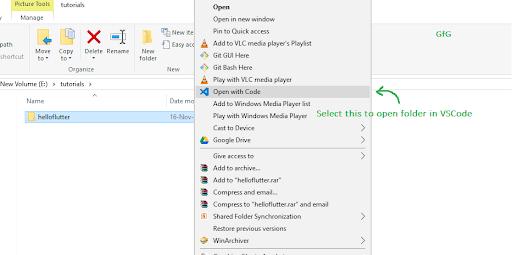
Step 2: Open the project folder in VS Code. We can right-click and utilize the context menu for opening into VS Code or starting VS Code and later open this folder as the project.
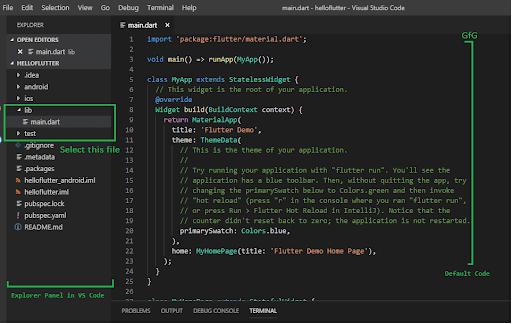
Step 3: The large panel on the left-side that shows all the folders and files is called Explorer Panel. Go to the ‘lib’ folder and choose the “main. dart” file. This file is a point of entry from where the application begins its execution.
Dart Basics
Dart is the general-purpose, object-oriented, open-source programming language with the C-language style syntax designed by Google in 2011. Dart programming intends to create frontend user interfaces for web and mobile applications. It is in active development, compiled to native machine code to build mobile apps, influenced by the programming languages like Javascript, Java, C#.
As Dart is the compiled language, we cannot execute our code directly; rather, the compiler parses and transfers it into the machine code. It supports almost all common concepts of the programming languages like Interfaces, Classes, Functions; a contrast to other programming languages, the Dart programming language will not support arrays directly.
[ Related Article: Flutter vs Ionic ]
1. Data Types
In Dart, every value we use in the program will have a data type either number or string should be known when we compile the code. Following are some common data types:
1. String: String variables store text values.
2. Num: Num Data type refers to number. Dart has two kinds of numerical values:
- Integer
- Double
3. Boolean: It utilizes the “bool” keyword for representing the Boolean values true and false.
4. Object: In Dart, everything is an object, but a thing can be more difficult.
2. Variables
Variables are defined as the namespaces that store values. The names of the variables are known as identifiers. Variables are the data containers that can store the value of any data type. For example:
Var myAge = 10;
In the above example, “myAge” is the variable that holds the integer value 10.
Become a master of Flutter by going through this online Flutter Training in Hyderabad!
3. Operators
Dart programming language supports all the operators available in the other programming languages like Java, C, C#. Following are the operators of Dart:
- Equality
- Arithmetic
- Logic
- Increment and Decrement
- Comparison.
4. Loops and Decision Making
Decision-Making statements are the features that enable us to determine the condition before the instructions are implemented. Dart programming language supports the below decision-making statements:
- If-else statement
- If Statement
- Switch Statement.
We use Loops for executing a code block repeatedly until a particular condition becomes true. Dart programming language supports the following loop statements:
- While
- For
- For..in
- do-while.
5. Functions
Functions are another essential feature of any programmiThisg language. They are statements that carry out a particular task. They are arranged into the building blocks of the code that are maintainable, reusable, and readable. The function declaration includes the return type, parameters, and function name.
[ Check out: Flutter vs React Native ]
6. Comments
Comments are defined as non-executable code lines. They are one of the primary aspects of all programming languages. Dart programming supports the following kinds of comments:
- Block Comments: It is the multi-line comment(/*...*/)
- Make format comments: It is the single-line comment(//)
- Doc comment: It is the document comment that we use for types and member(///).
7. “Continue” statement
The continue statement enables us to jump the rest of the code in the loop and instantly go to the later loop iteration.
void main() {
for (int i=1;i<=10; i++) {
if(i==5){
print("Hello");
continue; //it will skip the rest statement
}
print(i);
}
}
8. “Break” statement
The break statement allows us to stop the existing flow of the program and consistent execution after the loop body.
void main() {
for (int i=1;i<=10;i++){
if(i==5){
print("Hello"); break;//it will terminate the rest statement
}
print(i);
}
}
9. “Final” statement
We use the Final statement for restricting the user. We can use it in various perspectives like classes, methods, and variables.
10. “Const” keyword
We use the “Const” keyword for declaring the constants. After announcing a constant, we cannot modify the value.
void main() {
final a 100;
const pi 3.14;
print (a;
print (pi);
}
11. Object-Oriented Programming
In Dart, everything and value is an object, so Dart is object-oriented. In Dart, a number is also an object.
Object: Object is defined as the entity which has behavior and state. It can be logical or physical. Dart enables us to develop our custom objects for expressing complex relations between the data.
Class: Class is a group of objects. It indicates that we create objects through classes because all the objects require a blueprint according to which we can create a separate entity. The class definition contains the below things:
- Methods
- Fields
- Getters and Setters
- Constructors
-class Mobile {
// Property Declaration
String color, brandName, modelName;
// Method Creation
String calling() {
return "Mobile can do call to everyone.";
}
String musicPlay() {
return "Mobile can play all types of Music.";
}
String clickPicture() { return "Mobile can take pictures.";
}
}
void main() {
// Object Creation
var myMob = new Mobile();| Related Article: Flutter Interview Questions and Answers |
Flutter Basics
Flutter Widgets
In Flutter, whenever we code to build anything, it will be available in a widget. The primary purpose is to create the apps from the devices. It explains how our app view must appear with their present state and configuration. When we make any modification in the code, the widget redevelops its descriptions by computing the difference of current and previous widgets for determining the minimum changes to render in the User Interface(UI) of the application.
Kinds of Widgets
In Dart, we can divide the Flutter Widgets into two kinds:
1. Visible Widget
Visible Widgets are associated with the user output and input data. Following are the essential types of this Widget are:
- Text: The text widget displays text for displaying on the screen. We can coordinate with the text widget by utilizing the “textAlign” property. The style property enables us to customize the text that contains font style, font weight, letter spacing, color, font, etc.
- Button: This Widget enables us to carry out some action on the click. In Flutter, we cannot use the Button widget directly; instead, it utilizes a kind of buttons like a RaisedButton and a FlatButton.
- Image: The Image widget stores the image that can retrieve from various sources, such as from the asset folder or URL. It offers multiple constructors to load the following images:
-
- Image: It is the generic image loader that ImageProvider uses.
- File: It loads images from the system folder.
- Asset: It loads images from the project asset folder.
- Memory: It loads images from memory.
- Icon: This Widget serves as the container to store the Icon in Flutter.
2. Invisible Widget
The Invisible Widgets are associated with the control and layout of widgets. It offers controlling how widgets truly behave and how they look into the screen. Some of the essential kinds of these widgets are:
- Column: The Column widget is a kind of widget that organizes all the children’s widgets in the vertical alignment. It offers spacing widgets through “crossAxisAlignment” and “main axis alignment” properties. In these properties, the cross axis is the horizontal axis, and the central axis is the vertical axis.
- Row: The row widget is similar to the column widget, yet it builds the widget horizontally instead of vertically. In this Widget, the cross axis is the vertical axis, and the main axis is the horizontal axis.
- Center: We use this widget to center the child widget, which comes in it.
- Padding: This widget covers other widgets to provide them padding in particular directions. We can offer padding in all directions.
- Stack: It is the important widget, which we primarily use for overlapping the widget, like a button on the background gradient.
- Scaffold: This widget offers the framework that enables us to insert material design elements such as Floating Action Buttons, AppBar, Drawers, etc.
Flutter IDE
Flutter IDE is defined as the software program that enables us to create and edit text files. In the development field, editors generally relate to utilizing the editor plugins for a better experience. These plugins contain Code completion, Syntax highlighting, debug support, widget editing assists, etc. Following are the famous IDEs that support the Flutter application development:
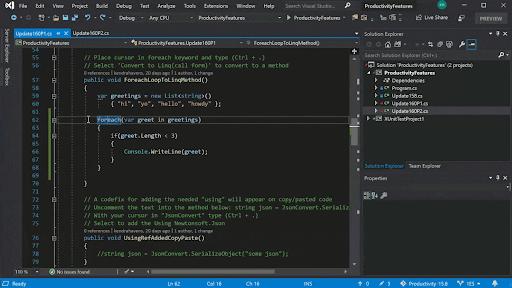
- IntelliJ Idea
- Visual Studio
- Android Studio
- Codemagic
- Emac
Android Studio
It is a freeware and rapid tool that we utilize for building the application on every kind of android device. It offers an entire experience to develop the flutter applications like code completion, syntax highlighting, refactoring, navigation, support, etc. The primary objective of android studio is to accelerate the application building process and develop high-quality applications for all android devices.
Visual Studio Code
VS Code IDE or Visual Studio Code is a popular editor to develop flutter applications. It is simple and easy for using. Almost all developers use the IDE for building flutter applications, yet Microsoft’s trusted company supports it. It is comparatively high support and growth. It offers Code completion, Syntax highlighting, Type Hierarchy, Pub Get Packages Command, etc.
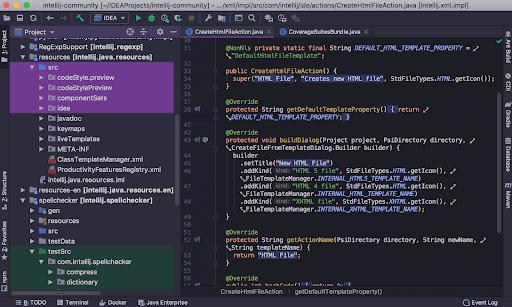
IntelliJ Idea
It is the most famous and robust IDE among developers that is maintained and developed by the JetBrains company. It supports various languages for developing applications. Apache 2.0 licensed it. If we want to build applications using the Dart language, it serves as the front runner in comparison with other IDEs.
Flutter Layout
The primary concept of the layout process is widgets. Thus, the icon, image, text, and layout of our application are all widgets. Flutter enables us to create the layout by forming multiple widgets for building more difficult widgets.
The container is the widget class that customizes the child widget. It is primarily used for adding borders, margins, padding, background color, etc. The text widget gets into the container to add the margins. The complete row is stored in the container to add margin and pad around the rows. The remaining UI is governed by the properties like text style, color, etc.
Layout the Widget
Step1: First, we have to choose the widget layout.
Step2: Later, create the visible widget.
Step3: After that, insert the widget into the layout widget.
Step4: Lastly, insert the widget layout to the page where we have to display it.
Kinds of Layout Widgets
1. Single Child Widgets
Single Child Widget is a kind of widget that can store only one widget in the parent layout widget. These widgets can also include particular layout functionality. Flutter offers several child widgets for making application UI attractive. If we utilize the widgets properly, it can reduce our time and causes the app code to be readable.
- Container: It is the most famous layout widget that offers customizable for positioning, sizing, and painting of devices.
- Padding: It is the widget that we use for arranging their child widget by the provided padding. It includes “EdgeInsets.from TRB” and “EdgeInsets” for the required side we have to offer to pad.
- Align: It is the widget that coordinates its child widget within itself and sizes it according to the size of the child. It offers more control for placing child widgets in the exact position where we require them.
- Center: This widget enables us to center the child widget inside itself.
- Aspect Ratio: The AspectRatio allows us to hold the child widget size to a particular aspect ratio.
- SizedBox: This Widget enables us to provide a particular size to child widget across all the screens.
- ConstrainedBox: It is the widget that enables us to force further constraints on the child widget.
- Baseline: This widget transfers the child’s widget as per the baseline of the child.
2. Multiple Child Widgets
Multiple Child Widgets are a kind of widget that includes multiple child widgets, and the layout of these widgets is distinct. For instance, the Row widget laying out of the child widget in the vertical direction.
- Column: It enables us to organize the child widgets in the vertical direction.
- ListView: It is the most famous scrolling widget that enables us to organize the child widgets one by one in the scroll direction.
- Expanded: It makes the children of the Row and Column widget for occupying the maximum possible area.
- Flow: It enables us to implement the flow-based widget.
- Table: It is the widget that allows us to organize its children in the table-based widget.
- GridView: It enables us to organize its child widgets as the scrollable, 2D array of the widgets. It contains an iterated pattern of the cells arranged in the vertical and horizontal layout.
- Stack: It is the important widget, which we primarily use to overlap various children’s widgets.

Some More Widgets
Flutter Row and Column
Rows and Columns are not one widget; they are two distinct widgets, namely column, and row. We can integrate those two widgets because they have the same properties that allow us to understand rapidly and efficiently. Row and Column are two important widgets that enable us to coordinate children vertically and horizontally as per our requirements.
Row Widget
The Widget organizes the children in the horizontal direction on the screen. Put it differently, and it will anticipate child widgets in the horizontal array. If the child requires to fill the accessible horizontal space, we should enfold children’s widgets in the expanded widget.
The row widget does not display scrollable, yet the widgets appear in the visible view. Therefore, it is regarded wrong if we have more children in the row, which will not suit in available space. If we have to make the scrollable list of widgets. We can control the child widget of the row through the below properties:
- Start: It will locate the children from starting of the main axis.
- End: It will locate children at the end of the main axis.
- Center: It will locate children in the middle of the main axis.
- spaceAround: It will locate free space between children uniformly and half of the space before and after the first and the last children widget.
Column Widget
The Column Widget organizes its children in the vertical direction on screen. Put it differently, and it will anticipate the vertical array of the child widgets. If child widgets have to occupy existing vertical space, we need to enfold the children’s widgets in the expanded widget. The Column Widget does not arise scrollable because it exhibits the widget's invisible view. Therefore, it is wrong if we have more children in the column that will not suit in the accessible space. If we have to make the scrollable list of the column widgets, we have to use the “ListView” widget.
Flutter Buttons
Buttons are defined as the graphical control elements that offer the user to invoke the event like making choices, taking actions, searching for things, etc. We can locate the buttons anywhere in the UI, like forms, cards, toolbars, dialogs, etc. Buttons are Flutter widgets which is a portion of the material design library. Flutter offers various kinds of buttons that contain different styles, features, and shapes. Following are the features of the buttons:
- We can simply apply the themes to the shapes, colors, animation, and buttons.
- We can also theme the text and icons in the button.
- Buttons can have different child widgets for the other characteristics.
Kinds of Flutter Buttons
Following are the different kinds of Flutter buttons:
- Flat Button: It is the text label button that does not contain more decoration and is exhibited without elevation. Flat button contains two properties: 1) child 2) onPressed(). It is primarily utilized in the inline or dialogs toolbars with the content.
- Floating Button: The Floating button is the circular icon button that invokes the main action in the application. It is the most frequently utilized button in nowadays applications. We can utilize this button to add, refresh or share the content.
- Raising Button: It is the button, which is according to material widgets and contains a rectangular body. It is the same as the flat button, yet it contains the elevation that raises when we press the button. It inserts the dimension to UI along the Z-axis. It has various properties like shape, text color, button color, padding, the color of the button.
Interactive Widgets
1. Touch Interactions
- AbsorbPointer Class: A widget that absorbs pointers during the hit testing is called AbsorbPointer class.
- Dismissible Widget: The Dismissible widget can be dismissed by dragging it into the accused direction.
- DragWidget: The DragWidget receives the data when the Draggable widget is dropped.
- Draggable: The Draggable widget can be dragged from or to the DragTarget.
- GestureDetector: The GestureDetector widget detects the gestures and tries to recognize the gestures.
2. Routing
- Hero: The Hero widget marks its child as the candidate for hero animations.
- Navigator: The Navigator widget handles a group of child widgets through the stack discipline.
Flutter Cookbook
Animation
Animation is a very famous and essential concept in the Flutter. We cannot think of any mobile app without animations. When we move the cursor on the button or shift from one page to another are all the animations. Animations improve the user experience and make the applications more communicative. It offers excellent support for the animation and divides the animation into two primary categories:
- Physics-based Animation
- Tween Animation
Physics-based Animation
It is a kind of animation that enables us to make the application feel interactive and realistic. It imitates real-time movement or animation like we have to animate the widget like falling, swinging, spring with gravity. So, the animation animates in response to the user input or movement. An easy example is the flight time and distance covered will be computed as per the physics laws.
Tween Animation
It is the concise form of “in-betweening.” In the tween animation, we have to define the “start” and “endpoint” of the animation. It indicates that the animation starts with the starting value, later goes through the group of intermediate values, and lastly reaches the end value. It also offers the curve and timeline, which specifies the speed and time of the transition. The widget framework provides the computation of how to transition from the start and endpoint.
Designing an Application
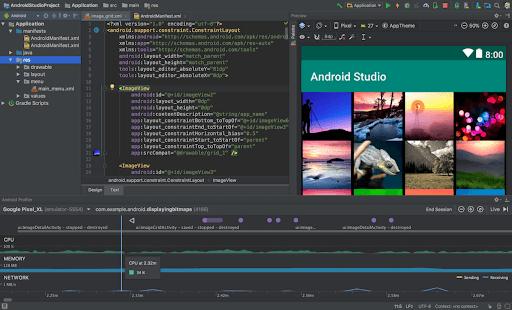
Step 1: Open the Android Studio.
Step 2: Create the Flutter Project; for that, press “File/New/New Flutter Project.”
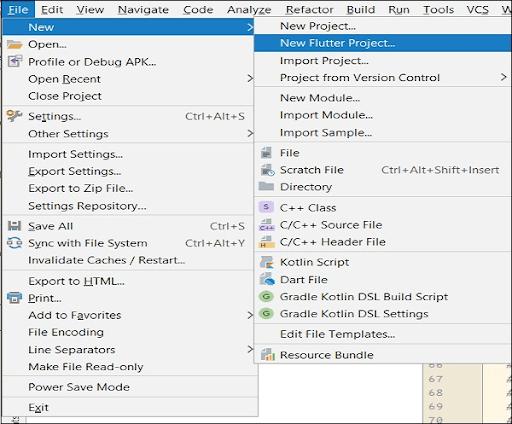
Step 3: Choose the Flutter Application. For that, choose “Flutter Application” and press “Next.”
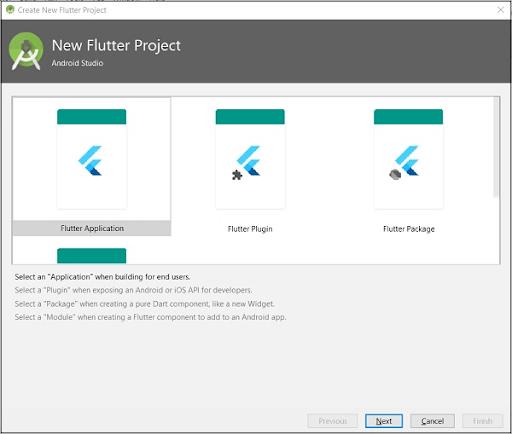
Step 4: Set up the application as follows and press Next
- Project name: “First_app.”
- Project Location: “path_to_project_folder.”
- Flutter SDK Path: “path_to_flutter_SDK.”
- Description: Flutter-based hello world application.
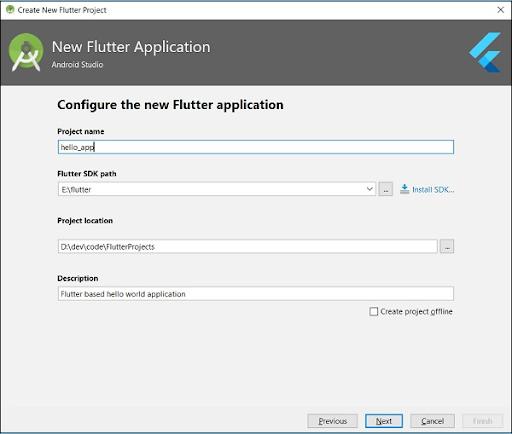
Step 5: Configuring the project
Configure the company domain as the “flutterapp.MindMajix.com” and press “Finish.”
Step 6: Provide the company domain.
Android Studio creates an entirely working Flutter application with minimum functionality. The structure of a flutter application:
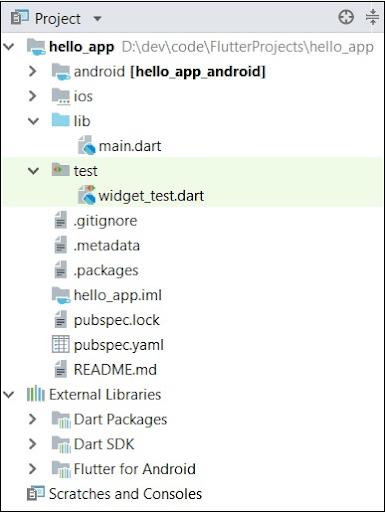
Following are the components of the structure of the Flutter application:
- Android: Self-Generated Source code for creating android applications.
- iOS: Self-Generated Source code for creating iOS applications.
- Lib: It is the primary folder that contains Dart code developed through Flutter Framework.
- Test: Folder that contains Dart code for testing flutter application.
- ib/main.Dart: Entry point of Flutter application.
- .gitignore: Git version control file.
- test/widget_test.dart: Plain code.
- .packages: Self-Generated for tracking the Flutter packages.
- .metadata: Self-generated by flutter tools.
- .iml: It is the project file utilized by the Android Studio.
- Pubspec.lock: Self-generated by Flutter Package Manager, Pub.
- Pubspec.yaml: Utilized by Pub, Flutter Package Manager.
- README.md: It is the project description file developed in the Markdown format.
Step 7: Substitute the dart code in lib/main.dart file with the following code:

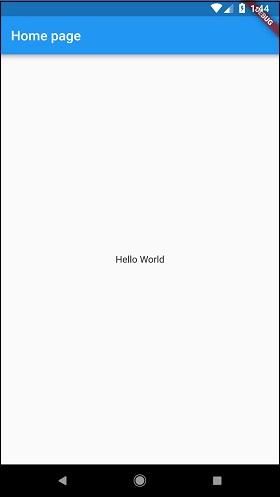
Step 8: Execute the application through “Run/Run main.dart.”
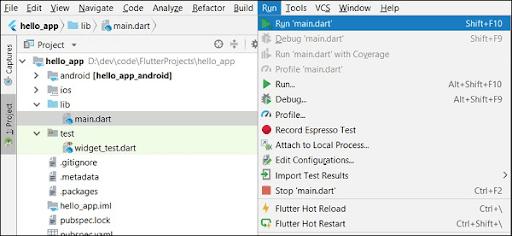
Step 9: Output of the application is:
Lists in Flutter
Lists are the most famous elements of all mobile or web applications. Lists are composed of multiple rows of items that contain buttons, text, icons, toggles, thumbnails, etc. We can utilize it to display information like tabs, menus or break the tedium of pure text files. In Flutter, we have different kinds of Flutter:
Basic Lists: Flutter contains a “ListView” widget to work with Lists. The ListView is a good standard to display lists that include only a few items. ListView also contains the ListTitle widget, which provides more properties to the visual structure for the lust of the data.
- Long Lists: For working with lists that include a large number of items, we have to use the “ListView.builder()” constructor. The primary difference between ListView.builder and ListView is that ListView creates all the items instantly.
- Grid Lists: The GridView widget enables us to create the grid list in the Flutter. The easy approach is to create the Grid is using the GridView.count() constructor, which defines the number of columns and rows in the Grid.
Navigating and Routing
Flutter as an essential routing mechanism, “Navigator” widget, and idiomatic declarative routing mechanism, the router widget. We can use those systems together. In Flutter, Pages and Screens are called Routes. For Navigating to another screen, we should use the “Navigator. push” together with “MaterialPageRoute”:
![]()
To Navigate Back, we will use:
![]()
Using JSON and Serialization
Manual Serialization
Manual JSON decoding relates to utilizing the in-built JSON decoder in “dart: convert.” It includes passing the raw JSON to the “JsonDecode()” function and later looking for the values we require in the resulting Map<String, Dynamic>. It has no explicit or specific setup process. Manual decoding does not carry out well when the project becomes bigger. Developing and Decoding logic can be hard to error-prone and handle.
Code Generation
The JSON Serialization with the code generation indicates having an explicit create the enciphering boilerplate for us. After the initial setup, we execute the file watcher that creates the code from our model classes. For instance, “built_value” and “json_serializable” are these types of libraries. This approach is suitable for large projects.
Data Persistence
Whenever we have to store the data on local and later, we have to utilize SQLite for persisting the user data.
Why SQLite?
SQLite is a famous selection as the integrated database software for a client or local storage in application software like web browsers.
How do we use SQLite in Flutter?
SQLite is not available in Flutter SDK, but we have the plugin “SQLite” that does all the operations on the database just as iOS and Android.
Step1: Adding Dependencies
- Adding Dependencies to the “pubspec.yaml” file.
For working with the SQLite databases, import “path” and “sqflite” packages.
- The “sqflite” package offers functions and classes that enable us to communicate with the SQLite database.
- The “path_provider” package offers functions that enable us to properly specify the location for storing the database on the disks like “ApplicationDocumentsDirectory” and “TemporaryDirectory.”
Step2: Create the Model Class
SQLite generates the table for the model class, fields in the class corresponding to the columns in the table. Thus, the classes are likely to be small model classes that don’t have any logic. Our class represents the model for data in a database. If we have to insert it into the database, we have to convert the class into the database. If we want to fetch data from the database, then we have to convert the database into a class.
Step3: Create the database
We will make an individual class as the “database. dart” for making the code modular and insert all the requirements myths to manage the database that we can access anywhere in the application.
Step4: Open the database
Before we read and write the data to the database, we have to open the connection to the database. This includes two steps:
- Specify the path to database file through “getdatabasepath” from “sqflite” package integrated with path function from “path” package.
- Open database with “OpenDatabase” function from “Sqflite.
Flutter State Management
We classify the widgets into two categories, one is the Stateless Widget, and another one is Stateful Widget. Stateless Widget does not have any implicit state. It indicated once it is developed, we cannot modify or alter it unless they are initialized again. At the same time, a Stateful Widget has a state, and it is dynamic. It indicates we can alter or change it simply across the lifecycle without reinitiating it again.
Explain State?
The state is the information that we can read when the widget is developed and may be altered or changed over the application’s lifetime. If we want to modify our widget,
We have to update the state object, which we can do using the setState() function useful for the Stateful widgets. setState() function enables us to configure the properties of the state objects that invoke the redraw of the UI.
Unit Testing
Unit testing is the simplest method to test software or an application. It tests one class, method, or function. The objective of the unit testing is to assure the exactness of the code in various conditions. Usually, unit testing does not communicate with the user input, render on screen, write or read from disk.
Widget Testing
Widget testing is used for testing a single widget. The intent of this testing is to assure that the Widget’s User Interface(UI) looks and interacts with other widgets as anticipated. The process of the widget testing is the same as the unit testing. Flutter offers the following tools to test the widget:
- Finder class: It is used for searching the widgets in the testing environment.
- WidgetTester: It enables us to develop and interact with the widgets in the testing environment.
- testWidgets(): This method mechanically generates the WidgetTester for every test case. It is utilized as the normal test() function. It takes two arguments: test code and test description.
- Matcher class: It verifies whether the Finder class locates the single widget or the multiple widgets in the testing environment.
Integration Testing
The integration testing includes both widget testing and unit testing, along with the explicit elements of the application. It verifies the entire application or the large part of the application. The intent of the integration testing is to assure that all the services and widgets work together as anticipated. It also utilizes the performance of the application.
Behavior Driven Development
BDD is a functional approach for the software teams that shuts up the gap between those working on the business side of the project and those on the technical side. This can be achieved by:
- Supporting Collaboration throughout the roles to build a shared understanding of the problem to get solved.
- Working on quick and tiny iteration to raise feedback and value flow.
- Developing System Documentation that is automatically checked opposite to the behavior of the system.
Conclusion
Flutter is the UI toolkit used for developing rapid, amazing, and compiled applications for web, desktop, and mobile with a single programming language and codebase. The Flutter applications use Dart programming language to create the applications. I hope this Flutter tutorial provides you with the required information about Flutter widgets, Dart programming, and app development in a flutter.
If you have any queries, let us know by commenting in the below section.
 On-Job Support Service
Online Work Support for your on-job roles.

Our work-support plans provide precise options as per your project tasks. Whether you are a newbie or an experienced professional seeking assistance in completing project tasks, we are here with the following plans to meet your custom needs:
- Pay Per Hour
- Pay Per Week
- Monthly
| Name | Dates | |
|---|---|---|
| Flutter Training | Aug 04 to Aug 19 | View Details |
| Flutter Training | Aug 08 to Aug 23 | View Details |
| Flutter Training | Aug 11 to Aug 26 | View Details |
| Flutter Training | Aug 15 to Aug 30 | View Details |

Viswanath is a passionate content writer of Mindmajix. He has expertise in Trending Domains like Data Science, Artificial Intelligence, Machine Learning, Blockchain, etc. His articles help the learners to get insights about the Domain. You can reach him on Linkedin


