
- 6 Hot And In-Demand Tech Areas In 2024
- How To Forward Your Career With Cloud Skills?
- Top 7 On-Demand IT Certifications
- Most In-demand Technologies To Upskill Your Career
- Top 10 Hottest Tech Skills to Master in 2024
- Top Skills You Need to Become a Data Scientist
- Groovy Interview Questions
- Facets Interview Questions
- Crystal Reports Tutorial
- VAPT Interview Questions
- Flutter Tutorial
- Saviynt VS Sailpoint
- Flutter vs Xamarin
- PingFederate Interview Questions and Answers
- Dart vs Javascript : What's the Difference?
- Terraform Private Registry
- Cylance Interview Questions and Answers
- Sophos Interview Questions and Answers
- Top Camunda Interview Questions
- NUnit Interview Questions and Answers
- Impala Interview Questions and Answers
- ETL Tutorial
- Ionic Interview Questions
- Grafana Tutorial
- What is VAPT? - A Complete Beginners Tutorial
- SnapLogic Interview Questions
- Saviynt Interview Questions
- What is PingFederate? - A Complete Beginners Tutorial
- SnapLogic Tutorial
- Grafana Interview Questions
- RHCE Interview Questions and Answers
- Web Services Interview Questions
- Domo Interview Questions and Answers
- Terraform Interview Questions
- What is Sophos? | Sophos Turorial for Beginners
- Top Servlet Interview Question And Answers
- NLP Interview Questions and Answers
- Microsoft Intune Interview Questions
- Top XML Interview Questions And Answers
- Tosca Commander
- Katalon vs Cypress
- SQLite Tutorial
- Tosca Tutorial - A Complete Guide for Beginners
- Xamarin Interview Questions and Answers
- UiPath vs Automation Anywhere - The Key Differences
- OpenShift Interview Questions
- What is Katalon Studio - Complete Tutorial Guide
- Kronos Interview Questions
- Tosca Framework
- Burp Suite Tutorial
- Mendix Interview Questions
- Power Platform Interview Questions
- Burp Suite Interview Questions
- What is Terraform ?
- Burp Suite Alternatives
- Dart vs Kotlin
- What is Kronos?
- ES6 Interview Questions
- Entity Framework Interview Questions
- COBOL Interview Questions
- Express JS Interview Questions
- OSPF Interview Questions
- LINQ Tutorial
- CSS3 Interview Questions and Answers
- Auth0 Tutorial
- MS Access Interview Questions
- What is SPARQL - A Complete Tutorial Guide
- ExpressJS Tutorial
- UML Tutorial
- HTML vs XML
- Cypress vs Jest
- Impacts of Social Media
- OWASP Interview Questions
- Security Testing Interview Questions
- OpenShift vs Docker
- ES6 Tutorial
- Spark SQL Interview Questions
- Spark SQL Tutorial
- What is OWASP?
- AppDynamics Interview Questions
- Dynatrace Interview Questions
- Rest Assured Tutorial
- New Relic Interview Questions
- REST API Tutorial
- Datadog Interview Questions
- Rest API Interview Questions
- Rest Assured Interview Questions
- PTC Windchill Interview Questions
- Easiest Tech Skills To Learn
- Python SQLite Tutorial - How to Install SQLite
- Datadog Tutorial - Datadog Incident Management
- What is AppDynamics - AppDynamics Architecture
- RabbitMQ Interview Questions And Answers
- What is Dynatrace
- Datadog Vs Splunk
- Web Developer Job Description
- JP Morgan Interview Questions
- Types of Corporate Training
- Benefits of Corporate Training
- What is Corporate Restructuring?
- Blended Learning in Corporate Training
- What is Corporate Level Strategy?
- Flutter Projects and Use Cases
- How to Become a Web Developer
- How To Install Keras?
- How to Install Flutter on Windows?
- How to Install Cypress on Windows?
- How to Become a Computer Scientist?
- How to Install Katalon Studio in Windows
- How to Become a Programmer
- OWASP Projects and Use Cases
- How to Install Sophos?
- Workato Tutorial
- Workato Tutorial - What is Workato?
Why Mendix is a low-code platform?
What are the key features of the Mendix platform?
What are the Key Capabilities of the Mendix Platform?
What are the Two Development Platforms of Mendix?
What is App Modeling in Mendix?
What are Microflows and Nanoflows in Mendix?
What are the Connectors used in Mendix?
What are the Different Cloud Deployments used in Mendix?
How to Build a Responsive Web Application using Mendix Pro9?
Mendix is the low-code software development platform used to build web and mobile applications. It is an automation-based tool that accelerates the lifecycle development of applications in top gear. Also, Mendix automates process flows and workflows of business applications.
Mendix offers good scalability and speed, thereby boosting business growth dramatically. You can be a business user or a professional developer, but the Mendix platform allows you to build applications in the best way.
Through this tutorial, you will go through the features and capabilities of the Mendix platform; along with that, we will tell you more about Mendix development platforms, App modeling flows, mobile development, and how to get started with Mendix applications, etc.
Let’s now look at them in detail.
Why Mendix is a Low-code Platform?
Mendix follows the visual approach for developing applications using codes at the minimum. With low code, you can automate the application life cycle, which, in return, streamlines software development, simplifies deployment, and accelerates application delivery. Therefore, Mendix ensures increased business value with speed delivery with low-code capability.
| If you want to enrich your career and become a professional in Mendix, then enroll in "Mendix Online Training" - This course will help you to achieve excellence in this domain. |
What are the Key Features of the Mendix Platform?
Mendix platform comes up with many key features to support app development, deploying in clouds, automating processes, and data integration.
Let's check them out now:

App Development: Mendix Studio and Mendix Studio Pro are the two platforms used to build applications in Mendix. As mentioned earlier, both professional developers and business users can quickly develop Mendix applications and collaborate with web portals.
Cloud Deployment: Mendix streamlines multi-cloud operations. In other words, microservice apps simplify the entire cloud operations. This way, centralized management supports updating patches, scheduling events, and monitoring logs in a one-place.
Intelligent Automation: With AI/ML-based technologies, Mendix automates workflows and process flows of businesses. Consequently, it provides data-driven solutions with the support of actionable insights. This way, Mendix embraces AI-based technologies such as Digital Twin and IoT for improving business operations and delivering competitive solutions. Moreover, the predictive capabilities of Mendix help to deploy new workflow models into businesses. In short, data can be transformed into a business value at scale through automation.
Data Integration: In Mendix, the Data Hub catalog is an open and standards-based Metadata Repository that developers can use to identify data resources through Data Hub connectors. In this regard, Data Hub-external is used to ensure that data is being used safely and consistently. Besides, data preparation and specialized integrations are used to close the gap between low-code solutions and iPaaS data.
What are the Key Capabilities of the Mendix Platform?
The capabilities of the Mendix platform start from creating a flexible environment to easy deployment. Let’s see them in detail.
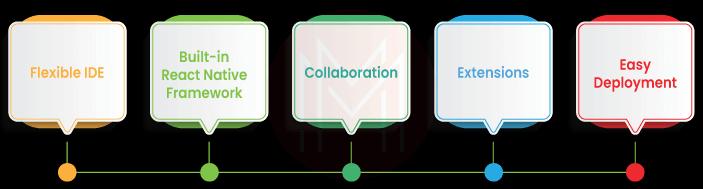
Flexible IDE: Mendix allows users to select Integrated Development Environment (IDE) based on their expertise. In other words, Mendix Studio can be chosen by business users, whereas developers can choose Mendix Studio Pro.
Built-in React Native Framework: With this type of native framework, you can build Mendix applications in IOS as well as Android.
Collaboration: The built-in collaboration tools of Mendix supports the activities such as – developing teams, agile project management, and feedback management.
Extensions: Using connectors and APIs, you can always integrate Mendix applications with external systems such as IBM, SAP, and Siemens digital software.
Easy Deployment: Deploying Mendix applications in public, private, and hybrid clouds simply with a single click.

What are the Two Development Platforms of Mendix?
Mendix allows you to develop applications through two platforms – Mendix Studio and Mendix Studio Pro. Let’s discuss the features of these platforms below:
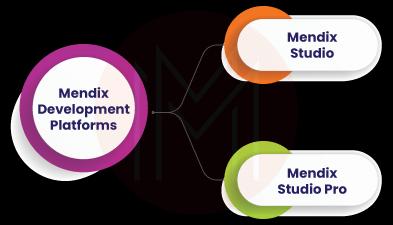
Mendix Studio: This platform supports citizen developers in developing applications. Or in other terms, this platform supports business users to develop Mendix applications and edit them as needed. In this case, the WYSIWYG environment is used to develop applications.
The following are the key elements of Mendix Studio:
Domain Models: Building objects, validations, and attributes with a UML-based data modeler in Mendix Studio.
UI Model: With a WYSIWYG graphical page designer, you can build mobile and web User Interfaces in Mendix with easy drag-and-drop options. On this note, the Atlas UI framework is used to build user interfaces effectively.
Microflows and Nanoflows: They help build visual models by which we can simplify user interactions with Mendix applications. In particular, Nanoflows support building models in an offline scenario.
Live Debugging: Mendix allows isolating bugs in Mendix applications and solving them lively and quickly.
Mendix Studio Pro: Professional developers can only use this Mendix platform. With the desktop-based development environment, you can add custom codes while developing Mendix applications. Not only custom codes, but you can add complex integrations to this platform.
What is App Modeling in Mendix?
App Modeling in Mendix is the systematic approach for creating and configuring web and mobile applications. It includes the operations such as creating pages, configuring security, adding data, adding application logic, and integrating with other applications.
In Mendix, App modeling consists of features such as App Explorer, Pages, Domain Model, Application Logic, Integration, Resources, and XPath.
Let's discover more about the features below:
App Explorer: It deals with structuring Mendix applications and ensuring security parameters in the models.
Pages: Generally, a page is a primary end-user interface. And pages are used to display information to end-users and allow them to edit and create information. This way, Mendix allows you to create and configure pages for your applications.
Domain Model: It is the visual representation of the app’s database. Every module in the database will have its domain model. Generally, these models are combined and translated into a database during runtime. Know that domain models in Mendix are similar to SQL tables. This feature is because domain models have entities like SQL tables. Moreover, entities have relationships with other entities in one-to-one, one-to-many, etc.
Application Logic: Configuring Microflows, Workflow, and Nanoflows are performed visually to display the logic of Mendix applications.
Integration: It deals with integrating Mendix applications with others.
Resources: It includes the documents such as Java actions, Scheduled events, and Enumerations.
XPath: The Mendix query language deals with XPath constraints, tokens, and functions.
| Related Article: Mendix Interview Questions & Answers |
What are Microflows and Nanoflows in Mendix?
Microflows: They help to understand the logic of Mendix applications visually. And they help to create and update objects in Mendix applications. In general, Microflows run only with runtime servers. Or, we can say they don’t run in offline mode.
Microflows have various elements such as events, decisions, flows, activities, parameters, loops, and annotation. Let’s look at a short note about them below:
Flows: They connect elements in a Microflow
Decisions: It is about making decisions and merging various paths in a Microflow
Activities: They represent actions executed in a Microflow
Loop: They support iterating over a list of objects
Parameter: It is the input data given to a Microflow
Annotation: It helps to make comments in a Microflow
Nanoflows: Similar to Microflows, Nanoflows support understanding the logic of applications. But, in contrast to Microflows, Nanoflows run on browsers and devices directly and in offline mode. That is why access to servers is not necessary to run Nanoflows. Besides, Nanoflows use JavaScript libraries, whereas Microflows use Java libraries.
What are Workflows in Mendix?
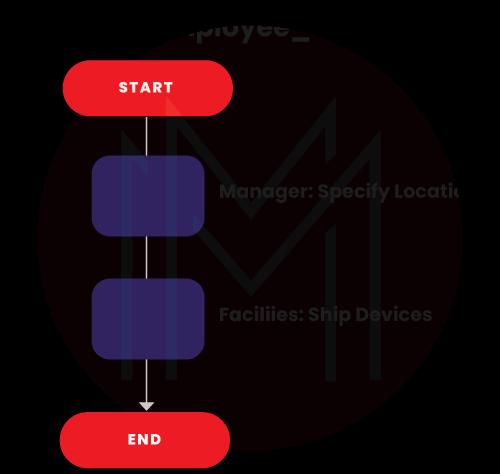
Workflows are similar to flowcharts used to build business processes. Technically speaking, workflows represent processing application logic. You can integrate Workflow with Microflow Editor as well as Page Editor. A workflow will continue to process further only when it receives input from the previous stage; otherwise, it will pause at that stage.
On the contrary, Microflows don’t pause at any stage. Know that every workflow will have a starting event and an end event. Also, you can add many activities in the path between the starting event and the end event.
The image below represents a workflow dealing with an organization's employee onboarding process.
What are the Connectors used in Mendix?
Mendix uses four connectors to communicate with external applications. They are given below:
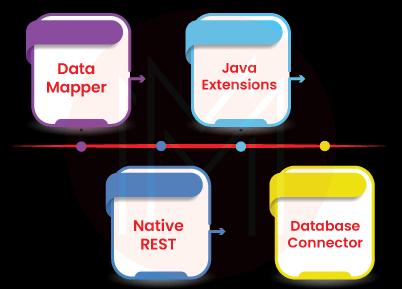
Data Mapper: It supports connecting JSON and XML messages with Mendix domain models and vice-versa. Not just that, developers don’t need to know about data structures and services if they use Data Mapper.
Native REST: This connector allows you to call REST API and SOAP API from Mendix Microflows.
Java Extensions: You can integrate Mendix models and Java codes altogether. As a result, it converts into a powerful tool. Know that Java actions become Native actions In Mendix Microflows.
Database Connector: This connector helps you connect Mendix models to third-party databases without codes.
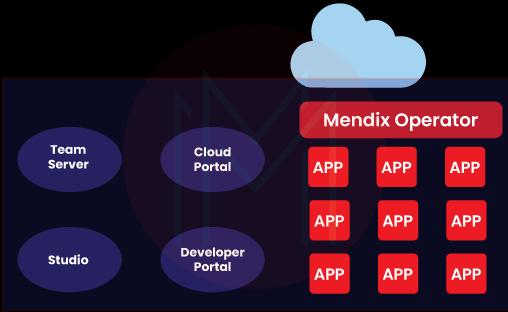
What are the Different Cloud Deployments used in Mendix?
Mendix Cloud: It is a Platform as a Service (PaaS), which provides public cloud services for Mendix applications. In this regard, IBM, AWS, SAP, Google, and Microsoft are a few public cloud vendors that support Mendix applications. As Mendix Cloud is equipped with microservice apps, scaling can be performed smoothly. Mendix Cloud is used to deploy and run Mendix applications faster. And they provide the best utilization rate and optimal flexibility. Apart from all these, Mendix Cloud provides self-service scaling, alerting, high availability, insights, and backups.
Mendix for Private Cloud: In Mendix, this cloud service offers automated build and deployment with one click. Also, it automates databases and file storage and provides network endpoint provisioning. Besides, centralized management helps to be updated with patches, schedule events, and monitor logs.
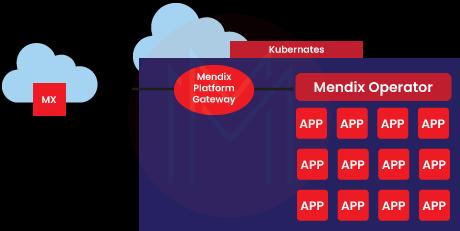
Mendix Cloud Dedicated: It is a dedicated instance of a Mendix Cloud running in the VPC of a customer. Not only that, it only hosts the customer’s apps in VPC. Considering VPC, it can be selected when your application requires higher data and application isolation levels. Also, it helps to achieve complete control over the development environment.
How to Build a Responsive Web Application using Mendix Pro9?
Mendix Pro9 is the IDE platform that supports professional developers building Mendix applications. You will learn to develop a responsive web application using the following procedures and steps through this tutorial. The procedures demonstrate managing data using domain models, populating pages with data, creating application logic using microflows, and many more.
Let’s get into the procedures right away:
Prerequisites:
Following are the two steps to be completed before creating a web app in the Mendix platform.
- Creating a free Mendix account
- Downloading and installing Mendix Studio Pro9
Selecting an App Template:
In the Mendix Studio Pro platform, execute the following steps to select an app template.
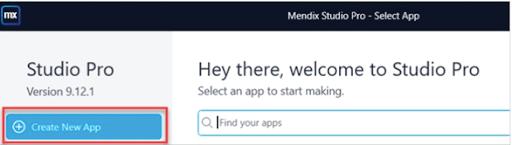
- First of all, click the ‘Create new app’ button as shown below image.
- Look for 'Blank native mobile app' in the search bar and then click 'use this starting point'.
- Name your app and then click the ‘Create app’ button.
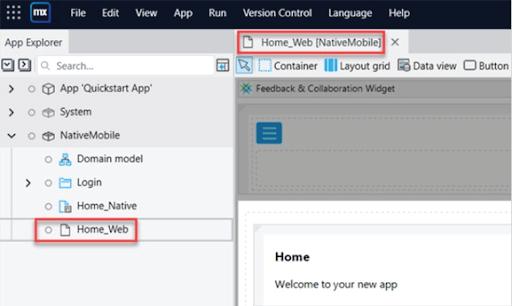
- Now, you can open your project in Home_Web. Your project's home page will open when you click this, as shown below.
Exploring Studio Pro:
You can explore Studio Pro entirely by going through a quick app tour. Through this process, you will learn about various components of the Mendix Pro app, such as stories, changes, errors, MxAssistant performance Bot, Data Hub, properties, toolbox, connectors, and console.
Creating Domain Model for App:
In this procedure, you will create an entity to store apps.
- Double-click the ‘App Explorer’ to open the domain model for the native mobile module.
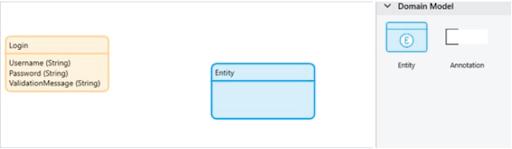
- Now, add a new entity with the name ‘picture’, which will be used to store all the uploaded images in the database.
- Drag the entity from the toolbox and drop it in the domain model below.
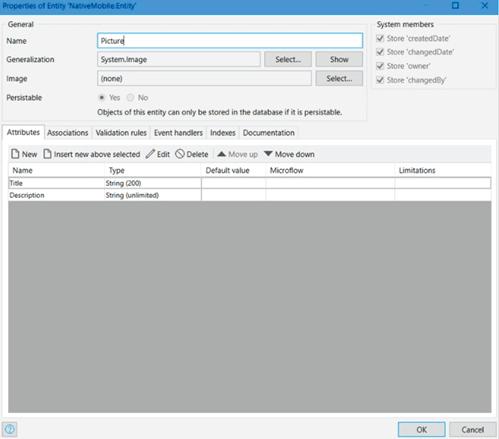
- Now, double-click to the entity, by which you can open its properties and name the entity as 'picture'. And click the select button next to generalization to select 'image' entities. You can understand these steps from the following image.
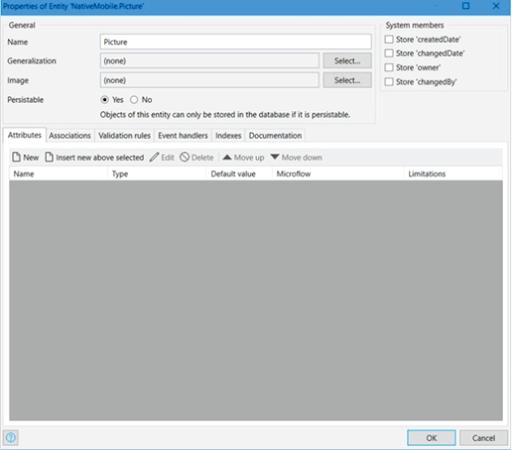
- Click the 'new' in the attribute tab in the 'entity property' window. Let's give the name to the attribute as ‘title’ and set a string length, and click 'OK' to close the window.
- Similarly, open a new attribute for ‘description’ and set the length of strings to unlimited. You will receive the results as shown in the below image.
Creating User Interface for the App:
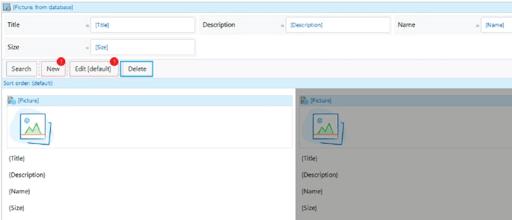
- In-App Explorer, open the Home_Web page. Then, drag ‘template Grid’ from the toolbox and drop it onto the page.
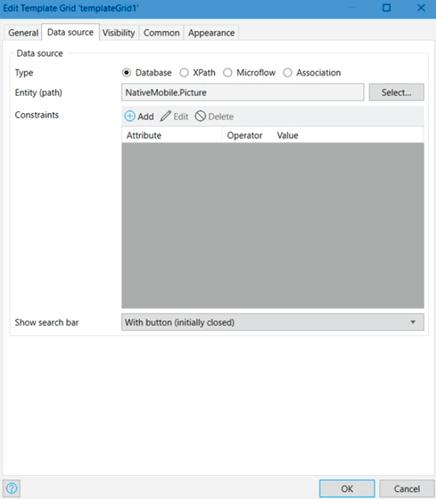
- Double-click ‘template Grid’ and open its properties. Now, you can allow the database to continue as the data source. Select ‘NativeMobilePicture’ as an entity and then click ‘OK’. Now, the resulting image will be as shown below:
- Now, you can see red dots on the template grid's 'new’ and ‘edit’ buttons, as indicated in the below image. It indicates that no page is connected with these pointers. So, you can right-click on these buttons and click ‘generate page’.
- Select the ‘form vertical' template for your page, continuing with the same page name.
As the following procedure, you can connect data sources with pages. Before that, delete all the display widgets on the page and add building blocks. Also, you have to convert static images into dynamic image types. Although images are displayed on the pages, the labels of the images will show default text. To resolve this issue, you have to follow the following step.
- Double-click to open the properties of the ‘card title’ label.
- Now, you shall click the edit button to open a new window.
- Replace the caption field and add a new parameter. Also, select the ‘title’ attribute. Continue this process for the label ‘supporting text’. In this case, select the ‘description’ attribute.

Defining Logic with Microflows:
To implement custom logic with a Microflow, you need to perform the following steps:
- In-App Explorer, open the picture_newedit page and then save it
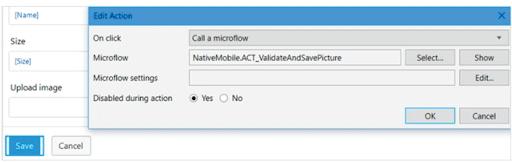
- Now, right-click the ‘save’ button and click ‘edit on click action’.
- After that, set the ‘click action’ type to ‘call a microflow’
- Select, NativeMobile.ACT_ValidateAndSavePicture to create a new workflow
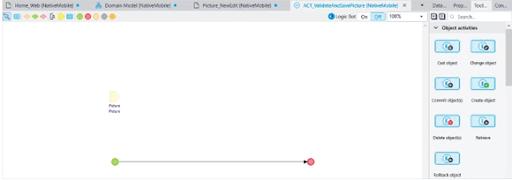
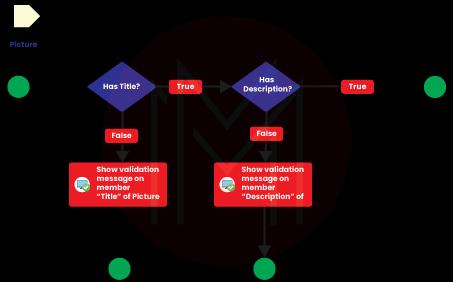
- Now, you can view the Microflow in the editor. Also, you can add decisions to the Microflow from the toolbox.
- Next, enter the caption as ‘Has title?’ to the decision and enter the expression shown below. Finally, you can click ‘OK’ to close the window.
trim($Picture/Title) ! = empty
and
trim($Picture/Title) ! = ' '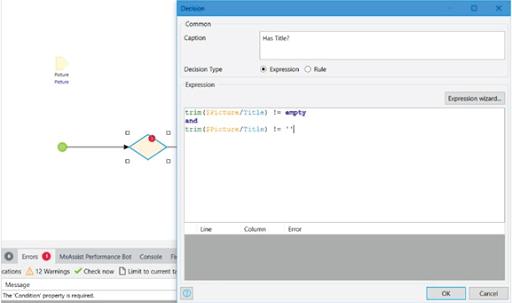
Suppose the Microflow line changes to red, it indicates that multiple paths are created within the Microflow due to the decision. So, you need to add another path to make the expression true. To achieve this, you have to carry out the following steps:
- You have to add a path and select the false path
- Also, you have to add the validation feedback action to the false path
- Now, double-click the validation feedback action and select the variable as ‘picture’ and the member as ‘title’.
- Add the error text such as ‘please provide a title for the picture’ in the template.
- Repeat the steps. Finally, you will get the Microflow as below:
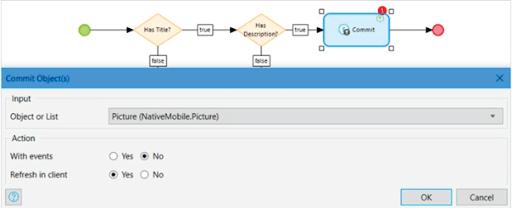
You can commit the image to the database and close the page as the last procedure. To implement this, you have to do the following steps:
- Add the commit object to the true path from the toolbox
- Select the picture entity to commit and select with events as ‘No’, and select refresh in the client as ‘Yes’.
- Finally, add the close page action to end the Microflow. You can return to the app's homepage by clicking the save page.
Congrats! Now you have created a responsive application in Mendix successfully. You can run and test your application by clicking the green play icon on the home page.
Benefits of the Mendix Platform
- Mendix is an all-in-one platform because of its features such as low-code/no-code, easy cloud deployment, lifecycle management, and many more
- It offers a fit-for-purpose solution to all types of businesses
- It is a single umbrella that supports developers who have skillsets from low to high
- You can build end-to-end business processes infusing business logic
- With AI/ML capabilities and microflows, you can accelerate the speed of software development
- It provides a one-click cloud deployment
- As a whole, Mendix helps to streamline business processes and offers the best customer experience.
Conclusion:
In short, Mendix is an automation-based tool that supports building applications quickly with low-code capability. We hope that reading this write-up might have uncovered many insights about the Mendix platform. By going through this tutorial, you might have understood the Mendix platform, its capabilities, intelligent automation, workflows, microflows, etc. Now you will be able to get started with the Mendix application with the support of the quick guide given in this tutorial.
 On-Job Support Service
Online Work Support for your on-job roles.

Our work-support plans provide precise options as per your project tasks. Whether you are a newbie or an experienced professional seeking assistance in completing project tasks, we are here with the following plans to meet your custom needs:
- Pay Per Hour
- Pay Per Week
- Monthly
| Name | Dates | |
|---|---|---|
| Mendix Training | Jul 18 to Aug 02 | View Details |
| Mendix Training | Jul 21 to Aug 05 | View Details |
| Mendix Training | Jul 25 to Aug 09 | View Details |
| Mendix Training | Jul 28 to Aug 12 | View Details |

Madhuri is a Senior Content Creator at MindMajix. She has written about a range of different topics on various technologies, which include, Splunk, Tensorflow, Selenium, and CEH. She spends most of her time researching on technology, and startups. Connect with her via LinkedIn and Twitter .


